2 - Setting Up A Scene
概述
Fusion 102將說明設定一個基礎已連網場景的方法。
在本章節末尾,專案將包含:
- 開始或加入對戰的基本Fusion運行器,以及
- 一個你可以移動的角色
啟動Fusion
為了啟動Fusion,需要在Fusion NetworkRunner上調用StartGame方法,因此應用程式必須在場景中具有此元件,或者從程式碼新增此元件。本教程將以程式碼為中心,因為大多數網路邏輯都需要編寫一定數量的程式碼。
在Unity中打開預設場景
- 建立一個新的空遊戲物件
- 向其中新增一個新的指令碼元件。
- 命名指令碼為
BasicSpawner。 - 打開指令碼,將
INetworkRunnerCallbacks介面以及所有所需方法的虛設常式新增到BasicSpawner類別中:
C#
using UnityEngine;
using UnityEngine.SceneManagement;
using Fusion;

public class BasicSpawner : MonoBehaviour, INetworkRunnerCallbacks
{
  public void OnPlayerJoined(NetworkRunner runner, PlayerRef player) { }
  public void OnPlayerLeft(NetworkRunner runner, PlayerRef player) { }
  public void OnInput(NetworkRunner runner, NetworkInput input) { }
  public void OnInputMissing(NetworkRunner runner, PlayerRef player, NetworkInput input) { }
  public void OnShutdown(NetworkRunner runner, ShutdownReason shutdownReason) { }
  public void OnConnectedToServer(NetworkRunner runner) { }
  public void OnDisconnectedFromServer(NetworkRunner runner, NetDisconnectReason reason) { }
  public void OnConnectRequest(NetworkRunner runner, NetworkRunnerCallbackArgs.ConnectRequest request, byte[] token) { }
  public void OnConnectFailed(NetworkRunner runner, NetAddress remoteAddress, NetConnectFailedReason reason) { }
  public void OnUserSimulationMessage(NetworkRunner runner, SimulationMessagePtr message) { }
  public void OnSessionListUpdated(NetworkRunner runner, List<SessionInfo> sessionList) { }
  public void OnCustomAuthenticationResponse(NetworkRunner runner, Dictionary<string, object> data) { }
  public void OnHostMigration(NetworkRunner runner, HostMigrationToken hostMigrationToken) { }
  public void OnSceneLoadDone(NetworkRunner runner) { }
  public void OnSceneLoadStart(NetworkRunner runner) { }
  public void OnObjectExitAOI(NetworkRunner runner, NetworkObject obj, PlayerRef player){ }
  public void OnObjectEnterAOI(NetworkRunner runner, NetworkObject obj, PlayerRef player){ }
  public void OnReliableDataReceived(NetworkRunner runner, PlayerRef player, ReliableKey key, ArraySegment<byte> data){ }
  public void OnReliableDataProgress(NetworkRunner runner, PlayerRef player, ReliableKey key, float progress){ }
}
執行INetworkRunnerCallbacks將允許Fusions NetworkRunner與BasicSpawner類別進行互動。NetworkRunner是Fusion的核心和靈魂,且運行實際的網路模擬。
NetworkRunner將自動偵測BasicSpawner執行了INetworkRunnerCallbacks並調用其方法,因為它將被新增到StartGame方法中的同一遊戲物件中。
新增以下內容到BasicSpawner指令碼中:
C#
private NetworkRunner _runner;

async void StartGame(GameMode mode)
{
    // Create the Fusion runner and let it know that we will be providing user input
    _runner = gameObject.AddComponent<NetworkRunner>();
    _runner.ProvideInput = true;

    // Create the NetworkSceneInfo from the current scene
    var scene = SceneRef.FromIndex(SceneManager.GetActiveScene().buildIndex);
    var sceneInfo = new NetworkSceneInfo();
    if (scene.IsValid) {
        sceneInfo.AddSceneRef(scene, LoadSceneMode.Additive);
    }

    // Start or join (depends on gamemode) a session with a specific name
    await _runner.StartGame(new StartGameArgs()
    {
        GameMode = mode,
        SessionName = "TestRoom",
        Scene = scene,
        SceneManager = gameObject.AddComponent<NetworkSceneManagerDefault>()
    });
}
StartGame方法首先建立Fusion NetworkRunner,並讓它知道這個客戶端將提供輸入。然後,它用硬編碼的名稱和指定的遊戲模式來開始一個新的遊戲階段(稍後將詳細介紹遊戲模式)。將傳入目前場景索引,但這僅與主機端相關,因為客戶端將強制使用主機端指定的場景。最後,指定了一個預設的場景管理器來進行良好的度量。場景管理器處理直接放置在場景中的網路物件的具現化,嚴格來說,在本例子中不需要場景管理器,因為沒有這樣的物件。
Fusion支援多種網路拓撲,但本概述將側重於Hosted Mode。在主機端模式下,一個網路同儕節點既是伺服器又是客戶端,並建立網路遊戲階段,而其餘同儕節點只是加入現有遊戲階段的客戶端。
為了處理這種情況,使用者需要有一種方法來選擇他們是遊戲主機端還是加入現有遊戲階段——為了簡單起見,下方的例子使用Unity IMGUI。將以下方法新增到BasicSpawner.cs中:
C#
private void OnGUI()
{
  if (_runner == null)
  {
    if (GUI.Button(new Rect(0,0,200,40), "Host"))
    {
        StartGame(GameMode.Host);
    }
    if (GUI.Button(new Rect(0,40,200,40), "Join"))
    {
        StartGame(GameMode.Client);
    }
  }
}
運行此應用程式將允許使用者成為一個新的遊戲階段的主機端,並允許其他執行個體加入該遊戲階段,但由於沒有互動,也沒有傳輸資料,因此看起來像是單一玩家體驗。
建立一個玩家虛擬人偶
為了使其成為一款遊戲,每個玩家都必須有一種提供輸入的方法,並在世界上擁有一個形體,例如玩家虛擬人偶。
在Unity編輯器中,
- 建立新的空遊戲物件,稱為
PlayerPrefab - 新增一個
NetworkObject元件到它。
這將賦予它網路識別,以便所有同儕節點都可以參照它。由於使用者將控制這個虛擬人偶,它也需要一個NetworkCharacterController-這不是一個要求,但對於大多數玩家控制的物件來說,這是一個很好的起點,所以也可以新增。NetworkCharacterController需要預設Unity Character Controller元件,其將被自動新增。
通常建議將網路物件與其視覺效果代表分開。為了達成這一點,
- 將標準Unity
Cube作為下層物件新增到PlayerPrefab - 重新命名它為
Body - 移除
Collider
虛擬人偶設置應該是看起來像這樣:
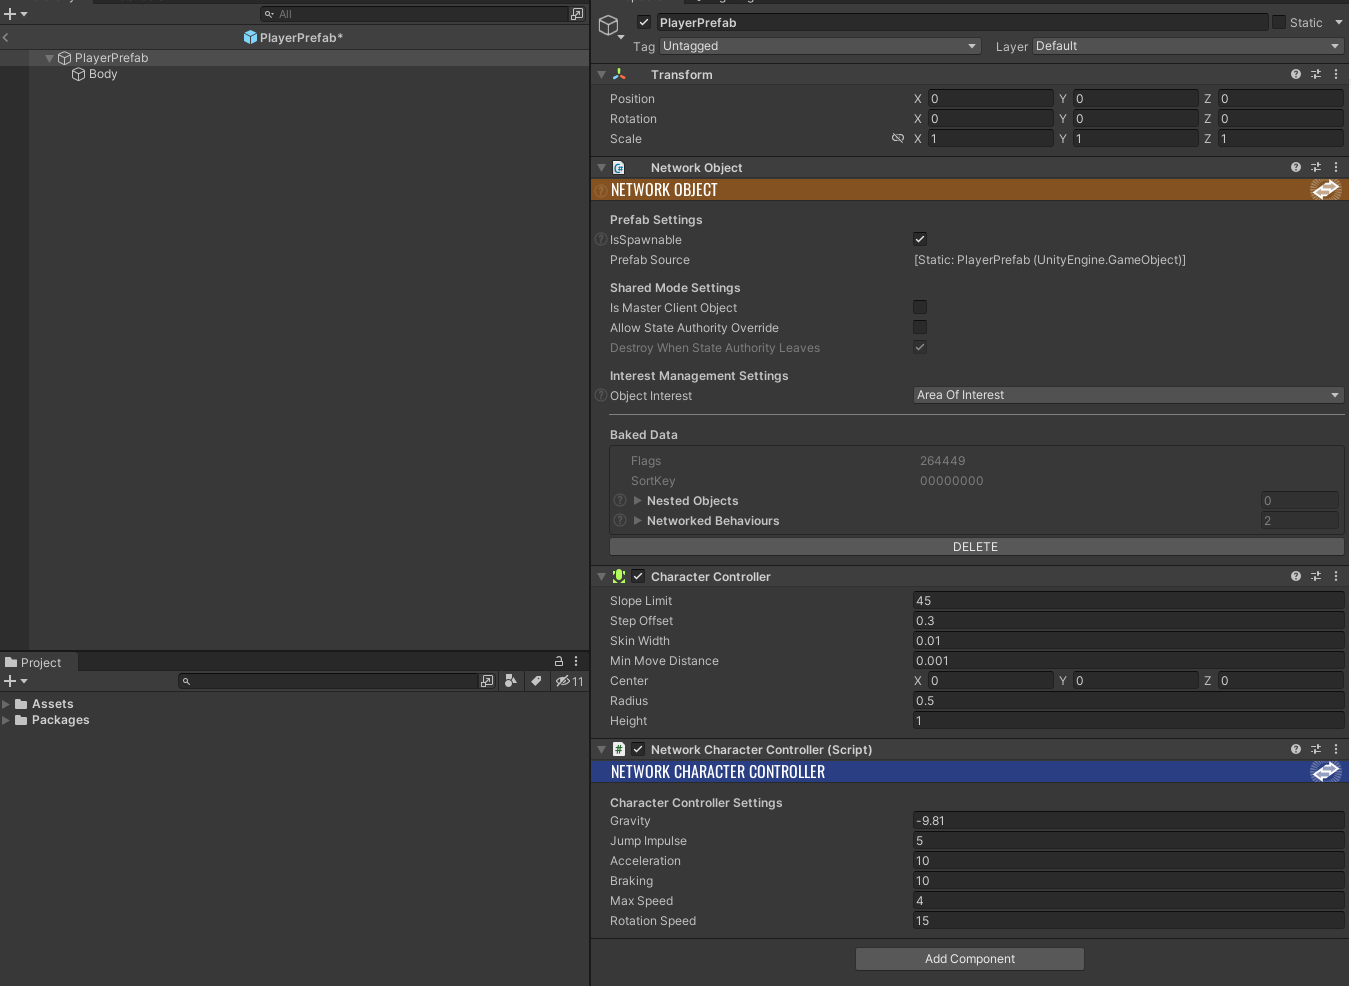
Save您的專案來讓Fusion內嵌新的網路物件,然後將其拖動到專案資料夾中以建立虛擬人偶預製件,並從場景中刪除物件。
生成虛擬人偶
因為遊戲是在主機端模式下運行的,所以只有主機端有授權可以生成新物件。這意味著所有玩家虛擬人偶在加入遊戲階段時都必須由主機端生成。簡單地說,INetworkRunnerCallbacks介面的OnPlayerJoined方法就是在這種情況下調用的。
類似地,當玩家中斷連線時,會調用OnPlayerLeft方法。
用以下程式碼替換空的OnPlayerJoined和OnPlayerLeft虛設常式:
C#
[SerializeField] private NetworkPrefabRef _playerPrefab;
private Dictionary<PlayerRef, NetworkObject> _spawnedCharacters = new Dictionary<PlayerRef, NetworkObject>();

public void OnPlayerJoined(NetworkRunner runner, PlayerRef player)
{
    if (runner.IsServer)
    {
        // Create a unique position for the player
        Vector3 spawnPosition = new Vector3((player.RawEncoded % runner.Config.Simulation.PlayerCount) * 3, 1, 0);
        NetworkObject networkPlayerObject = runner.Spawn(_playerPrefab, spawnPosition, Quaternion.identity, player);
        // Keep track of the player avatars for easy access
        _spawnedCharacters.Add(player, networkPlayerObject);
    }
}

public void OnPlayerLeft(NetworkRunner runner, PlayerRef player)
{
    if (_spawnedCharacters.TryGetValue(player, out NetworkObject networkObject))
    {
        runner.Despawn(networkObject);
        _spawnedCharacters.Remove(player);
    }
}
這一切看起來都很熟悉,因為它基本上用runner.Spawn()取代了Unity的Instantiate()方法,除了最後一個參數外,其採用了類似的參數集。最後一個參數是參照到被允許為虛擬人偶提供輸入的玩家——需要注意的是,這與「擁有」物件不同。稍後將對此進行詳細介紹。
別忘了回到Unity編輯器,將已建立的預製件虛擬人偶拖放到BasicSpawner的Player Prefab欄位中。
收集輸入
具有輸入授權並不允許客戶端直接修改物件的網路狀態。取而代之地,它可以提供輸入架構,然後主機端將解譯該輸入架構以更新網路狀態。
客戶端也可以在本機應用輸入,以向使用者提供即時反饋,但這只是可能被主機端否決的本機預測。
在可以從使用者收集輸入之前,必須定義一個資料架構來持有輸入。建立一個名為NetworkInputData.cs的新檔案,其中包含以下架構:
C#
using Fusion;
using UnityEngine;

public struct NetworkInputData : INetworkInput
{
  public Vector3 direction;
}
為了簡單起見,本例子使用向量來指出所需的移動方向,但要知道,有一些頻寬較低的方法可以做到這一點。例如,每個方向有一個位元的位元欄位。請注意,Fusion會壓縮輸入,只發送實際上變更的資料,所以不要過早進行最佳化。
當Fusion在OnInput回調中輪詢時,客戶端需要收集使用者的輸入,因此請回到BasicSpawner.cs並用以下內容替換OnInput()虛設常式:
C#
public void OnInput(NetworkRunner runner, NetworkInput input)
{
  var data = new NetworkInputData();

  if (Input.GetKey(KeyCode.W))
    data.direction += Vector3.forward;

  if (Input.GetKey(KeyCode.S))
    data.direction += Vector3.back;

  if (Input.GetKey(KeyCode.A))
    data.direction += Vector3.left;

  if (Input.GetKey(KeyCode.D))
    data.direction += Vector3.right;

  input.Set(data);
}
同樣地,這看起來應該很熟悉——處理程式使用標準Unity輸入來收集來自本機客戶端的輸入,並將其儲存在之前定義的架構中。該方法的最後一行將預先填入的輸入架構傳送到Fusion,Fusion將使其可用於主機端和該客戶端具有輸入授權的任何物件。
應用輸入
最後一步是將所收集的輸入資料應用於玩家虛擬人偶。
- 選擇
PlayerPrefab - 向其中新增一個名為
Player的新指令碼元件。 - 打開新指令碼,將單行為替換為網路行為。
- 執行
FixedUpdateNetwork(),以便行為可以參與Fusion模擬迴圈:
C#
using Fusion;

public class Player : NetworkBehaviour
{
  public override void FixedUpdateNetwork(){}
}
固定更新網路在每個模擬刷新上都會被調用。當Fusion應用較舊的已確認網路狀態,然後從該刷新一直重新模擬到目前(已預測)本機刷新時,每個轉譯幀可能會發生多次這種情況。
應在FixedUpdateNetwork中應用輸入,以確保為每個刷新應用正確的輸入。Fusion提供了一種簡單的方法來取得相關刷新的輸入,該方法的名稱恰如其分地命名為GetInput()。一旦取得了輸入,就調用NetworkCharacterController以將實際移動應用於虛擬人偶轉換。
完整的Player類別看起來像這樣:
C#
using Fusion;

public class Player : NetworkBehaviour
{
  private NetworkCharacterController _cc;

  private void Awake()
  {
    _cc = GetComponent<NetworkCharacterController>();
  }

  public override void FixedUpdateNetwork()
  {
    if (GetInput(out NetworkInputData data))
    {
      data.direction.Normalize();
      _cc.Move(5*data.direction*Runner.DeltaTime);
    }
  }
}
請注意,提供的輸入是標準化的,以防止作弊。
測試
現在剩下的就是驗證遊戲確實有可移動的玩家虛擬人偶,但首先場景需要一個地板,這樣生成的物體就不會掉到檢視之外。
建立一個方盒物件,將其放置在(0,-1,0)處,並在X和Z上按照100縮放。也要建立和指派一種新材質,使所有顏色都不相同。
組建應用程式並啟動多個執行個體(或直接從Unity中運行其中一個執行個體)。確保其中一個客戶端按下Host按鈕,其餘客戶端按下Join按鈕。
關於在Unity中運行的一個重要注意事項是:在編輯器中運行遊戲時,幀率可能非常不穩定,因為編輯器本身需要偶爾進行轉譯。這會影響Fusions正確預測時間的能力,並可能導致組建的應用程式中不發生的少量抖動。如果有疑問,請嘗試運行兩個獨立的組建。
下一章 主機端模式基礎3 - 預測
Back to top