Set Up Tutorial
The Quantum custom plugin is based of Photon-Server V5 and follows the workflow described in the Photon Server docs. Dive into these docs for further reading: Photon-Server V5 Step by Step Guide
Here we present a tutorial like introduction with all essential steps to get started with the Quantum custom plugin and finally run and debug it locally including the server side game simulation.
Watch Erick from Exit Games go through the installation and set up process: Quantum Custom Server Plugin Intro (YouTube)
Download The Plugin SDK
Download the Plugin SDK package here: Quantum SDK & Release Notes. If a matching Quantum CustomPlugin SDK version is not available please ask us.
On Windows it's better to unblock the zip file before extracting it (right-click the zip file, select Properties, check the unblock toggle and press OK). If you have problems getting the Photon Server to run locally this might be the cause.
Extract the zip file to a folder inside your Quantum project to have this setup:
Unknown
Quantum project
    assemblies
    quantum_code
    quantum_custom (or any other name)
        assemblies
        Photon-Server
        quantum.custom.plugin
    quantum_unity
    ...
If you chose another folder location OR renamed the unity project, adjust the following paths in quantum.custom.plugin\quantum.custom.plugin.csproj to point to the release versions of the Quantum SDK library files (PhotonDeterministic.dll, quantum.core.dll) and your quantum.code.dll.
XML
<Reference Include="PhotonDeterministic">
    <HintPath>..\..\assemblies\release\PhotonDeterministic.dll</HintPath>
</Reference>
<Reference Include="quantum.core">
    <HintPath>..\..\assemblies\release\quantum.core.dll</HintPath>
</Reference>
<Reference Include="quantum.code">
    <HintPath>..\..\quantum_unity\Assets\Photon\Quantum\Assemblies\quantum.code.dll</HintPath>
</Reference>
SDK Content
assembliesfolder includes the Quantum server plugin (PhotonDeterministic*.dll) and Photon Server libs (PhotonHivePlugin.dll)Photon-Serverfolder structure that include necessary tools and programs to run the Photon-Server locallydeploybin_Win64contains PhotonControl.exe, a tray-based tool to control the local Photon Server, PhotonSocketServer.exe which is the Photon Server main application and this folder is also where the license file should goLoadBalancing\GameServer\binthe location of theplugin.configthat supplies settings to our local plugin
logserver log filesPlugins\DeterministicPlugin\binthe location of the compiled plugin project and its assets
quantum.custom.pluginsource code that runs a Quantum Photon Server plugin
Run The Quantum Plugin Locally
License
- If you have not already, create an Exit Games account on our website SignUp.
- Visit the website Your Photon Server Licenses log into your account and download your free license file.
- If you require licenses to publish a game please contact us
- Place the
.licensefile inside thePhoton-Server\deploy\bin_Win64folder
Start And Debug The Plugin
- Open the quantum_custom.sln and make sure that the references to PhotonDeterministic.dll, quantum.core.dll and quantum.code.dll (your game project) are valid (see section above). Select dlls that are build with release configuration because debug will running be considerably slower.
- (Only Until Quantum 2.0 / PhotonServer 4) Run
Photon-Server\deploy\bin_Win64\PhotonControl.exeonce (it is started inside the Windows tray) and selectGame Server IP Config > Set Local IP: 192.168.XXX.XXX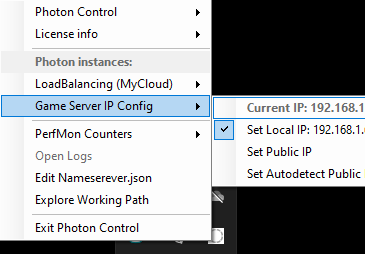
- Press F5 to start and debug the Quantum plugin running inside the Photon-Server
- You can set breakpoints but it may disconnect clients due to timeouts when resuming
Common Errors: no license file, Quantum library references not found or not compatible, zip file was not unblocked before extracting, check the Photon-Server\deploy\log for more information..
Connect Clients To The Photon-Server Plugin
The plugin project is set up in a way that it runs your quantum simulation as well. This can be interesting to add authority over the final game results or being able to send game snapshots to reconnecting players directly from the server.
The plugin requires the identical game libraries and data:
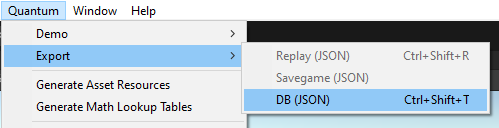
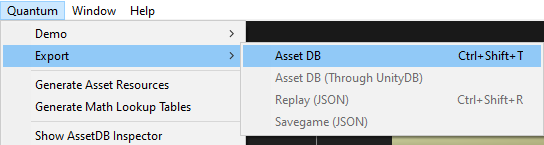
1) Export Quantum Asset Database
Export the asset db from Unity by selecting Quantum > Export > Asset DB. Chose the folder Photon-Server\deploy\Plugins\DeterministicPlugin\bin\assets as destination.
Quantum 2.0:
- Rename the file from assetDb.json to db.json (or change the path inside the plugin.config file)
- additional .bytes files are created alongside the asset db
Quantum 2.1:
- No additional files are created. All binary data is included in the json.
Optionally the export asset db can be embedded into the quantum.code.dll (only Quantum 2.1). There is already an empty placeholder file inside the Quantum code project ( quantum_code\quantum.code\db.json ). If not create it and add to the quantum.code.csproj:
XML
  <ItemGroup>
    <EmbeddedResource Include="db.json" />
    ...
  </ItemGroup>
Export the asset db via the Unity menu to quantum_code\quantum.code\db.json. Recompile the solution and make sure the plugin the just created dll.
The plugin will always try to load the db from file first. If non was found it will try to load the db from the assembly.
2) Copy Math Look-Up Tables
Copy the LUT folder (quantum_unity\Assets\Photon\Quantum\Resources\LUT) from your Quantum Unity project to Photon-Server\deploy\Plugins\DeterministicPlugin\bin\assets. You can delete the .meta files.
3) Configure Asset Paths
The location of the assets that you just used can be changed in this file:
Photon-Server\deploy\LoadBalancing\GameServer\bin\plugin.config (PathToDBFile and PathToLUTFolder). The paths are relative to quantum_custom\Photon-Server\deploy\Plugins\DeterministicPlugin\bin.
EmbeddedDBFile is the name of the asset db that is optionally embedded into the quantum.code assembly. The file name is db.json but requires the Quantum. prefix.
XML
<PluginSettings Enabled="true">
    <Plugins>
      <Plugin Name="DeterministicPlugin" Version=""
              AssemblyName="quantum.custom.plugin.dll"
              Type="Quantum.QuantumCustomPluginFactory"
              PathToLUTFolder="assets/LUT"
              PathToDBFile="assets/db.json"
              EmbeddedDBFile="Quantum.db.json"/>
    </Plugins>
  </PluginSettings>
When you publish the plugin online you need to configure these paths in the Photon dashboard.
4) Configure Unity
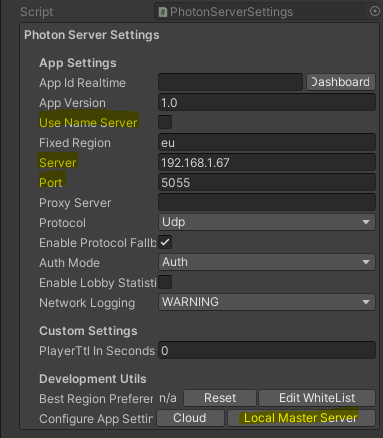
The Photon Server Settings file needs the information to connect to a local URL instead the Photon cloud. Open your Unity project select the Photon Server Settings file and press the Configure App Settings - Local Master Server button.
Settings required: UseNameserver=off, Host=your local IP address, Port=5055
Finally
- Start the plugin (open the custom plugin project and press F5)
- Start the Menu scene in Unity, connect and play