Utilities
Performance Recording
Recording performance for offline analysis helps identify rare spikes, which are hard to see in real-time profiling graphs. It also allows to measure performance at scale and is compatible with and can be appended to an automatized testing pipeline.
The base data structure for profiling is a ProfilingSet (represented by a graph). It contains:
- a set of
ProfilingTimerrepresented by a single line; - a set of
ProfilingStatisticsrepresented by a single line; and, - a method to write events as a string message with float value - typically representing execution time.
The ProfilingTimer records 3 values: total execution time, counter tracking how many times the timer was started and peak execution time. ProfilingStatistics on the other hand records only single value as a int, bool or float.
The following steps are necessary to record and then analyze a performance recording:
- Enable Analyzer options in
Resources/GameSettings(can be set at runtime):- Record Frames: If enabled, Analyzer service collects per-frame measurements from
ProfilingTimersandProfilingStatistics - Record Events: If enabled, events written with
ProfilingSet.RecordEvent()will be collected - Record Logs: If enabled, messages logged with Log class will be collected
- Export Statistics: If enabled, custom statistics set by calling
ProfilingSet.SetStatistics()will be exported - Export Times: Exports total execution times for all registered
ProfilingSets - Export Peaks: Exports peak execution times for all registered
ProfilingSets - Export Counters: Exports timer counters for all registered
ProfilingSets - Export Events: Exports recorded events
- Export Logs: Exports recorded logs
- Upload Records: If enabled, exported items will be uploaded to specified address
- Upload Address: Network address of FTP server
- Upload User Name: User name for upload to FTP server
- Upload Password: Password for upload to FTP server
- Record Frames: If enabled, Analyzer service collects per-frame measurements from
- Call
Game.Services.Analyzer.Register()for allProfilingSetsyou want to track (there are already 4 default sets registered). - Call
Game.Services.Analyzer.ClearRecords()to clear the records stack (already called fromGameplayDirector). - Call
Game.Services.Analyzer.ExportUploadClear(UNIQUE_ID)to export CSV files (it will create aUNITY_PROJECT/Analyzerfolder), optionally upload and flush records stack. - When CSV files are exported, copy
REPOSITORY/extras/Scripts/CreateHTMLGraphs.pyto the same folder in which the recently generated files placed and run it. It will create a HTML file with a graph for each CSV file located in the same folder.
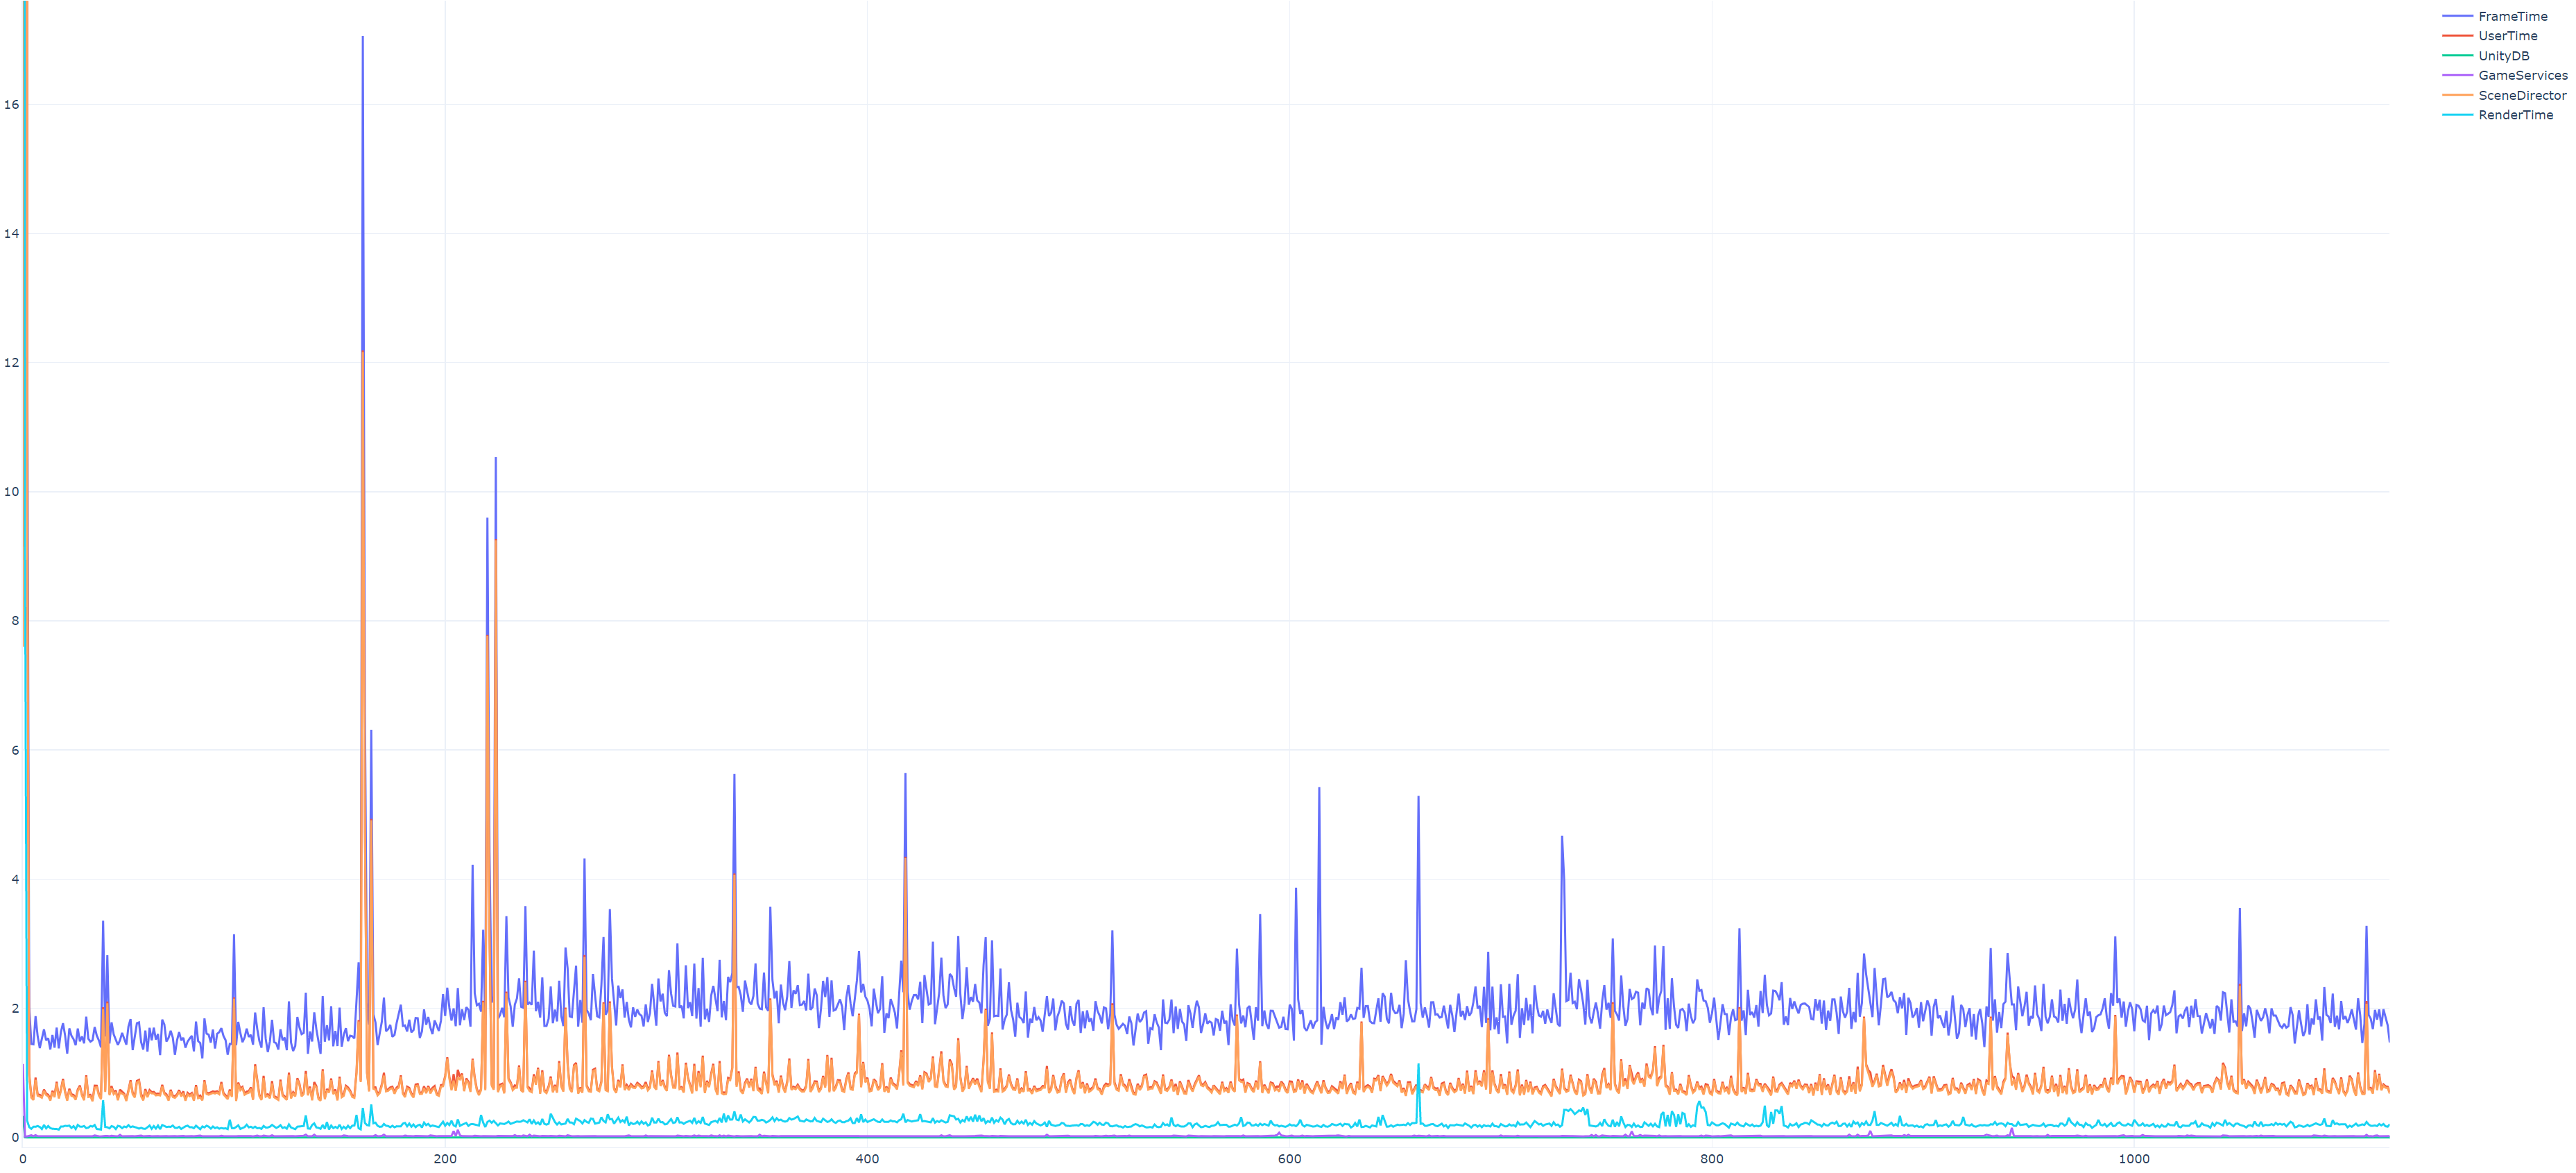
The graph illustrates time (in milliseconds) spent processing Unity frame, user scripts time, render time and other statistics tracked, including overall game performance, network performance, all game services, scene services, all simulation systems. It can easily record your own statistics and values which will automatically show in these graphs.
Graphics Quality Presets
GraphicsQualityPreset is a Unity Monobehavior component which allows switching specific properties of a GameObject or Component based on the selected quality level.
The FPS Template supports 4 quality levels:
- Low
- Medium
- High, and
- Ultra
The scripts available to manage the different aspects of the visual fidelity are:
GraphicsQualityPreset: Base class that can be inherited fromCameraQualityPreset: Allows toggling post-processing and shadowsGameObjectQualityPreset: Allows destroying game objectParticleSystemQualityPreset: Allows to disable lights and set max particlesPostProcessQualityPreset: Allows to set custom VolumeProfileRendererQualityPreset: Allows to switch materials on RendererSceneQualityPreset: Allows to disable reflections, lights and fog
These quality levels are paired 1-to-1 with the quality presets found in the Project Settings > Quality menu. It is highly advised to create a custom set of graphics quality preset scripts specifically tuned towards the needs of your game to enable you to push and balance maximum visual quality with stable performance.
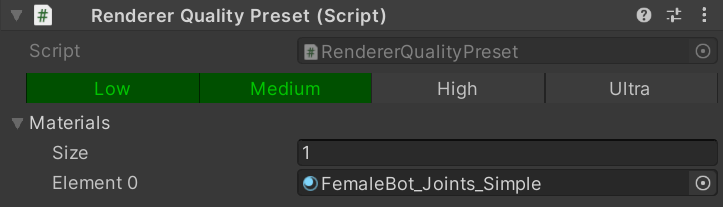
In the following screenshot an example preset can be seen; it switches renderer materials to the "simple" variant when the quality settings are on Low or Medium.
Platform Presets
The FPS Template supports Standalone, Mobile and VR platforms.
Using presents, it is possible to execute different code paths for specific platforms within a single repository. The platform needs to be set correctly before making a build or playing in the editor. It also can be switched from the toolbar above Scene view.

The platform information is serialized in the GameSettings asset and available at runtime. N.B. it can only be changed at runtime!
The scripts available to manage the platform specific presets are:
PlatformPreset: Base class that can be inherited fromCanvasPlatformPreset: Allows to switch canvas render modeComponentPlatformPreset: Allows to enable, disable or destroy a componentGameObjectPlatformPreset: Allows to enable, disable or destroy a GameObjectLayerPlatformPreset: Allows to switch the GameObject layer (including the one of its children)
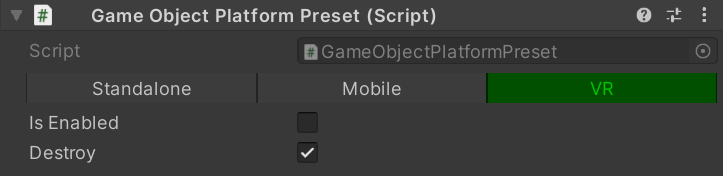
For instance, in the screenshot below the GameObject carries a GameObjectPlatformPreset which will destroy the selected game object on VR platforms.
Mass Simulation
The FPS Template allows simulating multiple games in memory at once, utilizing your CPU to 100% and ignoring gameplay visual. This can be used for balancing gameplay (power of weapons, projectiles, asymmetric maps, ...), finding bugs (holes in collision model, forbidden locations, unreachable spots, ...), improving AI, extracting map analytics data, testing various code paths with brute force and so on.
FPS Template supports two modes to execute mass simulation:
- Running directly in editor in
Quantum / Mass Simulation Editor - Running in play mode in custom scene
Mass Simulation Editor
This editor window is targeted for quick use, initial balancing, building mass simulation test cases, without the need of running or building game binary.
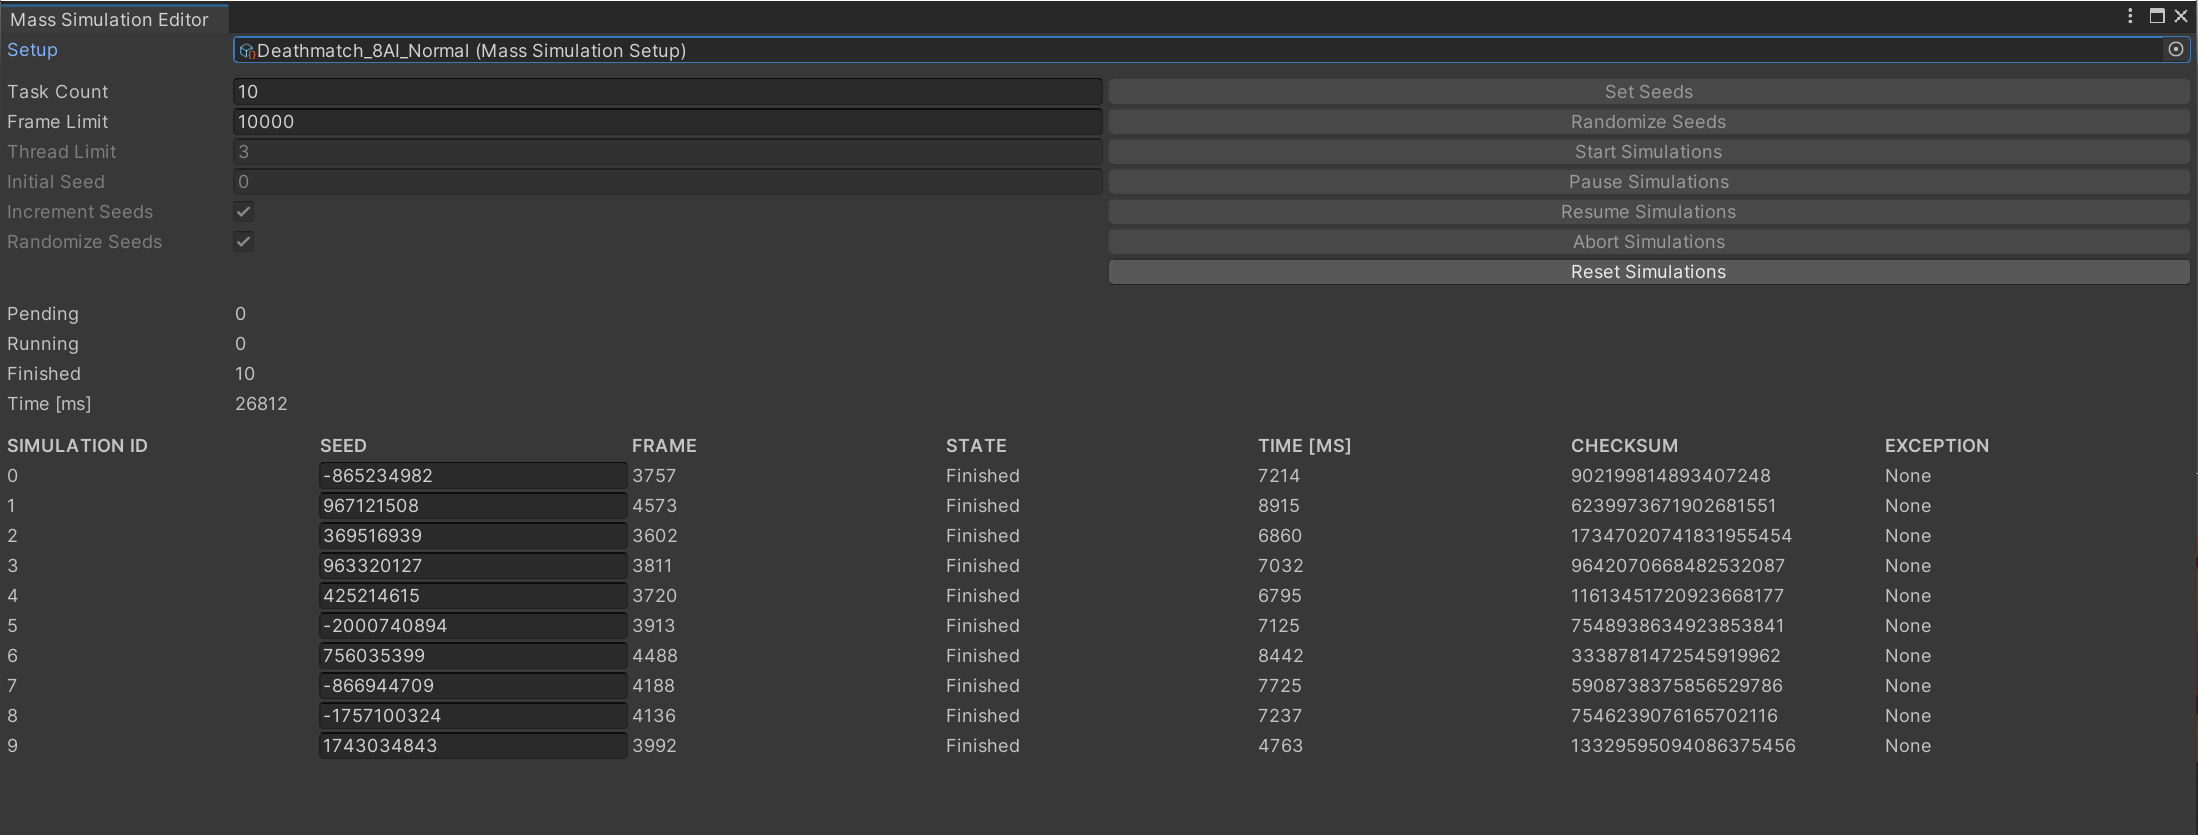
The Mass Simulation Editor requires a reference to MassSimulationSetup instance, which contains settings related to single simulation set (explained below).
Play Mode
Running mass simulation in play mode requires scene with custom scene director. FPS Template contains MassSimulation scene with MassSimulationDirector. The content of the scene depends on what you want to visualize, usually it's empty or similar to currently simulated scene.
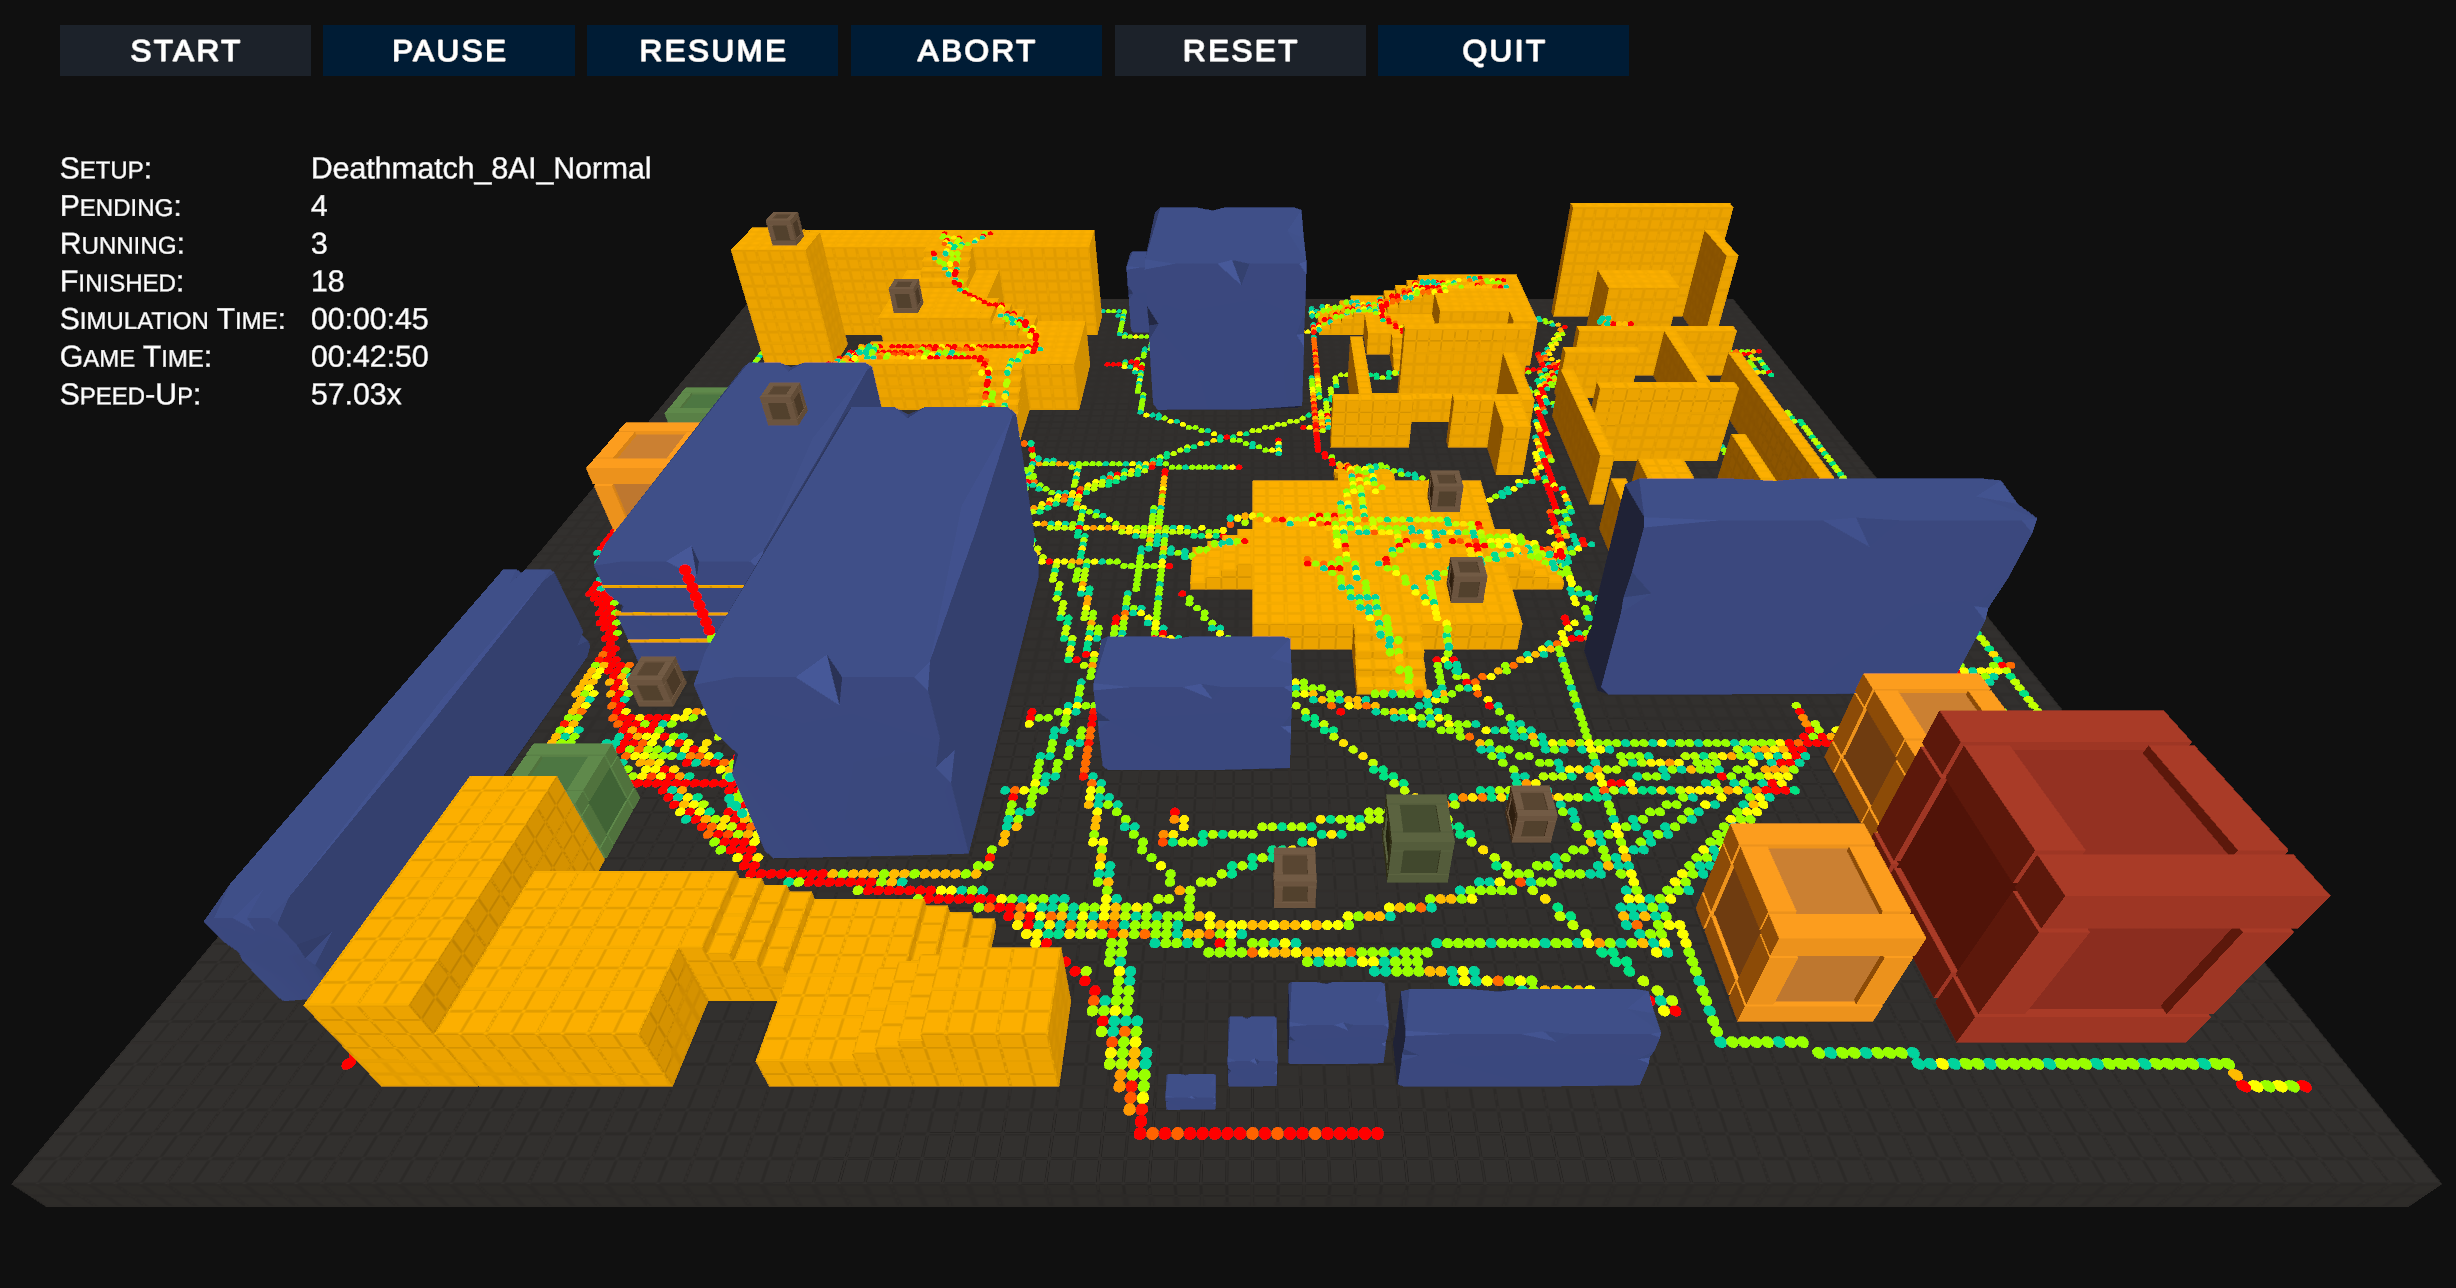
Following image shows running MassSimulation scene with special heat map processor (responsible for collecting and analyzing agent positions in level and visualizing using simple heat map).
Following image shows Mass Simulation Director from the scene:
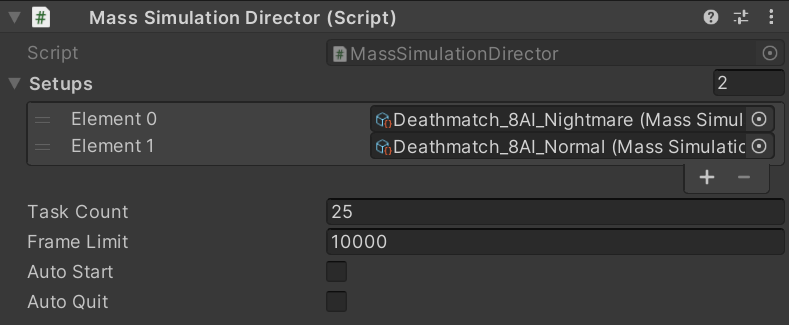
Properties of MassSimulationDirector:
Setups: List ofMassSimulationSetupwhich are executed sequentiallyTaskCount: Number of tasks (games) simulated for each setup fromSetupsFrameLimit: Frame limit for single game (in case the game stuck)AutoStart: Automatically start simulations after entering play modeAutoQuit: Automatically quit game / play mode after finishing allSetups
Mass Simulation Setup
MassSimulationSetup is an asset (scriptable object) which contains settings to single MassSimulationSet (a test case):
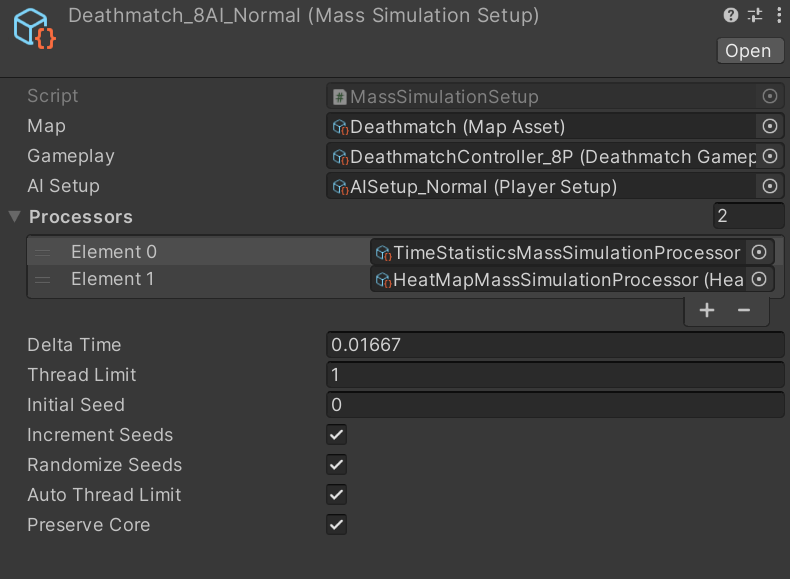
It contains these properties:
Map: Reference toMapAssetGameplay: Reference toGameplayControllerAssetAI Setup: Reference toPlayerSetupwhich will be used to spawn AI playersProcessors: List ofMassSimulationProcessorassets, which are processing running simulationDelta Time: Delta time passed to simulation each tickThread Limit: Maximum amount of threads (single simulation per thread)Initial Seed: Starting seedIncrement Seeds: If enabled, each new simulation started receives seed incremented by 1Randomize Seeds: If enabled, each new simulation started receives random seed (Initial SeedandIncrement Seedsare ignored)Auto Thread Limit: If enabled, maximum amount of threads equals your processor count (physical cores)Preserve Core: If enabled, one core will not be used to preserve system response
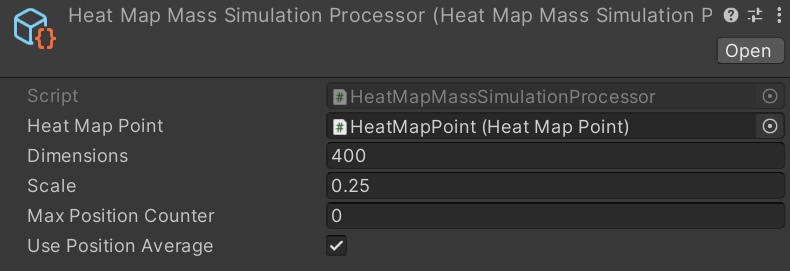
Mass Simulation Processor
MassSimulationProcessor is an asset (scriptable object) which is responsible for procesing simulation, collecting data and providing results:
Following image shows an example of HeatMapMassSimulationProcessor:
To create a new processor, make a MyCustomMassSimulationProcessor class inherited from MassSimulationProcessor and override following methods:
C#
// Called each frame and depends on Unity Editor/Runtime update rate.
protected virtual void OnTick(MassSimulationSet set)           {}

// Called on deinitialization and explicit reset, use for cleanup.
protected virtual void OnReset(MassSimulationSet set)          {}

// Called when the MassSimulationSet is started, use for initialization of local data.
protected virtual void OnSetStarted(MassSimulationSet set)     {}

// Called when the MassSimulationSet finished (all tasks already finished). This is the right place to analyze and report final results.
protected virtual void OnSetFinished(MassSimulationSet set)    {}

// Called when a MassSimulationTask started, use for initialization related to single simulation
protected virtual void OnTaskStarted(MassSimulationTask task)  {}

// Called when a MassSimulationTask finished, use to store results from the task / recalculate continuous statistics
protected virtual void OnTaskFinished(MassSimulationTask task) {}
Then you can create a new asset in editor and link to any MassSimulationSetup.
Note: MassSimulationSet is created based on MassSimulationSetup and contains list of MassSimulationTasks, each task representing single Quantum simulation.
It is safe to use private fields, processors are always instantiated (created copy) before running new simulation.
Remember that processors logic can be executed in both Editor / Runtime environment.
This tooling can be super efficient when added to your automatized tests pipeline.
Savegame / Offline Replay
Savegame and replay backup can be manually created at runtime from Pause UI view or by pressing keyboard shortcuts. By default, the data is exported to Unity project root subfolders Savegames and Replays (from Unity Editor) or to user application data (from builds).
Based on Replay settings in Resources/GameSettings (can be set at runtime), the replay can also be saved and/or uploaded to remote FTP server automatically when the match is over:
- Export DB: Exports asset DB
- Export Replay: Exports recorded inputs
- Export Checksum: Exports recorded checksums
- Upload Replay: If enabled, exported items will be uploaded to specified address
- Upload Address: Network address of FTP server
- Upload User Name: User name for upload to FTP server
- Upload Password: Password for upload to FTP server
To run the savegame or replay, you need to import exported files to Unity and reference them in the original scene - the GameplayDirector contains Replay File and Savegame File fields. To correctly simulate the game, it is important to run same binaries and database - ideally stick to the same commit as the exported file was created with.