詳細なガイド
ガイドイントロ
このガイドの目的は、初めてPhoton Serverプラグインを作成、設定および使用する際の手順の説明です。
このガイドはPhoton Serverプラグインを初めて使用するユーザーが対象で、注意深く順番どおりに手順をおこなう必要があります。
なお、このガイドはこちらのマニュアルに代わるものではありません。
初めてのプラグイン
最初のパートでは、最小限のプラグインを作成および展開します。
- Photonアカウントを作成します。
- Photon Plugin SDKをダウンロードします。
- SDKを展開します。このガイドでは、展開後に表示されるフォルダパスは"{pluginsSdkFolder}"と記載します。
- 有効なライセンスをダウンロードし、"{pluginsSdkFolder}\deploy\bin_Win64" フォルダに保存します。
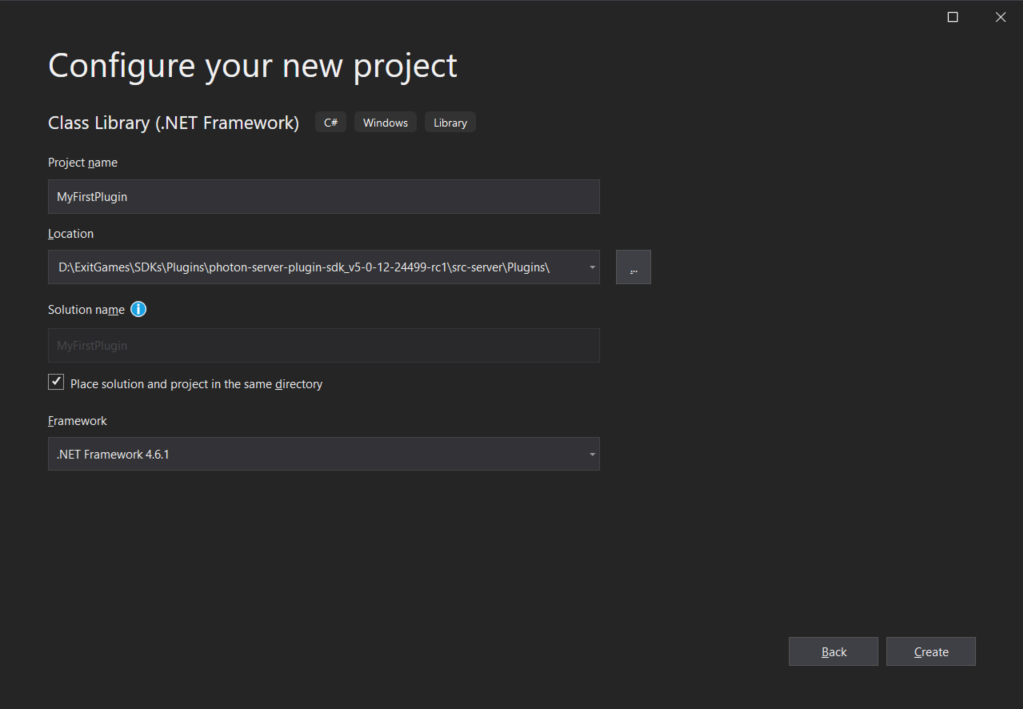
- Visual Studioプロジェクトを新規作成します(このガイドでは、Visual Studio 2019 Community版を使用しています):
- 「Class Library (.NET Framework)」という種類の新しいプロジェクトを追加します。
- プロジェクト名:「MyFirstPlugin」
- 場所:「{pluginsSdkFolder}\src-server\Plugins」
- 確認:「ソリューションとプロジェクトを同じディレクトリ内に格納してください」
- フレームワーク:「.NET Framework 4.6.1」(またはそれ以上)
依存関係を追加します:
1つのライブラリのみが必要です:「PhotonHivePlugin.dll」。
Visual Studioから追加する方法は以下のとおりです:- プロジェクトから「References」を右クリックします
- 「Add Reference..」をクリックします
- 「Browse」を選択します
- 「Browse」をクリックして、「{pluginsSdkFolder}\src-server\Plugins\lib\PhotonHivePlugin.dll」を選択します。
- 確認したら「OK」をクリックします。
プラグインクラスを追加します:
- Visual Studioで自動的に作成されたクラスファイルの名前を「Class.cs」から「MyFirstPlugin.cs」へ変更します。
- Visual Studioからクラスの名前の変更が提案されるので、承認してください。提案されない場合には、クラスの名前を
ClassからMyFirstPluginへ変更します。
-PluginBaseを拡張します。
C#
using Photon.Hive.Plugin;

    namespace MyFirstPlugin
    {
        public class MyFirstPlugin : PluginBase
        {
        }
    }
プラグイン名を設定します:
C#
public override string Name => "MyFirstPlugin";
SetupInstanceを上書きし、ロガーを作成します:コールバック内にログメッセージを追加します:
C#
public override void OnCreateGame(ICreateGameCallInfo info)
{
    this.PluginHost.LogInfo(string.Format("OnCreateGame {0} by user {1}", info.Request.GameId, info.UserId));
}
コールバック処理メソッドを1つ呼び出します:
C#
public override void OnCreateGame(ICreateGameCallInfo info)
{
    this.PluginHost.LogInfo(string.Format("OnCreateGame {0} by user {1}", info.Request.GameId, info.UserId));
    info.Continue(); // same as base.OnCreateGame(info);
}
プラグインファクトリクラスを追加します:
MyPluginFactoryという名前の新しいクラスを追加します。- そのクラスをパブリックにします。
C#
using Photon.Hive.Plugin;

namespace MyFirstPlugin
{
    public class MyPluginFactory
    {
    }
}
クラス
PluginFactoryBaseを拡張します:C#
using Photon.Hive.Plugin;
- プラグインを作成し、返します:
C#
public override IGamePlugin Create(string pluginName)
{
    return new MyFirstPlugin();
}
ソリューションをビルドします(F6)。
プラグインの設定をアップデートします:
- 「{pluginsSdkFolder}\deploy\LoadBalancing\GameServer\bin\plugin.config」を開きます
- 「PluginSettings」ノードを以下のようにアップデートします:
XML
<Configuration>
  <PluginSettings Enabled="true">
    <Plugins>
      <Plugin
        Name="MyFirstPlugin"
        AssemblyName="MyFirstPlugin.dll"
        Type="MyFirstPlugin.MyPluginFactory" />
    </Plugins>
  </PluginSettings>
</Configuration>
セルフホスティングされたPhoton Serverのプラグイン設定については、こちらを参照してください。
予期されるパスにバイナリをコピーします:
「{pluginsSdkFolder}\src-server\Plugins\MyFirstPlugin\bin\Debug\」から「{pluginsSdkFolder}\deploy\Plugins\MyFirstPlugin\bin\」へすべてをコピーします。
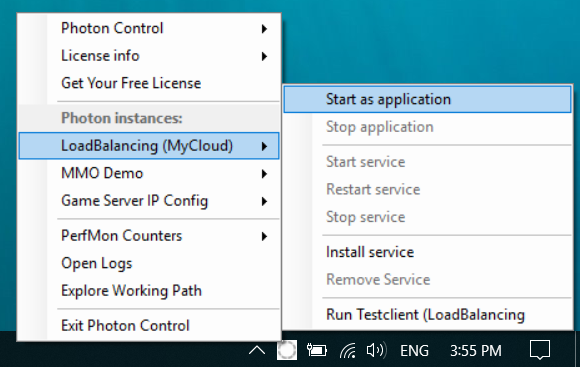
[PhotonControl]を開きます。
「{pluginsSdkFolder}\bin_Win64\PhotonControl.exe」で検索できます。アプリケーションとしてPhoton Serverを起動します:
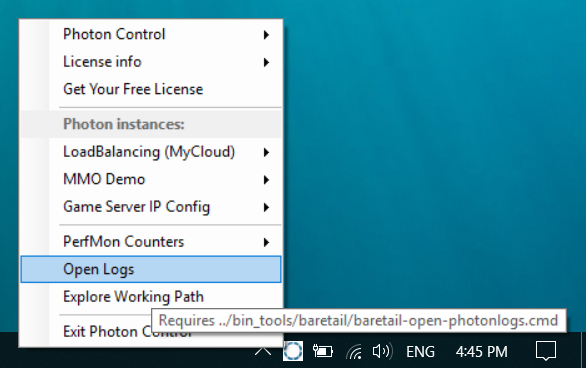
ログを確認します:
PhotonControlから直接ログを開くことができます:
Plain Old Text
  2021-05-24 16:00:06,904 [1] INFO  Photon.Hive.Plugin.PluginManager - Plugin configured: name=MyFirstPlugin
  2021-05-24 16:00:06,909 [1] DEBUG Photon.Hive.Plugin.PluginManager - Plugin path is set to 'D:\ExitGames\SDKs\Plugins\photon-server-plugin-sdk_v5-0-12-24499-rc1\deploy\Plugins/MyFirstPlugin//bin/MyFirstPlugin.dll'
  2021-05-24 16:00:06,931 [1] INFO  Photon.Hive.Plugin.PluginManager - Loaded Assembly Name=MyFirstPlugin, Version=1.0.0.0, Culture=, PublicKey token=, Path=D:\ExitGames\SDKs\Plugins\photon-server-plugin-sdk_v5-0-12-24499-rc1\deploy\Plugins/MyFirstPlugin//bin/MyFirstPlugin.dll
  2021-05-24 16:00:06,931 [1] INFO  Photon.Hive.Plugin.PluginManager - Referenced Assembly Name=mscorlib, Version=4.0.0.0, Culture=, PublicKey token=B7-7A-5C-56-19-34-E0-89, Path=
  2021-05-24 16:00:06,932 [1] INFO  Photon.Hive.Plugin.PluginManager - Referenced Assembly Name=PhotonHivePlugin, Version=1.1.0.24499, Culture=, PublicKey token=, Path=
  2021-05-24 16:00:06,932 [1] INFO  Photon.Hive.Plugin.PluginManager - Plugin Type MyFirstPlugin.MyPluginFactory from assembly MyFirstPlugin, Version=1.0.0.0, Culture=neutral, PublicKeyToken=null was successfuly created
  2021-05-24 16:00:06,933 [1] INFO  Photon.Hive.Plugin.PluginManager - Plugin manager (version=1.1.0.24499) is setup. type=MyFirstPlugin.MyPluginFactory;path=D:\ExitGames\SDKs\Plugins\photon-server-plugin-sdk_v5-0-12-24499-rc1\deploy\Plugins/MyFirstPlugin//bin/MyFrstPlugin.dll;version=1.1.0.24499
  ```
21. Photon Serverに接続します。任意のクライアントSDKを使用してください。
22. ルームを作成します。CreateRoom操作を実装するSDKに適したメソッドを呼び出します。
23. ログを再確認します:
  "{pluginsSdkFolder}\deploy\log\GSGame.log"にプラグインの作成が表示され、プラグインコールバックからのカスタムのログメッセージも表示されます:

  ```plain
  2021-05-24 16:03:19,734 [20] INFO  Photon.Hive.Plugin.PluginManager - Plugin successfully created:Type:MyFirstPlugin.MyPluginFactory, path:D:\ExitGames\SDKs\Plugins\photon-server-plugin-sdk_v5-0-12-24499-rc1\deploy\Plugins/MyFirstPlugin//bin/MyFirstPlugin.dll
  2021-05-24 16:03:19,760 [20] INFO  Plugin.MyFirstPlugin - OnCreateGame 81f04234-892d-4b14-ae17-3708e9f7fe5c by user 848140c0-a7fb-4d61-ba5f-5846184a9b78
  2021-05-24 16:03:19,761 [20] DEBUG Photon.Hive.Plugin.CreateGameCallInfo - Continue.
  ```

### デバッグモード

以下のパートでは、プラグイン開発に推奨されるワークフローを示します。

1. Visual Studioプロジェクトを閉じ、"{pluginsSdkFolder}\src-server\Plugins\MyFirstPlugin\MyFirstPlugin.sln" ソリューションファイルをダブルクリックして再度開きます。
 手順3でソリューションフォルダパスへの相対パスを使用できるようにするため、この手順は重要です。
2. プラグインプロジェクトの "Post-Build Events" をアップデートします:

  ここでの考えはプラグインのバイナリを自動的に更新し、プロジェクトのビルド出力ディレクトリからPhoton構成によって期待されるパスにコピーアンドペーストすることです。

  スクリーンショットに示されているとおり、ビルドが正常に完了した後にこの作業を正確におこなうコマンドを「Post-Build Events」のテキストエリアに入力してください。ここでは利便性と移植性のために相対パスを使用します。

     ```plain
     xcopy /Y /Q "$(TargetDir)*.*" "$(SolutionDir)..\..\..\deploy\Plugins\MyFirstPlugin\bin\"
     ```

::: figure src="{img}/PluginsStepByStepGuide/PostBuildEvents.png" caption="ビルド後のイベント"
:::

     忘れずに保存してください。

3. プラグインプロジェクトの「デバッグ」アクションを更新します:

ここでの考えは、デバッグプラグインが起動した際
にPhoton Serverを起動し、デバッグプラグインが停止した際にPhoton Serverを停止することです。

スクリーンショットに示されている通り、「Start action」と「Start options」を設定します。ここでは利便性と移植性のために相対パスを使用します。

   - "Start external program":

        ```plain
        ..\..\..\deploy\bin_Win64\PhotonSocketServer.exe
        ```

   - "Command line arguments":

        ```plain
        /run LoadBalancing /configPath ..\..\..\..\..\deploy\bin_Win64
        ```

::: figure src="{img}/PluginsStepByStepGuide/DebugActions.png" caption="Debug Start Action"
:::

    忘れずに保存してください。

4. ブレークポイントを追加します:

::: figure src="{img}/PluginsStepByStepGuide/MyFirstBreakpoint_v5RC1.png" caption="MyFirstPlugin.OnCreateGame内のブレークポイント"
:::

5. [PhotonControl]からPhoton Serverを停止します:

::: figure src="{img}/PluginsStepByStepGuide/StopPhotonAsAnApp_v5RC1.png" caption="Stop LoadBalancing from PhotonControl"
:::

6. Visual Studio (F5)からPhoton Serverを起動します:

::: figure src="{img}/PluginsStepByStepGuide/F5Clicked_v5RC1.png" caption="Visual StudioからPhoton Serverデバッグを開始"
:::

TaskManagerを使用してサーバーが起動した点を確認できます。このプロセスの名前はPhotonです。

7. Photon Serverに接続します。任意のクライアントSDKを使用します。
8. ルームを作成します。CreateRoomオペレーションを実装するSDKの適切なメソッドを呼び出します。
9. ブレークポイントがトリガーされるのを待ちます:

::: figure src="{img}/PluginsStepByStepGuide/BreakpointTriggered_v5RC1.png" caption="Breakpoint Triggered"
:::

[PhotonControl]({VersionPath}/applications/photon-control-application)