Secure WebSockets Setup
Guide
To allow your clients connecting your Photon Server using Secure WebSockets with 'wss://...' proceed as follows.
Obtain an SSL certificate:
a. For development purposes, you can generate a self-signed SSL certificate.- See "Generate Self-Signed Certificate" section.
- Make Sure Server Is Reachable By Client.
- Make Sure The Certificate Is Installed Into The Correct Certificate Store.
b. For production servers, acquire a certificate that is signed by a trusted Certificate Authority.
Install the certificate into the "Local Computer" certificate store on your server:
This step is not necessary if you are using a self-signed SSL certificate generated using IIS.
Just make sure you installed the certificate in the correct store.
- Add these attributes to the WebSocket listener(s) in the PhotonServer.config:
| Attribute | Default | Description |
|---|---|---|
| Secure | TRUE | True defines a listener to be secured by SSL. |
| StoreName | MY | Name of store where the certificate can be found. If you have installed the certificate into the "Personal" store, like described above, set the value to "MY" (or omit the StoreName setting, so the default is used). |
| CertificateName | Photon | Name of certificate. Enter the value of the 'IssuedTo' field that is shown in the certificate store (see step 1), NOT the "Friendly Name". |
| UseMachineStore | FALSE | Defines if machine store ("local computer store") should be used. We recommend to install the certificate into the machine store, like described above, and set this value to "TRUE" because the certificate will be available to Photon regardless of the account under which it runs and no matter if Photon is started as an application or as a service. If you set this value to "FALSE", Photon will look for the certificate in the "Current User" certificate store if it is started as an application; if it is started as a Service, it will look in the associated "Service" certificate store - so make sure that you install the certificate in the right store. |
Update GameServer configuration inside "deploy/LoadBalancing/GameServer/bin/Photon.LoadBalancing.dll.config":
Here is an example:
- Port for Game Server (WebSocketListener with
Secure = "true"andOverrideApplication="Game") connection is 9091. - Hostname (
%COMPUTERNAME%) is "photon". - Domain name is "example.com".
XML
<Photon.LoadBalancing.GameServer.GameServerSettings> <!-- other settings --> <!-- Client-to-Gameserver Secure WebSocket connections. Needs to match the secure WebSocketListener in PhotonServer.config --> <setting name="GamingSecureWebSocketPort" serializeAs="String"> <value>9091</value> </setting> <!-- the hostname for this gameserver. Required for HTTP & websocket connections. Change it to a useful entry, like hostname.mydomain.com, for a production scenario. --> <setting name="PublicHostName" serializeAs="String"> <value>photon.example.com</value> </setting> <!-- The domain name for this gameserver. Required for websocket connections and needs to match the certificate for secure websocket / https connections. --> <setting name="PublicDomainName" serializeAs="String"> <value>example.com<value/> </setting> <!-- other settings --> </Photon.LoadBalancing.GameServer.GameServerSettings>- Port for Game Server (WebSocketListener with
Restart your Photon Server ... voilà!
If you open the log file: "deploy/bin_WinXX/log/Photon-LoadBalancing-.log", you can find this line: 12700: 17:16:22.981 - Secured using certificate: "NW.exitgames.local" from store: "MY" using machine store
Generate Self-Signed Certificate
The following are just very basic and simple steps to generate a self-signed SSL certificate quickly for testing and development purposes.
We will not give extensive detail about each method, step or command used.
You can also use other ways or tools not mentioned here for this purpose.
Feel free to look up more information on the internet.
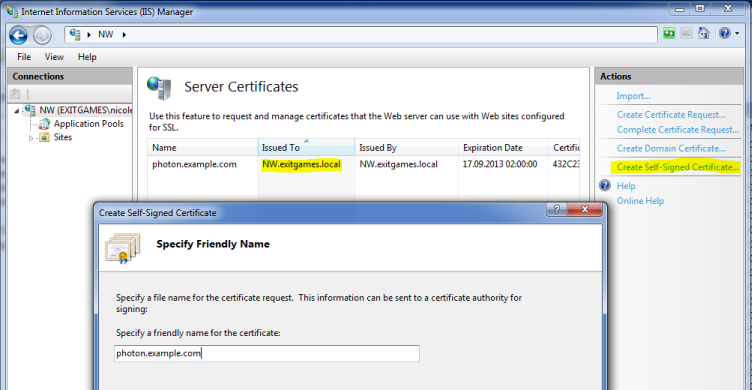
Using IIS
If you have IIS installed on your development machine, follow these steps.
The "friendly name" should be the same name which your web clients use to access your server, e.g.: photon.example.com:
Using OpenSSL
You need OpenSSL installed with the binary properly added to the environment variable path.
Prepare a configuration file, e.g. "req.conf" (replace values with your own):
[req]
distinguished_name = photon_wss
x509_extensions = v3_req
prompt = no
[photon_wss]
C = DE
ST = HH
L = Hamburg
O = ExitGames
OU = Photon
CN = www.myawesomegame.com
[v3_req]
keyUsage = keyEncipherment, dataEncipherment
extendedKeyUsage = serverAuth
subjectAltName = @alt_names
[alt_names]
DNS.1 = www.myawesomegame.com
DNS.2 = photon.myawesomegame.com
DNS.3 = *.myawesomegame.com
Generate certificate and key by running the following command with administrative privileges:
openssl req -x509 -nodes -days 730 -newkey rsa:2048 -keyout cert.key -out cert.pem -config req.conf -extensions 'v3_req'Convert the certificate to format required for IIS (.pfx) by running the following command with administrative privileges:
openssl x509 -in cert.pem -noout –text
openssl pkcs12 -inkey cert.key -in cert.pem -export -out cert.pfx -name "photon_wss" -certfile cert.pem
Using PowerShell
You need PowerShell 3 or higher.
Generate certificate by running the following PowerShell command with administrative privileges:
New-SelfSignedCertificate -DnsName *.myawesomegame.com -CertStoreLocation cert:\LocalMachine\MyCopy the "Thumbprint" value from the result of 1. and use it in 3.
Convert the certificate to format required for IIS (.pfx) by running the following PowerShell commands with administrative privileges:
(Don't forget to replace
"YourPassword"and<thumbprint>)$CertPassword = ConvertTo-SecureString -String "YourPassword" -Force –AsPlainText Export-PfxCertificate -Cert cert:\LocalMachine\My\<thumbprint> -FilePath cert.pfx -Password $CertPassword
Troubleshooting
Make Sure To Use Domain Name And Not IP Address
From the client, the server address to connect to should be a domain name and not an IP address.
Make Sure To Use WSS Prefix
From the client, the server address to connect to should have the prefix or scheme "wss://" which indicates that you are using WebSockets Secure protocol.
Make Sure To Use The Correct Port Number
Double-check the port number used to connect to the server.
It needs to match the port of the WebSocket Listener of the "Master" application as configured in "PhotonServer.config".
In the example above (step 3 of the "Guide") it's 9090.
On Photon Cloud we use 19090.
Make Sure The Certificate Is Installed Into The Correct Certificate Store
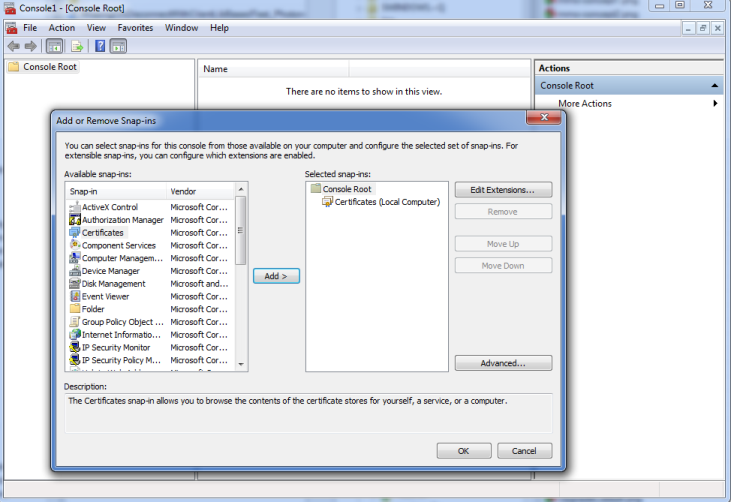
- Open the Microsoft Management Console by typing "mmc.exe" on the command line.
- From the "File" menu, choose "Add / Remove snap-in".
- Select "Certificates" -> "Add" -> "Computer Account" -> "Local Computer" -> "OK".
- Expand the nodes on the left hand to "Certificates" -> "Personal" -> "Certificates".
- Your certificate should show up like this:
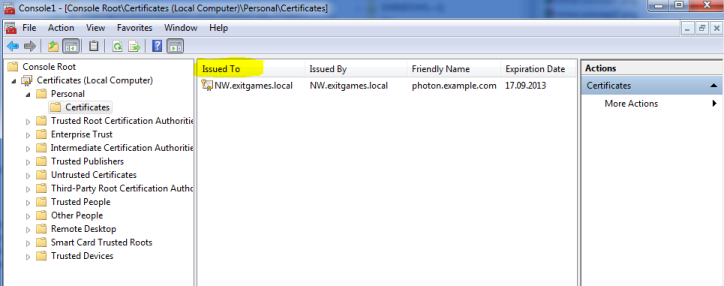
Here is a more detailed explanation on how to use the Management Console to view certificates.
Make Sure Server Is Reachable By Client
Try reaching the server using "ping" command.
For development purposes, if the domain name is not DNS ready yet you can add the IP address to your local "hosts" file.
On Windows, it's located under "C:\Windows\system32\drivers\etc\hosts".
Add a line with format: <IP Address> <domain name>.
Example:
If the server is on the same machine as the client and your domain is "photon.example.com"
127.0.0.1 photon.example.com
Also, don't forget to open the required ports from the server.
Read more about "Firewall Settings".
Try Connecting To Photon Server Using UDP or TCP
Try switching the transport protocol to make sure the client can connect to the server.
Try Connecting To Photon Cloud Using WSS
To make sure there is nothing wrong with the client, connect to Photon Cloud and see if it works.
Make Sure Binary Protocol Used By Client Is Supported By Server
The client may be using a binary protocol version not yet supported by the self-hosted Photon Server SDK.
Make sure the client uses v1.6 as v1.8 is supported by Photon Cloud only still.
You can find out if this is the case by checking the "deploy\log\MSMaster.log" file:
2019-03-06 14:29:40,397 [4] WARN Photon.SocketServer.Protocol - Subprotocol GBinaryV18 is unknown
2019-03-06 14:29:40,428 [4] WARN Photon.SocketServer.ApplicationBase - OnInit - Failed to parse init request for WebSecket peer: {0}System.Byte[]
Chrome Console Error: ERR_CERT_INVALID_AUTHORITY
If you encounter this error in Chrome, you can use the following workaround:
If your server address is "wss://photon.example.com:9090":
- Open a new tab.
- Enter "https://photon.example.com:9090" (Replace "wss://" with "https://" in the server address) in the address bar and click enter.
- Chrome will complain about the site not being secure.
- Click "Advanced".
- Click "Proceed to https://photon.example.com:9090 (unsafe)". This will make Chrome accept your self-signed certificate using wss.
- Restart Chrome.
- Test your client again.
Chrome Console Error: ERR_CERT_COMMON_NAME_INVALID
You can try the previous workaround used for ERR_CERT_INVALID_AUTHORITY error.
Or you need to make sure your certificate uses Subject Alternative Names (SANs).
See "Using OpenSSL" for how to generate a self-signed SSL certificate that uses SANs.
Try Guide From Clean SDK
If you encounter issues when configuring WSS for your self-hosted Photon Server, we recommend that you start by downloading a clean SDK version and following the steps provided here on it.
If you don't encounter the same issue then you need to find out what is wrong with your own custom setup.
Try Starting Photon As An Application
Sometimes when Photon Server is configured to be started as a service some issues may be encountered.
We recommend that you follow the steps provided here with a Photon Server started as an application.
Read The Server Logs
Always!
Check the logs.
The server's logs' files' locations can be found here.
- Guide
- Generate Self-Signed Certificate
- Troubleshooting
- Make Sure To Use Domain Name And Not IP Address
- Make Sure To Use WSS Prefix
- Make Sure To Use The Correct Port Number
- Make Sure The Certificate Is Installed Into The Correct Certificate Store
- Make Sure Server Is Reachable By Client
- Try Connecting To Photon Server Using UDP or TCP
- Try Connecting To Photon Cloud Using WSS
- Make Sure Binary Protocol Used By Client Is Supported By Server
- Chrome Console Error: ERR_CERT_INVALID_AUTHORITY
- Chrome Console Error: ERR_CERT_COMMON_NAME_INVALID
- Try Guide From Clean SDK
- Try Starting Photon As An Application
- Read The Server Logs