LoadBalancing Application
This article explains the server-side implementation of the LoadBalancing application.
Concept
LoadBalancing application extends Hive framework and implements features like Rooms, Events, Properties and so on and adds a layer of scalability, that enables you to run the application on multiple servers.
The basic setup is simple:
There is always 1 Master Server and 1..N Game Servers.
LoadBalancing also adds lobby support and matchmaking capabilities.
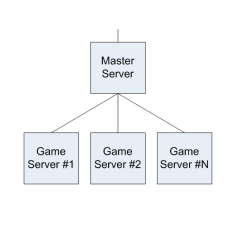
The Master Server handles these tasks:
- keep track of the games that are currently open on the Game Servers.
- keep track of the workload of the connected Game Servers and assign peers to the appropriate Game Servers.
- keep and update a list of available rooms for clients in the "Lobby".
- find rooms (random or by name) for clients and forward the game server address to them.
The Game Servers have these tasks:
- host the game rooms.
- regularly report their current work load and the list of their games to the Master Server.
Differences with Photon Cloud
The LoadBalancing Application provides almost the same logic as the Photon Realtime Cloud service.
Some requirements to run as Cloud service just don't apply to a special server with custom logic, so they are removed.
This greatly simplifies the code, too.
- No virtual Applications. Only one game logic is running per LB instance. The AppId parameter in operation Authenticate is ignored.
- No player separation by AppVersion parameter. This is part of the virtual apps also.
You can read more about the differences here.
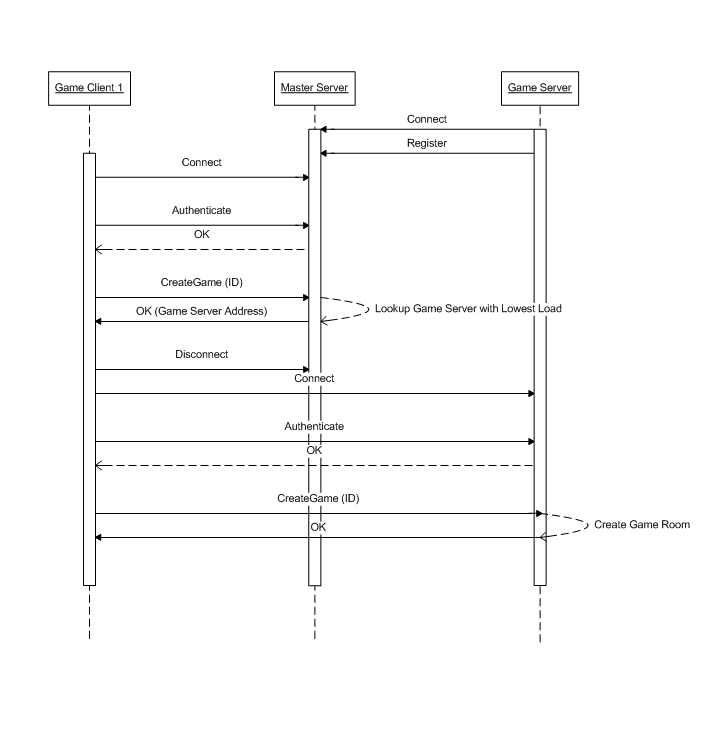
Basic Workflow
The workflow from a client side perspective is quite simple as well:
Clients connect to the Master Server, where they can join the lobby and retrieve a list of open games.
When they call a CreateGame operation on the Master, the game is not actually created - the Master Server only determines the Game Server with the least workload and returns its IP to the client.
When clients call a JoinGame or JoinRandomGame operation on the Master, the Master looks up the Game Server on which the game is running and returns its IP to the client.
The client disconnects from the Master Server, connects to the Game Server with the IP it just received and calls the CreateGame or JoinGame operation again.
Master Server
This section explains the Master Server implementation - see the LoadBalancing.MasterServer namespace in the "\src-server\Loadbalancing\Loadbalancing.sln" solution.
The MasterApplication decides if incoming connections are originated by game clients (on the "client port") or by game servers (on the "game server port").
Master Server: Handling Client Peers
The MasterClientPeer represents a client connection to the Master Server. T
he following operations are available for a MasterClientPeer:
- Authenticate
The Authenticate operation has only a dummy implementation.
The developer should use it as a starting point to implement his own authentication mechanism:
C#
    // MasterClientPeer.cs:
    private OperationResponse HandleAuthenticate(OperationRequest operationRequest)
    {
        OperationResponse response;

        var request = new AuthenticateRequest(this.Protocol, operationRequest);
        if (!OperationHelper.ValidateOperation(request, log, out response))
        {
            return response;
        }

        this.UserId = request.UserId;

        // publish operation response
        var responseObject = new AuthenticateResponse { QueuePosition = 0 };
        return new OperationResponse(operationRequest.OperationCode, responseObject);
    }
JoinLobby
The JoinLobby operation is used to add the MasterClientPeer to the AppLobby, which contains a GameList - the list of all open games on any Game Server.
The peer receives an initial GameListEvent, which contains the current list of games in the GameList (filtered by the optional Properties of the JoinLobby operation):
Afterwards, aGameListUpdateEventis send to the client at regular intervals, which contains the list of changed games (also filtered by the optional Properties of the JoinLobby operation).
The client will receive the update events as long as it is connected.C#
// AppLobby.cs:
protected virtual OperationResponse HandleJoinLobby(MasterClientPeer peer, OperationRequest operationRequest, SendParameters sendParameters)
{
    // validate operation
    var operation = new JoinLobbyRequest(peer.Protocol, operationRequest);
    OperationResponse response;
    if (OperationHelper.ValidateOperation(operation, log, out response) == false)
    {
        return response;
    }

    peer.GameChannelSubscription = null;

    var subscription = this.GameList.AddSubscription(peer, operation.GameProperties, operation.GameListCount);
    peer.GameChannelSubscription = subscription;
    peer.SendOperationResponse(new OperationResponse(operationRequest.OperationCode), sendParameters);

    // publish game list to peer after the response has been sent
    var gameList = subscription.GetGameList();
    var e = new GameListEvent { Data = gameList };
    var eventData = new EventData((byte)EventCode.GameList, e);
    peer.SendEvent(eventData, new SendParameters());

    return null;
}
JoinGame / JoinRandomGame
The JoinGame operation is called when a client wants to join an existing game that is listed in the AppLobby's GameList, specified by a unique GameId.
If the game exists and the peer is allowed to join, the Master Server returns the IP of the Game Server, on which the Game is actually running, to the client.The Master Server also updates the GameState and adds the peer to its list of "joining peers".
It will be removed once it has joined the game on the Game Server (or after a certain timeout).
This way, the Master Server can keep track of peers that are in transition between the Master and the Game Server.JoinRandomGame works in a similar way, except that the game is chosen by random by the Master Server and the GameId is returned to the client.
CreateGame
The CreateGame operation is called when a client wants to create a new game.
The Master Server determines a Game Server on which the new game will be created and returns the Game Server's IP to the client.
See the "LoadBalancing Algorithm" section for more details.In addition, a GameState object is created and added to the GameList and the peer is stored as a "joining peer".
Note that this GameState is only used to keep track of the games - the game itself only exists on a Game Server.
Handling Game Server Peers
The Master Server always knows which Game Servers are available, how many games they host and how the current workload is.
To achieve this, each Game Server connects to the Master Server on startup.
The MasterApplication maintains a GameServerCollection, in which IncomingGameServerPeers are stored.
The Game Server can only call one operation:
- RegisterGameServer
The Game Servers call the RegisterGameServer operation once after they are connected to the Master Server.
The Game Server is added to the Master'sGameServerCollectionand to its LoadBalancer (see the "LoadBalancing Algorithm").
It will be removed from theGameServerCollectionon disconnect.
Check the "Game Server" section to see how the Game Server sends further updates about its games and its workload to the Master.
Game Server
This section describes the Game Server implementation.
See the LoadBalancing.GameServer namespace in the "\src-server\Loadbalancing\Loadbalancing.sln" solution.
Game Server: Handling Client Peers
As soon as a client has received a Game Server address from the Master, the client can call any operation on the Game Server that is available in Hive (while joine to the room).
The only difference is that we have separate operation codes for JoinGame and CreateGame on the Game Server.
Reporting Game States to the Master
The connection to the Master server is represented as an OutgoingMasterServerPeer in the Game Server.
Once the connection is established, the Game Server calls a Register operation on the Master Server.
Afterwards, the Game Server publishes all existing game states to the master server:
C#
// OutgoingMasterServerPeer.cs:
protected virtual void HandleRegisterGameServerResponse(OperationResponse operationResponse)
{
    // [...]

    switch (operationResponse.ReturnCode)
    {
    case (short)ErrorCode.Ok:
        {
            log.InfoFormat("Successfully registered at master server: serverId={0}", GameApplication.ServerId);
            this.IsRegistered = true;
            this.UpdateAllGameStates();
            this.StartUpdateLoop();
            break;
        }
    }
}
This is done by sending a message to each Game that tells it to send it's game state to the Master:
C#
// OutgoingMasterServerPeer.cs:
public virtual void UpdateAllGameStates()
{
    // [...]

    foreach (var gameId in GameCache.Instance.GetRoomNames())
    {
        Room room;
        if (GameCache.Instance.TryGetRoomWithoutReference(gameId, out room))
        {
            room.EnqueueMessage(new RoomMessage((byte)GameMessageCodes.ReinitializeGameStateOnMaster));
        }
    }
}
The Game handles this in the ProcessMessage method and calls the UpdateGameStateOnMaster method to send an UpdateGameEvent to the Master:
C#
 protected virtual void UpdateGameStateOnMaster(
            byte? newMaxPlayer = null,
            bool? newIsOpen = null,
            bool? newIsVisble = null,
            object[] lobbyPropertyFilter = null,
            Hashtable gameProperties = null,
            string newPeerId = null,
            string removedPeerId = null,
            bool reinitialize = false)
        {
            // [...]

            var e = this.CreateUpdateGameEvent();
            e.Reinitialize = reinitialize;
            e.MaxPlayers = newMaxPlayer;
            // [ ... more event data is set here ... ]

            var eventData = new EventData((byte)ServerEventCode.UpdateGameState, e);
            GameApplication.Instance.MasterPeer.SendEvent(eventData, new SendParameters());
        }
}
The game state is also updated on the master whenever a game is created, joined or left by a client or its properties are changed.
LoadBalancing Implementation
The next section describes how the game servers report their current work load to the Master Server and how the Master Server determines the Game Server that is best suited to handle new CreateGame requests - the actual LoadBalancing algorithm.
Concepts
The LoadBalancer operates with three basic things: Server Load Levels, Sever Weights, and the Servers themselves.
Servers
Some objects which are operated by the LoadBalancer.
They have associated with them Load Level and Weight.
Weight is provided by the LoadBalancer, LoadLevel is provided to the LoadBalancer by some external logic.
Server Load Levels
A set of constants which define levels of server load.
Server measures/computes its load level and notifies the LoadBalancer about every change.
The first version of the set in Photon Server v4 contained only 5 levels.
Photon Server v5 contains 10.
Server Weights
Server weights are some numbers attached to load levels by the LoadBalancer.
We take them from the configured "WorkloadConfigFile" or take some defaults if the file is not configured or not provided.
These numbers define a servers probability to be returned by the LoadBalancer.
So then higher is the load level then less should be weight attached to it, to reduce the probability.
Highest level has weight 0.
Servers with such load level are not used at all.
We use so-called geometric probability.
We assign a segment to every server.
Length of this segment is defined by the server weight.
Then we make one big segment by concatenating all segments together.
Servers are sorted by load level.
Less loaded are first.
Then we get some random number (Random numbers are taken from the range [0 .. Sum of all server weights)) and check what server segment contains it.
Example:
For instance, we have 3 servers 'A', 'B' and 'C' with respective weights 3(|___A|), 1(|_B|) and 5 (|_____C|).
The big segment will look like 5, 3, 1 (|_____C|___A|_B|).
Then we take a random number from 0 to 8 ( 5 + 3 + 1).
[0, 4] -> server C, [5, 7] server A, [8] - server B.
Note: open and closed intervals:
- [a, b]: includes both ends
- [a, b): includes left but does NOT include right
- (a, b): does not include a and b.
Server States
There are three constants that define game server state: 'Normal', 'Offline' and 'OutOfRotation'.
Basic implementation of the LoadBalancer did not care about server state.
All servers were considered in state 'Normal'.
When the state was changed from 'Normal' to either 'Offline' or 'OutOfRotation', the server was removed by external logic from the LoadBalancer.
In Photon Server v5 the LoadBalancer is aware of server states.
So that if server state is not 'Normal', the server will not be returned by the LoadBalancer.
Server state can be set via text file.
The file name is configured via "ServerState" setting in "deploy\LoadBalancing\GameServer\bin\GameServer.xml.config".
The path is relative to the deployment folder.
By default it's "ServerState.txt" and since it's relative to the deploy folder the path is "deploy\ServerState.txt".
Priorities
Sometimes you need to quickly add a server to a cluster.
Usually providers that offer a rapid way to deploy new servers are costly.
That's why it's better to take those servers down as fast as possible (as soon as we don't need them).
Here is where the LoadBalancer priorities in Photon 5 come to play.
Idea behind this is as follows:
Once the load of main pool of servers reaches some threshold, the LoadBalancer will take servers from pool with higher priority.
Similar in opposite direction.
Once cluster loading reaches some low value, game servers with highest priority are excluded and so one.
You have to set two properties for the LoadBalancer in "deploy\LoadBalancer.config":
PriorityDownThreshold: defines the load value when servers with higher priority are excluded from available servers poolPriorityUpThreshold: defines the load value when servers with higher priority are included into available servers pool
You have to take care about those values, so that when you add new servers, the load does not fall below PriorityDownThreashold and when you remove priority servers, the load of remaining servers should not reach PriorityUpThreshold.
On GameSever side you have to set the server's priority in GameServer.xml.config.
Under GameServer section add LoadBalancerPriority setting.
0 is default value.
It is for the first level of servers.
You can use other priority levels: 1, 2, 3 and so on.
In the beginning, we use servers with the lowest priority.
Usually, it is 0.
When all such servers are reached some predefined by config level we include next priority.
Let's say priority '1'.
When the load level goes down and reaches another threshold value predefined by config, we take all servers with priority '1' out of the LoadBalancer so that they are not used anymore.
Reserve
This idea behind this is simple and is as follows:
Cluster load is not regular in a 24 hours span.
During the day we have more, during the night less.
We should have enough servers to handle it well in all cases.
But sometimes we need to quickly move one server from one cluster to another to reduce loading there.
For this reason, we introduced ReserveRatio.
In the LoadBalancer configured in "deploy\LoadBalancer.config" we may define a ReserveRatio.
It has value "0.0" by default which means no reserved servers.
If the value is set to 0.2, then for 10 server the LoadBalancer will keep in reserve 2 servers.
For 9 server we will have only 1 server in reserve.
The logic is similar to how priorities work.
After reaching some predefined value of servers load, we take ONLY ONE server from the reserve.
If that is not enough, we take ONE more.
Then we return servers from usage to reserve one by one.
Reserve works independently for every priority.
Every priority will have its own reserve.
Next priority will be used only when all servers of current priority including those from reserve have predefined load level.
Determine Workload
See the Photon.Common.LoadBalancer.LoadShedding namespace in the "\src-server\LoadBalancing\LoadBalancing.sln" solution for implementation details.
Respective source files are located under "\src-server\Photon.Common\LoadBalancer\LoadShedding".
The Game Servers regularly report their current work load to the master server.
The work load includes, for example:
- CPU usage
- Traffic
- some Photon-specific values, like ENet + Business Queue Length, the average time the server spends on each request, etc.
- Latency (when sending requests to itself)
The most important (and easiest to understand) factor is the CPU load, so we will focus on the CPU load in this documentation.
All these factors are summarized in a single value - the "Load Level" of a Game Server, which is reported to the Master.
The lower the load level, the better is the Game Server suited to host new games.
Implementation Details
The Game Server collects "Feedback" about the above-mentioned factors.
There is one FeedbackController object for each factor - it consists of a FeedbackName and a FeedbackLevel:
C#
namespace Photon.Common.LoadBalancer.LoadShedding
{
    public enum FeedbackName
    {
        CpuUsage,
        PeerCount,
        Bandwidth,
        OutOfRotation
    }
}
C#
namespace Photon.Common.LoadBalancer.LoadShedding
{
    public enum FeedbackLevel
    {
        Lowest = 0,
        Level0 = Lowest,
        Level1 = 1,
        Level2 = 2,
        Level3 = 3,
        Level4 = 4,
        Level5 = 5,
        Level6 = 6,
        Level7 = 7,
        Level8 = 8,
        Level9 = 9,
        Highest = Level9,
        LEVELS_COUNT
    }
}
The DefaultConfiguration class defines the thresholds for each value.
e.g. a server has the "lowest" FeedbackLevel up to 10% CPU usage, it reaches the "highest" FeedbackLevel at 90% CPU and so on.
C#
// src-server\Photon.Common\LoadBalancer\LoadShedding\Configuration\DefaultConfiguration.cs:
internal class DefaultConfiguration
{
    internal static List<FeedbackController> GetDefaultControllers()
    {
        var cpuController = new FeedbackController(
        FeedbackName.CpuUsage,
        new SortedDictionary<FeedbackLevel, FeedbackLevelData>
                {
                    { FeedbackLevel.Level0, new FeedbackLevelData(10, 0) },
                    { FeedbackLevel.Level1, new FeedbackLevelData(20, 9 ) },
                    { FeedbackLevel.Level2, new FeedbackLevelData(30, 19) },
                    { FeedbackLevel.Level3, new FeedbackLevelData(40, 29) },
                    { FeedbackLevel.Level4, new FeedbackLevelData(50, 38) },
                    { FeedbackLevel.Level5, new FeedbackLevelData(60, 48) },
                    { FeedbackLevel.Level6, new FeedbackLevelData(70, 57) },
                    { FeedbackLevel.Level7, new FeedbackLevelData(80, 67) },
                    { FeedbackLevel.Level8, new FeedbackLevelData(90, 77) },
                    { FeedbackLevel.Level9, new FeedbackLevelData(int.MaxValue, 77) }
                },
        0,
        FeedbackLevel.Lowest);

    // [...]
}
These values can also be configured in a "workload.1Gps.config" file.
See "workload.1Gps.config Example".
The Photon.Common.LoadBalancer.LoadShedding.Configuration namespaces takes care of reading values from a config file, or applies the DefaultConfiguration if no config exists.
At regular intervals, the Game Server checks some Windows Performance Counters, sets the current values for all its FeedbackControllers and calculates a new "overall feedback".
This is done in the WorkloadController class:
C#
// src-server\Photon.Common\LoadBalancer\LoadShedding\WorkloadController.cs
private void Update()
{
    if (!this.IsInitialized)
    {
        return;
    }

    FeedbackLevel oldValue = this.feedbackControlSystem.Output;

    if (this.cpuCounter.IsValid)
    {
        var cpuUsage = (int)this.cpuCounter.GetNextAverage();
        Counter.CpuAvg.RawValue = cpuUsage;

        WorkloadPerformanceCounters.WorkloadCPU.RawValue = cpuUsage;
        FeedbackLevel level;
        this.feedbackControlSystem.SetCpuUsage(cpuUsage, out level);
        WorkloadPerformanceCounters.WorkloadLevelCPU.RawValue = (byte)level;
    }

    if (this.bytesInOutCounters.IsValid)
    {
        int bytes = (int)this.bytesInOutCounters.GetNextAverage();
        Counter.BytesInAndOutAvg.RawValue = bytes;

        WorkloadPerformanceCounters.WorkloadBandwidth.RawValue = bytes;
        FeedbackLevel level;
        this.feedbackControlSystem.SetBandwidthUsage(bytes, out level);
        WorkloadPerformanceCounters.WorkloadLevelBandwidth.RawValue = (byte)level;
    }

    this.FeedbackLevel = this.feedbackControlSystem.Output;
    Counter.LoadLevel.RawValue = (byte)this.FeedbackLevel;

    if (oldValue != this.FeedbackLevel)
    {
        if (log.IsInfoEnabled)
        {
            log.InfoFormat("FeedbackLevel changed: old={0}, new={1}", oldValue, this.FeedbackLevel);
        }

        this.RaiseFeedbacklevelChanged();
    }

    this.UpdateWindowsSpecificCounters();
}
If the overall feedback level changes, the RaiseFeedbacklevelChanged will report the new server state to the Master and the this will trigger UpdateServerState in OutgoingMasterServerPeer class.
C#
// src-server\LoadBalancing\LoadBalancing\GameServer\OutgoingMasterServerPeer.cs
private void UpdateServerState()
{
    if (this.Connected == false)
    {
        return;
    }

    this.UpdateServerState(
        this.application.WorkloadController.FeedbackLevel,
        this.application.PeerCount,
        this.application.WorkloadController.ServerState);
}
workload.config Example
XML
<?xml version="1.0" encoding="utf-8" ?>
<FeedbackControlSystem>
  <FeedbackControllers>
    <!-- CPU -->
    <add Name="CpuUsage" InitialInput="0" InitialLevel="Lowest">
      <FeedbackLevels>
        <add Level="Level0" Value="10"  ValueDown="0"/>
        <add Level="Level1" Value="20"  ValueDown="9"/>
        <add Level="Level2" Value="30"  ValueDown="19"/>
        <add Level="Level3" Value="40"  ValueDown="29"/>
        <add Level="Level4" Value="50"  ValueDown="39"/>
        <add Level="Level5" Value="60"  ValueDown="49"/>
        <add Level="Level6" Value="70"  ValueDown="58"/>
        <add Level="Level7" Value="80"  ValueDown="67"/>
        <add Level="Level8" Value="90"  ValueDown="77"/>
        <add Level="Level9" Value="110" ValueDown="77"/>
     </FeedbackLevels>
    </add>

    <!-- Bandwidth -->
    <!-- 10 / 30 / 40 / 80 / 100 MB -->
    <add Name="Bandwidth" InitialInput="0" InitialLevel="Lowest">
        <FeedbackLevels>
            <add Level="Level0" Value="10485760"  ValueDown="0" />
            <add Level="Level1" Value="20971520"  ValueDown="10480000" />
            <add Level="Level2" Value="31457280"  ValueDown="20968000" />
            <add Level="Level3" Value="41943040"  ValueDown="31450000" />
            <add Level="Level4" Value="52428800"  ValueDown="41940000" />
            <add Level="Level5" Value="62914560"  ValueDown="52420000" />
            <add Level="Level6" Value="73400320"  ValueDown="62910000" />
            <add Level="Level7" Value="83886080"  ValueDown="73390000" />
            <add Level="Level8" Value="94371840"  ValueDown="83880000" />
            <add Level="Level9" Value="115343360" ValueDown="83880000" /><!-- Level1*11 -->
        </FeedbackLevels>
    </add>
  </FeedbackControllers>
Only "Highest" has consequences, where if its value is exceeded then no more games are created on this Game Server.
If you want to use higher limits you should test if the application can handle the number of messages.
LoadBalancing Algorithm
See the LoadBalancing.LoadBalancer class in the "\src-server\Loadbalancing\Loadbalancing.sln" solution for implementation details.
The Master Server stores the LoadLevel for each Game Server in the LoadBalancer class.
It also holds an additional list of all the servers that currently have the lowest load level.
Whenever a client calls the CreateGame operation, the Master Server fetches the address of a server with the lowest load level from the LoadBalancer and returns it to the client, which then connects to that server.
Configuration and Deployment
For demonstration purposes, the SDK contains a setup of 1 Master and 1 Game Server in its deploy directory:
- "deploy\LoadBalancing\Master"
- "deploy\LoadBalancing\GameServer"
This setup is only intended for local development.
Deploying a Game Server
When you deploy your LoadBalancing project to a production server, you should not host 2 Game Server applications on one server.
You need to make sure that the Game Servers can register at the Master Server.
Set the MasterIPAddress in the "GameServer.xml.config" to the Master's public IP.
You also need to make sure that the game clients can reach the Game Servers.
On each Game Server, you need to set the Public IP address of that Game Server.
If you leave the value empty, the Public IP Address will be auto detected.
XML
<GameServer>
      <MasterIPAddress>127.0.0.1</MasterIPAddress>
      <PublicIPAddress>127.0.0.1</PublicIPAddress>
        <!-- use this to auto-detect the PublicIPAddress: -->
        <!-- <PublicIPAddress></PublicIPAddress> -->
      <!-- [...] -->
</GameServer>
You can also use the Photon Control to set a Public IP.
Deploying a Master Server
You need to make sure that you only have 1 Master server: either remove all settings for the "Master" application from the PhotonServer.config on your Game Servers or at least make sure that your game servers and clients all use the same IP to connect to the same, single Master server.
Otherwise, no special configuration is required on the master server.
Take a Game Server out of Rotation
As discussed in the "Loadbalancing Implementation" section, the Master server knows the state of the Game Servers, as noted in the "ServerState" enumeration:
- "online" (that's the default)
- "out of rotation" (= open games are still listed in the Lobby and players can join existing games on that server but no new games are created)
- "offline" (existing games on that server can not be joined and no new games are created on that GS)
The GS send their server state to the Master regularly - see the OutgoingMasterServerPeer class:
C#
public void UpdateServerState()
{
  if (this.Connected == false)
  {
    return;
  }

  this.UpdateServerState(
                this.application.WorkloadController.FeedbackLevel,
                this.application.PeerCount,
                this.application.WorkloadController.ServerState);
}
If you want to set a server state programmatically, what you need to do is:
- modify the WorkloadController class so that it determines the current server state
- for example, you can add a "file watcher" and read the server state from a text file (0 / 1 / 2).
You can also build an operation that is called from a client, read it from a database or whatever comes to your mind.
Ports Configuration
To change the applications' ports, edit the "Port" attribute value in the configured listeners nodes in "PhotonServer.config".
Change your client to connect to the new master server port.
Restart Photon Server.
Changing Master Server Ports
If you happen to change the port for the "Master" application, you need to update the configuration for the NameServer application.
The idea is to change the setting(s) that match(es) the protocol(s) of the listener(s) where the port is changed.
Use the following list to get the mapping between the listener name and the setting name:
- Listener name in "deploy\bin_Win64\PhotonServer.config" -> Setting name in "deploy\NameServer\bin\NameServer.xml.config"
- "UDPListener" -> "MasterServerPortUdp"
- "TCPListener" -> "MasterServerPortTcp"
- "HTTPListener", depending on "PeerType" and "Secure" (also "Url") values:
- "WebSocket" -> "MasterServerPortWebSocket" / "MasterServerPortSecureWebSocket" ("MasterServerWsPath" may be changed also based on listener "Url")
Example:
If you change the Master Server UDP port from default 5055 to 5555 in "deploy\bin_Win64\PhotonServer.config"
XML
<UDPListener
    IPAddress="0.0.0.0"
    Port="5555"
    OverrideApplication="Master">
</UDPListener>
You need to edit the "MasterServerPortUdp" value in "deploy\NameServer\bin\NameServer.xml.config" to match the value set in UDPListener:
XML
<NameServer>
  <MasterServerPortUdp>5555</MasterServerPortUdp>
</NameServer>
The values of the "MasterServerPortXXX" settings configured for the "NameServer" application in "deploy\NameServer\bin\NameServer.xml.config" correspond to the port numbers returned with the "Master" address to the client by the "NameServer" application when authenticating for each protocol.
If the ports are not configured (missing) for a protocol or not configured properly (mismatch) for a protocol, clients could have issues connecting to the master server.
Changing Game Server Ports
If you happen to change the port for the "Game" application, you need to update the configuration for that application.
The idea is to change the setting(s) that match(es) the protocol(s) of the listener(s) where the port is changed.
Use the following list to get the mapping between the listener name and the setting name:
- Listener name in "deploy\bin_Win64\PhotonServer.config" -> Setting name in "deploy\LoadBalancing\GameServer\bin\GameServer.xml.config"
- "UDPListener" -> "GamingUdpPort"
- "TCPListener" -> "GamingTcpPort"
- "HTTPListener", depending on "PeerType" and "Secure" (also "Url") values:
- "WebSocket" -> "GamingWebSocketPort" / "GamingSecureWebSocketPort" ("GamingWsPath" also could be changed based on listener "Url")
Example:
If you change the Game Server UDP port from default 5056 to 6666 in "deploy\bin_Win64\PhotonServer.config"
XML
<UDPListener
    IPAddress="0.0.0.0"
    Port="6666"
    OverrideApplication="Game">
</UDPListener>
You need to edit the "GamingUdpPort" value in "deploy\LoadBalancing\GameServer\bin\GameServer.xml.config" to match the value set in UDPListener:
XML
<GameServer>
  <Master>
    <GamingUdpPort>6666</GamingUdpPort>
  </Master>
</GameServer>
The values of the "GamingXXXPort" settings configured for the "Game" application in "deploy\LoadBalancing\GameServer\bin\GameServer.xml.config" correspond to the port numbers returned with the "Game" address to the client by the "Master" application in matchmaking for each protocol.
If the ports are not configured (missing) for a protocol or not configured properly (mismatch) for a protocol, clients could have issues joining or creating rooms using that protocol.
In fact, they will not be able to connect to the "Game" server application.
Adding Ports
You can configure multiple ports per application.
This could be useful if some clients have trouble reaching an application using a certain protocol and you cannot change that protocol for all clients.
The client needs to explicitly switch to those ports when needed especially when connecting to the "Game" server application.
Example:
By default, we provide alternative UDP ports per application.
Clients can use port 5055 to connect to Master and alternatively 27001.
Clients can use port 5056 to connect to Game and alternatively 27002.
Clients can use port 5058 to connect to NameServer and alternatively 27000.
XML
    <UDPListeners>
      <UDPListener
        IPAddress="0.0.0.0"
        Port="5055"
        OverrideApplication="Master">
      </UDPListener>
      <UDPListener
        IPAddress="0.0.0.0"
        Port="27001"
        OverrideApplication="Master">
      </UDPListener>
      <UDPListener
        IPAddress="0.0.0.0"
        Port="5056"
        OverrideApplication="Game">
      </UDPListener>
      <UDPListener
        IPAddress="0.0.0.0"
        Port="27002"
        OverrideApplication="Game">
      </UDPListener>
      <UDPListener
        IPAddress="0.0.0.0"
        Port="5058"
        OverrideApplication="NameServer">
      </UDPListener>
      <UDPListener
        IPAddress="0.0.0.0"
        Port="27000"
        OverrideApplication="NameServer">
      </UDPListener>
    </UDPListeners>