5 - Building the Player
This section will guide you to create the player Prefab that will be used in this tutorial from scratch, so we'll cover every step of the creation process.
It's always a good approach to try and create a player Prefab that can work without PUN being connected, so that it's easy to quickly test, debug and make sure everything at least works without any network features.
Then, you can build up and modify slowly and surely each feature into a network compliant character.
Typically, user input should only be activated on the instance owned by the player, not on other players' computers.
We'll cover this in detail below.
The Prefab Basics
The first and important rule to know about PUN is, that a Prefab, that should get instantiated over the network, has to be inside a Resources folder.
The second important side effect of having Prefabs inside Resources folders is that you need to watch for their names.
You should not have two Prefab under your Assets' Resources paths named the same, as Unity will pick the first one it finds. So always make sure that within your Project Assets, there is no two Prefabs within a Resources folder path with the same name. We'll get to that soon.
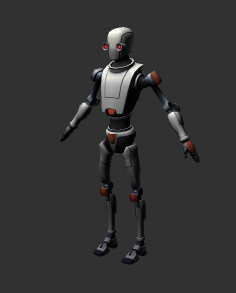
We are going to use the Kyle Robot that Unity provides as a free asset.
It comes as an Fbx file, which is created with a 3d software like 3ds Max, Maya, cinema 4D and the likes.
Covering the creation of the mesh and the animation with those software, is out of scope for this tutorial.
This Robot Kyle.fbx is located in "\Assets\Photon\PhotonUnityNetworking\Demos\Shared Assets\Models".
Here is one way to start using the Kyle Robot.fbx for your player:
- In your "Project Browser", create a folder named exactly "Resources" somewhere, typically it's suggested that you organized your content, so could have something like "PunBasics_tutorial\Resources"
- Create a new empty scene, and save it as
Kyle Testin "PunBasics_tutorial\Scenes".
The purpose of the "Kyle Test" scene is solely to create the prefab and set it up.
You can get rid of the scene once this is done. - Drag and drop
Robot Kyleonto the "Scene Hierarchy". - Rename the GameObject you've just created in the hierarchy to
My Robot Kyle - Drag and drop
My Robot Kyleinto "PunBasics_tutorial\Resources"
We have now created a Prefab that is based of Kyle Robot Fbx asset, and we have an instance of it in the hierarchy of your scene Kyle Test.
Now we can start working with it.
CharacterController
- Let's add a CharacterController Component to
My Kyle Robotinstance in the hierarchy.
You could do this directly on the Prefab itself but we need to tweak it, so this is quicker this way.
This Component is a very convenient Standard Asset provided by Unity for us to produce faster typical characters using Animator, so let's make use of these great Unity features.
- Hit "Apply" to affect the change we made.
It's a very important step, because we've edited an instance of our prefabMy Kyle Robot, but we want these changes to be for every instance, not just this one, so we hit "Apply".

Animator Setup
Assigning an Animator Controller
The Kyle Robot Fbx asset needs to be controlled by an Animator Graph.
We won't cover the creation of this graph in this tutorial, and so we provide a controller for this, located in your project assets under \Assets\Photon\PhotonUnityNetworking/Demos/PunBasics-Tutorial/Animator/ called Kyle Robot

To Assign this Kyle Robot Controller to our Prefab, simply set the property Controller of the Animator component to point to Kyle Robot
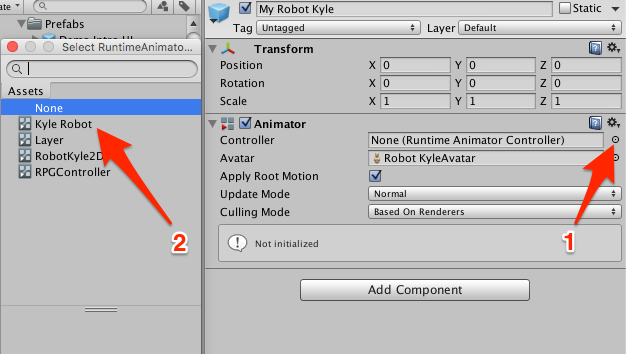
Don't forget that if you do that on the instance of My Kyle Robot, you need to hit "Apply" for the Prefab itself to incorporate these changes.
Working with the Controller Parameters
The critical features to understand the Animator Controller are the Animation Parameters.
We are using these, to control our animations via scripts.
In our case, we have parameters like Speed, Direction, Jump, Hi.
One of the great features of the Animator Component is the ability to actually move the character around based on its animation. This feature is called Root Motion and there is a property Apply Root Motion on the Animator Component that is true by default, so we are good to go.
So, in effect, to have the character walking, we just need to set the Speed Animation Parameter to a positive value and it will start walking and moving forward. Let's do this!
Animator Manager Script
Let's create a new script where we are going to control the Character based on the user's input.
Create a new c# script called
PlayerAnimatorManager.Attach this script to the Prefab
My Robot Kyle.Surround the Class with your NameSpace
Com.MyCompany.MyGamelike below.Surround the Start() and Update() with a region
MonoBehaviour CallBacksjust for clarity.C#
using UnityEngine;
using System.Collections;

namespace Com.MyCompany.MyGame
{
    public class PlayerAnimatorManager : MonoBehaviour
    {
        #region MonoBehaviour Callbacks

        // Use this for initialization
        void Start()
        {
        }

        // Update is called once per frame
        void Update()
        {
        }

        #endregion
    }
}
Save the Script
PlayerAnimatorManager
Animator Manager: Speed Control
The first thing we need to code is getting the Animator Component so we can control it.
Make sure you are editing the script
PlayerAnimatorManagerCreate a private Variable
animatorof typeAnimatorStore the Animator Component in this variable within the Start() method.
C#
    private Animator animator;
    // Use this for initialization
    void Start()
    {
        animator = GetComponent<Animator>();
        if (!animator)
        {
            Debug.LogError("PlayerAnimatorManager is Missing Animator Component", this);
        }
    }
Notice that since we require an Animator Component, if we don't get one, we log an error so that it doesn't go unnoticed and gets addressed straight away by the developer.
You should always write code as if it's going to be used by someone else :) It's tedious but worth it in the long run.Let's now listen to the User Inputs and control the
SpeedAnimation Parameter. Then save the scriptPlayerAnimatorManager.C#
// Update is called once per frame
void Update()
{
    if (!animator)
    {
        return;
    }
    float h = Input.GetAxis("Horizontal");
    float v = Input.GetAxis("Vertical");
    if (v < 0)
    {
        v = 0;
    }
    animator.SetFloat("Speed", h * h + v * v);
}
Save the Script
PlayerAnimatorManager
Let's study what this script is doing:
Since our game does not allow going backward, we make sure that v is less than 0. If the user is pressing the 'down arrow' or 's' key (default setting for the Verticalaxis), we do not allow this and force the value to 0.
You'll also notice that we've squared both inputs. Why? So that it's always a positive absolute value as well as adding some easing. Nice subtle trick right here. You could use Mathf.Abs() too, that would work fine.
We also add both inputs to control Speed, so that when just pressing left or right input, we still gain some speed as we turn.
All of this is very specific to our character design of course, depending on your game logic, you may want the character to turn in place, or have the ability to go backward. The control of Animation Parameters is always very specific to the game.
Test, test, 1 2 3...
Let's validate what we've done so far.
Make sure you have the Kyle Test scene opened. Currently, in this scene, we only have a camera and the Kyle Robot instance, the scene is missing ground for the Robot to stand on, if you'd ran now the scene the Kyle robot would fall.
Also, we won't care in the scene for lighting or any fanciness, we want to test and verify our character and scripts are working properly.
- Add a "Cube" to the scene.
Because a cube has by default a "Box Collider", we are good to use it as is for the floor. - Position it at
0,-0.5,0because the height of the cube is 1. we want the top face of the cube to be the floor. - Scale the cube to
30,1,30so that we have room to experiment - Select the Camera and move it away to get a good overview.
One nice trick is to get the view you like in the "Scene View", Select the camera and Go to the menu "GameObject/Align With View", the camera will match the scene view. - Final step, move
My Robot Kyle0.1 up in y, else collision is missed on start and the character goes through the floor, so always leave some physical space between colliders for the simulation to create the contacts. - Play the scene, and press the 'up arrow' or 'a' key, the character is walking!
You can test with all the keys to verify.
This is good, but still plenty of work ahead of us, camera needs to follow, and we can't turn yet...
If you want to work on the Camera right now, go to the dedicated section, the rest of this page will finish the Animator controls and implement the rotation.
Animator Manager Script: Direction Control
Controlling the rotation is going to be slightly more complex; we don't want our character to rotate abruptly as we press the left and right keys. We want gentle and smoothed out rotation. Luckily, an Animation Parameter can be set using some damping
Make sure you are editing the Script
PlayerAnimatorManagerCreate a public float variable
directionDampTimewithin a new region "Private Fields" region.C#
#region Private Fields

[SerializeField]
private float directionDampTime = 0.25f;

#endregion
At the end of Update() function, add:
C#
animator.SetFloat("Direction", h, directionDampTime, Time.deltaTime);So we notice straight away that animator.SetFloat() has different signatures.
The one we use for controlling theSpeedis straightforward, but this one takes two more parameters, one is the damping time, and one the deltaTime.
Damping time makes sense: it's how long it will take to reach the desired value, but deltaTime?.
It essentially lets you write code that is frame rate independent since Update() is dependant on the frame rate, we need to counter this by using the deltaTime.
Read as much as you can on the topic and what you'll find when searching the web for this.
After you understood the concept, you'll be able to make the most out of many Unity features when it comes to animation and consistent control of values over time.Save the Script
PlayerAnimatorManagerPlay your Scene, and use all arrows to see how well your character is walking and turning around
Test the effect of
directionDampTime: put it 1 for example, then 5 and see long it takes to reach maximum turning capability.
You'll see that the turning radius increases with thedirectionDampTime.
Animator Manager Script: Jumping
With jumping, we'll need a bit more work, because of two factors. One, we don't want the player to jump if not running, and two, we don't want the jump to be looping.
Make sure you are editing the Script
PlayerAnimatorManagerInsert this before we catch the user inputs in the Update() method.
C#
// deal with Jumping
AnimatorStateInfo stateInfo = animator.GetCurrentAnimatorStateInfo(0);
// only allow jumping if we are running.
if (stateInfo.IsName("Base Layer.Run"))
{
    // When using trigger parameter
    if (Input.GetButtonDown("Fire2"))
    {
        animator.SetTrigger("Jump");
    }
}
Save the Script
PlayerAnimatorManagerTest. Start running and press the 'alt' key or the right mosue button and Kyle should jump.
OK, so the first thing is to understand how we know that the animator is running or not. We do this using stateInfo.IsName("Base Layer.Run").
We simply ask if the current active state of the Animator is Run. We must append Base Layer because the Run state is in the Base Layer.
If we are in the Run state, then we listen to the Fire2 Input and raise the Jump trigger if necessary.
So, this is the full PlayerAnimatorManager Script so far:
C#
using UnityEngine;
using System.Collections;

namespace Com.MyCompany.MyGame
{
    public class PlayerAnimatorManager : MonoBehaviour
    {
        #region Private Fields

        [SerializeField]
        private float directionDampTime = .25f;
        private Animator animator;

        #endregion

        #region MonoBehaviour CallBacks

        // Use this for initialization
        void Start()
        {
            animator = GetComponent<Animator>();
            if (!animator)
            {
                Debug.LogError("PlayerAnimatorManager is Missing Animator Component", this);
            }

        }

        // Update is called once per frame
        void Update()
        {
            if (!animator)
            {
                return;
            }
            // deal with Jumping
            AnimatorStateInfo stateInfo = animator.GetCurrentAnimatorStateInfo(0);
            // only allow jumping if we are running.
            if (stateInfo.IsName("Base Layer.Run"))
            {
                // When using trigger parameter
                if (Input.GetButtonDown("Fire2"))
                {
                    animator.SetTrigger("Jump");
                }
            }
            float h = Input.GetAxis("Horizontal");
            float v = Input.GetAxis("Vertical");
            if (v < 0)
            {
                v = 0;
            }
            animator.SetFloat("Speed", h * h + v * v);
            animator.SetFloat("Direction", h, directionDampTime, Time.deltaTime);
        }

        #endregion
    }
}
Not too bad for few lines of code when you consider what it achieves in the scene.
Now let's deal with the camera work since we are able to evolve around our world we need a proper camera behaviour to follow along.
Camera Setup
In this section, we are going to use the CameraWork script.
If you want to write CameraWork from scratch, please go to the next part and come back here when done.
- Add the component
CameraWorktoMy Kyle Robotprefab - Turn on the property
Follow on Start, which effectually makes the camera instantly follow the character.
We'll turn it off when we'll start network implementation. - Set the property
Center Offsetto0,4,0which makes the camera look higher, and thus gives a better perspective of the environment than if the camera was looking straight at the player, we would see too much ground for nothing. - Play the scene
Kyle Test, and move the character around to verify the camera is properly following the character.
PhotonView Component
We need to have a PhotonView component attached to our prefab.
A PhotonView is what connects together the various instances on each computers and define what components to observe and how to observe these components.
- Add a PhotonView Component to
My Robot Kyle - Set the
Observe OptiontoUnreliable On Change - Notice PhotonView warns you that you need to observe something for this to have any effects.
You can ignore this for now, as those observed components will be setup later in the tutorial.
Beams Setup
Our Robot Character is still missing his weapon, let's create some laser beams coming out of his eyes.
Adding the Beams models
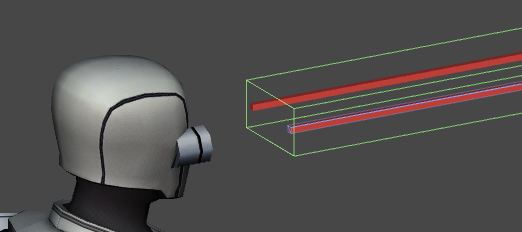
For the sake of simplicity, we are going to use simple cubes and scale them to be very thin and long.
There are some tricks to get this done quickly: don't add a cube directly as child of the head, but instead create it move it and scale it up on its own and then attach it to the head, it will prevent guessing the proper rotation values to have your beam aligned with eyes.
The other important trick is to use only one collider for both beams.
This is for the physics engine to work better, thin colliders are never a good idea, it's not reliable, so we'll make a big box collider so that we are sure to hit targets reliably.
- Open
Kyle testScene - Add a Cube to the Scene, name it
Beam Left - Modify it to look like a long beam, and be positioned properly against the left eye
- Select
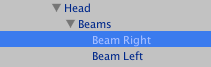
My Kyle Robotinstance in the hierarchy - Locate the Head child
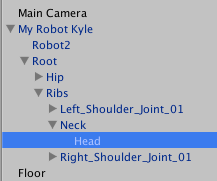
- Add an empty GameObject as a child of the
HeadGameObject, name itBeams - Drag and drop
Beam LeftinsideBeams - Duplicate
Beams Left, name itBeams Right - Position it so that it's aligned with the right eye
- Remove the Box Collider component from
Beams Right - Adjust
Beams Left's "Box Collider" center and size of to encapsulate both beams - Turn
Beams Left's "Box Collider"IsTriggerproperty toTrue, we only want to be informed of beams touching players, not collisions. - Create a new Material, name it
Red Beam - Assign
Red Beammaterial to both beams - Apply changes back to the prefab
Note: The laser beams should be outside of the character's colliders to not hurt yourself.
You should have something like this now:
Controlling the Beams with User Input
Ok, now that we have our beams, let's plug the Fire1 input to trigger them.
Let's create a new C# script, called PlayerManager.
Here's below the full code of the first version to get the beams to work.
C#
using UnityEngine;
using UnityEngine.EventSystems;

using Photon.Pun;

using System.Collections;

namespace Com.MyCompany.MyGame
{
    /// <summary>
    /// Player manager.
    /// Handles fire Input and Beams.
    /// </summary>
    public class PlayerManager : MonoBehaviourPunCallbacks
    {
        #region Private Fields

        [Tooltip("The Beams GameObject to control")]
        [SerializeField]
        private GameObject beams;
        //True, when the user is firing
        bool IsFiring;
        #endregion

        #region MonoBehaviour CallBacks

        /// <summary>
        /// MonoBehaviour method called on GameObject by Unity during early initialization phase.
        /// </summary>
        void Awake()
        {
            if (beams == null)
            {
                Debug.LogError("<Color=Red><a>Missing</a></Color> Beams Reference.", this);
            }
            else
            {
                beams.SetActive(false);
            }
        }

        /// <summary>
        /// MonoBehaviour method called on GameObject by Unity on every frame.
        /// </summary>
        void Update()
        {

            ProcessInputs();

            // trigger Beams active state
            if (beams != null && IsFiring != beams.activeInHierarchy)
            {
                beams.SetActive(IsFiring);
            }
        }

        #endregion

        #region Custom

        /// <summary>
        /// Processes the inputs. Maintain a flag representing when the user is pressing Fire.
        /// </summary>
        void ProcessInputs()
        {
            if (Input.GetButtonDown("Fire1"))
            {
                if (!IsFiring)
                {
                    IsFiring = true;
                }
            }
            if (Input.GetButtonUp("Fire1"))
            {
                if (IsFiring)
                {
                    IsFiring = false;
                }
            }
        }

        #endregion
    }
}
The main point of this script at this stage is to activate or deactivate the beams.
When activated, beams will effectivly trigger when a collision occurs with other models. We'll catch on these trigger to affect the health of each character later.
We've also exposed a public property Beams that will let us reference the exact GameObject inside the hierarchy of My Kyle Robot Prefab.
Let's look at how we need to work in order to connect Beams, because this is tricky within prefabs, since in the Assets browser, prefabs only expose the first childs, not sub childs, and our beams is indeed buried inside the prefab hierarchy, so we need to do that from an instance in a scene, and then Apply it back to the prefab itself.
- Open
Kyle testScene - Select
My Kyle Robotin the scene hierarchy - Add the
PlayerManagerComponent toMy Kyle Robot - Drag and drop
My Kyle Robot/Root/Ribs/Neck/Head/Beamsinto thePlayerManagerBeamsproperty in the inspector - Apply the changes from the instance back to the Prefab
If you hit play, and press the Fire1 Input (that is left mouse or left ctrl key by default), the beams will show up, and hide right away when you release.
Health Setup
Let's implement a very simple health system that will decrease when beams hits the player.
Since it's not a bullet, but a constant stream of energy, we'll need to account for health damage in two ways, when we get hit by a beam, and during the whole time the beam is hitting us.
Open
PlayerManagerScriptAdd a public
Healthproperty within thePublic FieldsregionC#
[Tooltip("The current Health of our player")]
public float Health = 1f;
Add the following two methods to the
MonoBehaviour CallbacksRegion. Then savePlayerManagerScript.C#
/// <summary> /// MonoBehaviour method called when the Collider 'other' enters the trigger. /// Affect Health of the Player if the collider is a beam /// Note: when jumping and firing at the same, you'll find that the player's own beam intersects with itself /// One could move the collider further away to prevent this or check if the beam belongs to the player. /// </summary> void OnTriggerEnter(Collider other) { if (!photonView.IsMine) { return; } // We are only interested in Beamers // we should be using tags but for the sake of distribution, let's simply check by name. if (!other.name.Contains("Beam")) { return; } Health -= 0.1f; } /// <summary> /// MonoBehaviour method called once per frame for every Collider 'other' that is touching the trigger. /// We're going to affect health while the beams are touching the player /// </summary> /// <param name="other">Other.</param> void OnTriggerStay(Collider other) { // we dont' do anything if we are not the local player. if (!photonView.IsMine) { return; } // We are only interested in Beamers // we should be using tags but for the sake of distribution, let's simply check by name. if (!other.name.Contains("Beam")) { return; } // we slowly affect health when beam is constantly hitting us, so player has to move to prevent death. Health -= 0.1f * Time.deltaTime; }PlayerManagerextendsMonoBehaviourPunCallbacks.
MonoBehaviourPunCallbacksextendsMonoBehaviourPun.
MonoBehaviourPunhas aphotonViewproperty with 'lazy initialization'.
That's howphotonViewends up inPlayerManager.Save
PlayerManagerScript
First of all, the two methods are almost identical, the only difference is that we decrement the health using Time.deltaTime during TriggerStay for the speed of decrement not to be dependant on the frame rate.
This is an important concept that usually applies to animation, but here, we need this too, we want the health to decrease in a predictable way across all devices, it would not be fair that on a faster computer, your health decreases faster :)
Time.deltaTime is here to guarantee consistency.
Get back to us if you have questions and learn about Time.deltaTime by searching the Unity Community until you completely assimilated the concept, it's essential.
The second important aspect, that by now should be understood is that we only affect health on the local player, that's why we exit the method early if the PhotonView is not Mine.
And last, we only want to affect health if the Object that hits us is a beam.
For easy debugging we made the Health float a public float so that it's easy to check its value while we are waiting for the UI to be built.
OK, this looks all done right? Well... the health system is not complete without taking into account the game over state of the player, that occurs when health hits 0, let's do that now.
Health Checking For Game Over
To keep things simple, when the player's health reaches 0, we simply leave the room, and if you remember, we've already created a method in the GameManager script to leave the room.
It would be great if we could reuse this method instead of coding twice the same feature. Duplicated code for the same result is something that you should avoid at all costs.
This will also be a good time to introduce a very handy programming concept, "Singleton".
While this topic itself could fill up several tutorials, we'll only do the very minimal implementation of a "Singleton".
Understanding Singletons, their variants within Unity context and how they can help creating powerful features is very important and will save you a lot of trouble.
So, don't hesitate to take the time aside this tutorial to learn more about it.
Open
GameManagerScriptAdd in the Public Fields Region this variable
C#
public static GameManager Instance;Add a Start() method as shown below
C#
void Start()
{
    Instance = this;
}
Save
GameManagerScript
Notice we've decorated the Instance variable with the [static] keyword, meaning that this variable is available without having to hold a pointer to an instance of GameManager,
so you can simply do GameManager.Instance.xxx() from anywhere in your code.
It's very practical indeed!
Let's see how that fits for our game for logic management
- Open
PlayerManagerScript - In the Update() method, inside the if statement where we check for
photonView.IsMine, let's add this and savePlayerManagerScriptC#
if (photonView.IsMine) { ProcessInputs(); if (Health <= 0f) { GameManager.Instance.LeaveRoom(); } } - Save
PlayerManagerScript
- Note: we take into account that health could be negative, since the damages caused by the laser beams varies in strength.
- Note: we reach the
LeaveRoom()public method of the GameManager instance without actually having to get the Component or anything,
we just rely on the fact that we assume a GameManager component is on a GameObject in the current scene.
OK, now we are diving into networking!
Back to top- The Prefab Basics
- CharacterController
- Animator Setup
- Assigning an Animator Controller
- Working with the Controller Parameters
- Animator Manager Script
- Animator Manager: Speed Control
- Test, test, 1 2 3...
- Animator Manager Script: Direction Control
- Animator Manager Script: Jumping
- Camera Setup
- PhotonView Component
- Beams Setup
- Health Setup