Setup And Connect
Photon Unity Networking (PUN) is really easy to setup.
Import PUN into a new project and the PUN Wizard will pop up. Alternatively it's in the menu: "Window", "Photon Unity Networking".
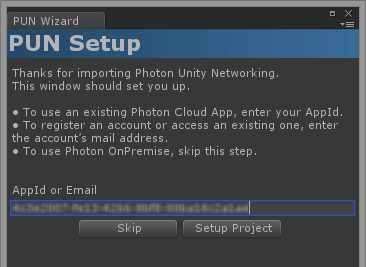
Register for a new (free) Photon Cloud account by entering an email or copy and paste an existing AppId from the Dashboard. Done.
If you want to host a Photon Server yourself, click "skip" and edit the PhotonServerSettings, as described below.
To connect, you only have to call PhotonNetwork.ConnectUsingSettings() in your code.
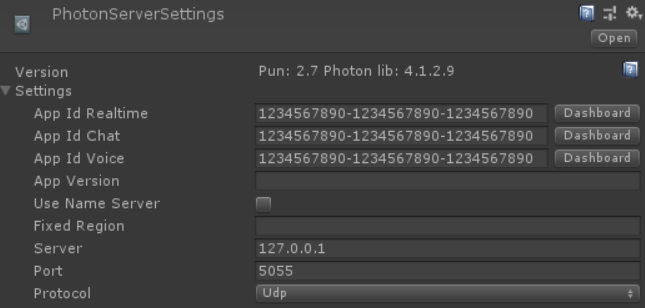
PhotonServerSettings
The Wizard adds a PhotonServerSettings file to your project to store a configuration, which is primarily used by ConnectUsingSettings. You can setup the connection to the Photon Cloud or a self hosted server and change other commonplace settings.
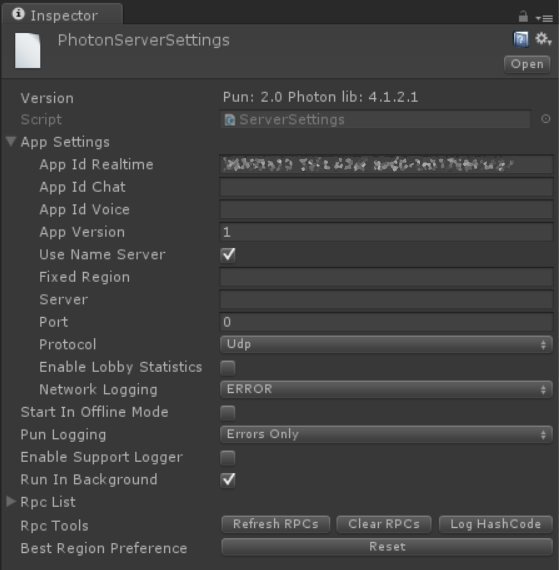
You can set the AppId, Photon Cloud Region, Game Version and more. The default settings will be fine in most of the cases.
Configuration Values
AppId Realtime, Chat and Voice
AppIds are used by the Photon Cloud to identify each title. PUN uses a Realtime App Id for the connections.
It also works well with Photon Chat and Voice, which need their own App Id each, should you use the features.
App Version
In PUN, the App Version is part of the Game Version. Clients with different Game Version values, are separated from one another. PUN adds its PunVersion string to this value, to mitigate potential incompatibilities between different PUN versions.
Use Name Server
When connecting to Photon Server v4 instances, the clients connect directly to a Master Server, instead of a Name Server. Uncheck this only, when you host Photon yourself. See here for more details.
Dev Region
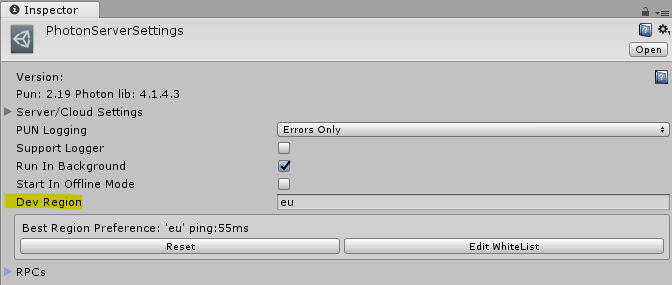
Starting from PUN v2.17, the "Dev Region" is only used in Unity Editor and in "Development" builds, when you use PhotonNetwork.ConnectUsingSettings() to connect.
You can disable the "Dev Region" in Unity Editor and "Development Build" by simply deleting the value.
Read more here.
Fixed Region
When connecting to the cloud, PUN will select the best region by default. In case you want to connect to a specific region, enter a region code here and Best Region Selection will be off.
Server
This option is mostly relevant when hosting your own Photon Server. To do so, get the Photon Server SDK.
Make sure your clients can reach the entered address.
It can be a public, static IP, hostname or any address in the network that your clients use.
If you develop games for iOS you may consider reading about "PUN and IPv6" and "how to setup Photon Server for IPv6".
When things are setup correctly, you can call PhotonNetwork.ConnectUsingSettings() in your code.
Port and Protocol
Photon is built to use several servers during one session. The port entered here is the one of the first server to connect to. This could be a Master Server or Name Server. The port also depends on the selected protocol.
If you connect to the Photon Cloud, leave this value 0. Else, look up the standard ports Photon uses.
The default for the Protocol is (reliable) UDP but Photon supports TCP and WebSockets. A PUN client will use Secure WebSockets automatically in WebGL exports.
We suggest you stick to UDP.
Enable Lobby Statistics
To get Lobby Statistics from the server this should be checked.
See "App And Lobby Stats" page for more information.
Network Logging
This controls the logging of the lower level Photon code. Unless needed, this should stick to the Error setting.
Enable Support Logger
This is a useful setting when you need to track down what happens during connect, matchmaking or in a room. When checked, our script will register for callbacks and log vital info to help debugging your game.
Run in Background
This sets the Unity setting with the same name.
More information here.
RPC List
"Remote Procedure Calls" enable you to call a method on other clients in a room.
PUN keeps a list of those methods in the PhotonServerSettings and uses each name's index as abbreviation when calling RPCs.
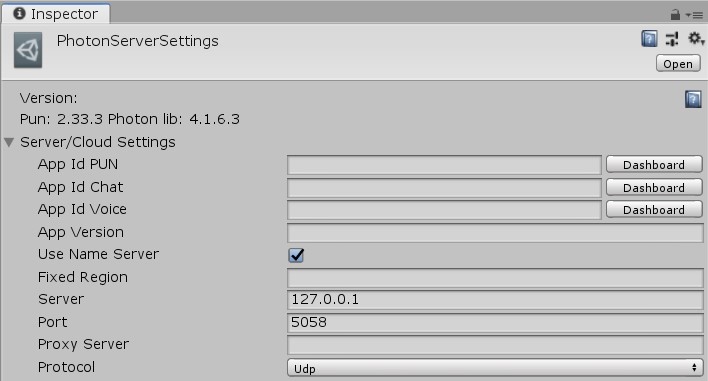
Configuration For Self Hosted Photon Server
We recommend using PhotonNetwork.ConnectUsingSettings method to connect and adjust PhotonServerSettings accordingly before connection, either in the Unity Editor at compile time or via code at runtime (change PhotonNetwork.PhotonServerSettings.AppSettings).
We also recommend using Photon Server v5.
Photon Server v5
Clear or set Fixed Region as configured in your NameServer.json. Set "Server" to the IP or host name of your Photon Server. It must be in a network your client(s) can reach. Using "localhost" or 127.0.0.1 is OK, if the client is a standalone build on the same machine. You can leave the port number set to 0 and the client will choose the default port number per protocol. Otherwise, enter the port: e.g. 5058 for default UDP, 19093 for default WSS, etc. (or the custom port for the NameServer application if you changed that in PhotonServer.config). See the list of default ports per protocol and server here.
When using the Photon Server (OnPremises) you need to know that there are some differences with Photon Cloud.
Those are listed here.
Photon Server v4
Uncheck "Use Name Server" as the Photon Server v4 SDKs don't include this service. Clear Fixed Region. Set "Server" to the IP or host name of your Photon Server. It must be in a network your client(s) can reach. Using "localhost" or 127.0.0.1 is OK, if the client is a standalone build on the same machine. Enter the port: 5055 for default UDP protocol (or the custom port for the MasterServer application if you changed that in PhotonServer.config). See the list of default ports per protocol and server here.
When using the Photon Server (OnPremises), there are some notable adjustments to make:
- If you connect to Photon Server v4, set the serialization protocol to version 1.6 before connecting (as 1.8 is not compatible with that server version):
PhotonNetwork.NetworkingClient.SerializationProtocol = SerializationProtocol.GpBinaryV16;. - Cients need to set a unique UserId, even if you don't authenticate users. For example, generate and save a GUID per device.
- The GameVersion / AppVersion is not used to create separate virtual AppIds.
To get the full list of differences between Photon Server v4 and Photon Cloud plus the known issues in Photon Server v4 visit this page.
Back to top