Photon Control
Photon Control is your one-stop, control UI for Photon.
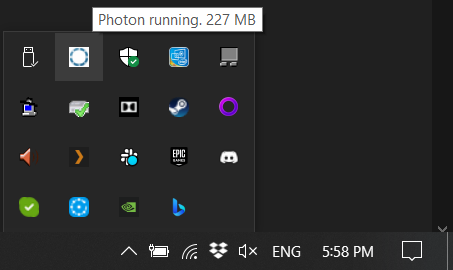
Starting "PhotonControl.exe" doesn't open a window, doesn't start the server but adds an icon to the tray bar.
A gray icon shows that Photon is not running.
When any Photon Server process is running, the icon turns blue.
Overview

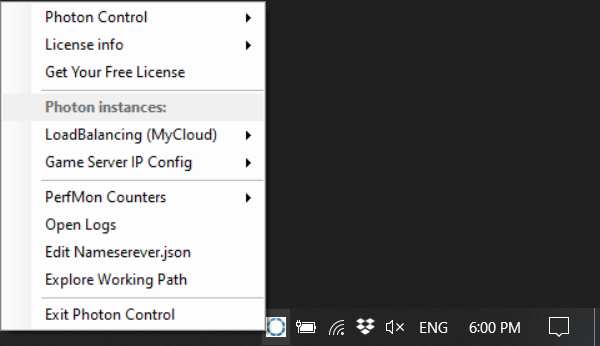
Click the icon to open the menu.
It allows you to:
- Start and stop Photon.
- Install, start and stop Photon services.
- Change the game server config for "LoadBalancing (MyCloud)".
- Setup and open Photon's Performance Monitor (PerfMon) Counters.
- Open the log files.
- Open working path in Explorer.
- Verify you are using the latest version of Photon.
Admin rights are required when you start Photon Control.
This allows us to make an entry in the Windows Firewall and most importantly you can now add or remove services for Photon.
On start, Photon Control reads your license to let you verify how long it is valid and checks if you use the latest version of Photon, shown in the "Photon Control" menu.
The "Autostart Photon Control" option starts Photon Control when you log-in to Windows.
This can be handy when you access a remote machine and can use "Explore Working Path" to spot Photon's files.
If the icon is not visible, click the tiny triangle and drag and drop the Photon Control icon from the popup back to the tray.

Starting PhotonControl
Start PhotonControl.exe and confirm the admin rights for this application.
They are needed for the option to set up Photon as a Service.
Look out for the tray-bar icon (bottom right by default).
Click the white/grey icon to open a menu that controls Photon.
Running Photon

By default, one Photon configurations (also called "Instances") is available.
It's a combination of server applications and ports mapped to each application.
Starting instance "LoadBalancing (MyCloud)" will run a Master Server and a Game Server, which is a minimum Photon Cloud compatible setup.
On a public server, Photon should run as a service.
This requires three steps in Photon Control:
- Install the Photon service
- Install the PerfMon Counters (they might prove useful)
- Start Photon as service
The PerfMon Counters are not exactly a requirement to run but they can't be enabled while Photon is running, so it makes sense to set them up first.
Running Photon as an application is an alternative for local development.
When you log off, Photon will be shut down.
Moving Photon
Before you move Photon from one folder to another, you should make sure to remove all services and also Photon Control autostart.
Install again at the new location.
Changing the "LoadBalancing IP Config" Path
While Photon Control can't be modified extensively, some important settings can be found in "PhotonControl.exe.config".
The "GameServerConfigPaths" setting is the one you might need when your project is based on LoadBalancing but renamed.
The GameServerConfigPaths is a list of ';'-separated paths, relative to the folder of "PhotonControl.exe".
Logs
Photon is logging essential information (state, exceptions, etc.) to several log files.
Click on "Open Logs" to show all logs that Photon used in the past 12 hours.
You can open more files as needed, of course.
There are two "log" folders:
- All application logs are in the deploy/log folder.
Anything that is logged by your business logic goes into a fitting file in deploy/log. - The server core's log folder is where your running executable is (e.g. "deploy\bin_Win64\log").
They contain anything instance and CLR (.NET runtime) related.
We use Log4Net in the logic layer.
It can be configured extensively and proved very useful. Learn more about Log4Net here.
Counters
Photon keeps track of several essential values as support for performance and error analysis.
These are published in two separate sets of Counters: "PerfMon Counters" and "Dashboard Counters".
PerfMon Counters
The PerfMon Counters are key values from the Photon Core.
They track values like connected peers, package count, reliable UDP usage, traffic and much more.
These Counters cannot be changed by the developer and are accessed by PerfMon.
PerfMon is a GUI to create those performance graphs and is already installed with Windows.
If PerfMon Counters should be logged over a longer time (and without running the GUI), Photon Control can set up and start logging to a file.
Under "PerfMon Counters", click "Create Logging Set" and "Start Logging".
The logs should end up under "C:\PerfLogs\Admin\photon_perf_log_<date>.blg"
Troubleshooting
If Photon does not behave as expected, always have a look at the logs.
These are the most common pitfalls you should check as well.
- Missing .NET 4.0: In this case, Photon can't start.
Don't mix this up with the CLR Version. - Application missing: If Photon does not find one of the configured applications, it can't start.
Check the configuration against deployed folders. - Build not up to date: Switching to a new server SDK, you should always re-build your applications, referencing the assemblies from the libs folder.
Otherwise, they might be incompatible. - Firewall: If Photon is running but not accessible from another machine, check the Firewalls.
Newer Windows versions have roles and rights and your hoster most likely used hardware firewalls. - Lag: By default, the roundtrip time is about 50ms, even locally.
This depends on a setting, explained on the setup page. Read: Send Delay and Ack Delay
License Info
Photon Server requires a license to work.
PhotonControl will read some values from your ".license" file on start.
Select the "License Info" item in the menu to check the CCU, expiry date and more from the menu.
If you replace the ".license" file, you should restart PhotonControl and Photon Server to get the new values.
The server log will also contain essential values of your license.
See Licenses page for more information and follow this guide for adding a new one.
Back to top