Custom Authentication
Custom Authentication for Photon is used if none of the existing Authentication Providers fits your needs and you want to integrate another service to identify users - including your very own user backend.
In short, a Custom Authentication Provider is a web service, built and managed by you. The Photon server gets set up to pass authentication values to a configured URL and wait briefly for a response. Depending on the result, the client can connect to Photon or gets rejected. In best case, a userID is defined by the backend and optionally additional info can be passed in a secure way to be used in Server Plugins.
Sample Implementation
We provide sample implementations of authentication providers via a Git repository.
Feel free to fork the repository and send us your pull requests.
You find the sources on GitHub.
Authentication Flow
The following steps describe the general flow of the authentication process.
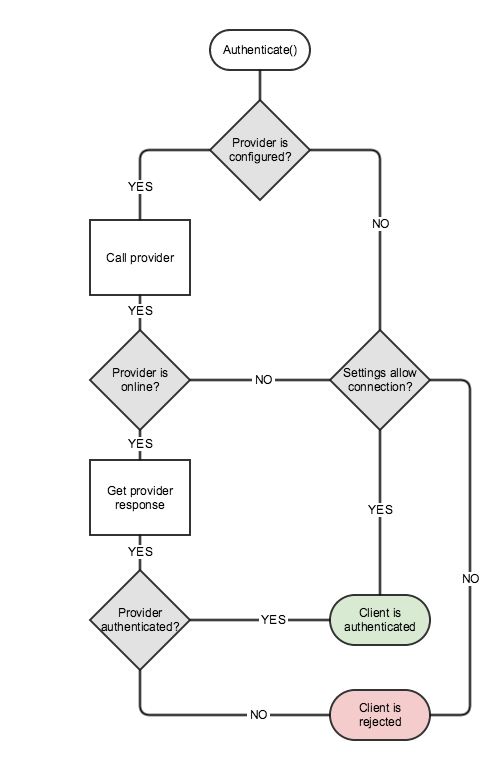
- Your client passes info about which authentication provider to use and the necessary authentication data to the Photon server when the client connects.
- The Photon server gets the desired authentication provider for your application and takes one of these steps
- The authentication provider configuration is found -> the authentication proceeds with step 3.
- The authentication provider configuration is not found -> the client will be either allowed to connect or rejected, depending on a setting of your application
- The Photon server calls the authentication provider with the authentication info passed with
Connect().- The authentication provider is online -> the authentication proceeds with step 4.
- The authentication provider is offline -> the client will be either allowed to connect or rejected, depending on the corresponding provider setting.
- The authentication provider processes the authentication information and returns the result to the Photon Server
- Depending on the authentication result, the client will be either successfully authenticated or rejected
Setup for Photon Server
Custom authentication can be setup in the NameServer application configuration file: "deploy\NameServer\bin\NameServer.xml.config".
The following snippet is an example of configuration of a custom authentication provider:
XML
<CustomAuth Enabled="true" AllowAnonymous="false">
    <AuthProviders>
        <AuthProvider Name="Custom"
            AuthenticationType="0"
            AuthUrl="https://your-custom-auth-provider-url"
            RejectIfUnavailable = "false">
            <CustomAttributes
                Key1="Val1"
                Key2="Val2" />
        </AuthProvider>
    </AuthProviders>
</CustomAuth>
The Photon native settings are:
AllowAnonymous: a flag that indicates whether or not to allow anonymous clients to connect without authentication.Name: name of the configured authentication provider.AuthenticationType: type of the authentication provider.AuthUrl: your authentication provider's endpoint.RejectIfUnavailable: a flag that indicates whether clients should be rejected if your authentication service is not working.
You can also add additional XML attributes for the AuthProvider node under <CustomAttributes>.
Those key/values will be sent as query string parameters.
In the sample given, (Key1="Val1", Key2="Val2") are two examples.
Implementation
If you use facebook authentication with Photon Cloud you can skip this part.
Client Side
On the client side, the API will handle custom authentication - you only set the relevant parameters and the target custom authentication service once.
Once setup, connect and handle eventual errors.
Example:
C#
AuthenticationValues authValues = new AuthenticationValues();
authValues.AuthType = CustomAuthenticationType.Custom;
authValues.AddAuthParameter("user", userId);
authValues.AddAuthParameter("pass", pass);
authValues.UserId = userId; // this is required when you set UserId directly from client and not from web service
loadBalancingClient.AuthValues = authValues;
// connect
C++
ExitGames::Common::JString params = "user=" + userId + "&pass=" + pass;
ExitGames::LoadBalancing::AuthenticationValues authenticationValues;
authenticationValues.setType(ExitGames::LoadBalancing::CustomAuthenticationType::CUSTOM);
authenticationValues.setParameters(params);
authenticationValues.setUserId(userId); // this is required when you set UserId directly from client and not from web service
// pass authenticationValues as parameter on connect
JavaScript
var queryString = "user=" + userId + "&pass=" + pass;
var type = Photon.LoadBalancing.Constants.CustomAuthenticationType.Custom;
loadBalancingClient.setCustomAuthentication(queryString, type);
// connect
To simplify the code sample, we chose very basic password based authentication credentials.
This will result in the following query string: ?user={user}&pass={pass} (from Photon Cloud to an authentication service).
Generally those credentials are a pair of values, the first value is a unique identifier (userId, username, email, etc.) and the other one is "a proof of authenticity" (hashed password, key, secret, token, etc.).
For security reasons it is not recommended to send plain text passwords.
Authenticate Operation
The Authenticate operation is where the authentication values are actually sent to the server.
It's usually used by our APIs and not by your client code directly.
What's important to notice is: Connecting to a server always includes an authentication step.
The first time, the operation sends the actual authentication values as encrypted operation.
For subsequent server switches, Photon provides it's own token, which is encrypted and used automatically.
Server Side
Once the web server receives the authentication request, the query parameters should be checked and validated.
As an example, credentials could be compared to existing ones stored in a database.
If the received parameters are missing or are invalid the returned results should be { "ResultCode": 3, "Message": "Invalid parameters." }
After finishing the validation the outcome should be returned as follow:
- Success:
{ "ResultCode": 1, "UserId": <userId> } - Failure:
{ "ResultCode": 2, "Message": "Authentication failed. Wrong credentials." }
Advanced Features
Other than authenticating users, extra information can be returned from the authentication provider.
In order to do so, the user should establish some kind of protocol between client and the web service who plays the role of the "authenticator".
Sending Data to Server
The easiest and simplest thing to do is an "all or nothing" strategy:
choose whether or not to return a static number of variables to the client.
But some use cases require a more complex approach where the web service returns data "on-demand" based on what the client has requested.
This subsection explains how the client can send data to the web service.
The data can be the credentials necessary for authentication plus any extra parameters.
The extra parameters are what could be used, among other things, to request piece of data available from server side to be returned within the authentication response.
This is pretty useful as it saves extra API calls and simplifies the login workflow.
The default HTTP method used in authentication is GET.
So, parameters can be sent as key/value pairs in the query string.
The final URL will include the "union" of the key/value pairs set from client and those set from the server configuration.
In case, the same key is used in both places, only the value configured on the server will be sent.
A best practice is to configure on the server only "sensitive" static values that should be "invisible" to the client; e.g.: API key, API version.
Also server key/values can be changed on the fly without the need to update client.
In some rare cases, authentication may require a lot of data.
On the other hand, most web servers have a limit for the number of characters used in the query string or a threshold for the length of the URL.
That is why Photon offers the possibility of changing the HTTP method to POST from the client, in C# SDKs, this is done by explicitly setting the AuthenticationValues.AuthPostData field to a value.
The latter can be of type string or byte[] or Dictionary<string, object>.
In case of Dictionary<string, object>, the payload will be converted to a JSON string and the HTTP request's Content-Type will be set to "applicaton/json".
In C# SDKs, the AuthenticationValues class offers setters methods for each supported type.
Since this could be a requirement or a constraint, the POST method option is also available for anyone who opts for receiving authentication requests as POST method from web service.
In other words, to send authentication parameters you are free to use query string or POST data or both.
The following table gives the possible combinations.
| AuthPostData | AuthGetParameters | HTTP method |
|---|---|---|
| null | * | GET |
| empty string | * | GET |
| string (not null, not empty) | * | POST |
| byte[] (not null, can be empty) | * | POST |
| Dictionary<string, object> (not null, can be empty) | * | POST (Content-Type="application/json") |
Returning Data to Client
Since Photon server is a proxy between the client and the web service, you should take note of the variables that could be handled by Photon servers.
Like all HTTP incoming responses received by Photon server, the web server should return a JSON object that includes a ResultCode and an optional Message.
Additionally, here is a list of what Photon servers can expect from the web service during authentication.
UserId:
this could be used as a parameter of the authentication itself or it could be requested from client side.
This is always forwarded to the client when received by Photon servers.
Otherwise, ifAuthenticationValues.UserIdwas not initially set a randomly generated UserId will be sent back to client.
This will override the value ofUserIdin client and cannot be changed after that.
This should be returned only in case ofResultCodevalue 1.
Example:{ "ResultCode": 1, "UserId": "SomeUniqueStringId" }Nickname:
this could be used as a parameter of the authentication itself or it could be requested from client side.
When returned from web service this will override the value ofNicknamein client.
TheNicknamecan still be updated after that from client side.
This should be returned only in case ofResultCodevalue 1.
Example:{ "ResultCode": 1, "UserId": "SomeUniqueStringId", "Nickname": "SomeNiceDisplayName" }AuthCookie:
also called secure data, is a JSON object returned by the web service but will not be accessible from client side as it will be embedded in the encrypted token received.
It could be sent later with Webhook or WebRPC HTTP requests.
This should be returned only in case ofResultCodevalue 1.
Example:{ "ResultCode": 1, "UserId": "SomeUniqueStringId", "AuthCookie": { "SecretKey": "SecretValue", "Check": true, "AnotherKey": 1000 } }Data: JSON object that contains any extra values that should be returned to the client.
Keep in mind that nested arrays or objects are not supported.
This should be returned only in case ofResultCodevalues 0 or 1.
Example:{ "ResultCode": 0, "Data": { "S": "Vpqmazljnbr=", "A": [ 1, -5, 9 ] } }
The ResultCode is the only required return variable, anything else is optional.
The following table summarizes what could be returned by the web server.
| ResultCode | Description | UserId | Nickname | AuthCookie | Data |
|---|---|---|---|---|---|
| 0 | Authentication incomplete, only Data returned.* | ||||
| 1 | Authentication successful. | (optional) | (optional) | (optional) | (optional) |
| 2 | Authentication failed. Wrong credentials. | ||||
| 3 | Invalid parameters. |
*: This may be useful for implementing OAuth 2.0 for instance or two-step verification.
Reading Data from Client
Here is a code snippet of how to get the returned values from the response:
C#
// implement callback from appropriate interface or override from class implementing it
void OnCustomAuthenticationResponse(Dictionary<string, object> data)
{
    // here you can access the returned data
}
C++
// In case of multi-leg authentication simply implement:
Listener::onCustomAuthenticationIntermediateStep();
// in case of ResultCode:0 LoadBalancing::Client will call that function and pass the intermediate data as parameter to it
Data Types Conversion
In this section, only the type of data exchanged between Photon server and the web service is explained.
For more information about data types between clients and Photon servers please refer to serialization in Photon page.
Photon Server -> Web Service
| C# / .NET (Photon supported types) | JavaScript / JSON |
|---|---|
byte
|
number |
short
|
|
int
|
|
long
|
|
| double | |
bool
|
bool |
string
|
string |
byte[] (byte array length < short.MaxValue)
|
string (Base64 encoded) |
T[] (array of supported type T, length < short.MaxValue)
|
array |
Hashtable (of supported types, count < short.MaxValue, preferably Photon implementation)
|
object
|
Dictionary (keys and values of supported types, count < short.MaxValue)
|
object
|
null
|
null
|
Sample request data (types are concatenated)
As sent from Photon Server:
JSON
{
    "(Dictionary<String,Object>)Dictionary":{
        "(Int32)dk_int":"1",
        "(String)dk_str":"dv2",
        "(Boolean)dk_bool":"True"
    },
    "(Hashtable)Hashtable":{
        "(Byte)hk_byte":"255",
        "(Object[])hk_array":[
            "(Int32)0",
            "(String)xy",
            "(Boolean)False"
        ],
        "hk_null":"null"
    },
    "null":"null",
    "(String[])string[]":[
        "PUN",
        "TB",
        "RT",
        "Bolt",
        "Chat"
    ],
    "(Byte[])byte[]":[
        "255",
        "0"
    ],
    "(Int16[])short[]":[
        "-32768",
        "32767"
    ],
    "(Int32[])int[]":[
        "-2147483648",
        "2147483647"
    ],
    "(Int64[])long[]":[
        "-9223372036854775808",
        "9223372036854775807"
    ],
    "(Single[])float[]":[
        "-3.402823E+38",
        "3.402823E+38"
    ],
    "(Double[])double[]":[
        "-1.79769313486232E+308",
        "1.79769313486232E+308"
    ],
    "(Boolean[])bool[]":[
        "True",
        "False"
    ]
}
As read by Web Service:
JSON
{
    "(object)Dictionary":{
        "dk_int":"(number)1",
        "dk_str":"(string)dv2",
        "dk_bool":"(boolean)true"
    },
    "(object)Hashtable":{
        "(number)hk_byte":"255",
        "(array)hk_array":[
            "(number)0",
            "(string)xy",
            "(boolean)false"
        ],
        "hk_null":null
    },
    "null":null,
    "(array)string[]":[
        "(string)PUN",
        "(string)TB",
        "(string)RT",
        "(string)Bolt",
        "(string)Chat"
    ],
    "byte[]":"(string)/wA=",
    "(array)short[]":[
        "(number)-32768",
        "(number)32767"
    ],
    "(array)int[]":[
        "(number)-2147483648",
        "(number)2147483647"
    ],
    "(array)long[]":[
        "(number)-9223372036854776000",
        "(number)9223372036854776000"
    ],
    "(array)float[]":[
        "(number)-3.40282347e+38",
        "(number)3.40282347e+38"
    ],
    "(array)double[]":[
        "(number)-1.7976931348623157e+308",
        "(number)1.7976931348623157e+308"
    ],
    "(array)bool[]":[
        "(boolean)true",
        "(boolean)false"
    ]
}
Web Service -> Photon Server
Here is a table that matches each JavaScript/JSON type to its equivalent one in C#/.Net :
| JavaScript / JSON | C# / .Net |
|---|---|
| object | Dictionary<string, object> |
| array | object[] (array of objects) |
| number (integral) | long |
| number (floating) | double |
| string | string |
| boolean | bool |
null (not a type) |
null |
undefined (when sent) |
null |
Sample response data (types are concatenated)
As sent from Web Service:
JSON
{
    "(object)number": {
        "(number)MAX_VALUE": "1.7976931348623157e+308",
        "(number)MIN_VALUE": "5e-324"
    },
    "(object)object": {
        "(string)string": "xyz",
        "null": null,
        "(boolean)bool": "false",
        "(undefined)undefined": "undefined",
        "(number)float": "-3.14",
        "(number)integer": "123456"
    },
    "(array)array": [
        "(string)xyz",
        "(number)0",
        "(boolean)true",
        null,
        "(undefined)undefined"
    ]
}
As read from Photon Server:
JSON
{
    "(Dictionary<String,Object>)number":{
        "(Double)MAX_VALUE":"1.79769313486232E+308",
        "(Double)MIN_VALUE":"4.94065645841247E-324"
    },
    "(Dictionary<String,Object>)object":{
        "(String)string":"xyz",
        "null":"null",
        "(Boolean)bool":"False",
        "(Double)float":"-3.14",
        "(Int64)integer":"123456"
    },
    "(Object[])array":[
        "(String)xyz",
        "(Int64)0",
        "(Boolean)True",
        "null",
        "null"
    ]
}
Troubleshooting
When Custom Authentication fails, the following callback is triggered:
C#
void OnCustomAuthenticationFailed(string debugMessage)
{
   // The `debugMessage` could be what the authentication provider returned.
}
In case the authentication URL you configured in your dashboard returns some HTTP error, the Photon server pauses the authentication calls for a short time to avoid some overhead.
Take this "backoff" time into consideration when configuring or testing your URLs.
Best Practices
- The returned result from the authentication provider should contain a readable
Messageespecially in case of failure.
This will save you a lot of debugging pain. - From dashboard, set static key/value pairs that should not be set from client side.
This will prevent duplicate keys in the resulting query string. - For security reasons, do not send plain text passwords as authentication parameter.
- It is recommended to set query string parameters from Photon dashboard.
That way you can check the origin of the request. - Make use of the
AuthenticationValuesmethods to set parameters and do not affect a value directly toAuthGetParameters.
This will prevent malformed query string.
Use Case Example: Block Old Client Versions
You can use custom authentication to refuse connections incoming from clients using old versions (or unexpected versions) and return a specific error so you can ask the user to update.
To do this you need to send the version in the custom authentication request. It is up to you to decide if you want to do it as query string parameter or a POST data argument.
In the example below we will use query string parameter:
C#
string version = lbClient.AppVersion;
lbClient.AuthValues = new AuthenticationValues();
lbClient.AuthValues.AuthType = CustomAuthenticationType.Custom;
lbClient.AuthValues.AddAuthParameter("version", version);
If your custom authentication URL is https://example.com then the request will be sent as https://example.com?version={version}.
From your authentication provider implementation you should get and compare the version received.
If the version is allowed return { "ResultCode": 1 }.
If not you should return a ResultCode with a custom value of your choice (different than 1), preferably with a message.
Example: { "ResultCode": 5, "Message": "Version not allowed." }.