Bolt & Voice Integration
One of the key features of a good game is certainly the interaction between players, and this can be done in a variate of ways, either by letting your players send a text to each other, make gestures with the character, but ultimately just having a good conversation while gaming, which makes it much more fun and fluid experience.
For this reason, Photon Voice was created, to create a seamless experience and bringing all the convenience of a realtime discussion.
Photon Bolt is meant to be used as a networking implementation for your game and focus on keeping all your player in sync, but it naturally lacks features like text and voice streaming out of the box, which is intended. In this tutorial, we will show how you can integrate your Photon Bolt game with Photon Voice and get your players talking to each other.
Setup Photon Voice
We recommend starting from a new empty Unity project first, just so you get an idea on how to setup Bolt and Voice.
After you know that all works fine, you can setup it into your already existing game.
Follow the steps below the setup the Photon Voice SDK into the Bolt project:
- Download and import Photon Bolt into your Unity project, if you already not have it imported;
- Download and import Photon Voice into your Unity project from the Asset Store.
- Uncheck the folders
PhotonLibsandPhotonRealtime, as they already exist on the project. - Follow the instructions here to remove PUN. Bolt and PUN are not meant to work together, so we suggest removing it from the project;
- Follow the instructions here to remove Chat, if you want;
- It may be necessary to restart Unity, if there are any errors that can't be cleared.
- Uncheck the folders
- Import the Photon Bolt samples:
- Go to
Assets/Photon/PhotonBolt/packages/and import thebolt_samples.unitypackage; - You can include all available samples or select only the
Voicefolder. If you did not find theVoicesample, you can download it directly from our public repository of samples here.
- Go to
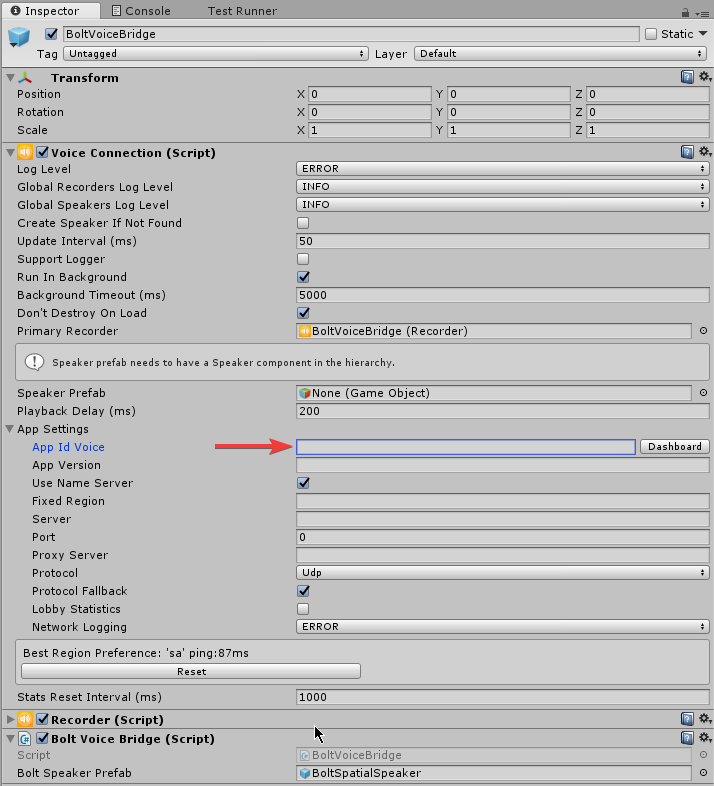
- Configure the Photon Voice Application ID:
- Open the Prefab at
Assets/samples/Voice/prefabs/BoltVoiceBridge, and look at theVoice Connectioncomponent. - At
App Settingssection, you will find theApp Id Voicefield; - Fill it with your Voice App ID.
- Open the Prefab at
- Enable the Voice sample by including the flag
BOLT_VOICE_SAMPLEat yourScripting Define Symbols. Read more about this here. It is disabled by default, as it needs some references from Photon Voice, that may or may not be included in your project.
Great, now you should have all the necessary to use the Bolt sample built for Voice.
Using the Voice Sample
The Sample of Bolt with Voice aims to show the following features:
- Synchronize the position of players in the scene, so you can walk a talk;
- Manage the Audio Sources so your player only listen to another player nearby (spatial audio);
- Manage "Voice Area", in which only players within the same are will hear and talk to each other.
If you don't have it on your SDK, please download it from our public repository here.
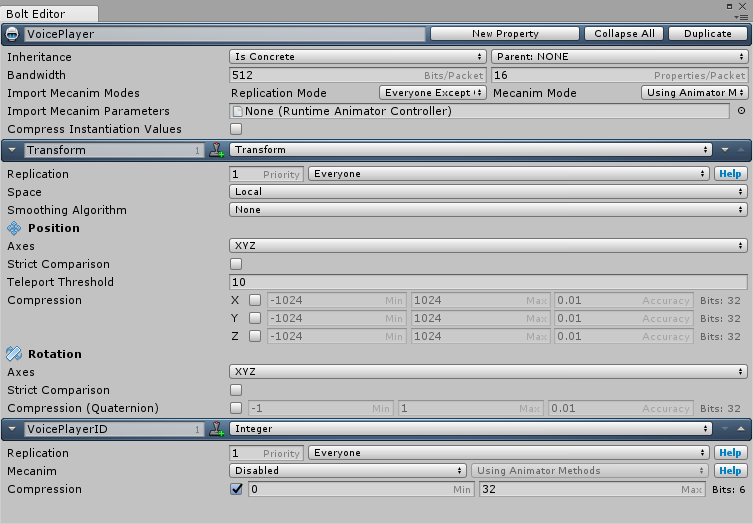
As usual in all Bolt games, you need to create a State that defines the data used by your Players.
In this particular sample, our player will use a simple state as shown below:
Transform: the usualTransformproperty used to synchronize the position of the player;VoicePlayerID: this property identifies the unique ID of the Voice client connected to Voice Room. It's used to map a specific Voice Speaker with the right Player.
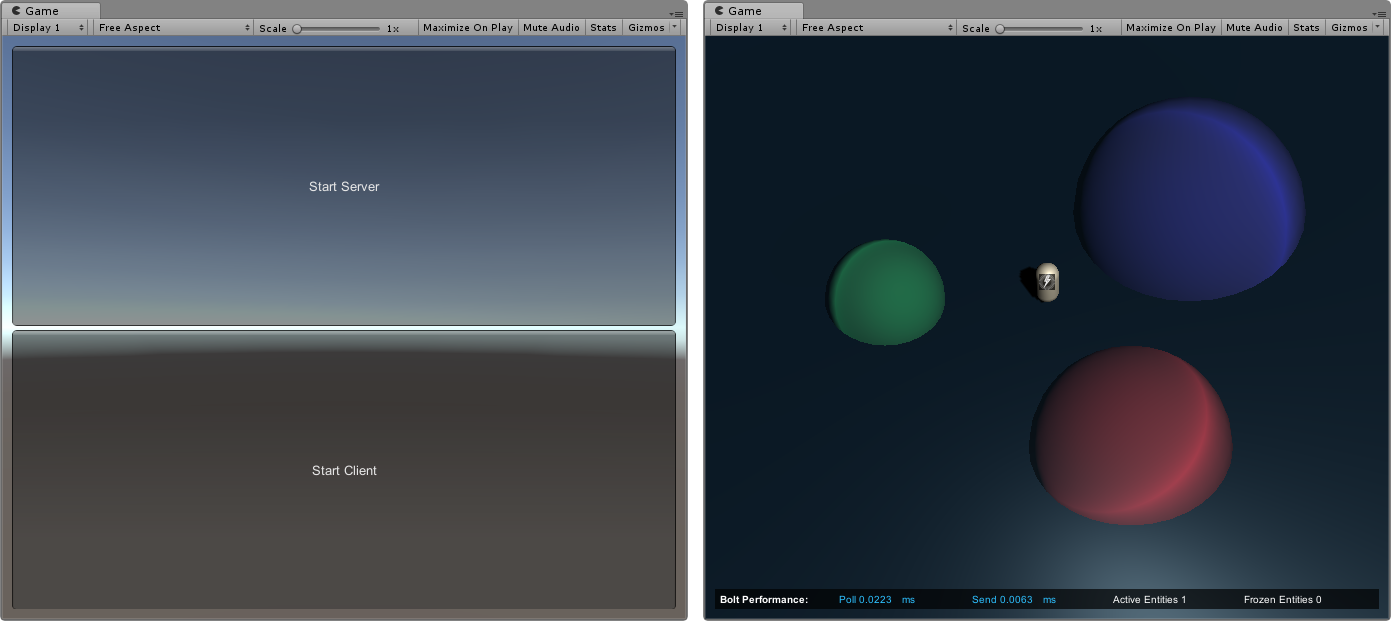
The sample contains only two Scene: (i) Voice_Menu is a simple Menu scene that lets you start as a Server or Client and will automatically load the game scene, and (ii) Voice_Meeting that is the actual "game" scene.
On the Meeting scene, you will find three areas, those are the "Voice Areas" we described before. The main characteristics of those areas are: (i) Tag GameController, (ii) has a Trigger Collider, and (iii) has a Bolt Voice Area component that identifies the group the player will be directed.
Another important piece of the integration is the BoltVoiceBridge class, which is responsible for managing the Photon Voice connection with Cloud services but also to instantiate and store the Voice Speaker references used by the players.
You can take a look at the source code to get more information on how the code works, in summary, this class behaves very similarly to the original ConnectAndJoin class found on the Photon Voice SDK, but hooks at some Bolt events and properties so your player will automatically create/join the Voice room and start sharing audio with other players.
When a player enters the Voice_Meeting scene, it will automatically connect to the Voice Room and receive a specific Voice ID.
This Voice Room is created with a name based on the name of the Bolt Session added of _voice and made invisible, so only the players that are able to construct this name are able to connect to it.
Once a remote player is detected, BoltVoiceBridge will create a new Speaker for this player and save it on the internal registry, look at BoltVoiceBridge.CustomBoltSpeakerFactory.
The registry of Speakers is a mapping between Voice Player IDs and Speakers, which is used to identify that a certain reference belongs to another remote player.
As each player enters the Bolt Game Session and also connects to the Voice Room, they will start to update their own Voice Player IDs on the Bolt Player State.
In the sample, the player is controlled by the class BoltVoicePlayerController, and if you are already familiar with Bolt, you will notice this is a super simple controller implementation.
Each player is the owner of its local entity player, so they are able to modify the state just fine.
In order to parent the right speaker with the right player, we use the VoicePlayerID property we talked about before, that will share the ID of that player on all peers, and based on this information, gather the Speaker reference from the registry created by BoltVoiceBridge.
This can seem in the Player Controller class on the BoltVoicePlayerController.SetupSpeaker method.
The Voice Groups are managed based on the location where the player is, more specifically, where it enters and exits.
We've subscribed to the Trigger callbacks on the Player Controller, so it detects when it goes in one of the "Voice Areas" on the scene, getter the Group ID from the BoltVoiceArea component and send it to the BoltVoiceBridge, so the Interest Group (read more here and here) can be modified.
If you want to modify the Speaker Prefab used by the integration, just change the settings on Assets/samples/Voice/Prefabs/BoltSpatialSpeaker.
By default it is configured to work as a 3D Sound, so only nearby players can hear each other, but this can be easily changed if necessary.
Great, now you should have a better idea of all moving parts of this sample.
Go ahead, include both scenes into your Build Settings, and build the standalone executable of the game.
If you've setup correctly both Bolt and Voice with their respective Application Ids, you should be able to create a Session with the Bolt Server and enter as Client.
Once both join the game, they will also connect as Voice clients and you will be able to hear each other.
Try to enter a "Voice Area", and you notice that only players in the same area will receive audio from others inside that area.
The "outside" area is also treated as a group, so anyone there can hear other players that are not inside any of the "Voice Areas".
