Unity Video Components
Goals
The goal of the Unity Video Components is twofold:
- To serve as a simple educational framework for understanding how to use the Video SDK API, with clearly separated concepts such as transport / send / receive / display video streams.
- To provide a turnkey set of components that can be used to integrate the Video SDK into a wide range of use cases. While it may not cover 100% of the SDK's capabilities out of the box, it should address a large subset of common scenarios and is extensible enough to serve as a solid foundation for more advanced use cases.
Principle
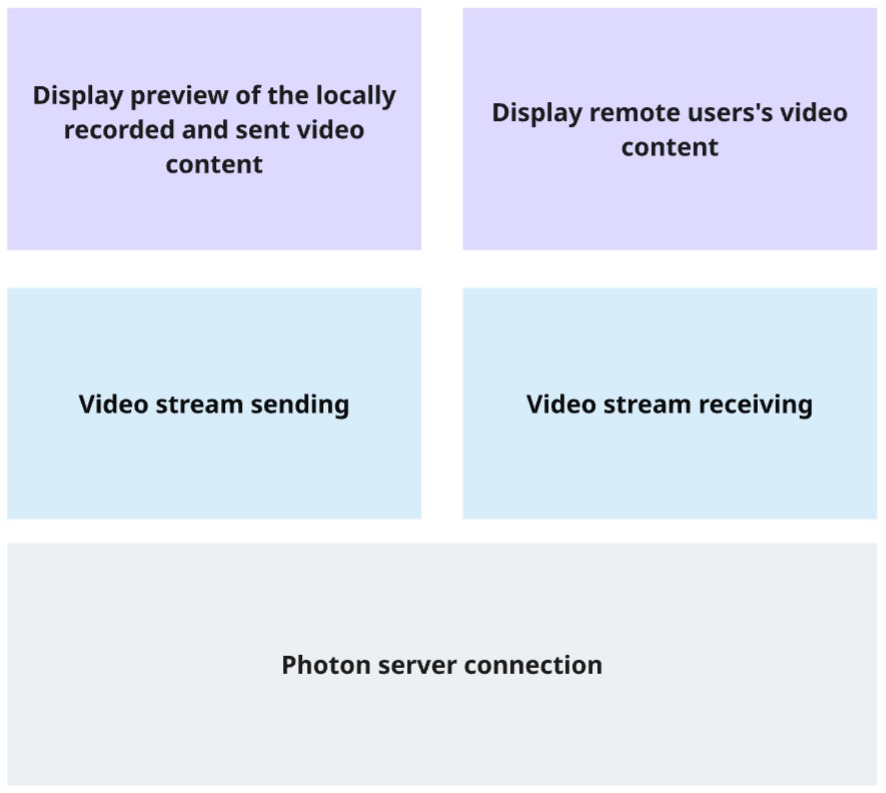
A typical application handling video streaming covers four main areas:
- Establishing a connection to the Photon server
- Sending some video content
- Receiving video content from remote users
- Displaying video streams, which can be either:
- a preview of the locally recorded and sent content,
- or the video content received from remote users
Supported platforms
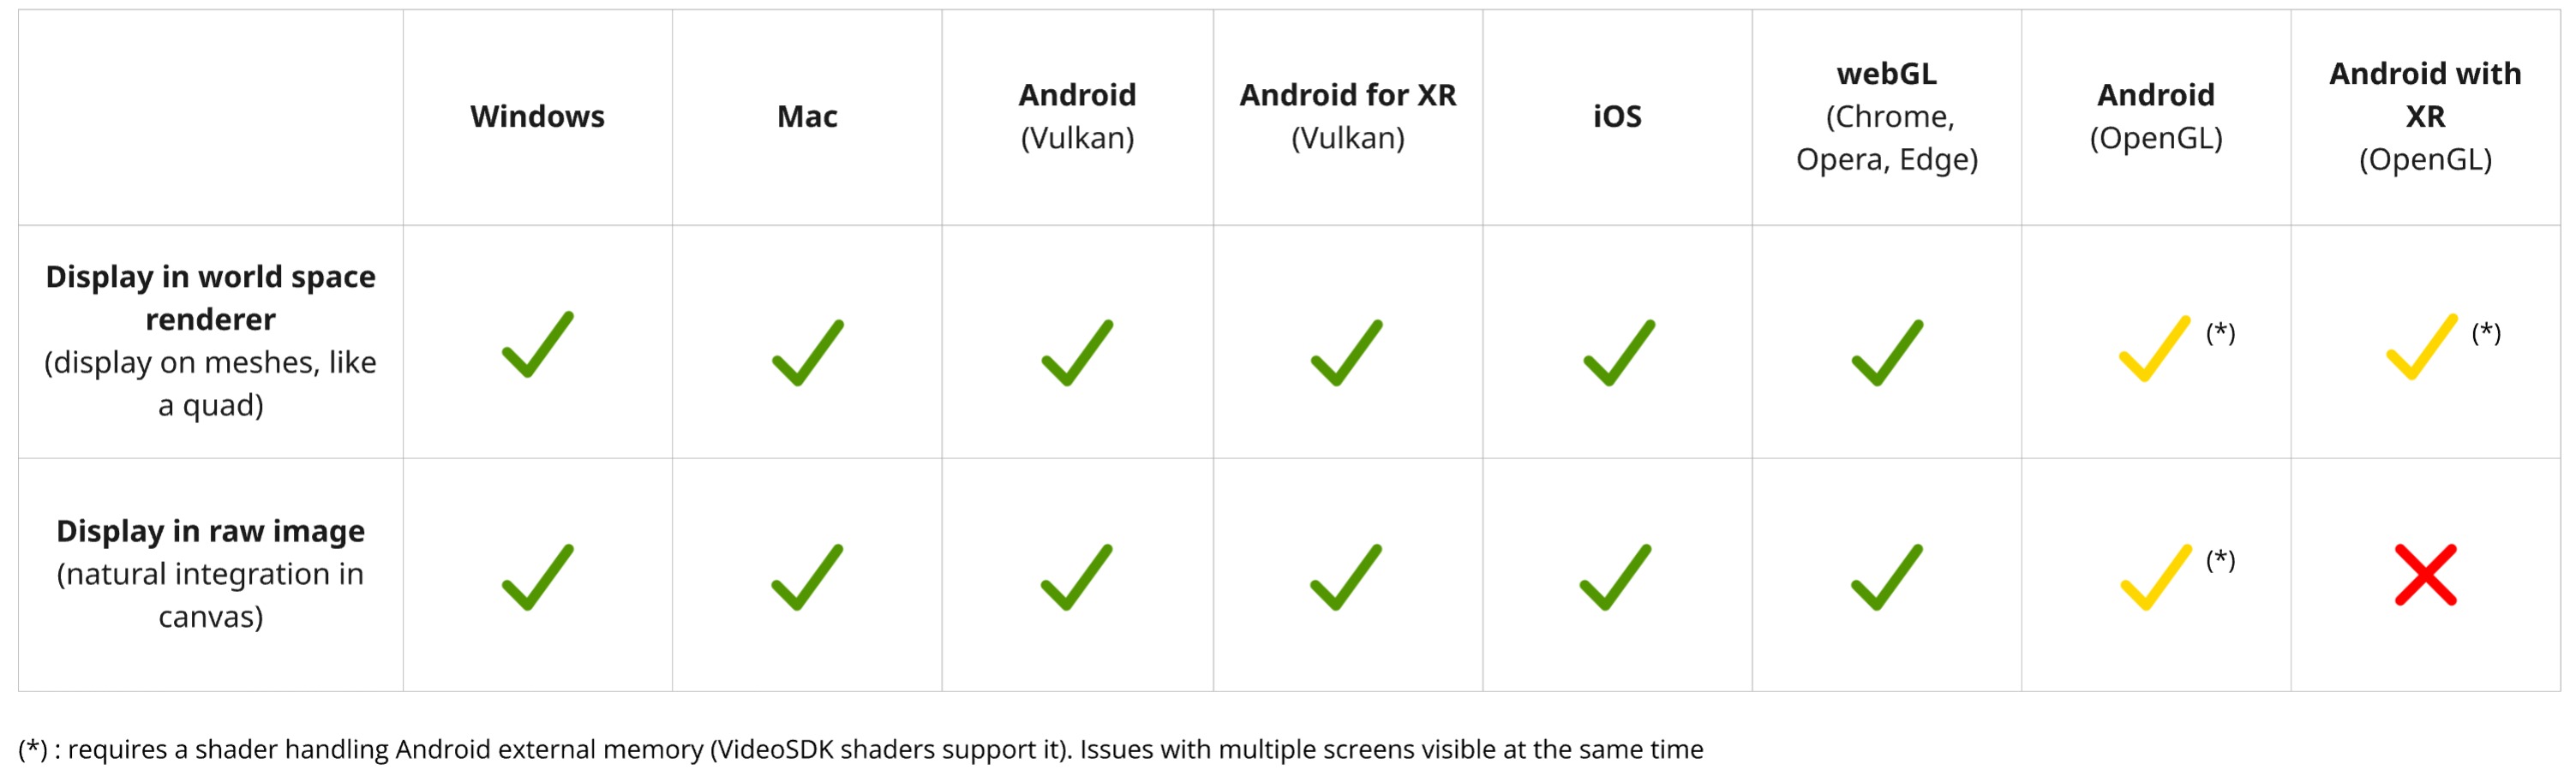
See supported platforms section for details on supported platforms, and see video display chapter for the types of display supported by the Unity components.
Quick start
Please follow the quick start guide to easily test the Video SDK.
Photon connection
The Photon Video SDK relies on Photon Voice to establish and manage connections.
As a result, the video sending and receiving components require a component capable of initializing a StreamTransport (a LoadBalancingTransport in Realtime 4 version, or a Realtime5Transport in Realtime 5 version).
This can be provided by:
- Any
VoiceConnectioncomponent: for example, when using Fusion, theFusionVoiceClientprovides the required transport initialization. For more information on how to initialize aFusionVoiceClient, please refer to the dedicated documentation - A
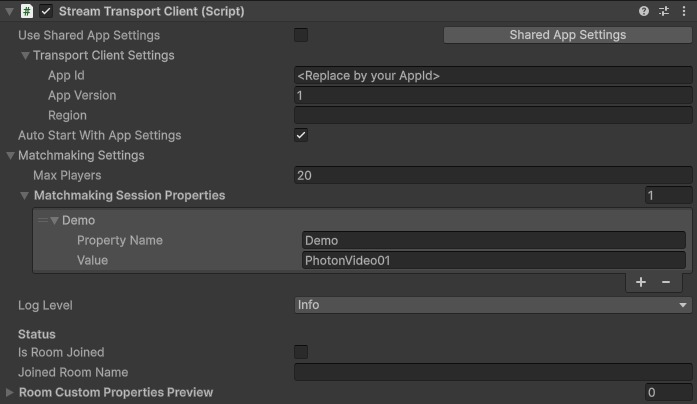
StreamTransportClient: the helpers include this simple transport initialization component, which handles the connection setup
Using VoiceConnection
Nothing additional is required here: simply use the VoiceConnection component and its connection logic.
For example, attaching FusionVoiceClient to the same GameObject as a Fusion's NetworkRunner will ensure that the connection is started alongside Fusion.
Using StreamTransportClient
To set up a StreamTransportClient:
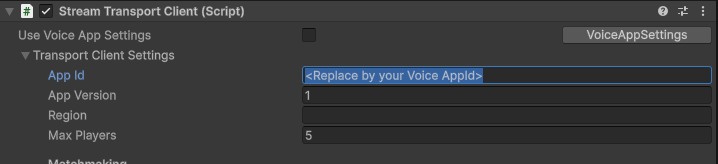
- Add a
StreamTransportClientto your scene - Set a valid Photon Video App ID in its
Transport Client Settings\App Idfield in the inspector
- The Photon
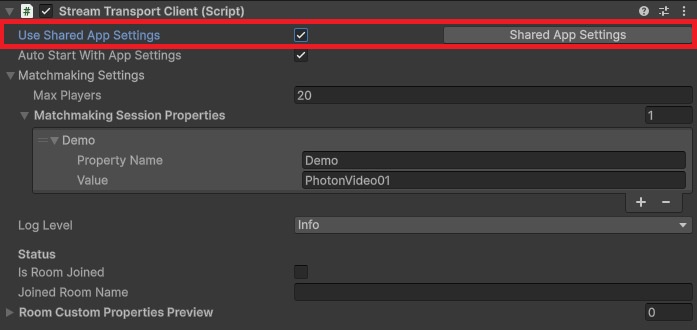
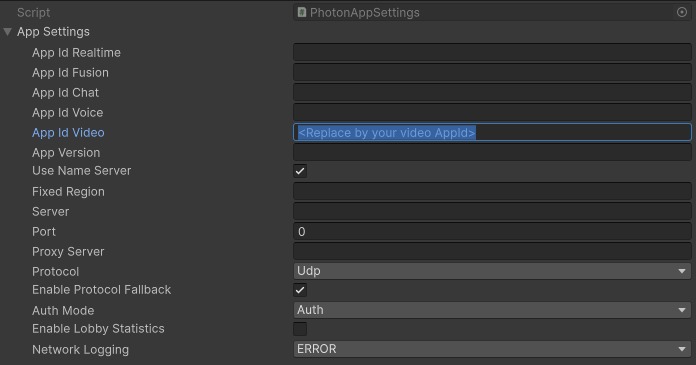
App Idcan also be managed centrally and reused across multiple scenes. To do so, enable theUseSharedAppSettingsoption, then click theSharedAppSettingsbutton
- Connection
- By default, the client will automatically connect on startup.
- If you prefer to control the connection manually, uncheck
Auto Start With App Settings. You can then either callStartConnectionWithDefaultSettings()or provide specific connection settings usingStartConnection(StreamTransportClientSettings startVideoClientSettings). - Alternatively, you can customize the connection logic by subclassing
StreamTransportClientand overriding any of the following methods:JoinRoom(): that by default uses random matchmaking by callingTransport.OpJoinRandomOrCreateRoom(RandomRoomParams(), EnterRoomParams()),RandomRoomParams(): that define the random matchmakingOpJoinRandomRoomParamspropertiesEnterRoomParams(): that defines the creation parameter of the joined room if the user is the first one in it
The connection is using Realtime random matchmaking.
It is possible to use the matchmakingSessionProperties field to filter matching rooms: if this list is not empty, the included properties will be required in the matchmaking (they are added to OpJoinRandomRoomParams.ExpectedCustomRoomProperties, EnterRoomParams.CustomRoomPropertiesForLobby and EnterRoomParams.CustomRoomProperties)
Video sending
The helpers include several sender components responsible for sending video data, all inheriting from the VideoStreamSender class.
There are two types of sender components:
TextureVideoStreamSender: sends video from a texture source (not supported on WebGL). Sub-classes of this component define the specific texture content to be streamedNativeCameraStreamSender: sends video from the device's webcam feed (useful for WebGL)
Camera sending
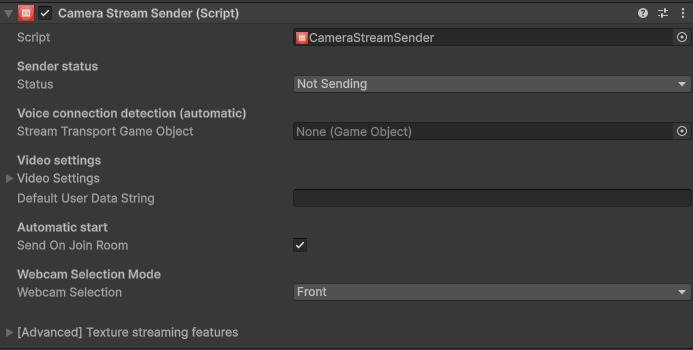
To send a camera video stream, simply add a CameraStreamSender to the scene.
Camera selection
To select at build time the camera to use, use the webcam selection mode on CameraStreamSender to determine if the default selected camera:
- should be a front facing or back facing camera
- or to provide a specific camera index (useful mostly in debug mode, where the developer is aware of their camera indexes in the device list)
To select the camera at run time (for instance after displaying a camera selection UI), please see the camera selection page.
To see a demonstration of the camera selection capabilities, please look at the demonstration scene 08-WebcamSelectionAndControl.
Implementation details
To simplify the usage, the CameraStreamSender is a facade that will act as a WebcamTextureStreamSender on all available platforms, and will, for webGL, create a sibling NativeCameraStreamSender and forward all the calls it receive to it.
The WebcamTextureStreamSender is a TextureVideoStreamSender that uses Unity's WebcamTexture.
Outside of WebGL use cases, it provides a more flexible and often preferable alternative to NativeCameraStreamSender.
Sending Control
Placing any VideoStreamSender component in the scene will automatically start streaming as soon as the Photon connection is established.
Alternatively, you can uncheck Send On Join Room, and manually call StartSending() or ToggleSending(). If it is done before joining the room, the sender will remember the request and start sending as soon as possible.
Sending can be stopped manually by calling StopSending().
The VideoSettings allow you to customize the sending parameters, such as bitrate, frame rate (FPS) and target resolution. Note that some implementations may ignore the resolution settings, if the video sender is configured to override it.
Sending callbacks
It is possible to register for the sender events using RegisterListener(IVideoStreamSenderListener listener) and UnregisterListener(IVideoStreamSenderListener listener).
This allows you to receive the following events:
OnVideoStreamCreated(IVideoRecorder videoRecorder, LocalVoice localVoice): triggered when sending startsOnVideoStreamRemoved(IVideoRecorder videoRecorder, LocalVoice localVoice): triggered when sending stops
User data
It is possible to add a user data payload to send alongside a stream.
To set it, fill the sender's UserData field before sending starts.
For debugging purposes, it is possible to set a string value from the inspector, with the defaultUserDataString field.
TextureVideoStreamSender
WebcamTextureStreamSender
The webcam texture sender will either create a new webcam texture or use the one provided in its webcamTexture field (for cases where the webcam feed needs to be shared with other components).
Regarding the webcam selection, several options are available:
- Front / Back: the webcam sender will select the first webcam whose
isFrontFacingvalue matches the desired configuration. - Webcam index: set the webcamIndex in the inspector to match the index of the desired webcam in the
WebCamTexture.deviceslist. This option is mainly intended for debugging purposes.
Note: the recommend camera sender component, CameraStreamSender, is a WebcamTextureStreamSender subclass
Send custom texture
It is possible to customize the sent texture in TextureVideoStreamSender.
To do so, it is possible to set materialToApplyToEncodedTexture, a custom material that will affect the sent texture. See Advanced - Custom shaders for more details on how to prepare the shader for such a material.
A commonly needed customization is to enhance the brightness of the captured texture (quite useful for Meta Quest or AndroidXR passthrough for instance).
A default brightening material will be added when checking the applyBrightenerMaterialOnSentStream option on a TextureVideoStreamSender.
Custom TextureVideoStreamSender subclasses
In addition to WebcamTextureStreamSender, Photon provides several TextureVideoStreamSender implementations covering platform-specific requirements.
For example:
MetaPassthroughCameraVideoStreamSenderfor the Meta Quest passthrough camera view available via the MRUK SDKMetaWearableVideoSenderfor Meta Ray-Ban glasses
Those senders are available in the Video SDK Addon page.
It is also possible to easily create a TextureVideoStreamSender for specific texture source needs. In a subclass, the following methods must be implemented:
bool IsTextureCollectingPossible(): should return true only when the texture source is availableTexture CollectTexture(): returns the texture to be streamed (called every frame)- (optional)
void RequestRecordingPermissions(): called when the stream is about to start. This is the appropriate place to request user permissions, initialize hardware components, etc. - (optional)
Vector2Int? GetResolutionOverride(): returns a value to override the resolution defined inVideoSettings
Video reception
Placing a VideoStreamReceiver component in the scene ensures that video streams sent by other users in the room are detected.

Reception callbacks
It is possible to register for receiver events using RegisterListener(IVideoStreamReceiverListener listener) and UnregisterListener(IVideoStreamReceiverListener listener).
This allows you to receive the following events:
OnVideoPlayerReady(IVideoPlayer vp, RemoteVideoPlayerInfo info): called when the video player for a remote stream is readyOnVideoPlayerRemoved(IVideoPlayer videoPlayer, RemoteVideoPlayerInfo info): called when a remote stream is stopped(optional) OnCreatingVideoPlayer(IVideoPlayer videoPlayer, int channelId, int playerId, byte voiceId, VoiceInfo info, RemoteVoiceOptions options): called when the video player is being created. This callback can be used to access stream details, such as user data payloads, if needed
User data
If the sender added a user data payload to its stream, it is possible to access it in the OnVideoPlayerReady/OnVideoPlayerRemoved callbacks, in the RemoteVideoPlayerInfo.userData field.
It is also possible to access it earlier, during the OnCreatingVideoPlayer callback, in the VoiceInfo.UserData field.
Video display
Both the preview of the sent video content and the received remote video streams can be displayed in an application.
This can be done manually, or by using the Video SDK Unity components.
The provided components cover common use cases of displaying video content (either preview of the locally recorded content, or remote users streamed video) on:
Renderer(quad, ...)RawImage(for canvas integration)
Video screen view handler
The PreviewVideoScreenViewHandler and RemotePlayersVideoScreenViewHandler components are responsible for displaying, respectively:
- the local sender preview
- and remote users' video content.
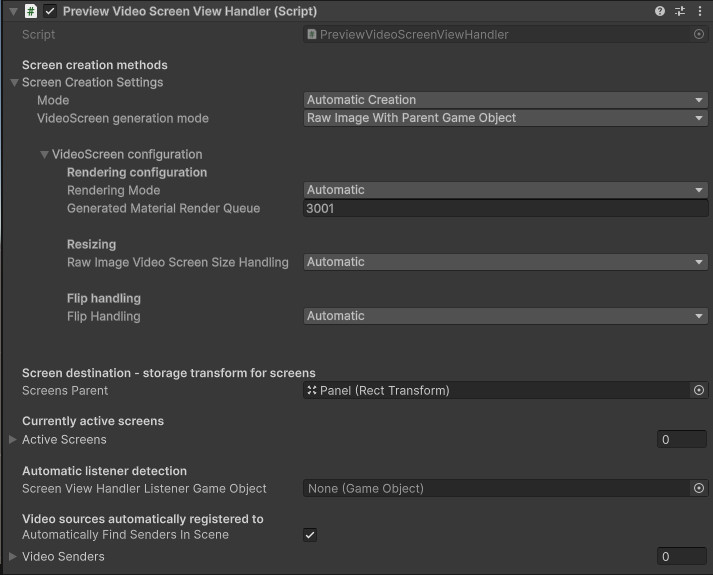
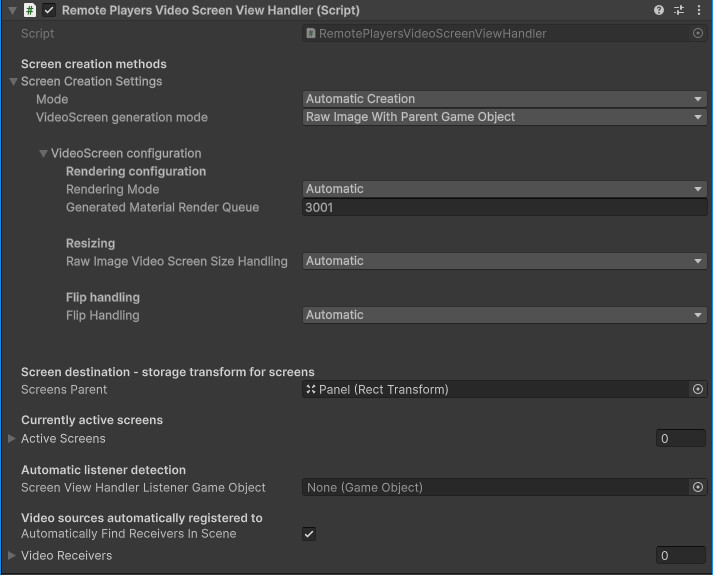
They are fully similar in their configuration and both create VideoScreen components, which handle the correct display of the received texture.
Video Screen View Handler configuration
The view handler needs to know how to find or create the VideoScreen used for display.
The following choices are possible:
- Spawn the video screen from a prefab
- Use a predefined
VideoScreenin the scene (note that this option is mainly relevant for the sender preview, as a single screen does not allow multiple remote players to be displayed simultaneously) - Let the video screen handler generate the video screen. In this case, you must specify the desired screen type, which can be:
- A
VideoScreenrendered on a 3DRenderer(a quad is generated) - A
VideoScreenrendered on aRawImage(for UI canvas integration) - A
VideoScreenGameObjectcontaining a childGameObjectwith aRawImage(useful for canvas layouts, with layout groups that may enforce a resolution that we do not want to affect theRawImageitself)
- A
In addition to the screen type, the generated VideoScreen configuration is exposed in the inspector for further customization.
This can also be configured via code callbacks by providing an IVideoScreenViewHandlerListener implementation, which can override the screen selection through OverrideScreenForLocalPreview or OverrideScreenForRemotePlayerView.
While using the video screen override approach, the potential user data for the remote player can be accessed during the OverrideScreenForRemotePlayerView callback, in the RemoteVideoPlayerInfo.userData.
Video Screens
VideoScreen components handle the various aspects of displaying a video content:
- Resizing the content to preserve the source aspect ratio and optionally fit within a parent layout
- Determining the material used to render the video
- Ensuring the image orientation matches the original source
- Defining how the video screen is cleaned up when the stream stops
While rendering mode and orientation logic can be customized, in most cases the Automatic settings will provide the expected results.
Two types of VideoScreen are available:
VideoScreenOnRenderer: displays the stream on a UnityRendererVideoScreenOnRawImage: displays the stream on a UnityRawImage(for UI canvas integration)
Video Screen configuration - Common options
All video screens define how they behave when a stream stops. The Remove Handling options are:
- Destroy (default for generated video screens): the video screen is destroyed when the stream stops
- Deactivate Display GameObject: deactivates the display game object (
RendererorRawImage). This is useful when the display is not on the same game object as theVideoScreen - Deactivate Screen GameObject: deactivates the entire
VideoScreengame object - Disable Display: disables the
RendererorRawImagecomponent (useful when a default "stream stopped" image is displayed) - Restore Material: restores the original material used before the stream started
Video Screen configuration - Renderer display options (VideoScreenOnRendererConfiguration)
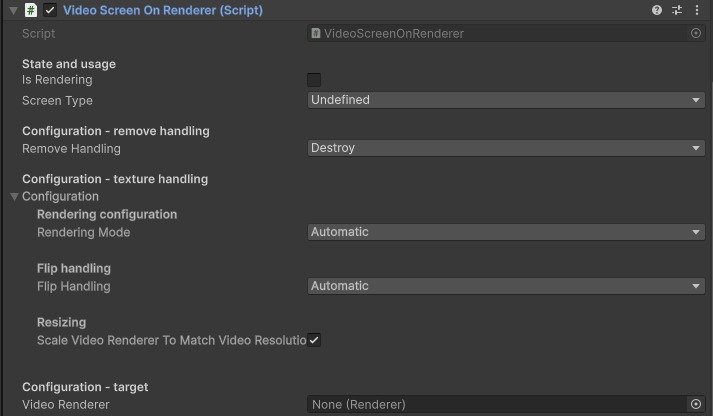
For VideoScreenOnRenderer, all options can be left to "Automatic".
Here are the options values for more advanced needs.
[Optional] Rendering mode
Describe the material/shader that will be used to render the video on the Renderer.
Possible values:
Automatic: should be used by default, will provide the best result in most cases (under the hood, it usesDefaultFlippableMaterialwhen possible)VideoSDKShader: uses the core shader included in the video SDK (returned byVideoTexture.Shader3D.Nameusually, unless in Android OpenGL XR, where a specific one is available)CustomMaterial: use a material provided by the user (acustomMaterialfield will appear upon selecting this option, to specify the shader. It should use a compatible shader, see Advanced - custom shaders for details)UnlitTextureMaterial: a simpleUnlitTextureMaterialwill be used (mostly relevant for test/debugging)DefaultFlippableMaterial: usePhotonVideo/DefaultFlippableshader render. This shader handles the flip and rotation value. It is the only option supporting the rotation value, allowing to apply a rotation provided by the recorder to the local preview (not transmitted to remote users). See Preview rotation support for details
[Optional] Flip handling
Describe how the raw video texture (usually vertically flipped) is handled to be displayed properly on the final renderer.
Possible values:
Automatic: should be used by default, will use the most appropriate solution (PhotonVideoFlipParammode, if aDefaultFlippableMaterialrendering mode is used)ShaderTilling: will use negative values on the material mainTextureScale to flip the image. Not working on Android.VideoSDKShaderFlipParam: will pass the flip value to the shader through the_Flipparameter.PhotonVideoFlipParam: will pass the flip value to the shader through the_PhotonVideoFlipparameter (used in theFlippedUVshader graph node, that can be used to create custom rendering shaders). See Advanced - custom shaders for more details.GraphicsBlit: will do aGraphics.Blitcall to flip the image, every frame.Ignore: no flip will be applied: the raw received texture will be displayed.
[Optional] Resizing
The scaleVideoRendererToMatchVideoResolution is true by default: in this case, the object containing the Renderer will be rescaled so that it will shrink on the required axis to respect the received texture aspect ratio.
Video Screen configuration - RawImage display options (VideoScreenOnRawImageConfiguration)
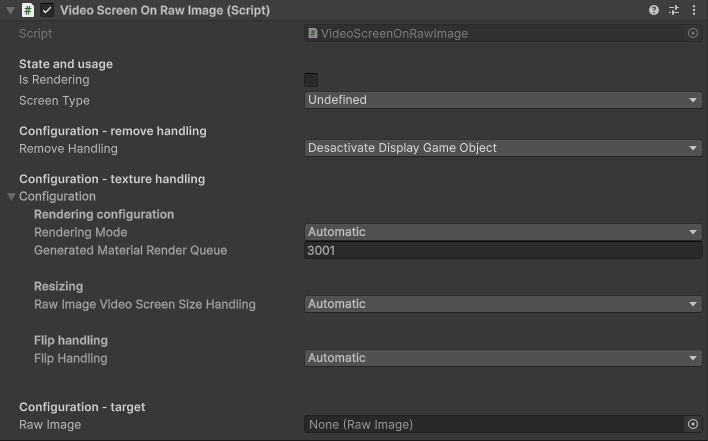
For VideoScreenOnRawImage, many options can be left to "Automatic".
However, as the RawImage will be integrated somewhere in a canvas, the "Resizing" options might need to be customized differently than the default settings (the default Automatic option will work nicely with a GridLayoutGroup parent for instance)
[Optional] Rendering mode
Describe the material/shader that will be used to render the video on the RawImage. Possible values:
Automatic: Will use the most appropriate solution (DefaultFlippableMaterialmode, unless in Android OpenGL)DefaultUIMaterial: apply no material on RawImage (the default canvas material is used under the hood)VideoSDKShader: uses the core shader included in the video SDK (returned byVideoTexture.Shader3D.Nameusually, unless in Android OpenGL XR, where a specific one is available)CustomMaterial: use a material provided by the user (a customMaterial field will appear upon selecting this option, to specify the shader)DefaultFlippableMaterial: usePhotonVideo/DefaultFlippableshader rendering. This shader handles the flip and rotation value. It is the only option supporting the rotation value, allowing to apply a rotation provided by the recorder to the local preview (not transmitted to remote users). See Preview rotation support for more details.
Resizing
Describe how the VideoScreenOnRawImage and RawImage game objects (if not the same) are resized to respect the stream texture ratio while integrating in a canvas.
The option rawImageVideoScreenSizeHandling describes the VideoScreenOnRawImage game object resizing.
Possible values:
Automatic: sets bothrawImageVideoScreenSizeHandlingandrawImageSizeHandlingtoFitInParent. Hides therawImageSizeHandlingfield in the inspectorFixedResolution: will use the configuration'sfixedResolutionas the RectTransform's sizeDeltaNone: No resizing will occurFixedHeightWithRatio: thefixedResolution.xvalue will be used for the width, and the height will be determined by the texture ratioFixedWidthWithRatio: thefixedResolution.yvalue will be used for the height, and the width will be determined by the texture ratioParentWidthWithRatio: will match parent's width, while respecting the texture ratio for the heightParentHeightWithRatio: will match parent's height, while respecting the texture ratio for the widthFitInParent: will try to fit inside a parentRectTransform, while respecting the texture ratio
The option rawImageSizeHandling describes the RawImage's own game object resizing (only displayed if the raw image is not on the same game object as the VideoScreenOnRawImage, and if the Automatic setting was not selected for rawImageVideoScreenSizeHandling).
Possible values:
FitInParent: will try to fit inside a parentRectTransform, while respecting the texture ratioParentWidthWithRatio: will match parent's width, while respecting the texture ratio for the heightParentHeightWithRatio: will match parent's height, while respecting the texture ratio for the widthScaleTransform: the transform of the object containing the RawImage will be rescaled so that it will shrink on the required axis to respect the received texture aspect ratio.None: No resizing will occur
[Optional] Flip handling
Describe how the raw video texture (usually vertically flipped) is handled to be displayed properly on the final RawImage.
Possible values:
Automatic: will use the most appropriate solution (UVRectmode)UVRect: uses theRawImageuvRectto apply the flipIgnore: no flip will be applied, the raw received texture will be displayed
Manual handling
If the VideoScreen handler approach does not meet an application's needs, and subclassing it is also not suitable, it is possible to implement the same behavior manually from code.
To do so, register to the sender and receiver callbacks, which respectively provide an IVideoRecorder during OnVideoStreamCreated, and an IVideoPlayer during OnVideoPlayerReady.
Both IVideoRecorder and IVideoPlayer implement the IVideoPreview interface, which provides:
object PlatformView: contains the actual texture to display. In most cases, it will be a Unity Textureint Width: texture widthint Height: texture heightFlip Flip: indicates whether the texture is flipped horizontally and/or vertically
To display the video content, use the PlatformView texture and apply the required Flip transformation accordingly.