Stage Screen Sharing

Overview
The Fusion Stage Screen Sharing is based on the Fusion Stage sample. This documentation focuses only on the main functionality provided by this sample, namely the ability to share your computer screen. To understand others features, please refer to the main, Fusion Stage page first. More technical details are provided directly in the code comments.
Technical Info
- This sample uses the Shared Mode topology,
- Builds are available for PC, Mac & Meta Quest,
- The project has been developed with Unity 2021.3.13f1, Fusion 1.1.3f 599, Photon Video 0.10 (Photon Voice 2.51),
- 2 avatars solutions are supported (home made simple avatars & Ready Player Me 1.9.0 avatars),
Before you start
To run the sample :
Create a Fusion AppId in the PhotonEngine Dashboard and paste it into the
App Id Fusionfield in Real Time Settings (reachable from the Fusion menu).Create a Voice AppId in the PhotonEngine Dashboard and paste it into the
App Id Voicefield in Real Time SettingsThen load the
AvatarSelectionscene and pressPlay
Download
| Version | Release Date | Download | ||
|---|---|---|---|---|
| 0.0.19 | Feb 02, 2023 | Fusion Stage Screen Sharing 0.0.19 Build 92 | ||
Download Binaries
A demo version of Stage Screen Sharing client is available below :
- Fusion Stage Screen Sharing for Meta Quest
- Fusion Stage Screen Sharing for Windows
- Fusion Stage Screen Sharing for Mac
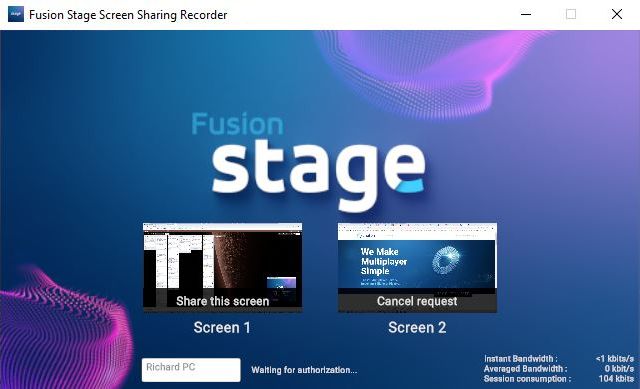
The Stage Screen Sharing Recorder for Windows is available below :
Handling Input
Desktop
Keyboard
- Move : WASD or ZQSD to walk
- Rotate : QE or AE to rotate
Mouse
- Move : left click with your mouse to display a pointer. You will teleport on any accepted target on release
- Rotate : keep the right mouse button pressed and move the mouse to rotate the point of view
- Move & rotate : keep both the left and right button pressed to move forward. You can still move the mouse to rotate
- Grab : put the mouse over the object and grab it using the left mouse button.
Meta Quest
- Teleport : press A, B, X, Y, or any stick to display a pointer. You will teleport on any accepted target on release
- Touch (ie for chat bubbles lock buttons) : simply put your hand over a button to toggle it
- Grab : first put your hand over the object and grab it using controller grab button
Folder Structure
The main folder /Stage contains all elements specific to this sample.
The folder /IndustriesComponents contains component shared with the Fusion Stage sample or the Fusion Expo sample.
The /Photon folder contains the Fusion and a special version of the Photon Voice SDK, including the Photon Voice Video SDK.
The /Photon/FusionXRShared folder contains the rig and grabbing logic coming from the VR shared sample, creating a FusionXRShared light SDK that can be shared with other projects.
The /Photon/FusionXRShared/Extensions folder contains extensions for FusionXRShared, for reusable features like synchronized rays, locomotion validation, ...
The /Plugins folder contains the Ready Player Me SDK
The /StreamingAssets folder contains pre-built ReadyPlayerMe avatars. It can be removed freely if you don’t want to use those prebuilt avatars.
The /XR folder contain configuration files for virtual reality.
The screensharing specific components are available:
- in
/IndustriesComponents/Screensharefor scripts that only display how to use the PhotonVideoSDK - in
/Stage/Screen/Screensharingfor scripts specific to the stage sample
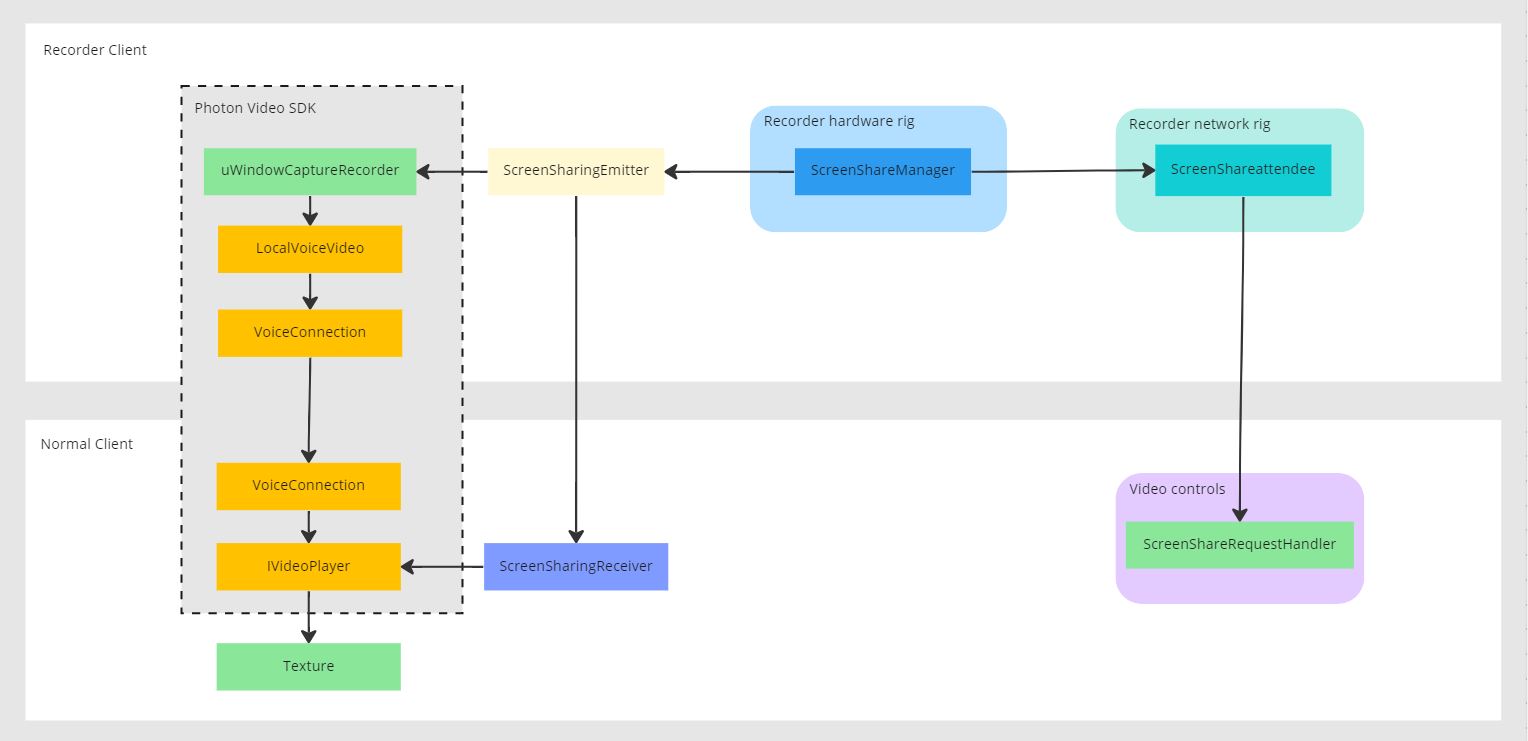
Architecture overview
This sample rely on an alpha version of the Photon Video SDK, which an addition of the Photon Voice SDK.
In addition to the normal client launched by user in the Stage sample, user who want to share their screen have to launch a dedicated Windows application "Recorder client", which controls which screen they want to share, and request the authorization to display it.
The screen capture is based on uWindowCapture, which handles the captation of the desktop image and applies it on a texture.
Then, the Photon Video SDK handles this video stream through the VoiceConnection (for now, we are still using the "Voice" term in a meaning of "Stream").
To request the authorization to stream on the main screen, an authorization system similar to the attendee system of the stage sample is used: as a ScreenSharingAttendee, you can request screen sharing access, and the control screen on the stage offers a ScreenShareRequestHandler to validate those requests.
Screen sharing
Screen sharing is capture with uWindowCapture and sent to other clients through the PhotonVideo SDK.
VideoSDK
The Photon Video SDK is a special version of the Photon Voice SDK, including support for streaming video.
More details are available in its dedicated README, available at the location Photon/PhotonVoice/PhotonVideoSDK_README_v0.x.md.
The capture of video streams can be made with recorders implementing IVideoRecorderPusher, and the playback can be handled by players implementing IVideoPlayer.
uWindowCapture
uWindowCapture offers specific windows capture, or full desktop capture. In this sample, for simplification, only full desktop capture is supported.
The uWindowCaptureRecorder class implementing the IVideoRecorderPusher interface allows to collect frames for the PhotonVideo SDK.
To enable it, U_WINDOW_CAPTURE_RECORDER_ENABLE has to be added to the define symbols.
Video stream
Emitter
The ScreenSharingEmitter first wait for the Photon Voice connection to be established, before allowing to connect screensharing.
Then, it waits for uWindowCapture to be ready. Then, a video stream is created with voiceConnection.VoiceClient.CreateLocalVoiceVideo: from now on, the recorder will stream the desktop capture.
Receiver
The ScreensharingReceiver first wait for the connection of a voice client, with the OnRemoteVoiceInfoAction callback.
Then, if it is a video voice, it creates a video player with CreateVideoPlayerUnityTexture.
And finally, when the video player is ready, it prepares a material holding the texture where the video is applied with VideoTexture.Shader3D.MakeMaterial.
Note that ScreensharingReceiver is configured to only stream one video at a time. To stream multiple video, a different renderer should be created for each clients.
Android Shader compatible with URP, VR and single pass
The Photon Video SDK can handle the creation of the receiving material, which will display the video texture, and the SDK provides several shader suited for those material, included for Android.
However, the Quest build of the stage sample has additional requirements:
- it uses the URP graphical pipeline
- we need single-pass for VR rendering
The Photon\PhotonVoice\PhotonVoiceApi\Platforms\Unity\Video\Resources\PhotonVoiceApi\GLES3\VideoTextureExt3D.shader default shader does not work on Android under those condition, so the sample contains a specific version of this shader.
Its main specificity is to requires additionnal dedicated code in the ScreensharingReceiver, to forward missing possitioning data (the localToWorldMatrix, not available in GLSL shaders with URP) to the shader, during each updates.
The comments in the shader provides some additionnal details and references.
Scene logic
We have to use the same Unity scenes for the normal client (attendee) and for the recorder client (to stream a desktop on the stage screen). So, some modifications are required depending on the client mode we want to use.
In the StageWithScreenSharing scene, the RigSelection game object contains the RecorderAppRigSelection class.
The App Kind parameter is used to configure the application as a normal client (attendee) or as the recorder client (to stream a desktop on the stage screen).
C#
protected override void Awake()
{
...
    if (appKind == AppKind.Normal) ConfigureAsNormalApp();
    if (appKind == AppKind.Recorder) ConfigureAsRecorderApp();
}
Companion App (recorder)
So, the ConfigureAsRecorderApp() function is in charge to configure the application in recorder mode. It means :
- change the default user prefab by a specific emitter prefab,
- disable the ambiant sound,
- enable objects required for the recording (specific rig, UI, emitter) and hide useless objects,
- register the application in the attendee registry.
The recorder rig contains the ScreenShareManager class.
It is in charge to display the screen sharing buttons and update text fields according to the user interaction with the Menu or according to the screenShareAttendee value (see below).
Screen Sharing Request Managment
The way a user is allowed to share his deskop screen on stage is similar to what was done to allow attendees to talk with the presentator. Please refer to the main, Fusion Stage page for more details.
The StageNetworkRigRecorder prefab is spawned when the recorder application join the session.
This prefab contains the ScreenShareAttendee class, that host a [Networked] variable ScreenShareStatus.
C#
[Networked(OnChanged = nameof(OnChangedScreenShareStatus))]
public ScreenShareStatus ScreenShareStatus { get; set; }
This status describes :
- if a screen sharing request has not yet been made,
- if a screen sharing request has been made,
- if the request has been accepted,
- if it has been stopped,
- or if the request has been rejected,
C#
public enum ScreenShareStatus
{
    NoScreenShareRequested,
    ScreenShareRequested,
    ScreenShareInProgress,
    ScreenShareStopped,
    ScreenShareRejected
}
The ScreenShareRequestHandler associated to the desk on the stage, can store a list of user requesting screen sharing, and update its UI accordingly.
Please, see the IScreenShare interface for more details.
The first screen sharing request is displayed on the control desk.
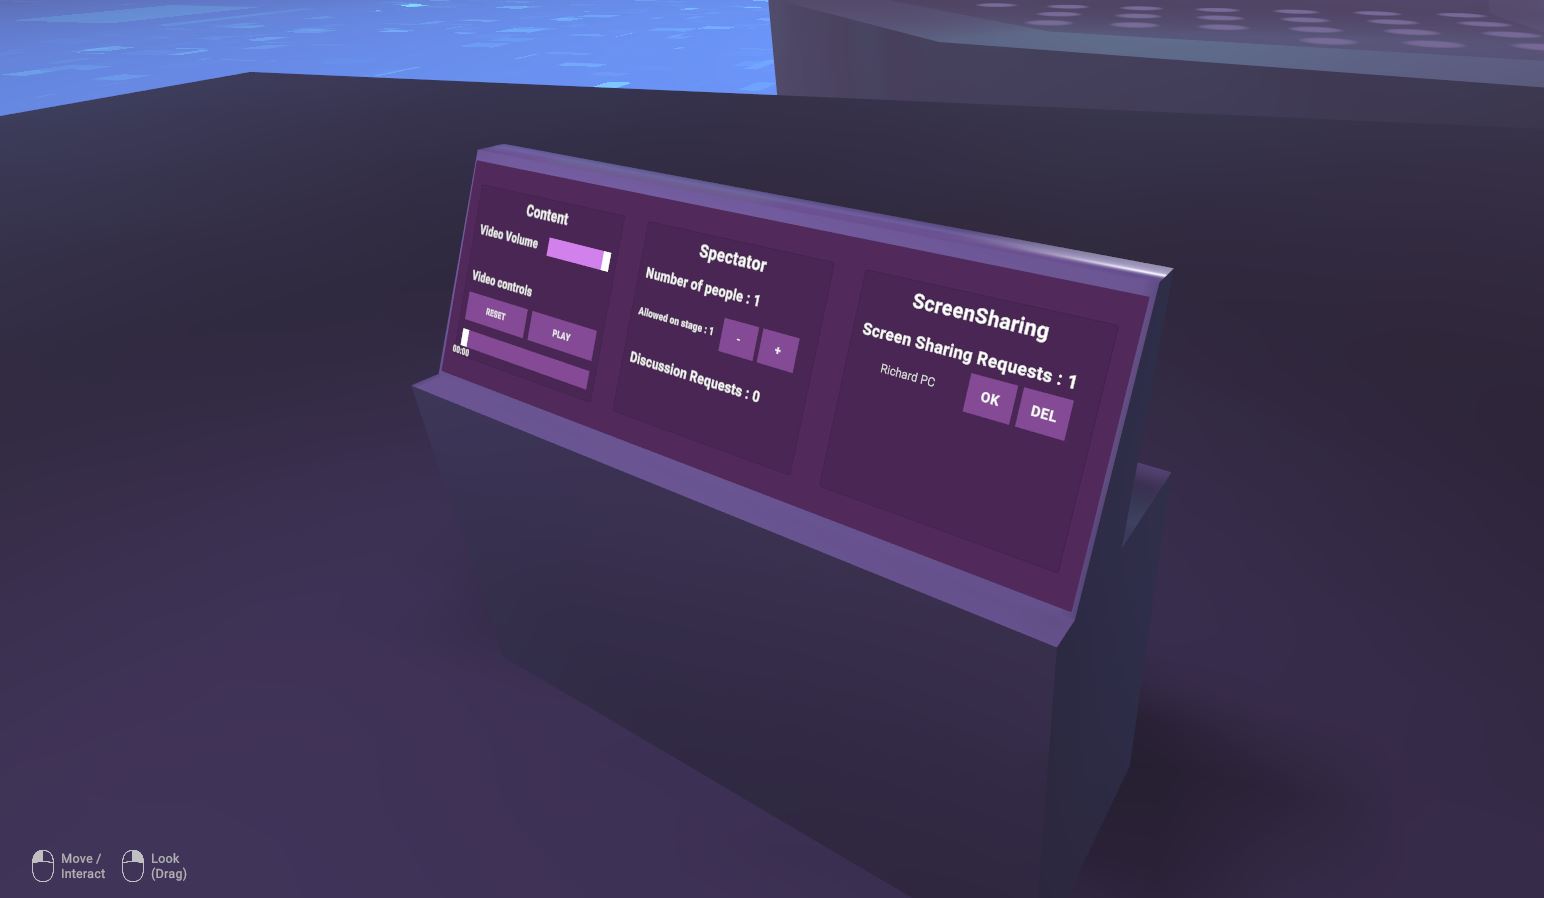
When the ScreenShareStatus change (for example when the presenter validates a screen sharing request), it is broadcasted to the network so that the client owning the screen sharing can change its status.
Thus, when the screen sharing requester receives the authorization, it start to stream the selected deskop.
C#
if (ScreenShareStatus == ScreenShareStatus.ScreenShareInProgress)
{
    Debug.Log("Starting Screen Sharing !");
    screenSharingEmitter.ConnectScreenSharing();
}
Compilation
We use the same Unity scenes for the normal client (attendee) and for the recorder client (to stream a desktop on the stage screen). So, we have to made some manual modifications depending on the client we want to compile.
Recorder Client Compilation
So, to compile the recorder application, you have to follow 3 steps :
1/ Open the StageAvatarSelection scene : on the LoadMainSceneInRecorderMode game object, check the box Is Recorder Compilation Mode to load the main scene directly without loading the avatar selection scene.
This tips is required because the scene list must be identical for the normal client and for the recorder.
2/ Open the StageWithScreenSharing scene : on the RigSelection game object, RecorderAppRigSelection class, set the App Kind parameter to Recorder.
RecorderAppRigSelection is in charge to configure the scene according to the normal/recorder selection.
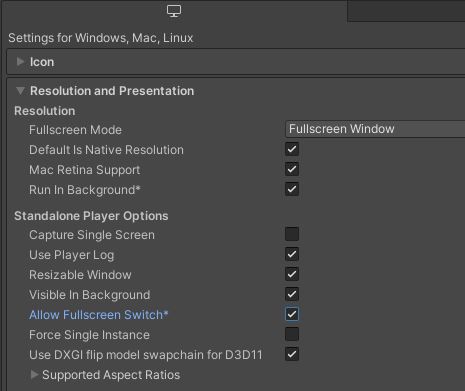
3/ Change some Unity parameters :
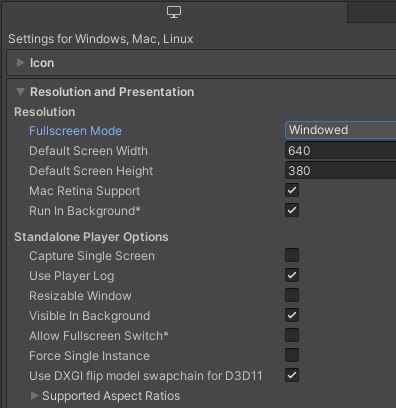
Project Settings/Player:- Change
Product name: add 'Recorder' for example
- Change
Project Settings/Player/Resolution and Presentation/Resolution- Fullscreen Mode : Windowed
- Default Screen Width : 640
- Default Screen Height : 380
- Resizable : No
- Allow Fullscreen : No
Normal Client Compilation
So, to compile the normal client application, you have to follow 3 steps :
1/ Open the StageAvatarSelection scene : on the LoadMainSceneInRecorderMode game object, uncheck the box Is Recorder Compilation Mode.
2/ Open the StageWithScreenSharing scene : on the RigSelection game object, RecorderAppRigSelection class, set the App Kind parameter to Normal.
RecorderAppRigSelection is in charge to configure the scene according to the normal/recorder selection.
3/ Change some Unity parameters :
Project Settings/Player:- Change
Product name: add 'Client' for example
- Change
Project Settings/Player/Resolution and Presentation/Resolution- Fullscreen Mode : Fullscreen Windows
- Resizable : Yes
- Allow Fullscreen : Yes
Third party components
- Oculus Integration
- Oculus Lipsync
- Oculus Sample Framework hands
- Ready player me
- Sounds
Known Issues
- Quest : if the screen sharing has been initiated before the user logs in, then the display of the screen share may be long or may fail.
Changelog
- Fusion Stage 0.0.20
- First version