Bolt 102 - Getting Started
This tutorial teaches you how to create your first multiplayer game with Bolt.
You'll set up a couple of simple scenes with Bolt, and perform all basic tasks like spawning objects and replicating transforms.
For clarity and teaching purposes, code is favored over Bolt's built in automation and testing tools.
This tutorial is intended to be followed using the DEBUG build of Bolt, for more information on the different builds see the Debug vs. Release page. For instructions on upgrading Bolt: Upgrading.
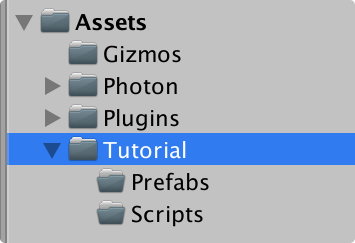
After installing or upgrading Bolt, you should have a folder structure which looks something like this:
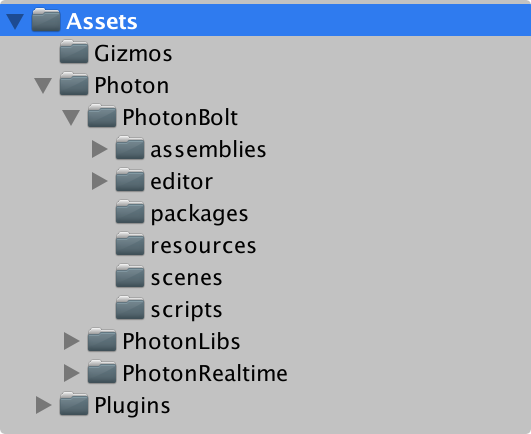
In the package folder there are addons for Bolt you can import such as the samples.
If you import those, be aware you may be asked in the Getting Started tutorials to create a Bolt Asset that already exists.
You can either hold off on importing them or delete the existing Bolt Asset before creating the new one with the same name.
The main characteristic that sets Bolt apart from other networking solutions for Unity is that there's very little actual networking code you need to write by hand.
All serialization, interpolation and extrapolation, animation replication, etc, is handled automatically by Bolt.
The only thing you need to do is telling Bolt what you want to replicate over the network.
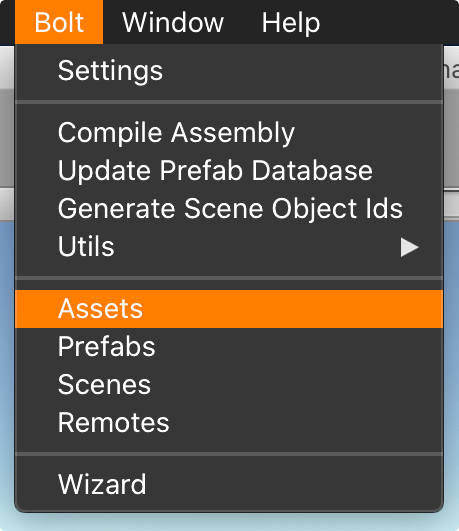
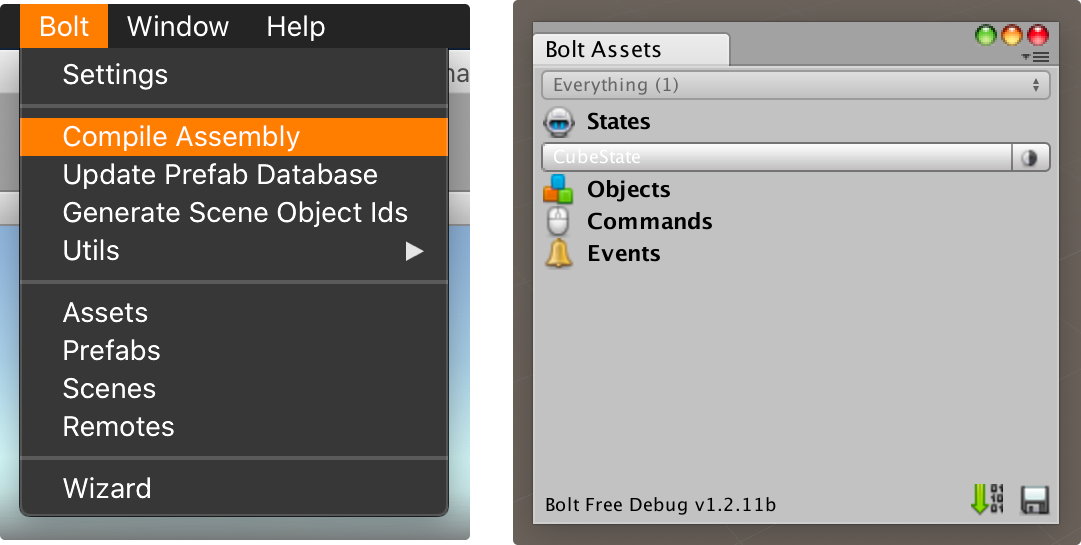
This is done through the Bolt Assets window, which can be found under Bolt/Assets.
Assets are broken down into four categories:
- States: these are the meat of most games built with
Bolt, they allow you to define things like name, health, transform, animation parameters, etc. - Objects: objects are a way of logically grouping several properties in the same way you would do with a C# class. As an example, say that you want to create an inventory for a player in an RPG game, you could create an Object called Item and give it properties like ItemId, Durability, etc. You would then on the State create an array of Item objects.
- Commands: these are used exclusively for the authoritative features of
Boltand are used to encapsulate user input and the result of applying the input to a character in the world. Commands lets you implement advanced client side prediction and automatic correction of predicted state. - Events: these are simply messages. Events allow you to much easier decouple the different parts of your game from each other, as you can have several listeners to a single event active at the same time.
At the bottom of the Bolt Assets window you'll also see the version number of Bolt, whether it's built in Debug / Release mode and two buttons for compiling and saving the Bolt Assets.
Right click anywhere in the empty space of the Bolt Assets window and select New State.
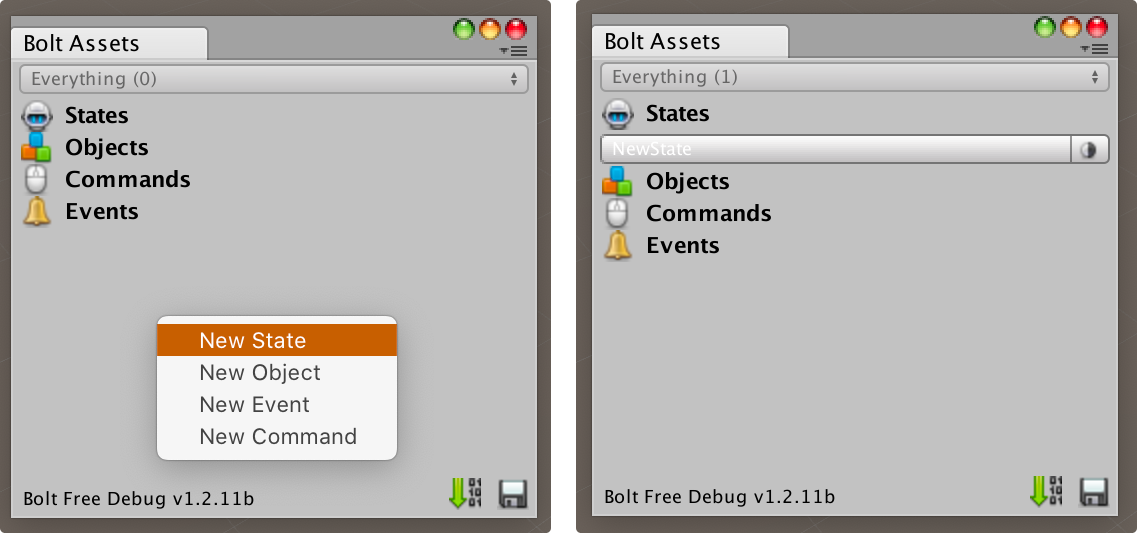
Bolt will create a new state called NewState, and pop up the Bolt Editor window for you with that state active.
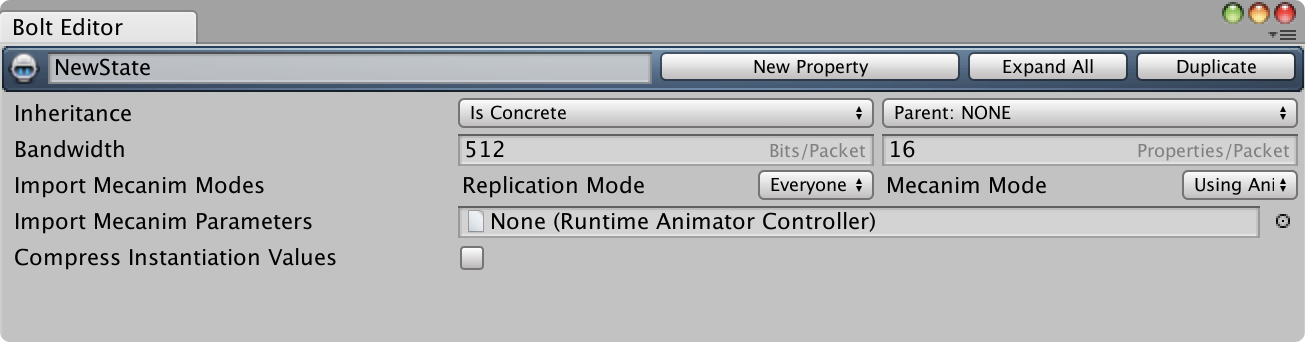
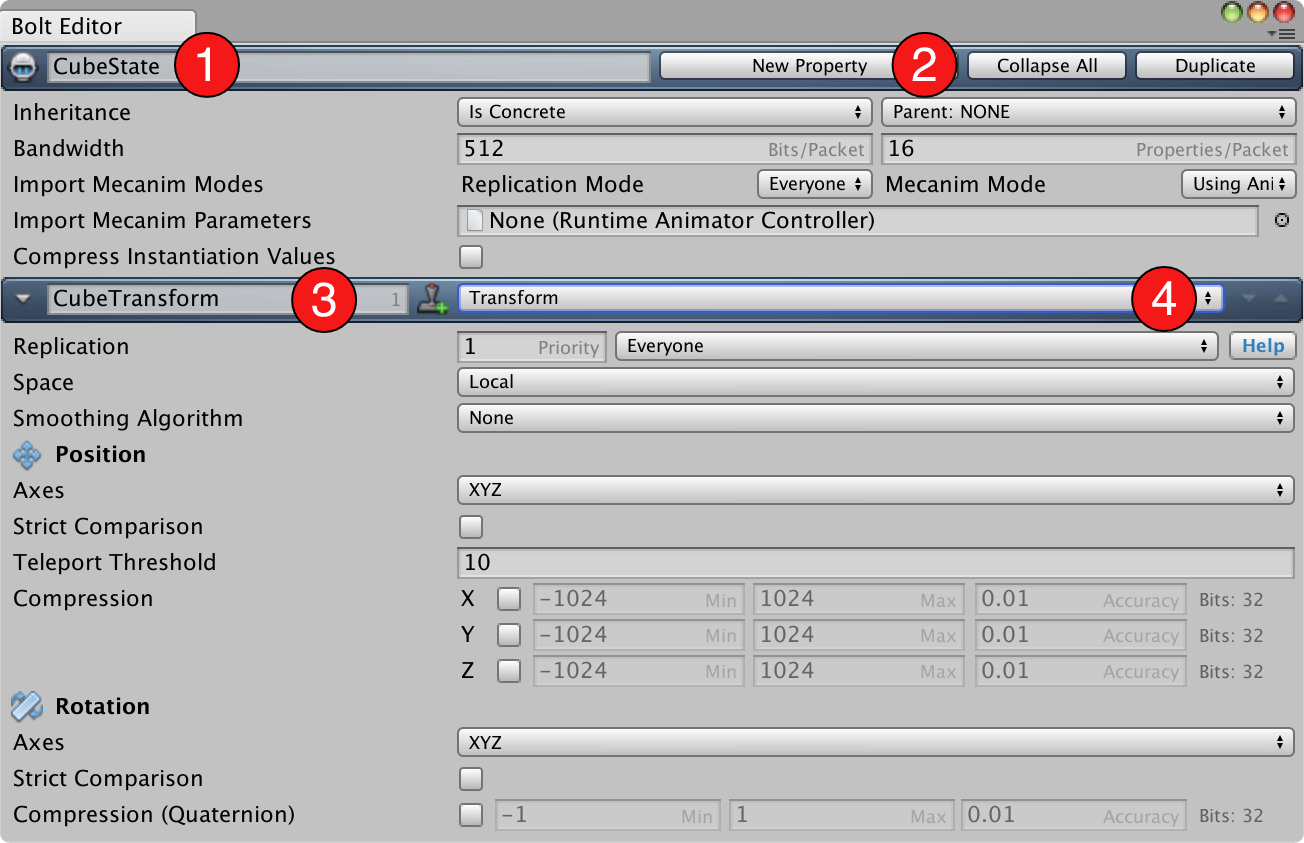
Let's configure our new state:
- Change the name of the state to
CubeStatein the first text field; - To create a new property to this state, click on
New Property; - Name the property
CubeTransform; - Set it's type to
Transform. - Leave the rest of the settings as is.
If you accidentally added more than one property or an asset you don't want, hold down the Ctrl key on your keyboard and a little red X will pop up next to all assets and properties allowing you to delete them.
To make Bolt aware of our state and property we need to compile it, this can be done either through the Bolt/Compile Assembly menu option or with the little green arrow icon in the Bolt Assets window. They both do the exact same thing.
When compiling Bolt will output a couple of messages in the Unity editor console.

Go to the Project tab in Unity and create a folder called Tutorial, with two sub-folders Scripts and Prefabs.
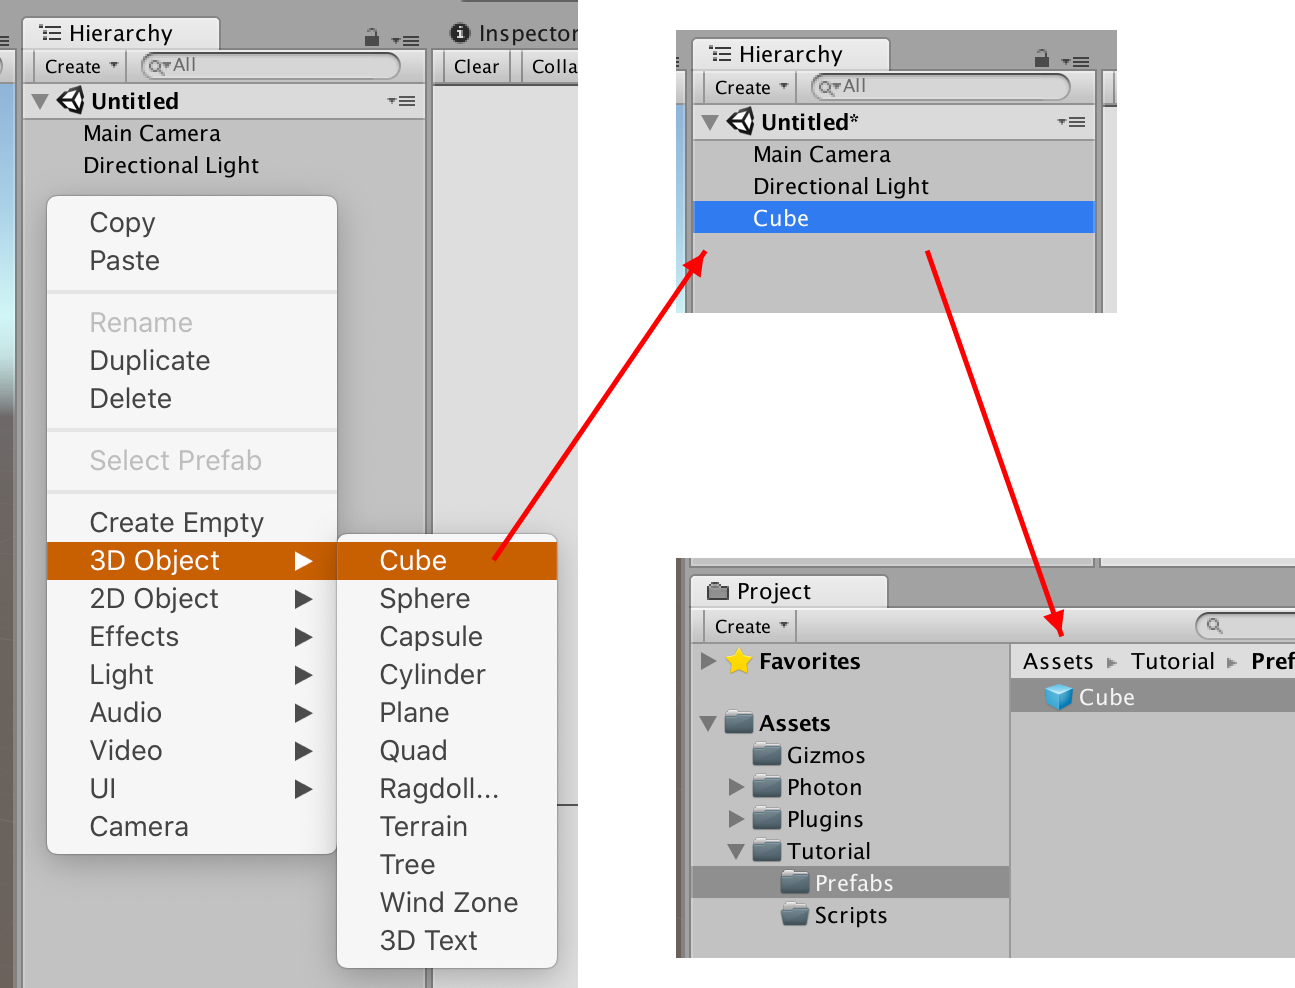
The first thing we are going to do is to create our prefab for Bolt, it's just going to be a standard Unity cube.
Create a new cube from the GameObject/3D Object/Cube menu or right-click on the Hierarchy panel and create a new Cube, then drag it from the Hierarchy into the Tutorial/Prefabs folder in the Project tab.
You can delete the cube left in the Hierarchy when this is done.
To make Bolt aware of our Cube prefab add a Bolt Entity component to it, click Add Component and look up the component by name.

Since this is the first time Bolt sees our Cube prefab it will give you a couple of errors in the Bolt Entity component editor.
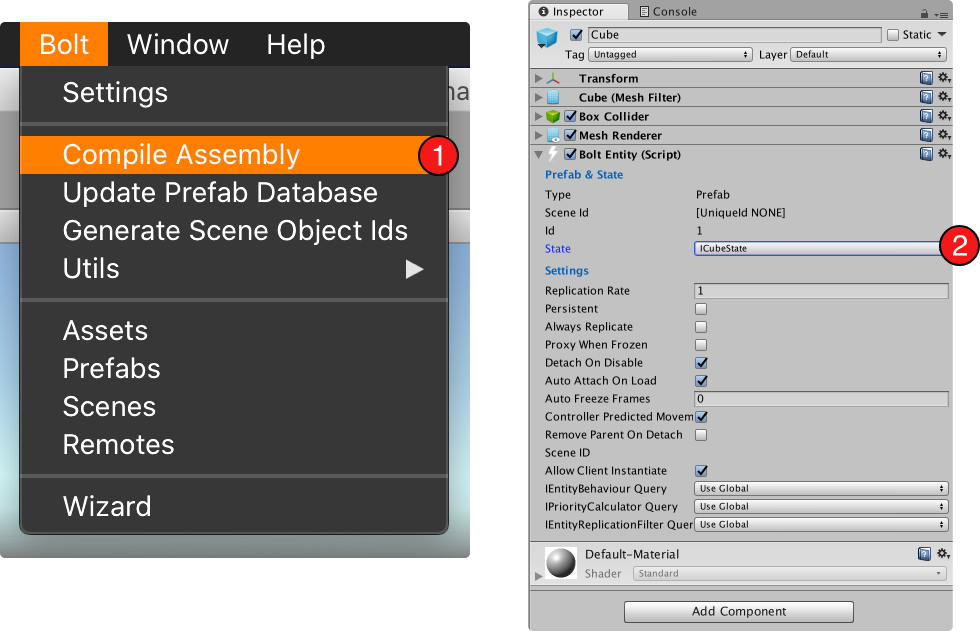
The two errors below the Prefab Id field are resolved by running the compiler for Bolt, either through Bolt/Compile Assembly or the green arrow icon in the Bolt Assets window.
The error under the State field is resolved by selecting the ICubeState state from the drop-down where it says NOT ASSIGNED currently.
There are a bunch of settings on the Bolt Entity component we can change, but we really don't need to as the defaults are what you want on almost all prefabs and types of games. The settings mostly deal with special cases that we have descriptions for in the more advanced sections of this documentation.
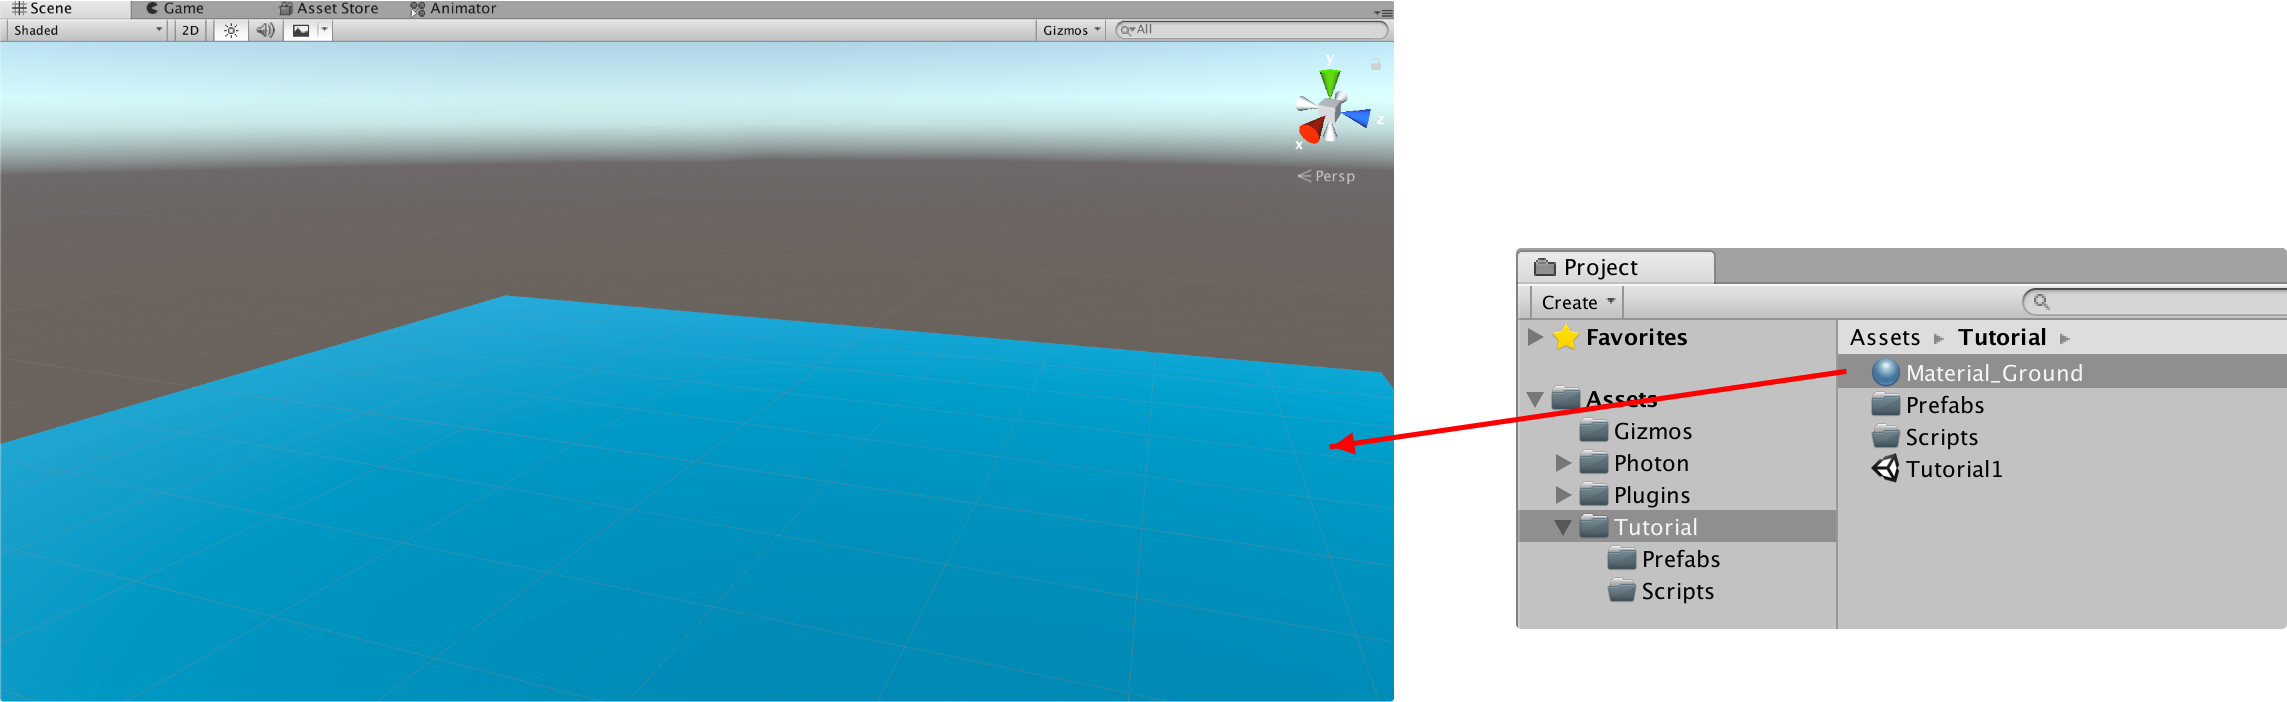
Before we continue with some actual C# code, let's just set up a simple scene in Unity to spawn our cubes into. Create a new Unity scene and save it to Tutorial/Tutorial1. In our scene create a new plane from GameObject/3D Object/Plane, that will be used as the ground and a new material for it, saved to Tutorial/Material_Ground, so we can give it a different color than the cubes.
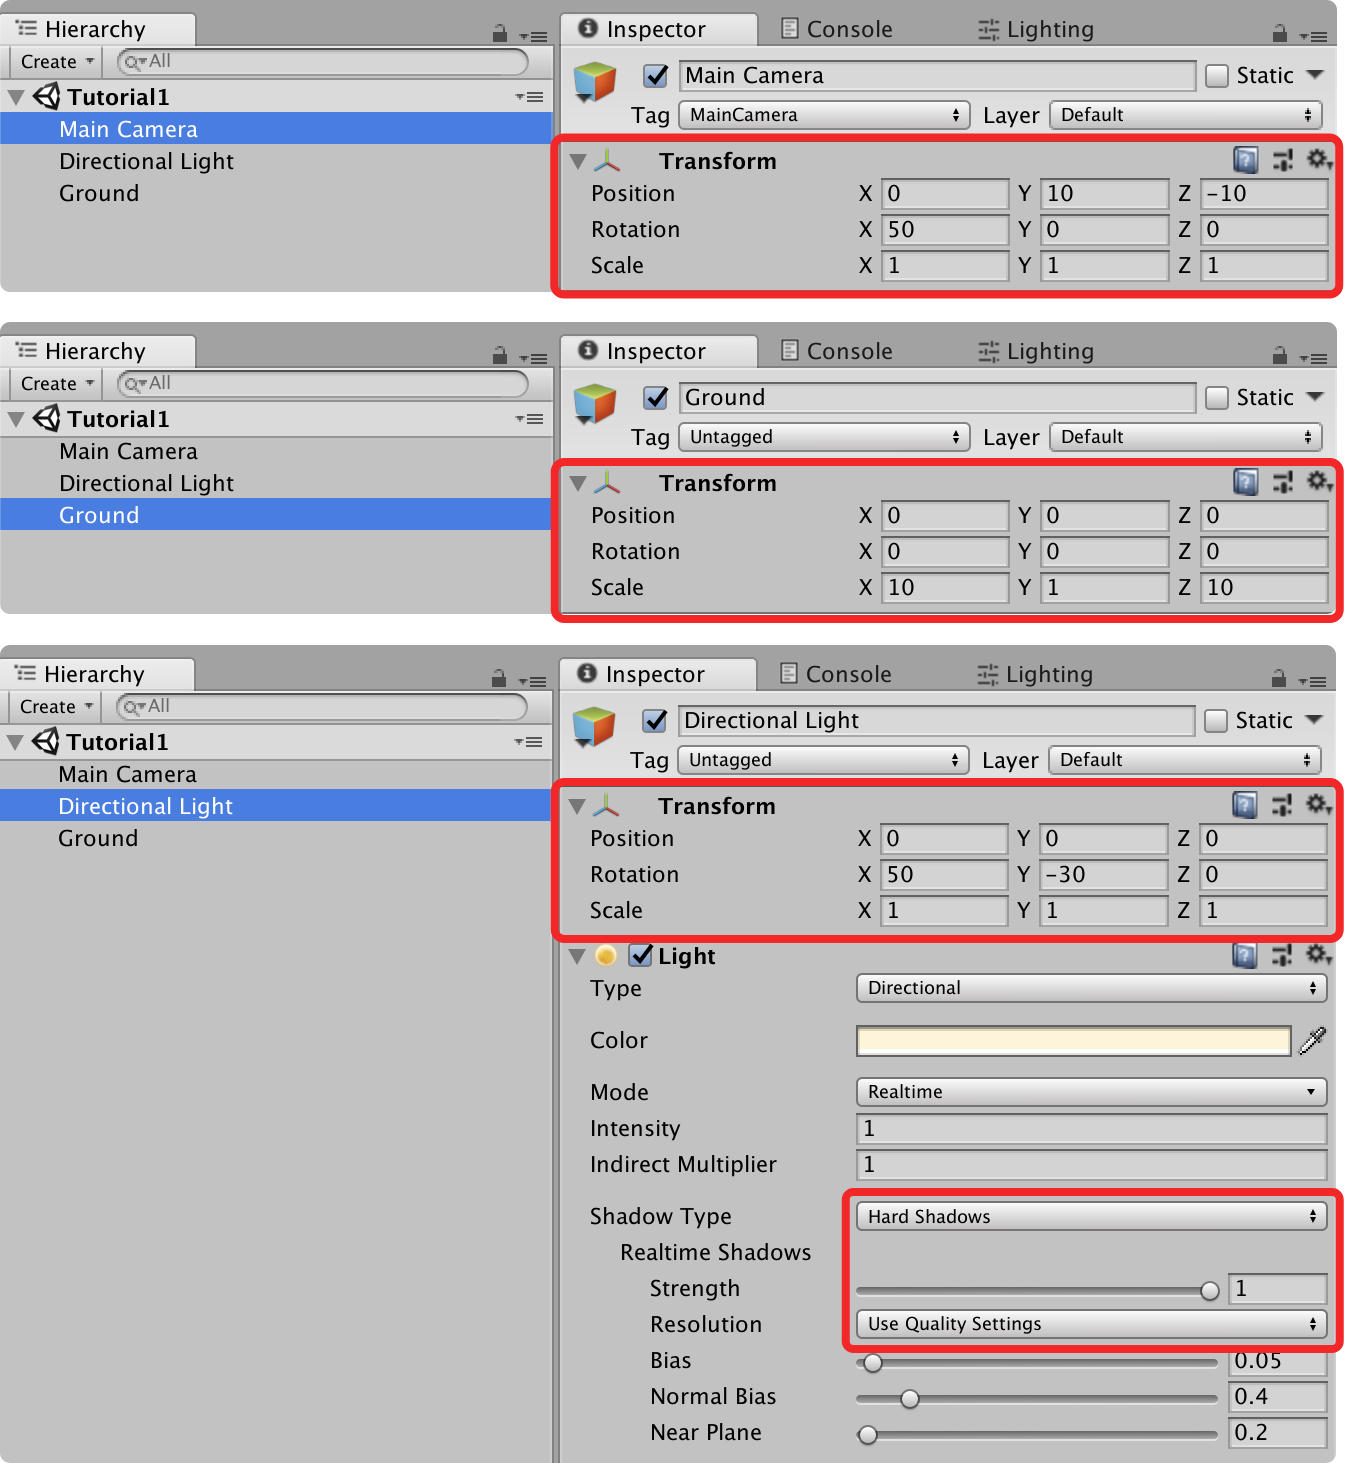
Next are the settings I used to position the Main Camera, the Ground plane and the Directional Light in the scene, so we can have a similar scene to work with.
Now it's time to write some code. Create a new script called NetworkCallbacks in the Tutorial/Scripts folder and open it up in your text editor of choice, clear out the default unity methods so that your file looks like below.
C#
using UnityEngine;
using System.Collections;

public class NetworkCallbacks : MonoBehaviour
{

}
We are going to change the base-class from MonoBehaviour to GlobalEventListener. The GlobalEventListener class itself does inherit from MonoBehaviour so you can do all the normal Unity stuff as usual, but it adds several Bolt specific methods on-top.
C#
using UnityEngine;
using System.Collections;
using Bolt;

public class NetworkCallbacks : GlobalEventListener
{

}
What we want to do is to receive a callback when a scene is loading (in this case our Tutorial1 scene) so that we know when we can instantiate our Cube prefab. Bolt supports automatically networked loading of Unity scenes, the callback we want to hook into for this is called SceneLoadLocalDone.
It's important to note here also that Bolt uses the public override standard C# way of implementing methods, instead of the Unity way where you don't designate a method as an override.
C#
using UnityEngine;
using System.Collections;
using Bolt;

public class NetworkCallbacks : GlobalEventListener
{
    public override void SceneLoadLocalDone(string scene)
    {
        // Your code here...
    }
}
To instantiate a prefab in Bolt you use the BoltNetwork.Instantiate method.
In general it works exactly the same as the built-in GameObject.Instantiate in Unity.
There are several different overloads for this method with various parameters, but we are going to use one of the simpler ones: It takes a Bolt prefab reference, position and rotation.
C#
using UnityEngine;
using System.Collections;
using Bolt;

public class NetworkCallbacks : GlobalEventListener
{
    public override void SceneLoadLocalDone(string scene)
    {
        // randomize a position
        var spawnPosition = new Vector3(Random.Range(-8, 8), 0, Random.Range(-8, 8));

        // instantiate cube
        BoltNetwork.Instantiate(BoltPrefabs.Cube, spawnPosition, Quaternion.identity);
    }
}
We randomize a position on the XZ plane so that everyone doesn't spawn at the same position, we then call BoltNetwork.Instantiate with a reference to our Cube, the random position and a default rotation.
The usage of BoltPrefabs.Cube might look a bit weird if you are brand new to Bolt.
BoltPrefabs is a static class which is compiled and updated by Bolt when you run Bolt/Compile Assembly.
It contains a unique reference to each prefab with a Bolt Entity on it.
You could also pass in a normal GameObject reference to the prefab instead if you wanted to.
There's one last thing we are going to do before we are done with the NetworkCallbacks script, we are going to add an attribute to it called [BoltGlobalBehaviour], on the line above the public class NetworkCallbacks ... definition add the attribute.
C#
using UnityEngine;
using System.Collections;

[BoltGlobalBehaviour]
public class NetworkCallbacks : Bolt.GlobalEventListener
{
    public override void SceneLoadLocalDone(string scene)
    {
        // randomize a position
        var spawnPosition = new Vector3(Random.Range(-16, 16), 0, Random.Range(-16, 16));

        // instantiate cube
        BoltNetwork.Instantiate(BoltPrefabs.Cube, spawnPosition, Quaternion.identity);
    }
}
What this attribute does is that it allows Bolt to automatically detect this script and create an instance of it which lives together with Bolt and is destroyed when Bolt is shut down.
Important: You should not manually attach an instance of this script to any GameObject in Unity, it will be handled by Bolt automatically.
If you want to manually attach a GlobalEventListener somewhere then you should not add the [BoltGlobalBehaviour] attribute.
The last step we need to perform before we can test our Cube spawning is to just setup a main menu script that starts Bolt.
Create a new scene and save it to Tutorial/Tutorial1_Menu.
Before we go any further and write some code for our Menu, make sure that both the Tutorial1 and Tutorial1_Menu scenes are added to the Build Settings in Unity.
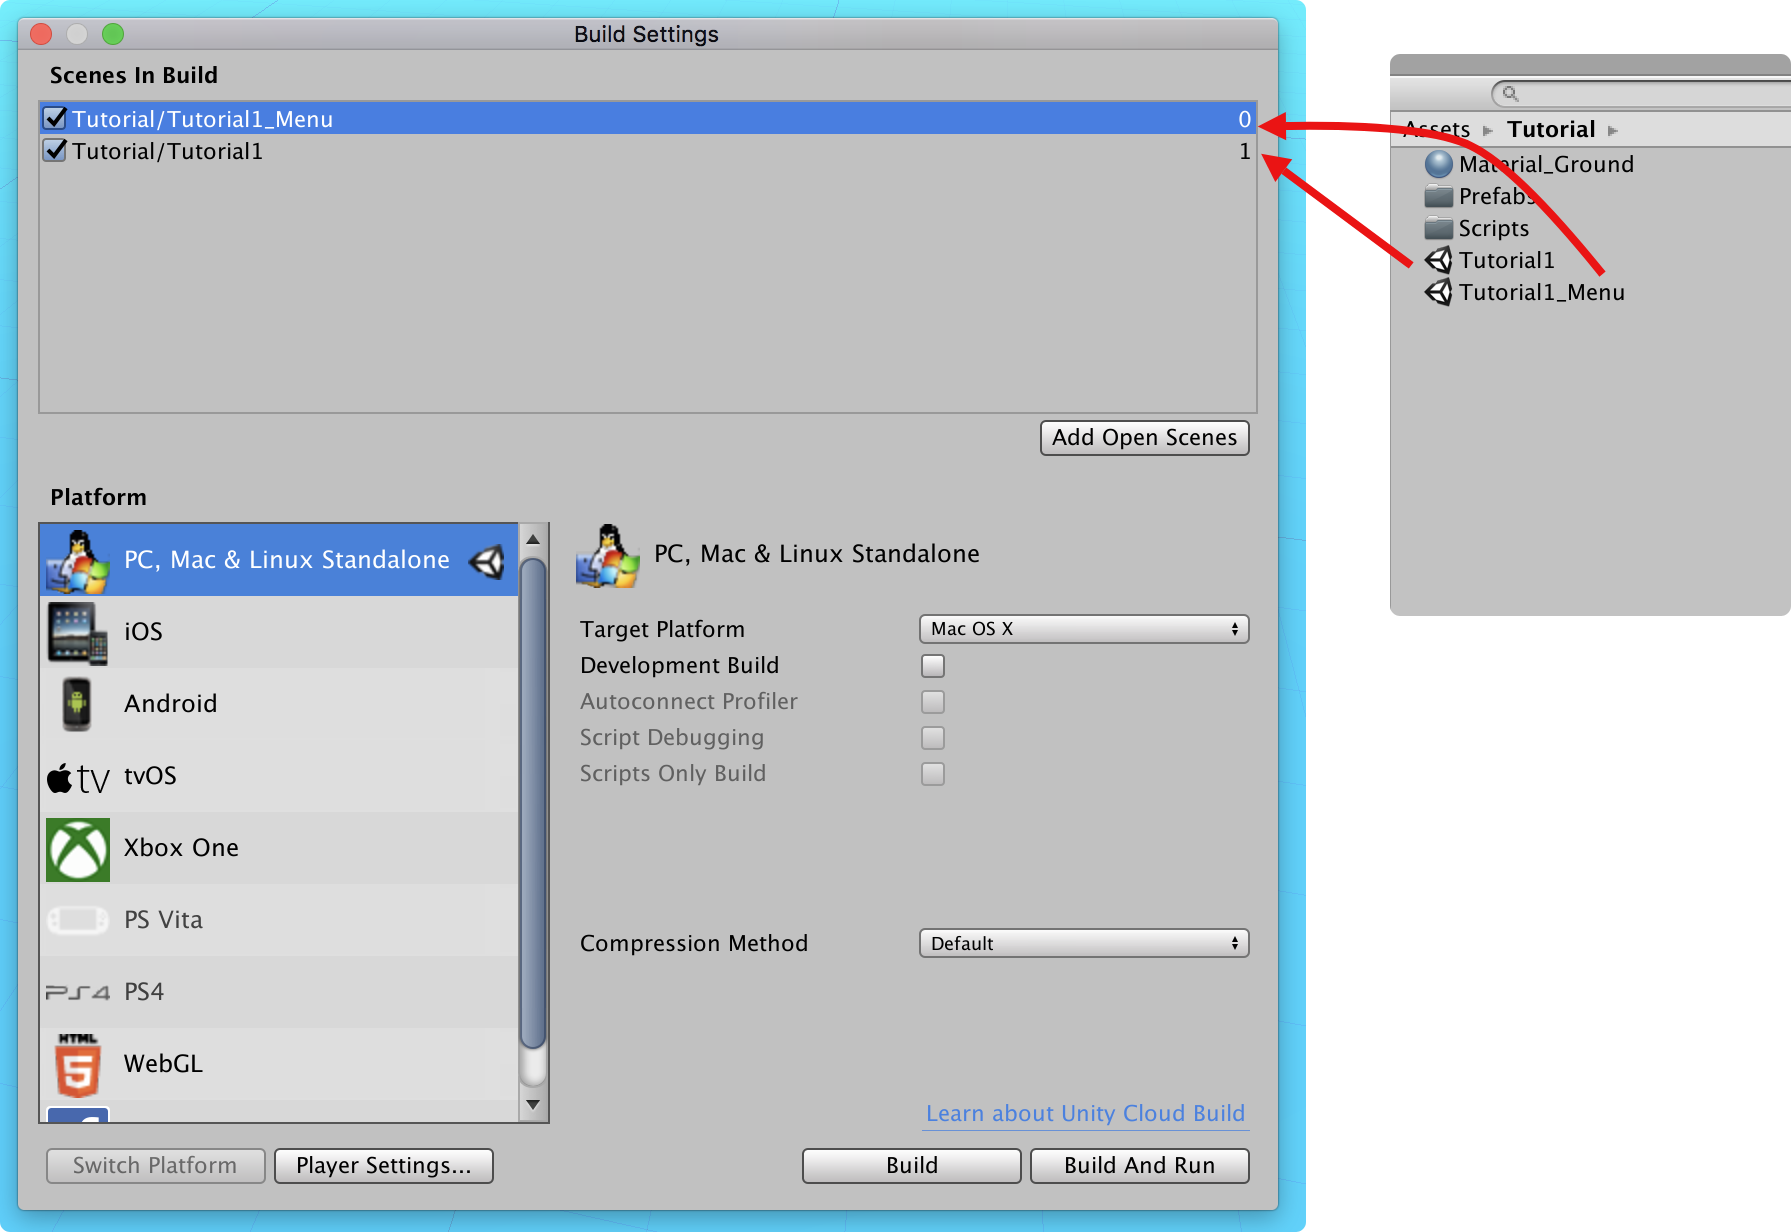
Important: After you've added both scenes, make sure to run Bolt/Compile Assembly again to make Bolt aware of your scenes.
Also, make sure that the Tutorial1_Menu scene is the first one (index 0) so that it loads when your game starts.
We're going to create a super simple menu script and attach it to the MainCamera in the Tutorial1_Menu scene.
Create a script called Menu in Tutorial/Scripts as shown below:
C#
using System;
using UnityEngine;
using Bolt;
using Bolt.Matchmaking;
using UdpKit;

public class Menu : GlobalEventListener
{
    void OnGUI()
    {
        // Your code here...
    }
}
Clear out the default Unity methods and add an OnGUI method.
We're going to create two buttons which stretches over most of the screen, one for starting the server and one for starting the client.
And as usual, we need to make this class extends from GlobalEventListener, in order to use the Bolt behaviors.
C#
using System;
using UnityEngine;
using Bolt;
using Bolt.Matchmaking;
using UdpKit;

public class Menu : GlobalEventListener {

    void OnGUI()
    {
        GUILayout.BeginArea(new Rect(10, 10, Screen.width - 20, Screen.height - 20));

        if (GUILayout.Button("Start Server", GUILayout.ExpandWidth(true), GUILayout.ExpandHeight(true)))
        {
            // START SERVER
            BoltLauncher.StartServer();
        }

        if (GUILayout.Button("Start Client", GUILayout.ExpandWidth(true), GUILayout.ExpandHeight(true)))
        {
            // START CLIENT
            BoltLauncher.StartClient();
        }

        GUILayout.EndArea();
    }

    public override void BoltStartDone()
    {
        if (BoltNetwork.IsServer)
        {
            string matchName = Guid.NewGuid().ToString();

            BoltMatchmaking.CreateSession(
                sessionID: matchName,
                sceneToLoad: "Tutorial1"
            );
        }
    }

    public override void SessionListUpdated(Map<Guid, UdpSession> sessionList)
    {
        Debug.LogFormat("Session list updated: {0} total sessions", sessionList.Count);

        foreach (var session in sessionList)
        {
            UdpSession photonSession = session.Value as UdpSession;

            if (photonSession.Source == UdpSessionSource.Photon)
            {
                BoltMatchmaking.JoinSession(photonSession);
            }
        }
    }
}
All the GUILayout.* calls are standard Unity stuff so we'll skip that, the two important pieces of code are inside the methods BoltStartDone and SessionListUpdated.
The server is started by calling BoltLauncher.StartServer, this will set this peer as the Host of the game.
After we've started the server (when the BoltStartDone is called) we call one important method:
BoltMatchmaking.CreateSession: this method will setup the Photon Cloud Room on the Photon Servers, expecting new peers connect to this room and join the game. You can set the Room name using thesessionIDargument of the function. As an example, we just create a random name for it. By using thesceneToLoadargumento you tellsBoltto load theTutorial1scene.
The process on the client is similar to the server, we call BoltLauncher.StartClient, to configure this peer as a client that can join other games.
The main difference is that we will need information about the room created by the game server on the Photon Servers in order to make our client connect to the Host peer.
For your convenience, Bolt already do this automatically without we need to do anything.
When the client is started, it connects to Photon Server and pulls information about any visible room that has been registered on the cloud.
To get this information we use the SessionListUpdated callback, which is invoked by Bolt every time the room list is updated, cases where new rooms are created, rooms are removed or their properties are changed.
In our implementation of SessionListUpdated, we just go through all available sessions, looking for the first Photon Session and connects to the it.
The client will start the NAT punchthrough process with the Host and joins the game.
Attach our Menu script to the MainCamera game object in the Tutorial1_Menu scene.
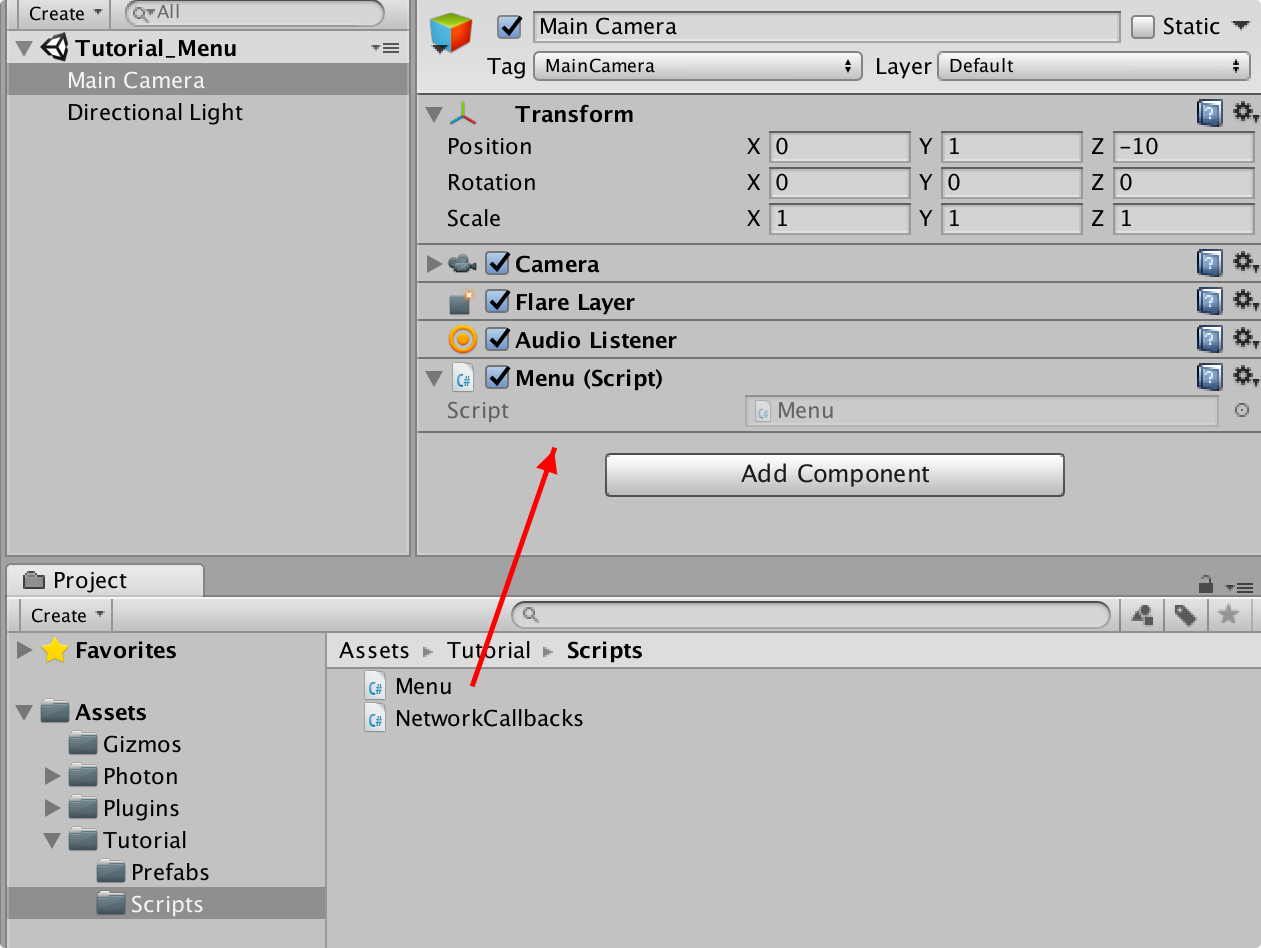
Important: Make sure it's the correct scene you attach the Menu script to.
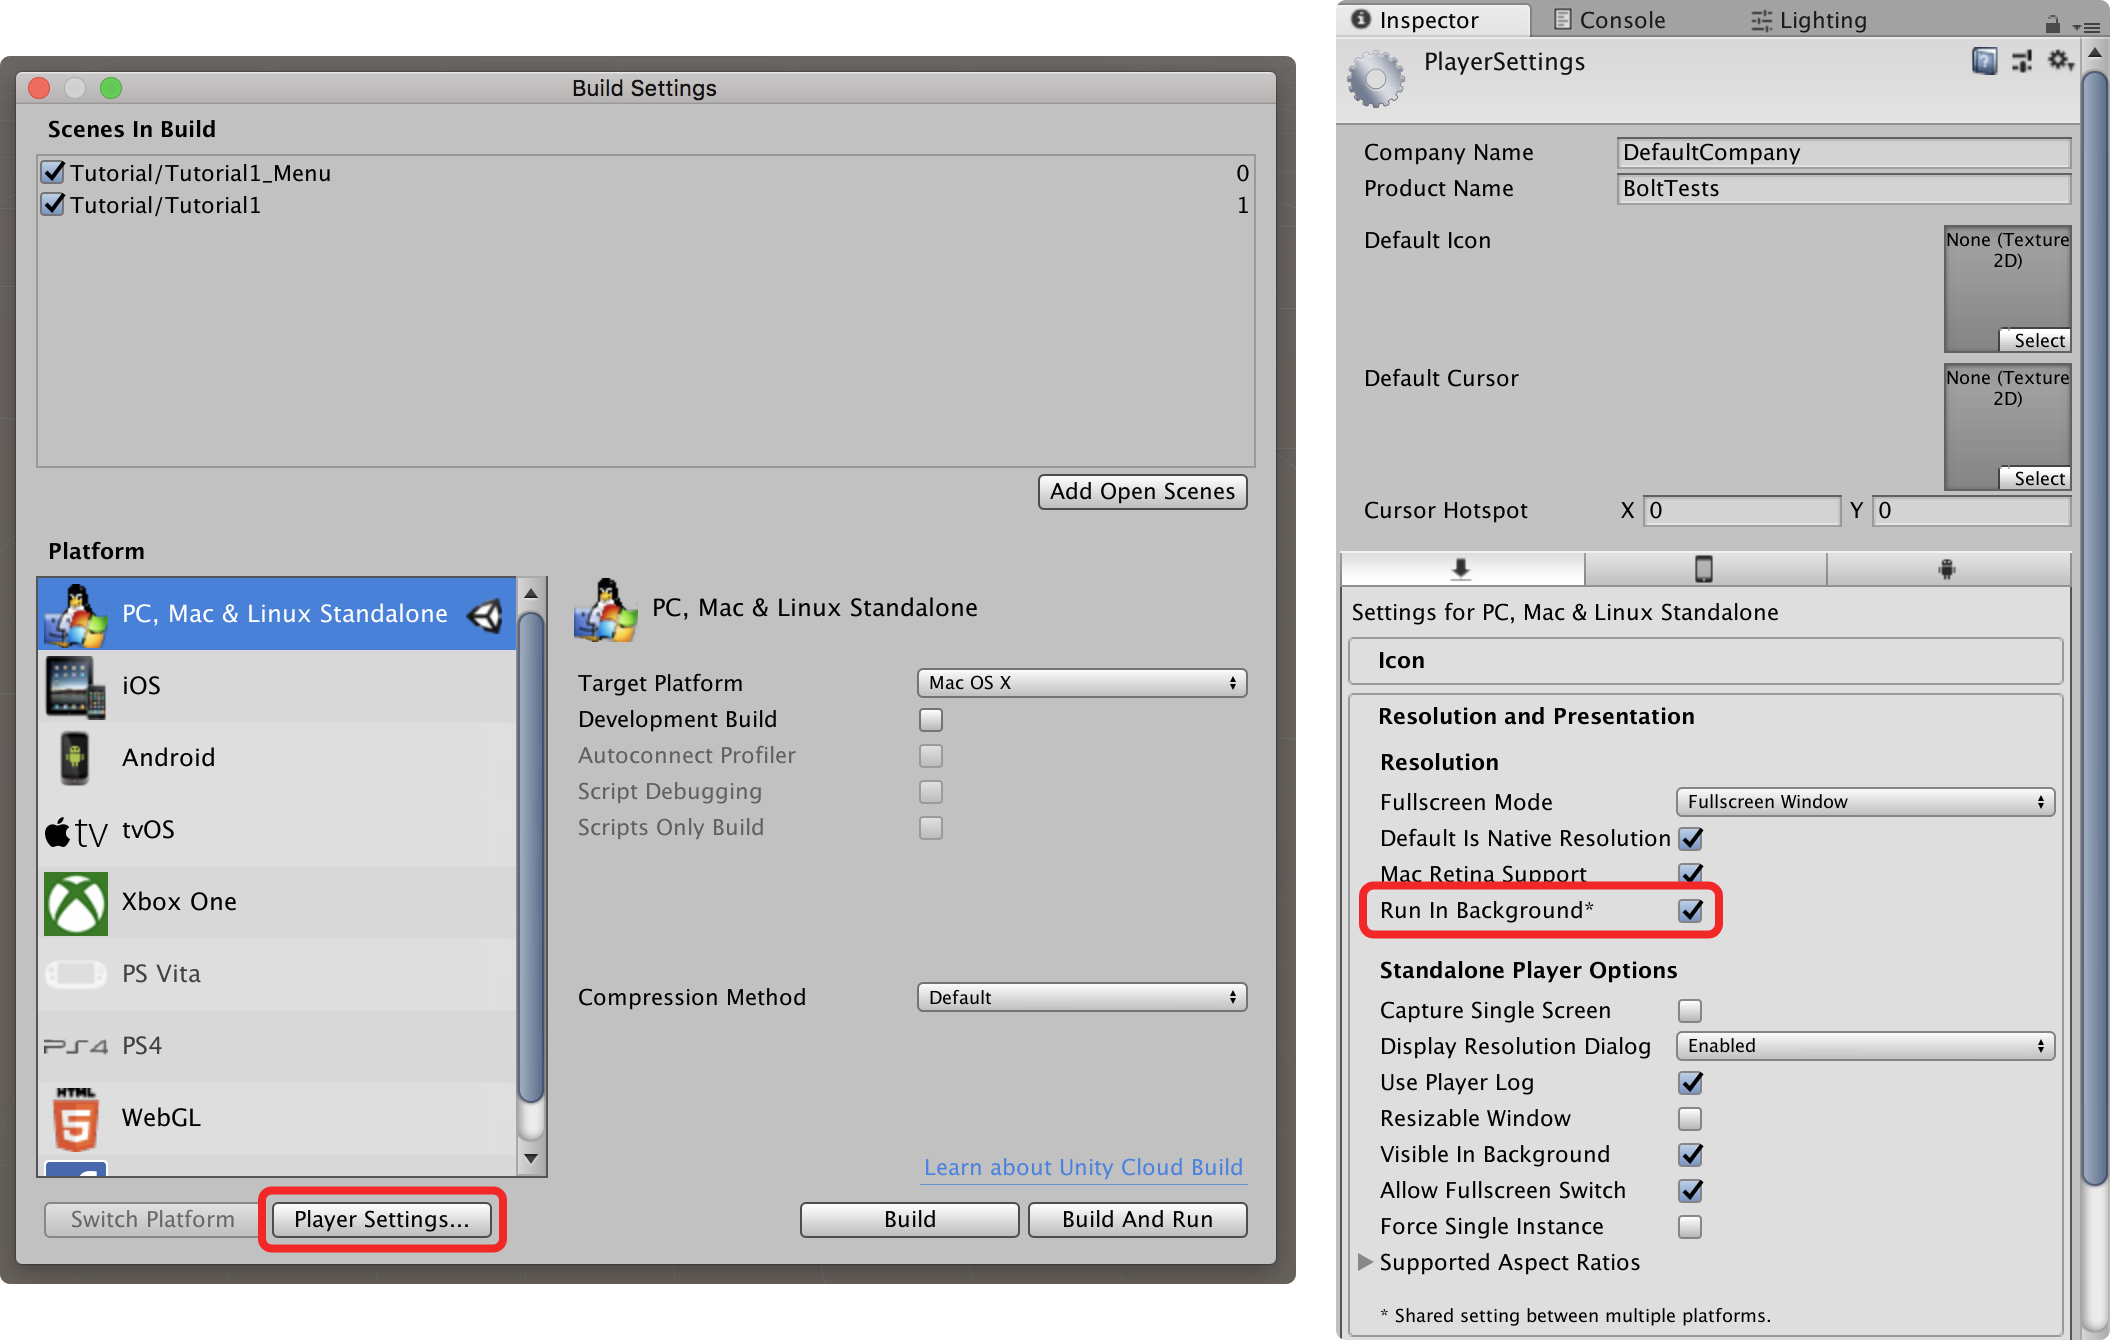
Before we start our game make sure to go into the unity 'Player Settings' and enable 'Run In Background'.
Build a standalone desktop version of the game and start two instance of it. On windows you will most likely get a Windows Firewall popup, just click Allow access. On Mac machines, it will show a similar window when the peers are trying to connect, click on Allow.
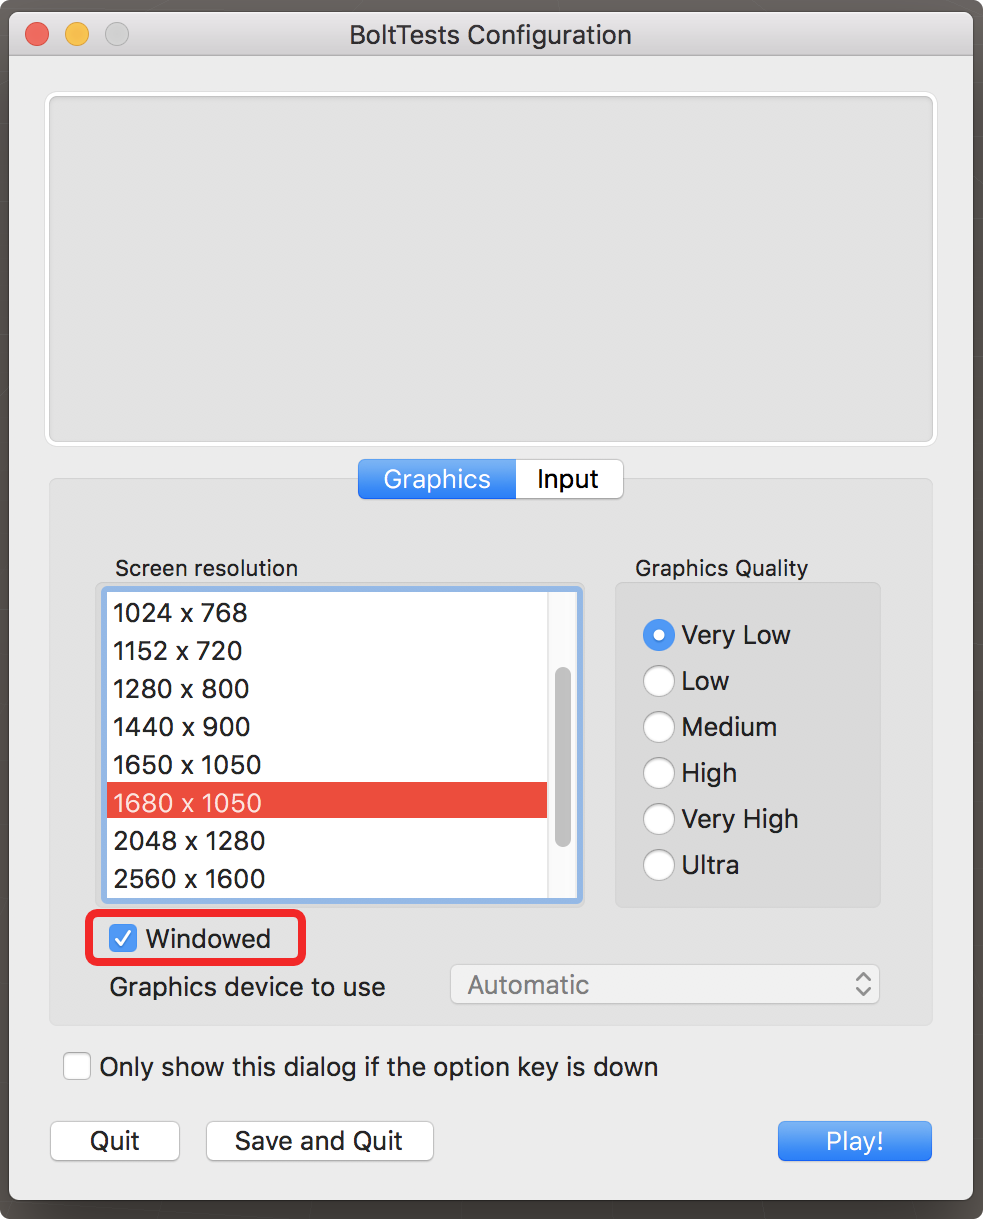
Make sure you are running in Windowed mode, and also pick a resolution which is in 16:9.
When the game starts click Start Server on the first one and Start Client on the second one, you should now see two instances of the game running, two cubes spawning (one for each instance of the game).
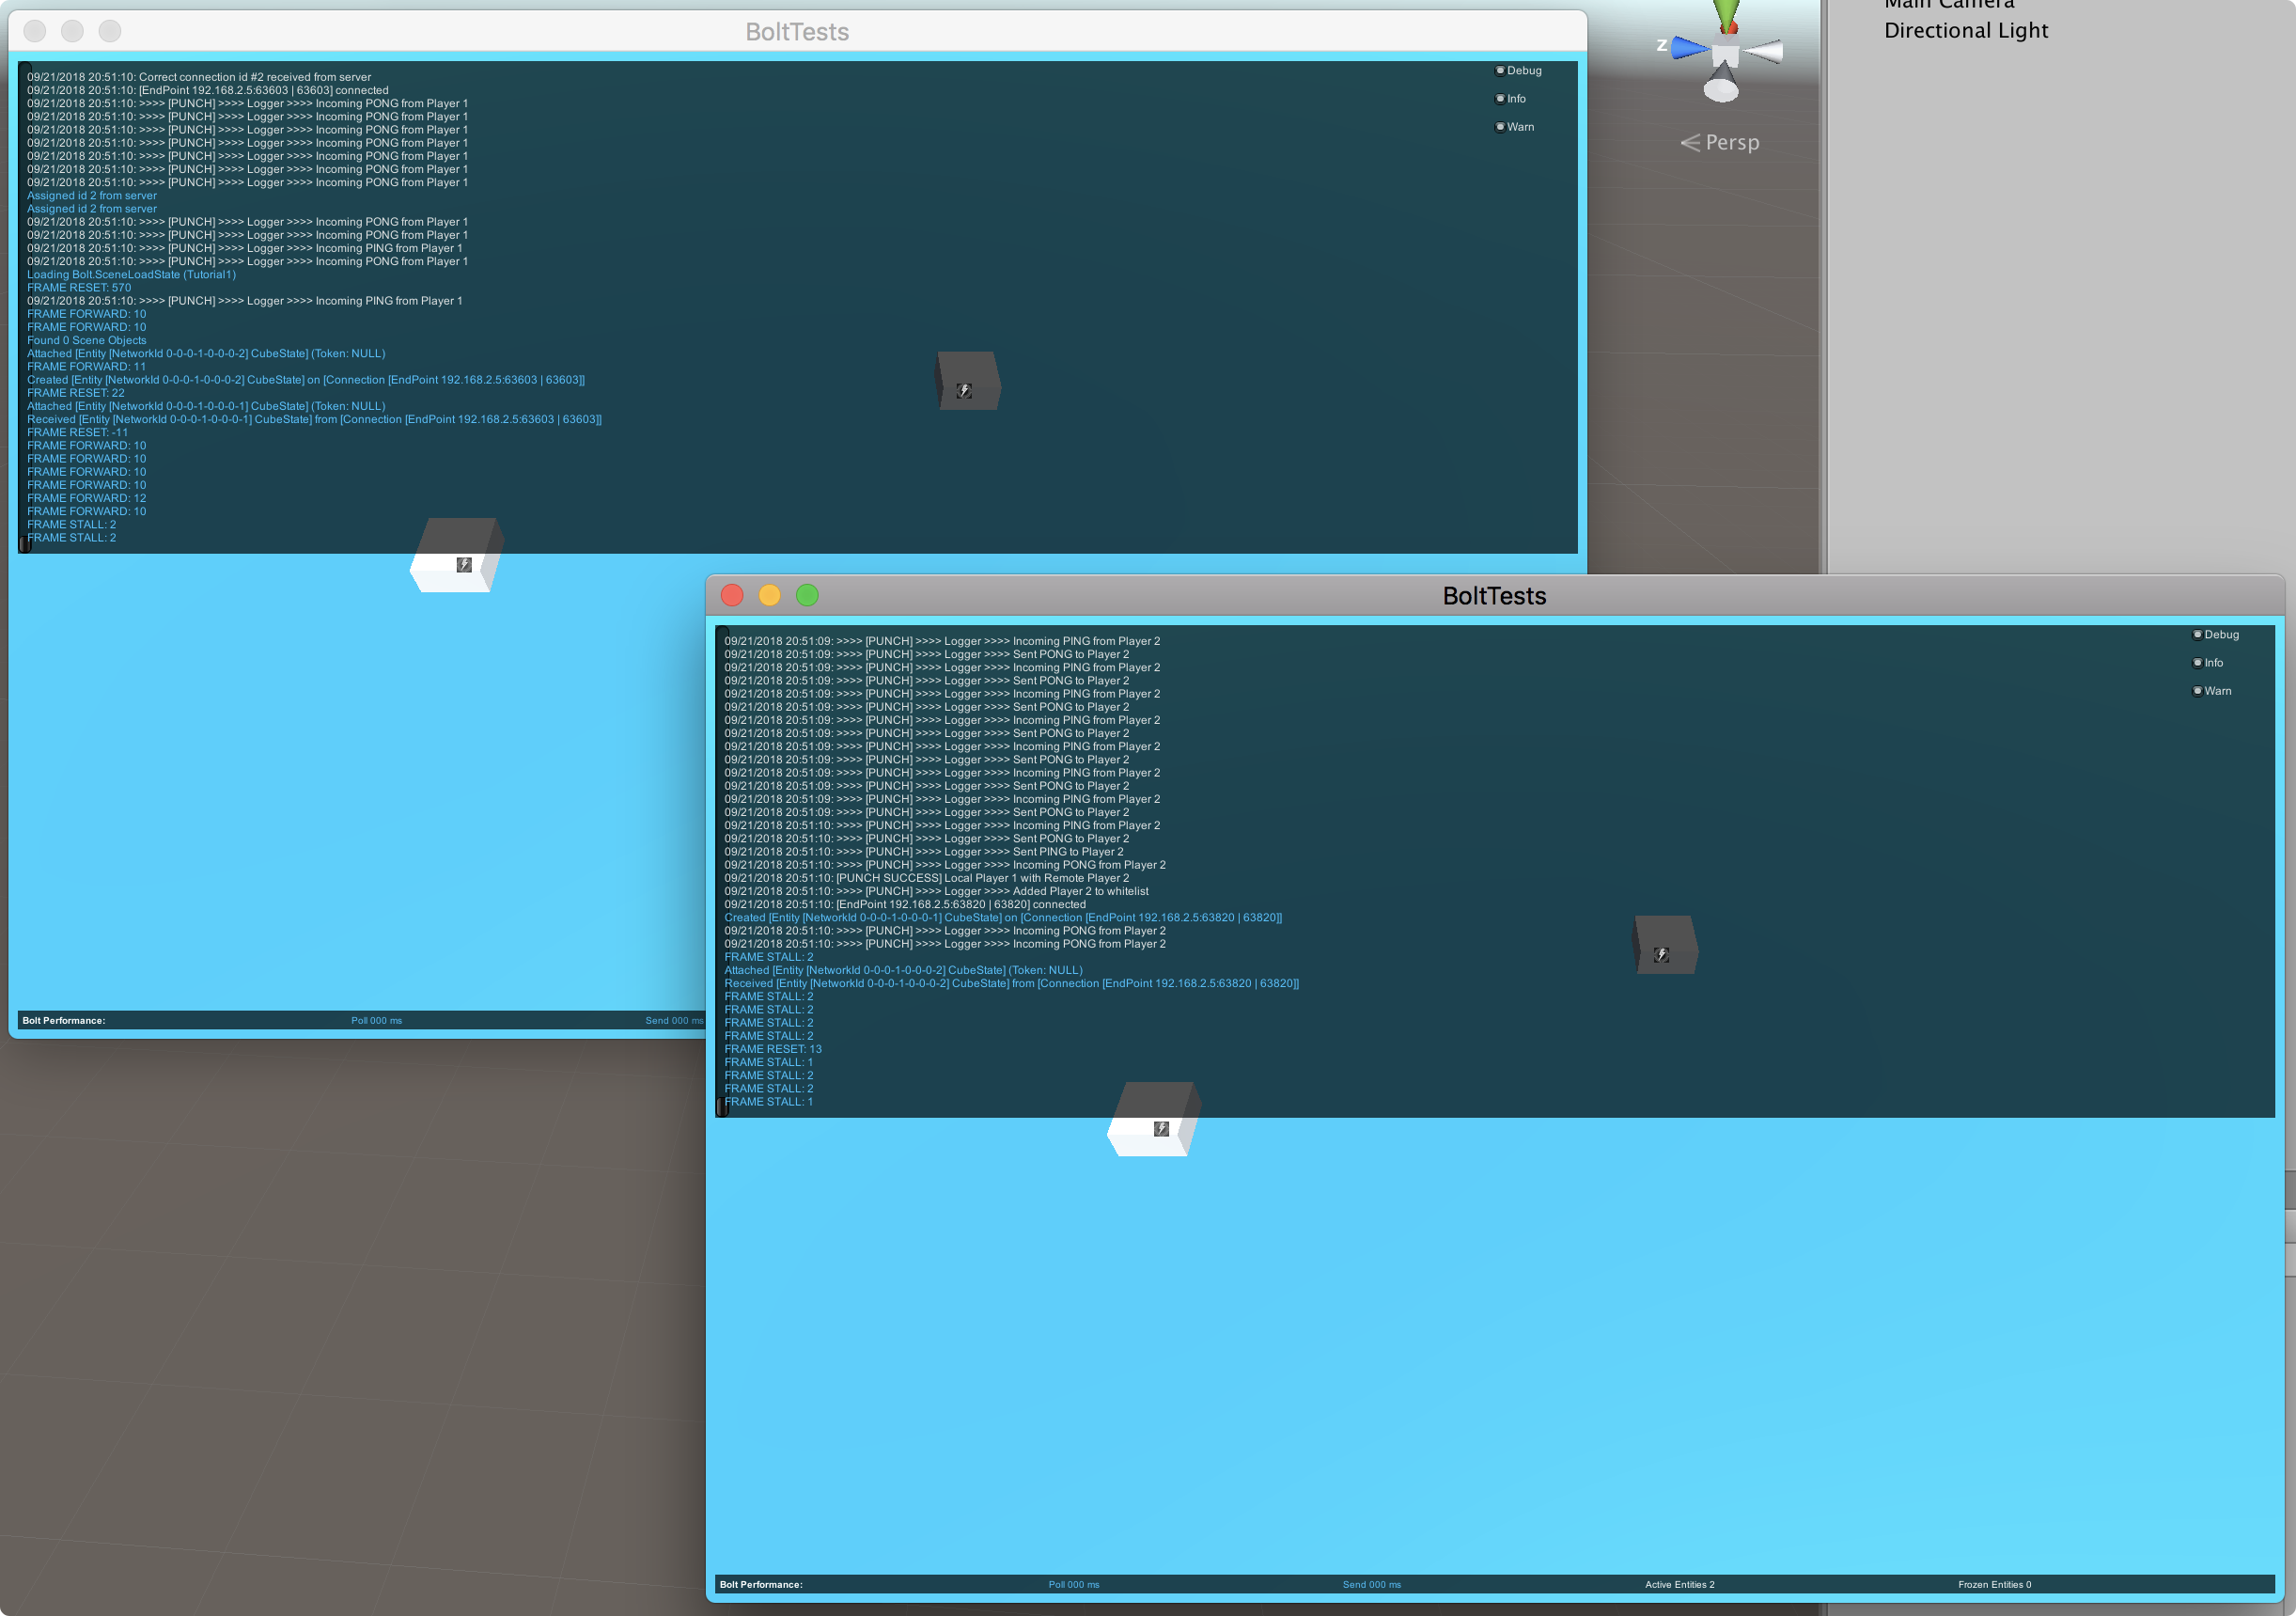
You will also see the Console which Bolt adds by default when running in Debug mode, and a little Bolt Performance display at the bottom.
Continue in next chapter >>.
Back to top