状態
Photonボルトの核心には、State と呼ばれる概念があります。
Boltの State 実装を使用して、Entity のネットワーク State をテンプレートとして定義します ( Bolt Assets ウィンドウを使用します)。これは、トランスフォームなどのプロパティや多くの組み込みプリミティブ型を含んでいます。
アセットがリソースから読み込まれ、Unityエディターを再起動するか、実行時にUnity DBをリセットする場合、UnityはUnityアセットをアンロードしません。
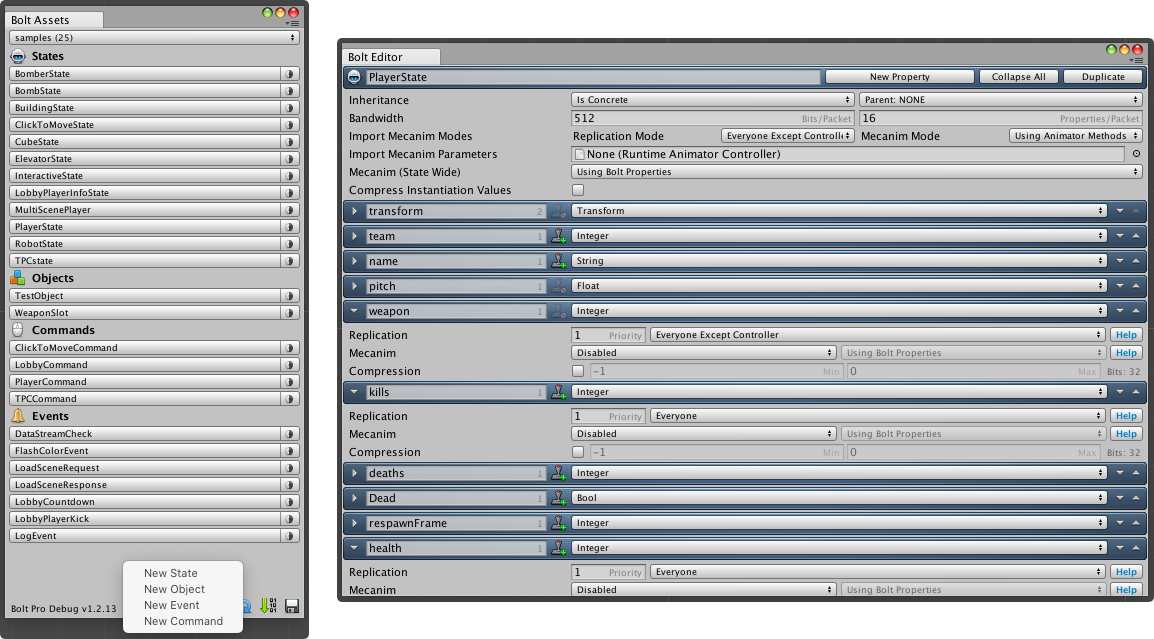
それぞれの State は、その挙動の一部を設定するための内部設定のセットを持っています。
- Inheritance: この設定では、状態の階層を作成することができます。簡単に言えば、親の
Statesのすべてのプロパティが子の状態に作成されるので、プレイヤーと敵のように非常に似た状態を持っている場合は重複する必要はありません。 - Bandwidth: この
Stateが 1 パケットあたりに使用できるビット数と、このStateから同時にパケットに書き込めるプロパティの数を決定します。 - Mecanimモードをインポート:
- Replication Mode: Mecanimプロパティがどのように同期されるかを設定します。他の
Stateプロパティで設定できることと似ています。 - Mecanim Mode: アニメーターのプロパティをどのように変更するかを設定します。アニメーターのメソッド (
animator.SetFloatなど) を使って、あるいは代わりにBoltプロパティを使います。
- Replication Mode: Mecanimプロパティがどのように同期されるかを設定します。他の
- Import Mecanim Parameters: これはアニメーションを制御するために必要なすべてのパラメータをインポートするためのベースとして使われる
AnimatorControllerへの参照。 - Compress Instantiation Values: 有効にすると、新しいBolt
Entityを生成する際にStateに基づいて初期変換位置を圧縮する方法を設定することができます。値の範囲を知っていて、Entityを作成する際にビットを節約したい場合は、これを利用すると良いです。
状態の説明
Bolt Stateは、ユーザーがネットワークのプロパティを同期できるようにします(自動的に、そして、それらが変更されたときだけ)。
加えて、State は遅延結合の実装をほぼ透過的にします。
Bolt State の所有者がプロパティを変更するたびに、Bolt は現在そのエンティティにスコープされているクライアントにその値を送信します。
ユーザーは、Entityの挙動のコールバック(Attached)コールバックを購読することができます(こちらを参照してください)。
Float や Transform のような State プロパティは、Entity が作成されたときに最初に設定されるデフォルト値を持っています(変更はできません)。
特定のプロパティ値がデフォルト値から変更されていない場合、Boltはこのプロパティを接続に同期せず、全体的なネットワーク転送を最小限に抑えます。
ネイティブプロパティでは不十分な場合は、Stateをカスタムプロパティで拡張することもできます。
これは IProtocolToken の実装を使用して行われ、カスタムビジネスロジックのシリアライズを完全に制御することができます。
トークン内のデータを変更すると、変更されたプロパティを送信するためにBoltをトリガーしません。
Boltがトークンを送信するのは、トークンの参照自体が変更された場合のみです。つまり、既存のトークンを別のトークンに変更した場合や、それをNULLに設定した場合(またはNULLトークンをNULLではないトークンに変更した場合)です。
トークンは、ファクトリから作成されているので、Boltに登録する必要があります。
新しい接続がゲームセッションに参加すると、すべてのエンティティが(スコープに基づいて)自動的に同期されます。
変更されたすべてのプロパティは、このプレイヤーにも同期されます。
エンティティ/プロパティの数に応じて、これには可変の時間がかかる可能性があります。
Boltは、Bolt Settingsで設定したように、1秒間に多くのパケットを送信するだけなので、最終的にはすべてのデータがクライアントに到着します。
これにより、遅延参加の実装が非常に簡単になり、通常のハック(一般的には何らかのメッセージバッファリング)を回避することができます。
状態の複製
Boltは各送信ティック(Bolt Settingsで定義)でのみ状態更新を送信します。つまり、プロパティは基本的に「ダーティ」としてマークされ、次の送信ティックまで評価されません。
言い換えれば、FixedUpdates の間に何度かプロパティの値を変更した場合、Bolt の送信時の値だけが送信されます (つまり、中間の値は送信されません)。
Bolt State とそのプロパティを扱う際に注意すべきことの一つは、Entity の Owner だけがその値を変更し、ネットワーク上に複製することができるという事実です。
唯一の例外は、プロパティの Replication Mode ( こちらをご確認ください) が Everyone Except Controllerに設定されている場合です。この場合、Controller はプロパティの値を変更することができますが、複製されることはなく、ローカルの Controller でプロパティのコールバックが実行されるだけです。
状態プロパティは、エンティティが添付されたときにすべてがクライアントに届くことを保証するものではありません。
あるデータが絶対に必要な場合は、そのデータにアタッチトークンを使用してください(つまり、インスタンスを作成する際に IProtocolToken でデータを送信してください)。
アタッチトークンは比較的重いのでご注意ください。作成操作が確認されるまで、作成操作の送信ティックごとに送信されます。
また、状態プロパティは、一般的には優先順位の高い順に受信されますが(Bolt状態の設定で優先順位の高い番号が高いほど優先順位が高くなります)、これは保証されていません。
これは"eventual consistency"と呼ばれ、最終的に状態がエンティティの所有者と一致することを意味します。
Bolt がすべての状態プロパティをパッキングしているとき、最初に Entities を優先度でソートしてから、それらを反復処理します。
各エンティティについて、Boltはダーティなプロパティをソートし、パケットスペースがなくなるまで、一定の数(設定で定義されている)を送信します(エンティティの優先度でもソートして)(Bolt Packets。
この手順は接続ごとに行われます。
パケットサイズとBolt設定の両方の関係で、状態プロパティを変更した後、次の送信ティックでBoltがそれを送信することが保証されることはありません。
Bolt には Scopeという概念もあり (詳細はこちら) 、どの接続が特定の Entity からの更新を受け取るかを決定します。
デフォルトでは、すべての接続がすべての更新を受け取りますが、これは Manual スコープモードを使って変更できます。
状態のプロパティタイプ
任意のBolt Stateは基本的にプロパティのセットとして作成され、それぞれのプロパティはデータ型で表現されます。
ここでは、Entity's State を作成するために使用できるすべてのプロパティの型と、その詳細について説明します。
各プロパティタイプには、デフォルトの動作を操作するために使用される設定の独自のセットがあります。 Replication Mode (すべてのフィールドにこの設定があります。詳細はこちらです。)や圧縮オプションがあります。
プロパティタイプの中には Mecanimと呼ばれるオプションもあり、このプロパティを Animator パラメータとみなすかどうかを制御することができます。その場合、Boltはプロパティ値を AnimatorControllerと自動的に同期できます(この詳細については、このページで後ほど説明します)。
- Float:
float値 - Smoothing Algorithm: 値を補間するかどうかを選択します。
- Interpolation Mode: 値を通常の浮動小数点値とみなすか、角度とみなすかを選択します。Boltが値を補間する際に
UnityEngine.Mathf.Lerpを使うか、UnityEngine.Mathf.LerpAngleを使うかを指定します。 - Compression: floatの圧縮設定を決定します。
- Integer: 整数値。
- Compression: 整数値の圧縮を設定します。
- Matrix4x4: Unity Matrix4x4 インスタンス。
- Quaternion: Unity Quaternion インスタンス。
- Smoothing Algorithm:
Quaternionの値を補間するかどうかを選択します。UnityEngine.Quaternion.Slerpを利用しています。 - Axes:: どの軸(
X,Y,Z)をこのクォータニオンで考慮するかを選択します。 - Strict Comparition:: これを有効にすると、
Quaternionの等値演算子 (q1 != q2) の代わりに、Quaternionが変更されたかどうかを検出する際に、各特異値を 1 つずつ比較します (q1.x != q2.x || q1.y != q2.y...)。 - Quaterinon Compression:
Quaternionの各値の圧縮設定を決定します。 - Vector: Unity Vector3 のインスタンス。
- Smoothing Algorithm:
Vectorの値を補間するかどうかを決定します。UnityEngine.Vector3.Lerpを利用しています。 - Axes:: どの軸(
X,Y,Z)をこのベクトルで考慮するかを選択します。 - Strict Comparition:: これを有効にすると、
Vectorが変化したかどうかを検出する際に、Vectorの等値演算子 (v1 != v2) を使用する代わりに、各特異値を 1 つずつ比較します (v1.x != v2.x || v1.y != v2.y...)。 - Teleport Threshold: 値の間を補間するのではなく、
Vectorの値が所定の位置に収まるまでの大きさの限界を決定します。 - Axis Compression:
Vectorの各値の圧縮設定を決定します。
- Smoothing Algorithm:
- Smoothing Algorithm:
- Bool: ブーリアン値。
- String: Stringの値。
- Encoding & Length: String の値をシリアライズする際にどのエンコーディングを使用するか、また最大文字数を設定することができます。
- Guid: System.Guid のインスタンス。
Color: Unity Color のインスタンス。
Color32: Unity Color32 のインスタンス。
Entity: 他の
BoltEntityのインスタンスへの参照。NetworkId: 任意の
Bolt.NetworkIdへの参照。PrefabId: 任意の
Bolt.PrefabIdへの参照。Array: 配列の形式で整理された、同じ型の値の集まりです。
FloatsやStringsの配列など、ネイティブ配列と非常によく似たインデックスを使用して、個々のアイテムにアクセスできます。- Element Type: 配列の種類を選択します。
- Element Count: 配列が保持する要素数。
Object:
Objectアセットの型を表します。Objectアセットは特殊なタイプのコンテナで、関連するデータを同じ「ボックス」内に格納するために使用できます。Bolt Assetsウィンドウでも定義されており、Stateとして同じプロパティを定義し、複数の異なるStateでObjectの定義を再利用することができるため、サブステートとみなすことができます。- Object Type: この型に用いる
Object型を選択することができます。
- Object Type: この型に用いる
ProtocolToken:
Bolt.IProtocolTokenを実装したカスタムトークンへの参照です。Tokenフィールドは、他のプロパティタイプでは通常送信できないような任意のデータを送信したい場合に便利です。既に述べたように、Tokenフィールドの値を変更しても値は同期されませんが、トークンの参照を変更した場合(nullまたは新しいトークンに変更した場合)にのみ更新されます。Trigger: トリガーは特殊な一発発射状態です。アニメーションの状態変化や武器の発射をトリガーとして実行できるプロパティが必要な場合、
Triggerプロパティはこの場合に役立ちます。Transform: Unity Transform インスタンス。
Transformプロパティは他のすべての型とは異なります。透過的に補間/補外を実装しており、オプションの単純な "レンダリング "補間も実装しています。最適化として、Boltはトランスフォームが移動したときだけTransformの状態変化を送信します。オブジェクトが移動しない場合、帯域幅は使用されません。- Space: この
TransformがLocalまたはWorldトランスフォーム座標空間を使って翻訳するかどうかを定義します。言い換えれば、BoltがGameObjectを移動する際にlocalPosition/localRotationまたはposition/rotationを使用するかどうかです。 - Smoothing Algorithm:
- None: 位置と回転は新しい値にスナップします。
- Interpolation: Boltは、
UnityEngine.Vector3.Lerpを使って位置ベクトルを補間し、UnityEngine.Quaternion.Slerpを使って回転四元系を補間します。 - Extrapolate: Bolt は現在の速度に基づいて
Transformの位置と回転を外挿します。これは、あまり方向を変えないオブジェクトがあって、ネットワークラグを補正したい場合に便利です。- Extrapolation Velocity: Boltが現在のオブジェクトの速度を計算したり、取得したりする場所から選択します。
- Extrapolation Settings: Boltが位置/回転を外挿するフレーム数を設定することができます。
- Position: プロパティタイプ
Vectorと同じ設定。 - Rotation: プロパティタイプ
Quaternionと同じ設定。
- Space: この
状態のインタラクション
作成する State アセットは、特定の Entity のネットワークレイアウトを記述したものにすぎません。
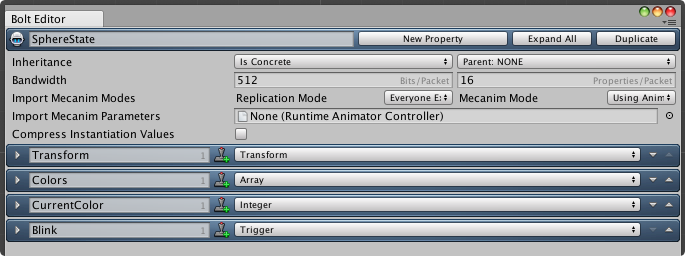
まず、例として使用する State を設定する必要があります。ここでは SphereState という状態を使用します。これには4つの基本プロパティが含まれており、すべてデフォルト設定になっています。
- Transform
Transform型 - Colors of type
ArrayofVectorwith 3 elements;3つの要素を持つVectorのArray型 - CurrentColor
Integer型 - Blink
Trigger型
状態データとインタラクトしたり、値を読み込んだり書き込んだりできるようにするためには、いくつかのステップが必要です。
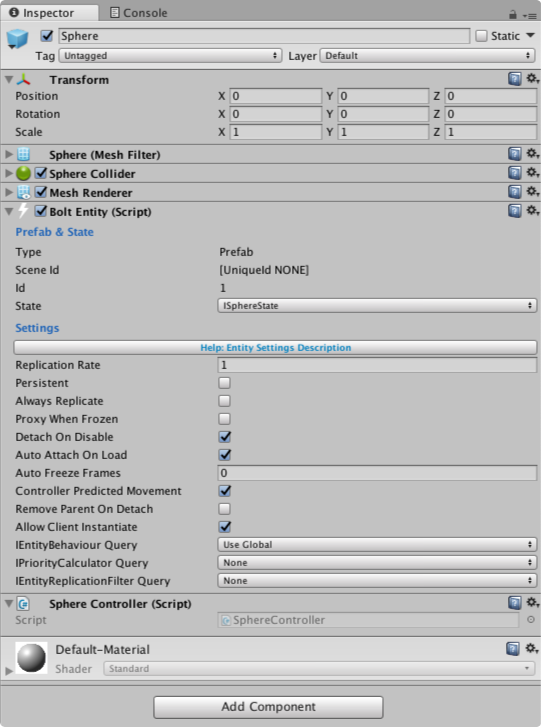
- 新しいUnity Prefabを作成し、そこに
BoltEntityコンポーネントを追加します。 - State フィールドで、
Bolt Assetsウィンドウで定義したStateを選択します。 - 新しいC#スクリプトを作成し、プレハブに追加します。
- アセットに変更を加えた後、再度Boltをコンパイルしてください(
Bolt/Compile Assemblyメニュー)。
下の画像のような構成になるはずです。
この例の SphereController スクリプトを開いてください。任意の Bolt Entity の基本的な実装はこれと非常によく似ています。
C#
using System.Collections;
using System.Collections.Generic;
using UnityEngine;

public class SphereController : Bolt.EntityBehaviour<ISphereState>
{
    public override void Attached()
    {
        // entity initialization
    }
}
エンティティの状態を管理する Entity コントローラを作成する際の注意点をご確認ください。
Bolt.EntityBehaviour<YourStateInterface>またはBolt.EntityEventListener<YourStateInterface>から拡張されている必要があります。 これらのクラスはUnityEngine.MonoBehaviourからも継承されているので、Unityのすべてのメソッドにアクセスすることができます。- クラスを定義する際に渡される汎用型(
YourStateInterface)は、アクセスしようとしているStateの型を定義しますので、GameObjectプリファブに接続されているBoltEntityコンポーネントで設定したものと同じになるはずです。 GameObjectとBoltEntityは初期化処理が異なります。通常のGameObjectと同様にStartメソッド内でEntityを設定することができますが(理論上は)、Bolt は代わりにAttachedメソッドを使用します。つまり、通常はStartメソッドで行っていることをすべてAttachedメソッドで行う必要があります。
では、Entityを初期化し、プロパティに値を関連付ける方法を詳しく説明しましょう。
C#
public override void Attached()
{
    // Link the GameObject with the Bolt Transform Property
    state.SetTransforms(state.Transform, transform);

    // Init the Colors Array
    state.Colors[0] = new Vector3(1, 0, 0);
    state.Colors[1] = new Vector3(0, 1, 0);
    state.Colors[2] = new Vector3(0, 0, 1);

    // Set the Active Color
    state.CurrentColor = 0;
}
ご覧のように、Entity に関連付けられた State を変更するには、付属の state 変数を使って個々のプロパティにアクセスするのと同じくらい簡単です。
これは、Stateを変更したい場合はどこのメソッドでも行うことができます。
他のスクリプトで BoltEntity を参照していて、その状態にアクセスしたい場合は、entity.GetState<YourStateInterface>()を呼び出してください。
このスニペットで重要なのは、Boltが GameObject' の Transform と Transform プロパティをどのようにリンクしているかという点です。state.SetTransforms メソッドを使用することで、Boltは GameObject の位置や回転を移動時に自動的に同期させます。
上のスニップには示されていませんが、Boltとの統合に関連する他の例としては、Entityがアニメーションを持っていて、そのパラメータをすべて同期させたい場合があります。
この場合、Animator の参照を状態に登録する必要があります。
C#
state.SetAnimator(GetComponentInChildren<Animator>()); // Or wherever your animator is
その後、Stateプロパティがすべてエディタで適切に設定されていれば、リンクされたプロパティを変更するだけで、Animatorは意図した通りに複製されるはずです。
前述したように、Entity の Owner だけが Entity の状態を変更できるので、Owner の上でコードを実行したことを確認したい場合は、if (entity.IsOwner) チェックを使ってそれをラップすることができます。
このフィールドは Entity を作成したピアに対してのみ true を返します。
実行時には、例えば CurrentColor に新しい値を代入するだけでインデックス 0 と 1 を切り替えるように CurrentColor を変更し、関連するメソッドを呼び出して Trigger プロパティをアクティブにすることができます (これはこの種のプロパティに特有のものです)。
このページの後半では、これらの変更にどのように反応するかを説明します。
C#
private void Update()
{
    if (entity.IsOwner == false) { return; }

    if (Input.GetKeyDown(KeyCode.C))
    {
        var current = state.CurrentColor;
        current = ++current % 2;
        state.CurrentColor = current;
    }

    if (Input.GetKeyDown(KeyCode.R))
    {
        var idx = Random.Range(0, state.Colors.Length);
        state.Colors[idx] = new Vector3(Random.value, Random.value, Random.value);
    }

    if (Input.GetKeyDown(KeyCode.F))
    {
        state.Blink();
    }
}
Replication Modes(link)は、状態がどのように誰に複製されるかを変更するので、状態の管理方法に重要な影響を与えます。
デフォルトでは、すべてのプロパティは Everyone モードで作成され、Only だけが割り当てを行い、他はデータを受け取るだけです。
Everyone Except Controller設定することもできます。これは、コントローラが状態プロパティの値を変更することもできますが、複製されないことを意味します。
以下の場合は Everyone Except Controller することが理にかなっています:
1. コントローラが完全に制御できるようにしたいプロパティ。
2. サーバ/オーナーからExecuteCommand()でresetState==trueの結果を受け取ることで更新されるプロパティ。一方で、以下のような場合は Everyone で維持するべきです:
- これは
Ownerが設定し、Controllerが設定しないプロパティ。
- これは
状態コールバック
Statesに値を書き込むことのもう一方の側面は、実行時に更新に反応することです。
Boltはプロパティを使用してこれを達成します。これはプロパティの値が変更されたときに Bolt によって自動的に呼び出されるハンドラです。
これは様々な方法で便利ですが、最も重要なことは、状態をプールする必要がなく、必要なときに新しい値を管理するだけでよいということです。
ほとんどのシナリオでは Attached メソッドにプロパティのコールバックを登録します。
このイベントを受け取ったときに Entity が完全に初期化されたことを知ることができ、そこから State を変更したり、更新を受け取ることができます。
プロパティのコールバックにはsimple、array、triggerの3つの主要なタイプを指定することができ、これらはほとんどがプロパティタイプ自体に関連しています。
次のセクションでは、プロパティハンドラを使い始めるためのコードスニペットとともに、それぞれのタイプについて説明します。
シンプルなコールバック
このタイプのコールバックは最も使いやすく、最もよく使うものです。
特別なことは何もなく、シグネチャは delegate PropertyCallbackSimple に従わなければなりません。
C#
public delegate void PropertyCallbackSimple();
このようなコールバックを登録するには、以下のコードに従ってください。
C#
public override void Attached()
{
    // previous entity setup...

    // Callbacks
    state.AddCallback("CurrentColor", HandlerCurrentColor);
}

void HandlerCurrentColor()
{
    Debug.LogFormat("New current color: {0}", state.CurrentColor);

    var currentColor = state.Colors[state.CurrentColor];

    var r = (byte) currentColor.x;
    var g = (byte) currentColor.y;
    var b = (byte) currentColor.z;

    GetComponent<Renderer>().material.color = new Color(r, g, b, 1);
}
見ての通り、State自身の state.AddCallback()メソッドを使ってコールバックを登録しています。
最初の引数はプロパティ名の文字列です。スペルが正しいことを確認し、大文字・小文字に注意してください。
この例のコールバックでは、Colors 配列の正しい色のインデックスを取得するために CurrentColor プロパティを読み込みます。
次に、このベクトルを UnityEngine.Color に変換して GameObject のマテリアルに割り当て、現在のレンダリングカラーを変更します。
オブジェクトを使ったシンプルなコールバック
State で Object を定義していて、そのフィールドごとにコールバックを設定するのではなく、単一のグローバルコールバックを設定したいが、特定のプロパティごとに別のメソッドを呼び出したい場合は、switch 文ではなくルックアップテーブルを使用することをお勧めします。
これは必要性というよりも最適化のためのものであり、コールバックが頻繁にトリガーされ、オブジェクト内に多くのフィールドがある場合にのみ有益なものとなります。
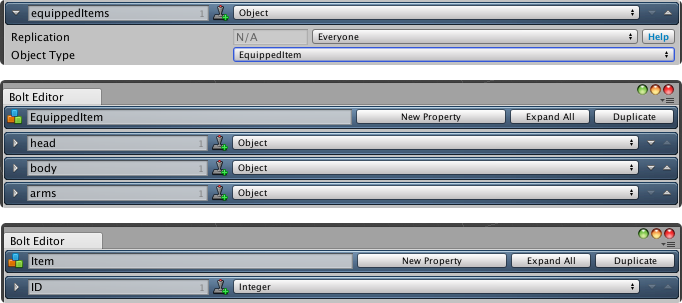
上の画像に示された定義に基づいて、Actionsのルックアップテーブルを次のように定義することができます。
C#
private Dictionary<string, Action> lookupTable;

public override void Attached()
{
    // previous entity setup...

    // Setup Look-up table
    lookupTable = new Dictionary<string, Action>() {
        { "equippedItems.head.ID", () => UpdateSingleArmor(0, state.equippedItems.head) },
        { "equippedItems.body.ID", () => UpdateSingleArmor(1, state.equippedItems.body) },
        { "equippedItems.arms.ID", () => UpdateSingleArmor(2, state.equippedItems.arms) }
    };

    // Callbacks
    state.AddCallback("equippedItems", UpdateNewArmor);
}

private void UpdateNewArmor(IState state, string propertyPath, ArrayIndices arrayIndices)
{
    Debug.LogFormat("Updated path {0}", propertyPath);
    lookupTable[propertyPath]();
}

private void UpdateSingleArmor(int slot, Item item)
{
    Debug.LogFormat("Slot {0} new item {1}", slot, item.ID);
}
このようにして、例えば同じコールバックを使って特定の Object から更新情報を取得することができます。
配列コールバック
Array プロパティを扱う際には、前節で紹介したシンプルなコールバックを使うことができますが、より多くの引数を受け取る特別な delegate PropertyCallback を使うこともできます。
C#
public delegate void PropertyCallback (IState state, string propertyPath, ArrayIndices arrayIndices);
- Bolt.IState state: は、メソッド内で
State型にキャストすることができます(Bolt.IStateはすべての状態が継承するクラスであることに注意してください)。- これが実際の
Stateですが、(汎用的なAddCallbackメソッドを持つために)強く型付けされていません。そのため、独自の型にキャストする必要があります。
- これが実際の
- string propertyPath: はプロパティへのフルパスです。
- Bolt.ArrayIndices arrayIndices には、コールバックで添付した配列のインデックスが含まれています。
ここでは、このバージョンのコールバックの使用例を紹介します。
単一レベルの配列
Array プロパティのコールバックを登録するには、Simple Callbackと非常に似ていますが、プロパティ名の後に [] を含める必要があります。
C#
public override void Attached()
{
    // previous entity setup...

    // Callbacks
    state.AddCallback("Colors[]", HandlerColors);
}

void HandlerColors(IState state, string propertyPath, ArrayIndices arrayIndices)
{
    var index = arrayIndices[0];
    var localState = (ISphereState)state;

    var newColor = localState.Colors[index];

    Debug.LogFormat("Property {0} with index {1} has changed to {2}", propertyPath, index, newColor);
}
一方、この場合のコールバックはもう少し複雑です。
前述したように、より多くの引数にアクセスできるようになりましたが、それらは本当に単純なものです。
唯一注目すべき点は arrayIndices 引数に関連しています。これは実際には、Array プロパティでどのインデックスが変更されたかを記述する配列です。
ネストされた配列のコールバック
Bolt はネストされた Array プロパティを管理することも可能で、これは非常に強力な機能ですが、使用には注意が必要です。
これは、Array プロパティを含む Object アセットを使用することで実現します。つまり、この Object 定義を配列プロパティの型として使用する State は、ネストしたレベルの配列を作成することになります。
以下の State と Object の説明は、コードスニペットとリンクさせるための例です。
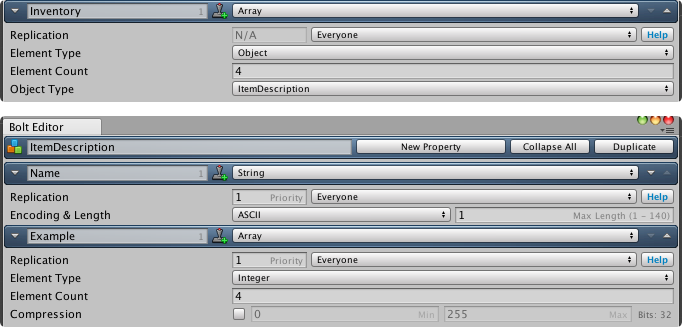
この例では、Array プロパティ Example を持つ Object があり、この定義は State の Array Inventory の型として使用されます。
コールバックを登録して、Example Array の変更ごとに処理したい場合は、コールバックの登録を次のように拡張します。
C#
public override void Attached()
{
    // previous entity setup...

    // Callbacks
    state.AddCallback("Inventory[].Example[]", HandlerInventory);
}

void HandlerInventory(IState state, string propertyPath, ArrayIndices arrayIndices)
{
    var indexInventory = arrayIndices[0];
    var indexExample = arrayIndices[1];

    var localState = (ISphereState)state;

    var newValue = localState.Inventory[indexInventory].Example[indexExample];

    Debug.LogFormat("Property {0} with index {1}/{2} has changed to {3}", propertyPath, indexInventory, indexExample, newValue);
}
ネストされた配列がいくつかあるので、 arrayIndicesにはより多くの値が入力され、各位置はネストされた配列のそのレベルで変更されたインデックスを表します。
したがって、例を考慮してより多くのレベルの配列がある場合、 arrayIndicesのインデックス 0には、 Inventory配列のインデックス、 Example配列のインデックス 1などが含まれます。
トリガーコールバック
Triggerプロパティは、他の通常のStateプロパティとは少し異なります。state.AddCallback()を使用する代わりに、トリガーはすでにC#のdelegateです。
新しいプロパティのコールバックを登録するには、通常のC#の方法でメソッドオブザーバを登録することになります。
C#
public override void Attached()
{
    // previous entity setup...

    // Callbacks
    state.OnBlink += HandlerBlink;
}

void HandlerBlink()
{
    Debug.Log("Blink!");
}
他のタイプのプロパティとの主な違いは、リスナーを追加する際に、On <TriggerName>という名前の(<TriggerName>はトリガープロパティの名前です)State プロパティを使用することです。
この例では、Blink トリガーを作成したので、state.OnBlynk を使ってコールバックを登録します。
state.Blink()` は実際には、以前に示したように、トリガーを起動/有効化するためのメソッドです。