State
At the core of Photon Bolt there is the concept called State.
Using Bolt's State implementation you define the network State of an Entity as a template (using the Bolt Assets window) which includes properties for such things as transforms and many built-in primitive types.
In addition, you can implement a state property as a IProtocolToken, which is essentially a way to implement arbitrary datatypes as a state property.
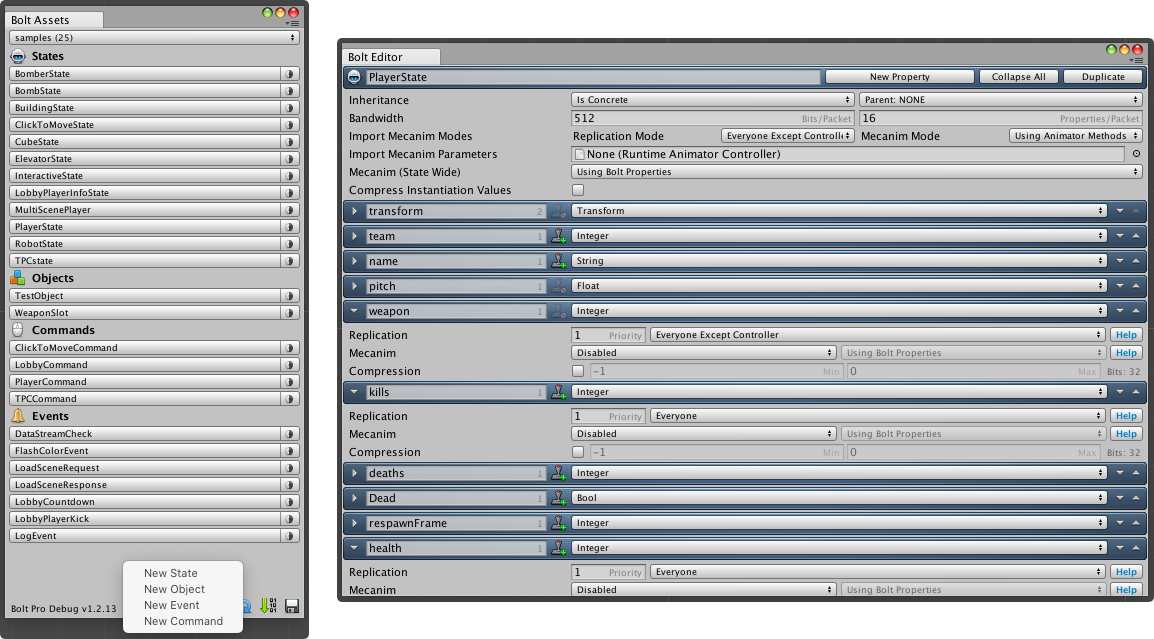
Each State has a set of internal settings to configure some of it's behavior:
- Inheritance: this setting lets you create a hierarchy of states. In simple terms, all properties from the parent
Statesare created on the child state, so you don't need to duplicate if you have very similar states, like for player and enemy. - Bandwidth: determines how many bits this
Statecan use per Packet and how many properties at the same time from thisStatecan be written into a Packet. - Import Mecanim Modes:
- Replication Mode: set how the Mecanim properties will be synchronized, similar to what you can setup with other
Stateproperties. - Mecanim Mode: set how the properties from the animator will be changed, via the animator methods (e.g.
animator.SetFloat) or if you want to useBoltproperties instead.
- Replication Mode: set how the Mecanim properties will be synchronized, similar to what you can setup with other
- Import Mecanim Parameters: reference to a
AnimatorControllerthat will be used as base for importing all necessary parameters to control the animations. - Compress Instantiation Values: when enabled, you can configure how to compress the initial transform position when spawning a new Bolt
Entitywith based on thieState. If you know the range of value and wants save some bits when creating theEntity, this can help on this.
State Description
The power of Bolt State is that it allows the user to sync network properties, automatically, and only when they change.
In addition, State makes implementing late joining almost transparent.
Whenever the owner of Bolt State changes a property, Bolt will send that value to clients who are currently scoped to that entity.
The user can subscribe to callbacks (in the Attached) callback of the Entity behaviour (see here).
Each State property, like a Float or Transform has a default value (that can't be changed) that is set first when a Entity is created.
If a particular property value has not been changed from the default value, Bolt will not sync this property to any connection, minimizing the overall network transfer.
State can also be extended with custom properties if the native ones are not enough.
This is done using an implementation of a IProtocolToken, allowing you complete control over the serialization for custom business logic.
Keep in mind, though, that changing data inside the token will not trigger Bolt to send the property as changed.
Bolt will only send the token if the token reference itself changes - i.e. if you change an existing token to another token or set it to null (or change a null token to a non-null token).
Remember that tokens have to be registered with Bolt since they are created out of a factory.
When a new connection joins the game session, all entities will automatically sync to him (based on scope).
All changed properties will also be synced to this player.
Depending on the number of entities/properties this could take a variable amount of time.
Bolt will only send as many packets per second as set in the Bolt Settings, so, eventually all of the data will arrive on the client.
This makes implementing late joining very simple and avoids all of the usual hacks involved (generally some sort of message buffering).
State Replication
Bolt sends state updates only at each send tick (defined in your Bolt Settings), meaning that the properties are essentially marked as "dirty" and they are not evaluated until the next send tick.
In other words, if you change a property value several times between FixedUpdates, only the value at the time of Bolt tick will be sent (i.e. none of the intermediate ones).
One thing to keep in mind when dealing with a Bolt States and its properties is the fact that only the Owner of the Entity is able to change its values and those be replicated over the network.
The only exception to this, is when the property's Replication Mode (read here) is set to Everyone Except Controller - in this case, the Controller can also change the property value, but it will not be replicated, only the property callbacks will be fired on the local Controller.
State properties are not guaranteed to all arrive on the client when the entity is attached.
If you require some data to absolutely be there, use an Attach Token for this data (i.e. send the data in a IProtocolToken when you instantiate it).
Keep in mind that attach tokens are relatively heavy - they get sent each send tick for the creation operation until that creation operation is acked.
Also, state properties are not guaranteed to arrive in any order, although they typically will be received in priority order ((where a higher priority number in the Bolt State settings is a higher priority)), but this is not guaranteed.
This is called "eventual consistency" which means eventually state will be consistent with the entity owner.
When Bolt is packing all state properties, it will sort the Entities on priority first and then iterate over them.
For each entity, Bolt sorts dirty properties and sends a certain number (defined in your settings) for each entity (sorted also by entity priority) until it runs out of packet space (see Bolt Packets).
That procedure is done per-connection.
Due to both packet size and Bolt settings, it is never guaranteed that after changing a state property that Bolt will send it in the next send tick.
Bolt also comes with the concept of Scope (read more here), which determines which connection should receive updates from a particular Entity, this includes any property changes.
By default, all connections will receive all updates, but this can be changed using the Manual scope mode.
State Property Types
Any Bolt State is made basically as a set of properties, each one being represented by a data type.
Here we will describe all properties types that you can use to build your Entity's State, and its details, that may have real impact into your network layout.
Each property type has its own set of configurations used to manipulate its default behavior, this can range from the Replication Mode (all fields has this settings, you can read more about here) to compression options.
Some of the property types has also the option called Mecanim, that let's you control if this property should be considered as an Animator parameter, if so, Bolt can automatically sync the property value with a AnimatorController (more about that later on this page).
Float: a
floatvalue;- Smoothing Algorithm: select if the
floatvalue should be interpolated or not; - Interpolation Mode: select if the value should be considered a normal float value or an angle. This will determine if Bolt will use
UnityEngine.Mathf.LerporUnityEngine.Mathf.LerpAnglewhen interpolating the value; - Compression: here you can determine the compression settings for the float.
- Smoothing Algorithm: select if the
Integer: a
integervalue;- Compression: setup the compression for the integer value.
Matrix4x4: a Unity Matrix4x4 instance;
Quaternion: a Unity Quaternion instance;
- Smoothing Algorithm: select if the
Quaternionvalues should be interpolated or not. This make use ofUnityEngine.Quaternion.Slerp; - Axes:: select which axes (
X,Y,Z) should be considered by this quaternion; - Strict Comparition:: if enabled, instead of using the equality operator from the
Quaternion(q1 != q2), each singular value is compared one by one (q1.x != q2.x || q1.y != q2.y...) when detecting if theQuaternionhas changed or not; - Quaterinon Compression: determines the compression settings for each value on the
Quaternion.
- Smoothing Algorithm: select if the
Vector: a Unity Vector3 instance;
- Smoothing Algorithm: determines if the
Vectorvalues should be interpolated or not. This make use ofUnityEngine.Vector3.Lerp; - Axes:: select which axes (
X,Y,Z) should be considered by this vector; - Strict Comparition:: if enabled, instead of using the equality operator from the
Vector(v1 != v2), each singular value is compared one by one (v1.x != v2.x || v1.y != v2.y...) when detecting if theVectorhas changed or not; - Teleport Threshold: determines the magnitude limit from where the
Vectorvalues should snap into place instead of interpolate between the values; - Axis Compression: determines the compression settings for each value on the
Vector.
- Smoothing Algorithm: determines if the
Bool: a
booleanvalue;String: a
stringvalue;- Encoding & Length: here you can set which
Encodingwill be used to serialized thisStringvalue and also its maximum lenght in characters.
- Encoding & Length: here you can set which
Guid: a instance of
System.Guid;Color: a Unity Color instance;
Color32: a Unity Color32 instance;
Entity: reference to other
BoltEntity;NetworkId: reference to any
Bolt.NetworkId;PrefabId: reference to any
Bolt.PrefabId;Array: a collection of values of the same type, organized into an array format. You can access individually items by index very similar to a native array, like an array of
FloatsorStrings;- Element Type: select the type of the array;
- Element Count: number of elements the array will hold.
Object: represents an
Objectasset type.Objectassets are a special type of container that you can use to store related data within the same "box". They are also defined in theBolt Assetswindow, and you can consider then as sub-states, as you can define the same set of properties as aState, then reuse theObjectdefinition on several differentStates;- Object Type: here you can select which
Objecttype to use for this type.
- Object Type: here you can select which
ProtocolToken: reference to a custom token that implements the
Bolt.IProtocolToken. ATokenfield can be useful if you want to send arbitrary data that could not be normally be sent by the other property types. As already mentioned, changing theTokenfields' values will not cause the values the be synchronized, only if you change the token reference (tonullor a new token), it will be updated.Trigger: trigger are a special one-fire state. If you want a property that can be executed to trigger a animation state change or fire a weapon, the
Triggerproperty can help you in this case.Transform: a Unity Transform instance.
Transformproperties are different from all other types. It is implemented interpolation/extrapolation transparently as well as implementing the optional simple "render" interpolation as well. As an optimization, Bolt will only sendTransformstate changes when the transform moves. If an object doesn’t move there will be no bandwidth used;- Space: here you define if this
Transformwill use theLocalorWorldtransform coordinate space to translate. In othe words, ifBoltwill uselocalPosition/localRotationorposition/rotationto move theGameObject; - Smoothing Algorithm:
- None: the position and rotation will just snap to the new values;
- Interpolation: Bolt will interpolate the position vector using
UnityEngine.Vector3.Lerpand the rotation quaternion usingUnityEngine.Quaternion.Slerp; - Extrapolate: Bolt will extrapolate the position and rotation of the
Transformbased on it's current velocity. This is usefull if you have object that does not change direction too much and want to compensate the network lag.- Extrapolation Velocity: select from where Bolt will calculate or get the current object's velocity.
- Extrapolation Settings: here you can configure how many frame ahead Bolt will extrapolate the position/rotation.
- Position: same settings as the
Vectorproperty type; - Rotation: same settings as the
Quaternionproperty type.
- Space: here you define if this
State Interaction
Any State asset that you create is just a description of your network layout for a specific Entity.
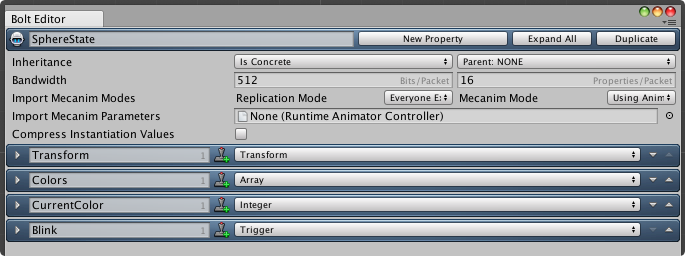
Before we continue, we need to setup a State to be used as an example, we will be using an state called SphereState, and it contains 4 basic properties, all with the default settings:
- Transform of type
Transform; - Colors of type
ArrayofVectorwith 3 elements; - CurrentColor of type `Integer*;
- Blink of type
Trigger;
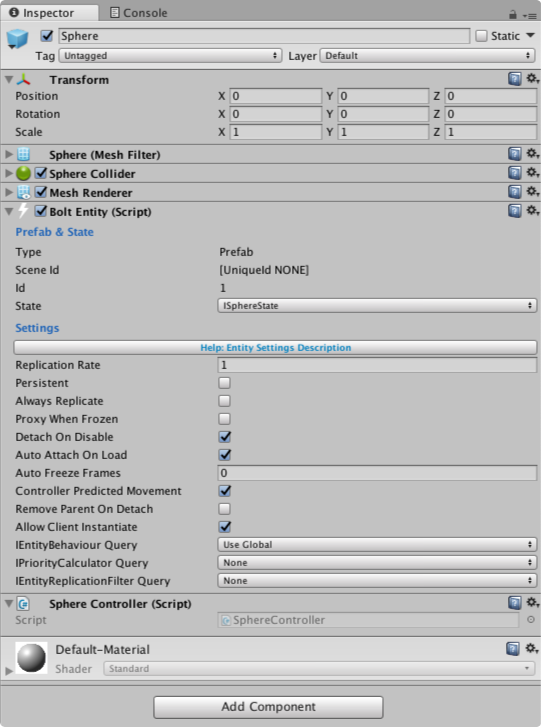
In order to be able to interact with the state data, read and write values to it, you need to follow a few steps:
- Create a new Unity Prefab and add a
BoltEntitycomponent to it; - On the State field, select the
Stateyou've defined on theBolt Assetswindow. - Create a new C# Script and add it to your prefab.
- Make sure that after any change to the assets you must compile Bolt again (
Bolt/Compile Assemblymenu);
And you should get a configuration similar to the image below:
Open the SphereController script from our example, the basic implementation for any Bolt Entity is very similar to this one:
C#
using System.Collections;
using System.Collections.Generic;
using UnityEngine;

public class SphereController : Bolt.EntityBehaviour<ISphereState>
{
    public override void Attached()
    {
        // entity initialization
    }
}
There are some points that you need to keep in mind when creating an Entity controller, that will manage it's state:
- It should extends from
Bolt.EntityBehaviour<YourStateInterface>orBolt.EntityEventListener<YourStateInterface>. Those classes also extends fromUnityEngine.MonoBehaviour, so you still have access to all Unity methods; - The generic type passed when defining your class (
YourStateInterface), defines theStatetype you are trying to access, so it should be the same as you've set on theBoltEntitycomponent attached to yourGameObjectprefab. - The
GameObjectand theBoltEntityhave different initialization processes, while you could (in teory) setup theEntityinside theStartmethod, as it's done with a normalGameObject, Bolt uses instead theAttachedmethod, meaning that thisEntityhas been acknowledge and should be initialized. So, everything that you would normally do on theStartmethod, should be done on theAttachedmethod.
Now, lets detail how we could initilze the Entity and associate some values to our properties:
C#
public override void Attached()
{
    // Link the GameObject with the Bolt Transform Property
    state.SetTransforms(state.Transform, transform);

    // Init the Colors Array
    state.Colors[0] = new Vector3(1, 0, 0);
    state.Colors[1] = new Vector3(0, 1, 0);
    state.Colors[2] = new Vector3(0, 0, 1);

    // Set the Active Color
    state.CurrentColor = 0;
}
As you can see, modifying the State associated with the Entity is as simples as using the included state variable, and access each individual property.
This can be done on any method, wherever you want to modify the State.
If you have a reference for an BoltEntity on other script, and want to access it's state, just call entity.GetState<YourStateInterface>().
One important part on this snippet is how Bolt links the GameObject's Transform and the Transform property - by using the state.SetTransforms method, Bolt will automatically synchonize the GameObject position/rotation when it moves.
Other relevant integration with Bolt that is not shown in the snipped above, is the case where your Entity has animations and you want to Bolt synchronize all its parameters.
In this case, you also need to register the Animator reference on your state, this is done with just one line:
C#
state.SetAnimator(GetComponentInChildren<Animator>()); // Or wherever your animator is
After that, if your State properties are all set up properly in-editor, then all you have to do is change the linked properties, and your Animator should replicate as intended.
As we mentioned before, only the Owner of an Entity can modify its state, and if you want to make sure that you run a piece of code on the Owner you can wrap it using if (entity.IsOwner) check.
This field will return true only on the peer that has created the Entity.
At runtime, we could, for example, modify the CurrentColor to toggle between the index 0 and 1 by just assigning a new value to it, and also active our Trigger property invoking the associated method (this is particular to this kind of property).
Later on this page, we will describe how to react to those changes.
C#
private void Update()
{
    if (entity.IsOwner == false) { return; }

    if (Input.GetKeyDown(KeyCode.C))
    {
        var current = state.CurrentColor;
        current = ++current % 2;
        state.CurrentColor = current;
    }

    if (Input.GetKeyDown(KeyCode.R))
    {
        var idx = Random.Range(0, state.Colors.Length);
        state.Colors[idx] = new Vector3(Random.value, Random.value, Random.value);
    }

    if (Input.GetKeyDown(KeyCode.F))
    {
        state.Blink();
    }
}
The Replication Modes(link) have an important impact on how you manage the state, as they modify how the state is replicated and to whom.
By defaul, all properties are created using the Everyone mode, meaning that only the Only can assign, and other will just receive the data.
But you could also set it to Everyone Except Controller, which means that the controller can also change a state property value, but it will not be replicated.
It makes sense to use Everyone Except Controller when:
- It's a property that you want to allow the Controller to have full control over.
- It's a property that will be updated by the resulting state you receive from the Server/Owner in
ExecuteCommand()whereresetState==true.
On the other hand you would maintain at Everyone if:
- It's a property that the
Ownerwill set and theControllerwon't.
- It's a property that the
State Callbacks
The other side of writing values to States is to react to the updates at runtime.
Bolt accomplishes this by the use of property callbacks, handlers that will be invoked by Bolt automatically when a certain property value has been changed.
This is useful in a variety of ways, but most importantly, you don't need to be pooling your state, but just manage the new values when it's necessary.
One thing to keep in mind is that in most scenarios, you will register the property callbacks on the Attached method.
That is the case because when you receive this event, you know that your Entity is fully initialized and from there you are able to change the State and also receive updates.
We can specify three main types of property callbacks, that are mostly related to the property type itself: simple, array, and trigger.
In the next sections, we will describe each type, along with some code snippets to get you started using property handlers.
Simple Callback
This type of callback is the easiest to use and also the one you will be using the most.
There is nothing special on it, it's signature must follow the delegate PropertyCallbackSimple, which is very similar to the plain System.Action:
C#
public delegate void PropertyCallbackSimple();
So, in order to register this kind of callback follow the code below:
C#
public override void Attached()
{
    // previous entity setup...

    // Callbacks
    state.AddCallback("CurrentColor", HandlerCurrentColor);
}

void HandlerCurrentColor()
{
    Debug.LogFormat("New current color: {0}", state.CurrentColor);

    var currentColor = state.Colors[state.CurrentColor];

    var r = (byte) currentColor.x;
    var g = (byte) currentColor.y;
    var b = (byte) currentColor.z;

    GetComponent<Renderer>().material.color = new Color(r, g, b, 1);
}
As you can see, we use the state.AddCallback() method from the State itself to register the callback.
The first argument is a string with the property's name, make sure to spell it right, pay attention to the lower/upper case; the second argument is just a reference to your callback function.
On our example callback, the CurrentColor property is read to get the right color index on the Colors arrays.
We then transform the vector into a UnityEngine.Color and assign to the material of the GameObject, changing its current rendering color.
Simple Callback with Objects
If you have defined an Object in your State and you want a single global callback instead of setting a callback for each of its fields, but you still want a separate method to be called per specific property then it's recommended to use a look-up table as opposed to a switch statement.
This is more of an optimization than a necessity, also this will only be of any benefit if the callback is triggered a lot and there are many fields in your Object.
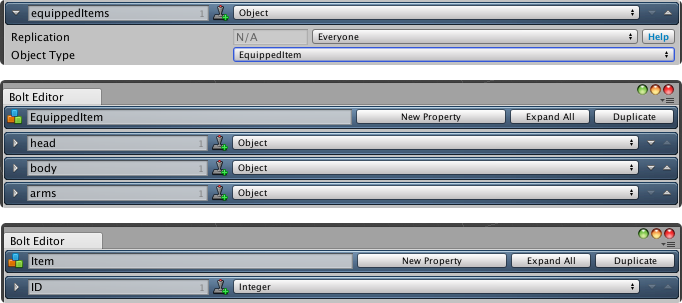
Based on the definition shown in the image above, we could define a look-up table of Actions like this:
C#
private Dictionary<string, Action> lookupTable;

public override void Attached()
{
    // previous entity setup...

    // Setup Look-up table
    lookupTable = new Dictionary<string, Action>() {
        { "equippedItems.head.ID", () => UpdateSingleArmor(0, state.equippedItems.head) },
        { "equippedItems.body.ID", () => UpdateSingleArmor(1, state.equippedItems.body) },
        { "equippedItems.arms.ID", () => UpdateSingleArmor(2, state.equippedItems.arms) }
    };

    // Callbacks
    state.AddCallback("equippedItems", UpdateNewArmor);
}

private void UpdateNewArmor(IState state, string propertyPath, ArrayIndices arrayIndices)
{
    Debug.LogFormat("Updated path {0}", propertyPath);
    lookupTable[propertyPath]();
}

private void UpdateSingleArmor(int slot, Item item)
{
    Debug.LogFormat("Slot {0} new item {1}", slot, item.ID);
}
This way, you are able to get updates from a particular Object using the same callback, for example.
Array Callback
When dealing with Array properties, you could use the same Simple Callback we show on the last section, but you can also use the special delegate PropertyCallback that receives more arguments:
C#
public delegate void PropertyCallback (IState state, string propertyPath, ArrayIndices arrayIndices);
- Bolt.IState state: can be cast to your
Statetype within the method (note thatBolt.IStateis the class all States inherit from).- This is your actual
Statethough it's just not strongly typed (to have a genericAddCallbackmethod); that's the reason you need to cast it to your own type.
- This is your actual
- string propertyPath: is the full path to the property.
- Bolt.ArrayIndices arrayIndices contains the indices for any of the arrays that you attached in the callback.
Here we will follow with some examples of how to use this version of Callback.
Single Level Array
In order to register the callback for a Array property, it is very similar to what we've seen with the Simple Callback, the only difference is that now we need to include [] after the property name, as shown below:
C#
public override void Attached()
{
    // previous entity setup...

    // Callbacks
    state.AddCallback("Colors[]", HandlerColors);
}

void HandlerColors(IState state, string propertyPath, ArrayIndices arrayIndices)
{
    var index = arrayIndices[0];
    var localState = (ISphereState)state;

    var newColor = localState.Colors[index];

    Debug.LogFormat("Property {0} with index {1} has changed to {2}", propertyPath, index, newColor);
}
The callback in this case, on the other hand, is just a little bit more complex.
As we described, now you have access to more arguments, but they are really straightforward.
The only extra observation is related to arrayIndices argument - it is, in fact, an array that describes which index was changed on the Array property.
Nested Arrays Callback
Bolt is also capable of managing nested Array properties, and this can be very powerful but should be used with care.
This is done by using an Object asset that also contains an Array property, meaning that any State that uses this Object definition, as the type of an array property, will be creating nested levels of arrays.
We will be using the following State and Object description just as an example to link with the code snippets.
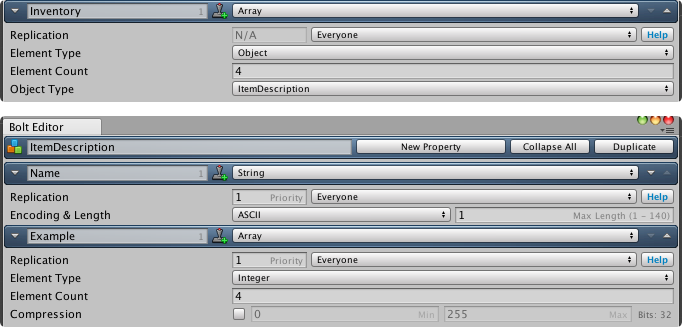
On our example, we have an Object with an Array property Example and this definition is used as the type of the Array Inventory on our State.
If we want to register a callback and handle every change to the Example Array, we do this by extending the callback registration like so:
C#
public override void Attached()
{
    // previous entity setup...

    // Callbacks
    state.AddCallback("Inventory[].Example[]", HandlerInventory);
}

void HandlerInventory(IState state, string propertyPath, ArrayIndices arrayIndices)
{
    var indexInventory = arrayIndices[0];
    var indexExample = arrayIndices[1];

    var localState = (ISphereState)state;

    var newValue = localState.Inventory[indexInventory].Example[indexExample];

    Debug.LogFormat("Property {0} with index {1}/{2} has changed to {3}", propertyPath, indexInventory, indexExample, newValue);
}
As now we have some nested arrays, the arrayIndices is now populated with more values, each position represents which index has changed at that level of the nested arrays.
So, the index 0 of arrayIndices will contain the index of the Inventory array, the index 1 of the Example array, and so on, if you had more levels of arrays, considering our example.
Trigger Callbacks
Trigger properties are little difference from the other regular State properties, instead of using state.AddCallback(), triggers are already C# delegates.
In order to register a new property callback, you will be using the usual C# way to register an method observer:
C#
public override void Attached()
{
    // previous entity setup...

    // Callbacks
    state.OnBlink += HandlerBlink;
}

void HandlerBlink()
{
    Debug.Log("Blink!");
}
The main difference from the other types of properties is that when you are adding a listener you use a State property named On<TriggerName>, where <TriggerName> is the name of your trigger property.
So, on our example we've created a Blink trigger, that is why we use the state.OnBlynk to register the callback.
The state.Blink() is in fact a method used to fire/activate the trigger, as was shown previously.