3 - Authoritative Movement
In this chapter we will handle taking control of entities and moving around in the world, this will familiarize you with how the control concept in Bolt works and how it handles authoritative movement.
Hiding Server And Client Differences
Before we go onto taking control of our entities we are going to deal with and explain something which comes up a lot when dealing with both Bolt and multiplayer in general.
The problem: If we want let the server be just another player in the game, how do we deal with the fact that the server doesn't exist as a connection on itself?
Each client that connects to the server is represented by a BoltConnection object and on each client the server is represented as a single BoltConnection object.
However when we want to do something to the server player on the server itself we have no easy way to refer to it, since there is no object which represents the server on itself.
The answer to this is that we need to create a simple abstraction, which lets us deal with a Player object instead of a specific connection, in this player object we will hide if we have a connection or not, so that the rest of our code does not have to think about it.
Create a new folder Tutorial/Scripts/Player and two new C# files: TutorialPlayerObject.cs and TutorialPlayerObjectRegistry.cs.
Let's start in the TutorialPlayerObject class.
C#
using UnityEngine;

public class TutorialPlayerObject
{
    public BoltEntity character;
    public BoltConnection connection;
}
This is a standard C# class; it does not inherit from unity's MonoBehaviour class.
This is very important.
It also contains two fields:
BoltEntity character: field will contain the instantiated object which represents the player's character in the world.BoltConnection connection: field will contain the connection to this player if one exists, this will benullon the server for the servers player object.
We are going to add two properties also, which lets us check if this is a Client or a Server player object without having to deal with the connection field directly.
C#
using UnityEngine;

public class TutorialPlayerObject
{
    public BoltEntity character;
    public BoltConnection connection;

    public bool IsServer
    {
        get { return connection == null; }
    }

    public bool IsClient
    {
        get { return connection != null; }
    }
}
The methods IsServer and IsClient simply check if the connection is or isn't null, which tells us if the player represents the server or a client.
Before we add more functionality to our TutorialPlayerObject we are going to open up the TutorialPlayerObjectRegistry class.
We are using this class for managing instance of our TutorialPlayerObject class.
The only thing in this entire class which isn't just standard C# code is that we are accessing the UserData property on the BoltConnection class.
This property is simply a place where you can stick any type of other object/data that you want to pair with the connection.
In our case we are going to pair the TutorialPlayerObject we create with the connection it belongs to (if it belongs to one).
The remainder of this class contains very little which is specific to Bolt, if you want read through the code and comments below but we're not going to go into more detail on it.
C#
using System.Collections.Generic;

public static class TutorialPlayerObjectRegistry
{
    // keeps a list of all the players
    static List<TutorialPlayerObject> players = new List<TutorialPlayerObject>();

    // create a player for a connection
    // note: connection can be null
    static TutorialPlayerObject CreatePlayer(BoltConnection connection)
    {
        TutorialPlayerObject player;

        // create a new player object, assign the connection property
        // of the object to the connection was passed in
        player = new TutorialPlayerObject();
        player.connection = connection;

        // if we have a connection, assign this player
        // as the user data for the connection so that we
        // always have an easy way to get the player object
        // for a connection
        if (player.connection != null)
        {
            player.connection.UserData = player;
        }

        // add to list of all players
        players.Add(player);

        return player;
    }

    // this simply returns the 'players' list cast to
    // an IEnumerable<T> so that we hide the ability
    // to modify the player list from the outside.
    public static IEnumerable<TutorialPlayerObject> AllPlayers
    {
        get { return players; }
    }

    // finds the server player by checking the
    // .IsServer property for every player object.
    public static TutorialPlayerObject ServerPlayer
    {
        get { return players.Find(player => player.IsServer); }
    }

    // utility function which creates a server player
    public static TutorialPlayerObject CreateServerPlayer()
    {
        return CreatePlayer(null);
    }

    // utility that creates a client player object.
    public static TutorialPlayerObject CreateClientPlayer(BoltConnection connection)
    {
        return CreatePlayer(connection);
    }

    // utility function which lets us pass in a
    // BoltConnection object (even a null) and have
    // it return the proper player object for it.
    public static TutorialPlayerObject GetTutorialPlayer(BoltConnection connection)
    {
        if (connection == null)
        {
            return ServerPlayer;
        }

        return (TutorialPlayerObject) connection.UserData;
    }
}
Open up the TutorialServerCallbacks.cs file and update the class we have in there:
- Remove the two calls to
BoltNetwork.Instantiate; - Implement the Unity
Awakefunction and callTutorialPlayerObjectRegistry.CreateServerPlayerinside it, this creates the server player for us whenever this callback object becomes active. - Override the method called
Connectedwhich is inherited fromBolt.GlobalEventListeneron theTutorialServerCallbacks.
Inside of it callTutorialPlayerObjectRegistry.CreateClientPlayerand pass in the connection argument.
C#
using UnityEngine;

[BoltGlobalBehaviour(BoltNetworkModes.Server, "Level2")]
public class TutorialServerCallbacks : Bolt.GlobalEventListener
{
    void Awake()
    {
        TutorialPlayerObjectRegistry.CreateServerPlayer();
    }

    public override void Connected(BoltConnection connection)
    {
        TutorialPlayerObjectRegistry.CreateClientPlayer(connection);
    }

    public override void SceneLoadLocalDone(string map)
    {
    }

    public override void SceneLoadRemoteDone(BoltConnection connection)
    {
    }
}
It's finally time to spawn the characters for each of our players and also assign control of them correctly.
Open up the TutorialPlayerObject class again, we are going to add two new methods:
Spawn: will spawn our character;RandomPosition: simply picks a random position in the world to spawn at.
C#
using UnityEngine;
using System.Collections.Generic;

public class TutorialPlayerObject
{
    // ...

    public void Spawn()
    {
        if (!character)
        {
            character = BoltNetwork.Instantiate(BoltPrefabs.TutorialPlayer, RandomPosition(), Quaternion.identity);

            if (IsServer)
            {
                character.TakeControl();
            }
            else
            {
                character.AssignControl(connection);
            }
        }

        // teleport entity to a random spawn position
        character.transform.position = RandomPosition();
    }

    Vector3 RandomPosition()
    {
        float x = Random.Range(-32f, +32f);
        float z = Random.Range(-32f, +32f);
        return new Vector3(x, 32f, z);
    }
}
In the Spawn function we first check if we have a character or not and if we don't have one we call BoltNetwork.Instantiate and create one.
Then we simply check if we are the server or not and call the proper method for taking or giving control.
And finally, we set the transform.position property on the character object which moves our player to a random position in the world.
Before we start our game, there are two more things we need to handle.
First, open up the TutorialPlayerCallbacks class found in Tutorial/Scripts/Callbacks.
We are going to override a callback called ControlOfEntityGained which notifies us of when we get control of an entity.
You can read more about this callback on the API page.
C#
using Bolt.AdvancedTutorial;
using UnityEngine;

[BoltGlobalBehaviour("Level2")]
public class TutorialPlayerCallbacks : Bolt.GlobalEventListener
{
    public override void SceneLoadLocalDone(string map)
    {
        // this just instantiates our player camera,
        // the Instantiate() method is supplied by the BoltSingletonPrefab<T> class
        PlayerCamera.Instantiate();
    }

    public override void ControlOfEntityGained(BoltEntity entity)
    {
        // this tells the player camera to look at the entity we are controlling
        PlayerCamera.instance.SetTarget(entity);
    }
}
The last thing we need to do is go back to the TutorialServerCallbacks and call the Spawn method when we are done loading the scene, since this behaviour exists on the server only (courtesy of the [BoltGlobalBehaviour(BoltNetworkModes.Host, "Level2")] attribute), we need to check both for the SceneLoadLocalDone for the server itself and for the SceneLoadRemoteDone for the clients.
C#
using UnityEngine;

[BoltGlobalBehaviour(BoltNetworkModes.Server, "Level2")]
public class TutorialServerCallbacks : Bolt.GlobalEventListener
{
    void Awake()
    {
        TutorialPlayerObjectRegistry.CreateServerPlayer();
    }

    public override void Connected(BoltConnection connection)
    {
        TutorialPlayerObjectRegistry.CreateClientPlayer(connection);
    }

    public override void SceneLoadLocalDone(string map)
    {
        TutorialPlayerObjectRegistry.ServerPlayer.Spawn();
    }

    public override void SceneLoadRemoteDone(BoltConnection connection)
    {
        TutorialPlayerObjectRegistry.GetTutorialPlayer(connection).Spawn();
    }
}
If you go to the Bolt Scenes window and click Play As Server you will see a screen like the one below.
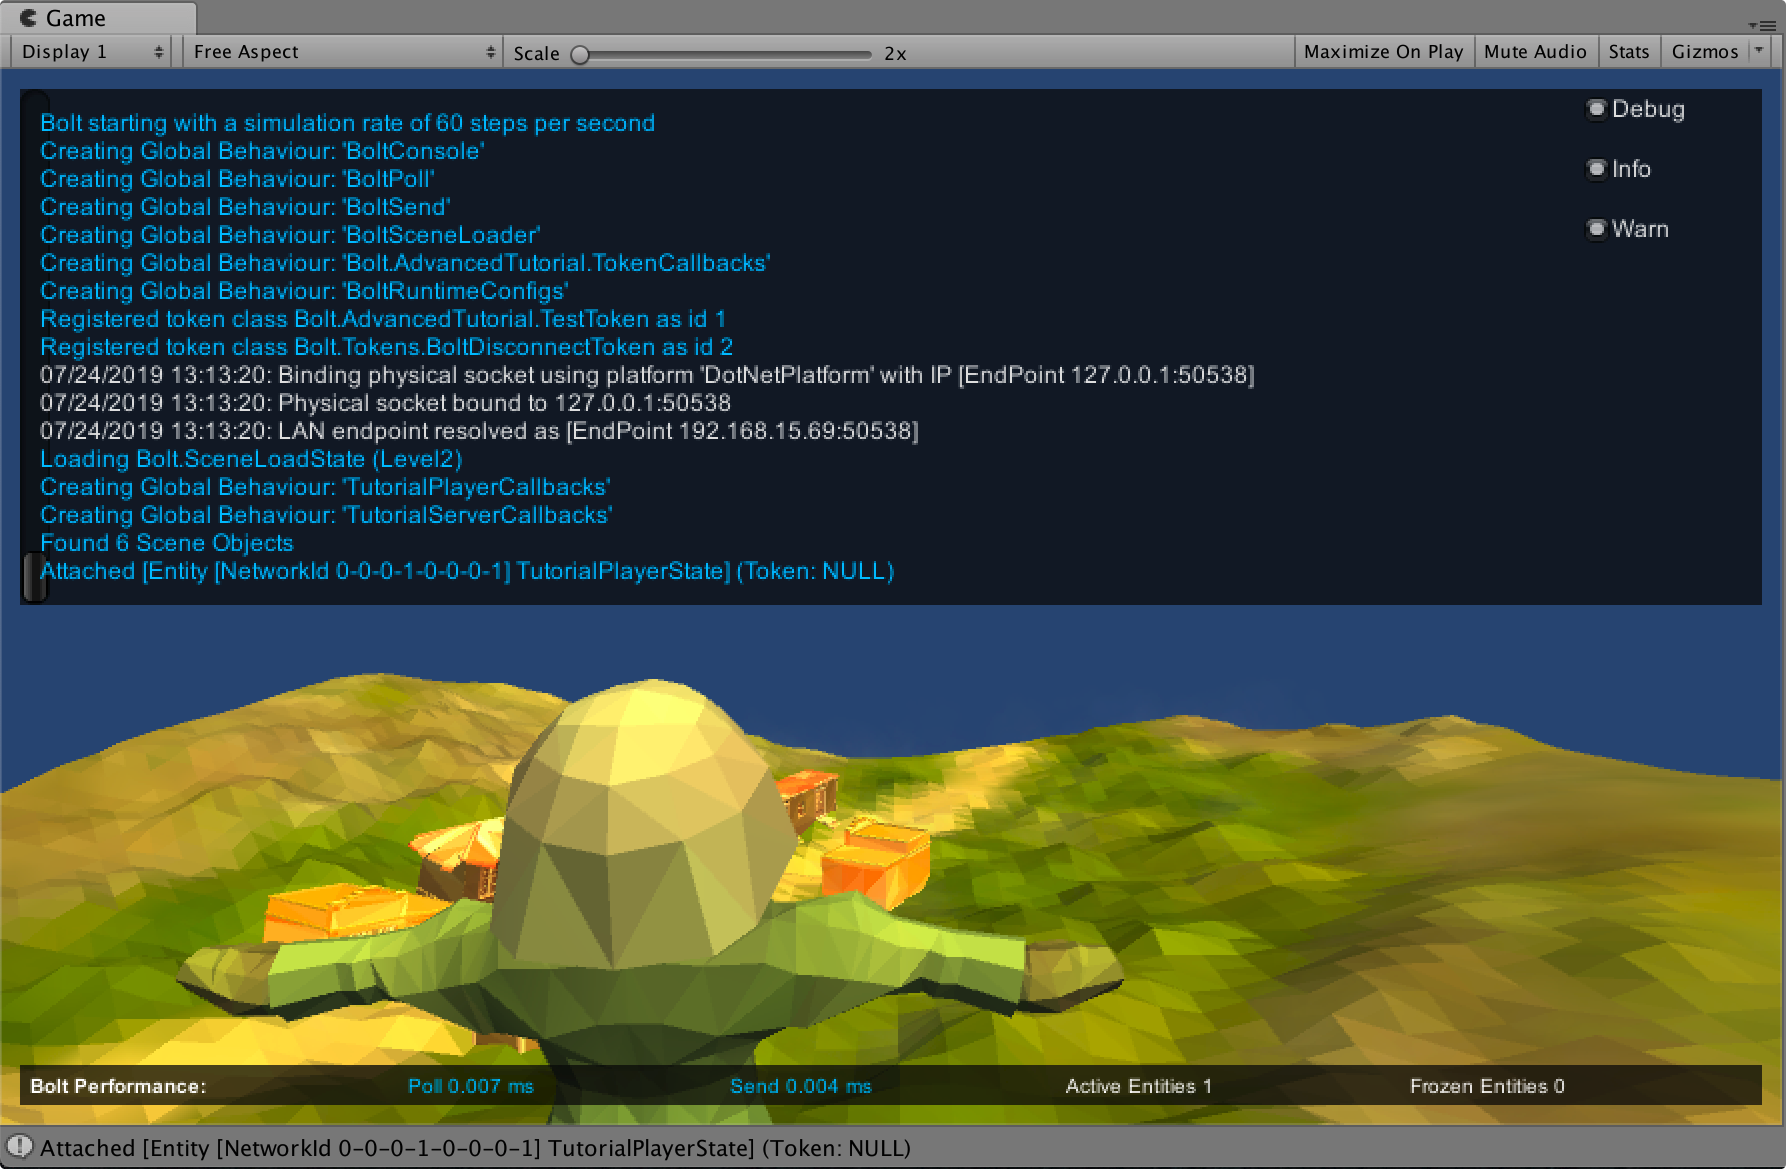
Great, now we have our character spawned, the control has been assigned to the correct player and the camera is looking at it.
Next up is moving around and controlling our character.
You can also build a separate client and connect to the server you are starting in the editor with it; you will see that the client gets spawned properly and assigned a character just like the server is.
Note: Due to the way the camera code works you cannot rotate it around your character, it's completely static if the character is not moving, this is intentional
Movement
This section of the tutorial deals with something a lot of people ask about: Authoritative movement with client side prediction for instant movement on the clients that is still controlled and verified by the server.
Bolt does this completely transparently and removes the differences between being a Client and a Server from movement codes point of view.
Photon Bolt uses the Commands to accomplish this concept: a command is a set of data that represents the control information (input) from the controller to the server, the server executes the command, compute the outcome (results) and replicate them over the network. More information about Commands can be found on it's dedicated page.
We are going to start by creating a new Command.
Open the Bolt Assets window (Bolt/Assets), right-click and select New Command.
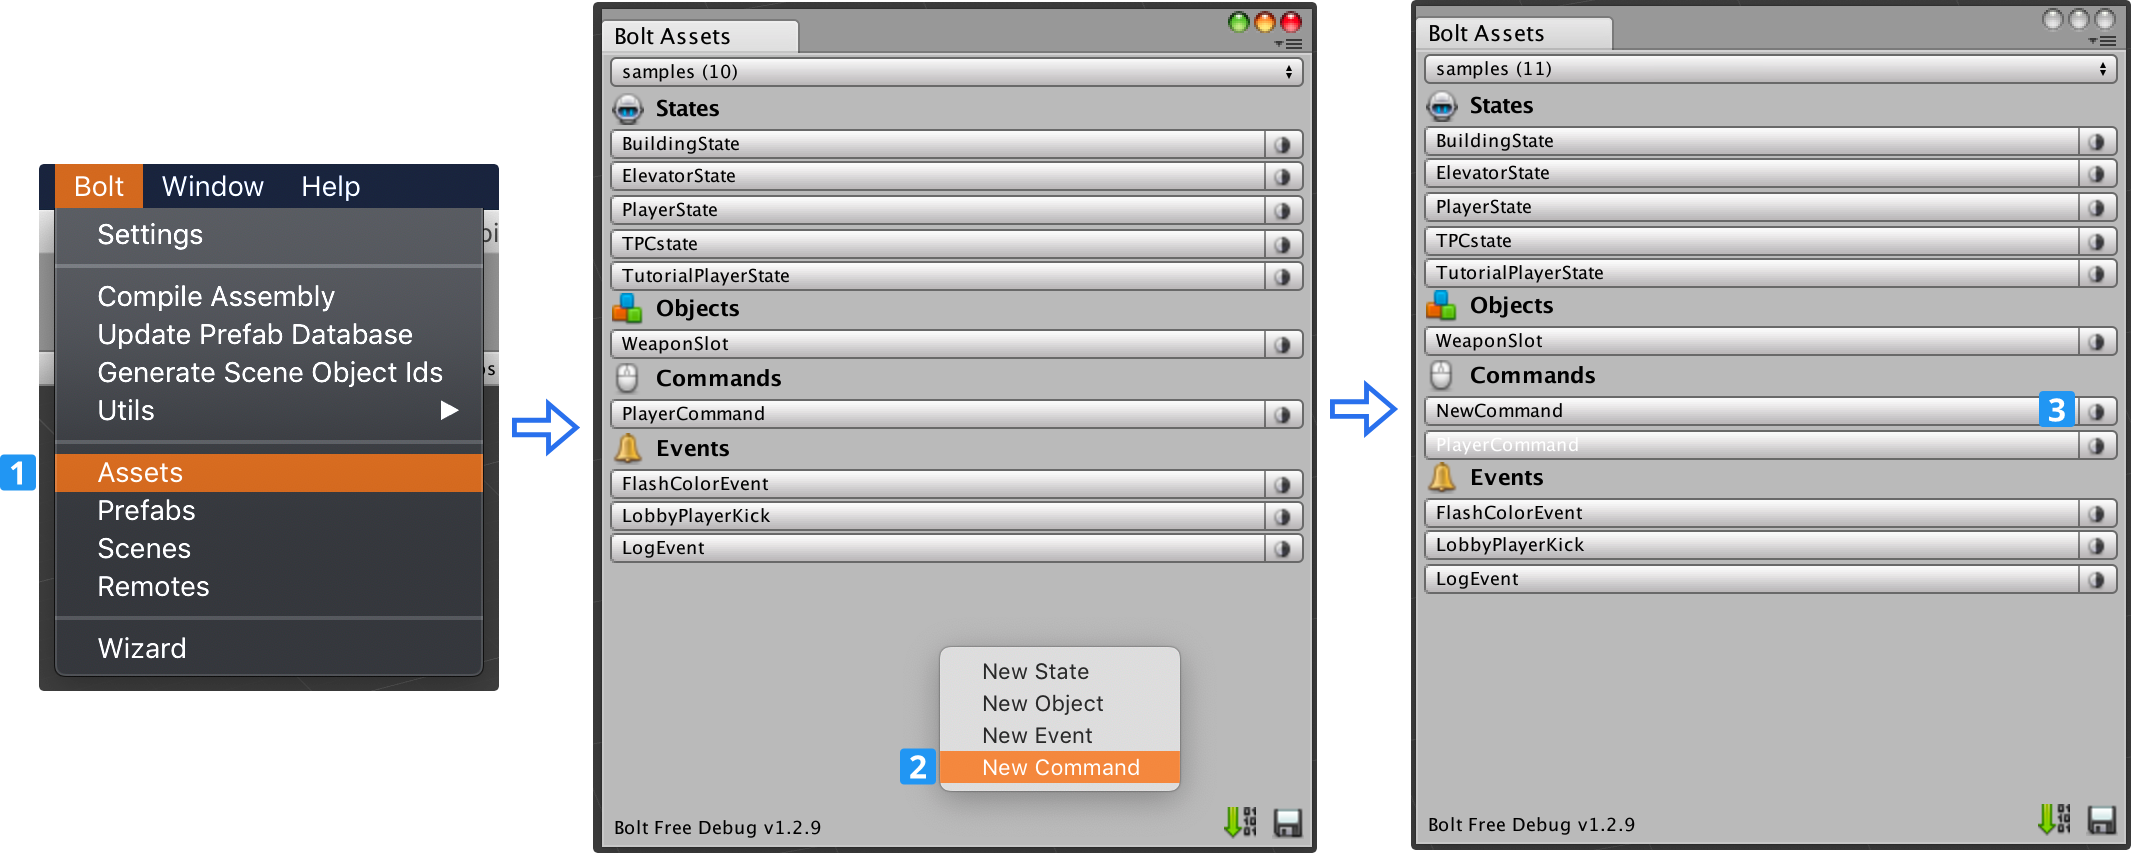
We are now going to configure our new Command to accommodate the inputs and results necessary for our player movement.
Select the command by clicking on it on the Bolt Assets window, the Bolt Editor window will show up, at the top left you can see that instead of the states New Property button you have two buttons called New Input and New Result.
Before we start adding data to our command, let's go into detail on exactly what the Input and Result represents.
- Input: in general terms encapsulates player input from one player.
This is often something like "Forward" and "Backward" for movement, or "YRotation" and "XRotation" for mouse rotation.
But it can also be a bit more abstract such as "SelectedWeapon". - Result: encapsulate the state which is the result of applying the Input to your object, common properties here are values for position and velocity but also flags for different types of state as isGrounded, etc.
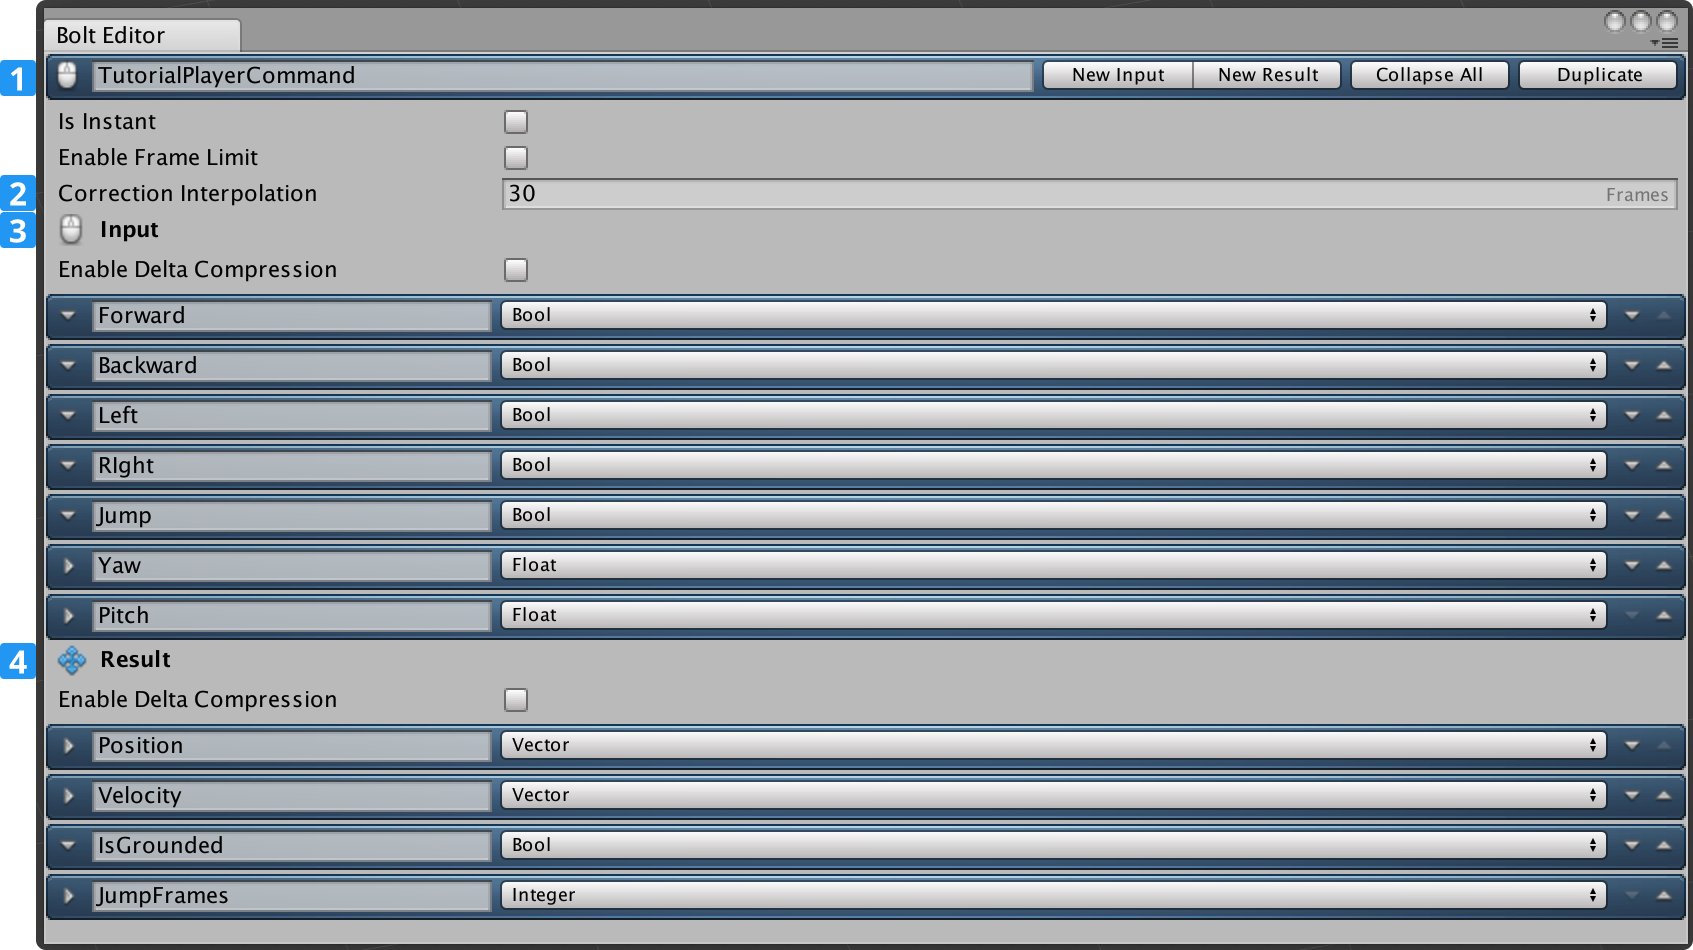
With this in mind, let's start configuring the Command:
- Rename it to TutorialPlayerCommand;
- Set the
Correction Interpolationto value30; - Add the Input:
- Forward [Bool]: If we are holding down the forward key;
- Backward [Bool]: If we are holding down the backward key;
- Left [Bool]: If we are holding down the left key;
- Right [Bool]: If we are holding down the right key;
- Jump [Bool]: If we pressed the down the jump key;
- Yaw [Float]: Our current rotation on the Y axis;
- Pitch [Float]: Our current rotation on the X axis.
- Add the Results:
- Position [Vector3]: final position of the character after apply the input;
- Velocity [Vector3]: current velocity of the character after apply the input;
- IsGrounded [Bool]: If we are touching the ground or not;
- JumpFrames [Integer]: This one is a bit odd, it is the number that represents how many "frames" we have left of applying our jump force on. This is a detail specific to the character motor we will be using.
After creating all details for this Command, it should look like this:
Our command is done, we are going to add more to it later but for now it's all we need to get movement working.
Compile Bolt again by going to Bolt/Compile Assembly, doing this Bolt will update its internal data with the new command we created.
The next thing we need to setup is the character motor, the original Advanced Sample comes with an already working character motor which supports all of the features we need.
You can find it in Assets/samples/AdvancedTutorial/scripts/Player/PlayerMotor.cs.
Locate the script and also our TutorialPlayer prefab, attach a copy of the motor to our prefab.
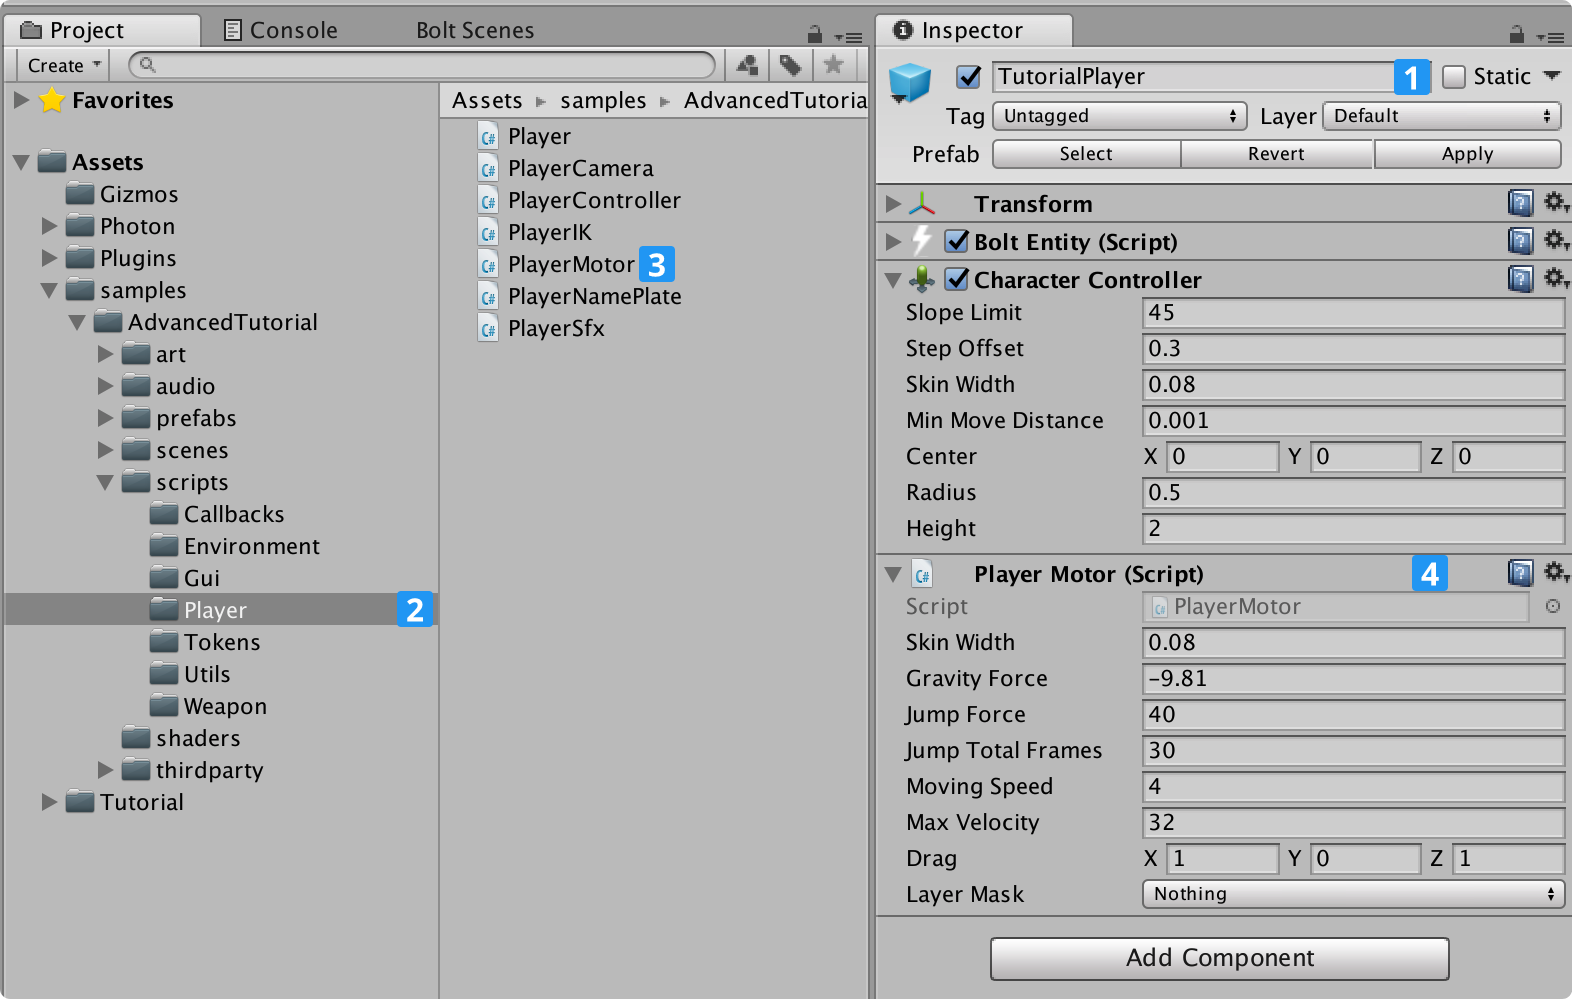
We need to adjust a couple of settings on both the Player Motor component and also the Character Controller component which gets added automatically:
- Set Step Offset to
0.5; - Set Center to
(0, 1, 0); - Set Height to
2.2; - Set Layer Mask to
Terrain.
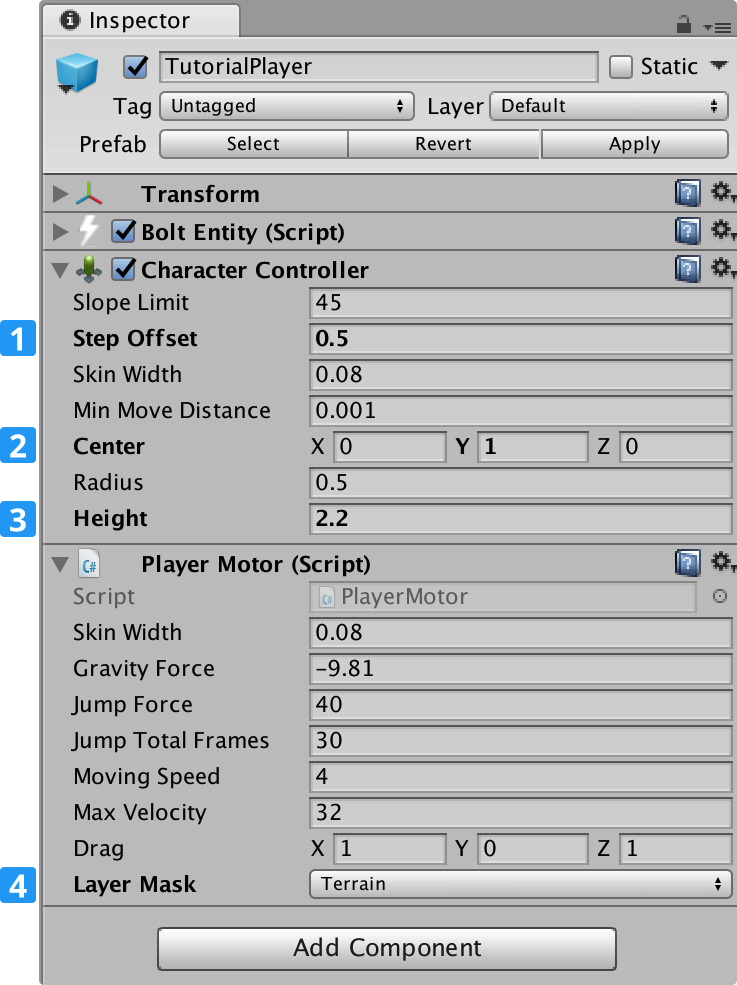
Now we need a script to receive the inputs and send to our motor, we need a controller.
Create a new script called TutorialPlayerController.cs in the Tutorial/Scripts/Player folder.
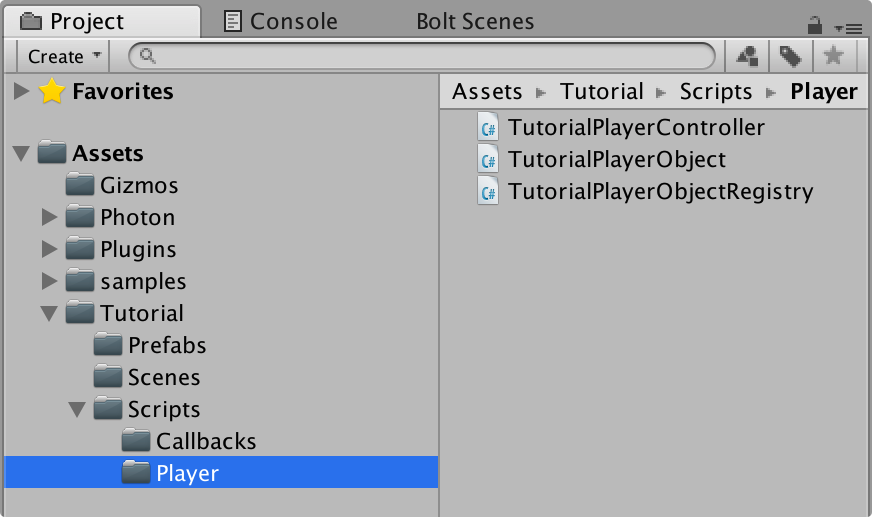
Our new class should inherit from Bolt.EntityBehaviour<ITutorialPlayerState> which gives us direct and static access to the data on our TutorialPlayerState state asset.
Bolt.EntityBehaviour is similar to the Bolt.GlobalEventListener, but it's intended to be used on each Bolt Entities, serving as the interface between your game code and the Bolt SDK.
By using ITutorialPlayerState state as a generic argument, we signal to Bolt that this class will manage this type of State.
C#
using Bolt;
using Bolt.AdvancedTutorial;
using UnityEngine;

public class TutorialPlayerController : Bolt.EntityBehaviour<ITutorialPlayerState>
{
}
The player controller is a large class that needs to be written, please follow the small pieces of code, one at time.
We will start by adding fields for our inputs, motor and also a constant to the TutorialPlayerController class:
C#
using Bolt;
using Bolt.AdvancedTutorial;
using UnityEngine;

public class TutorialPlayerController : Bolt.EntityBehaviour<ITutorialPlayerState>
{
    const float MOUSE_SENSITIVITY = 2f;

    bool _forward;
    bool _backward;
    bool _left;
    bool _right;
    bool _jump;

    float _yaw;
    float _pitch;

    PlayerMotor _motor;

    // ...
}
Next, we are just defining the standard Unity Awake method and get a reference to the motor in it:
C#
// ...
void Awake()
{
    _motor = GetComponent<PlayerMotor>();
}
// ...
We also need to make Bolt aware of the transform of our entity.
Override the Attached method which is provided by the Bolt.EntityBehaviour base class (API), inside this method access state.Transform and call the method SetTransforms on it and supply the transform of our game object.
This is the recommended approach when you want to sync the Entity transform.
C#
// ...
public override void Attached()
{
    // This couples the Transform property of the State with the GameObject Transform
    state.SetTransforms(state.Transform, transform);
}
// ...
Next up is PollKeys which is used for buffering the input data of the local player, this includes all of our buttons and the mouse movement.
C#
// ...
void PollKeys(bool mouse)
{
    _forward = Input.GetKey(KeyCode.W);
    _backward = Input.GetKey(KeyCode.S);
    _left = Input.GetKey(KeyCode.A);
    _right = Input.GetKey(KeyCode.D);
    _jump = Input.GetKeyDown(KeyCode.Space);

    if (mouse)
    {
        _yaw += (Input.GetAxisRaw("Mouse X") * MOUSE_SENSITIVITY);
        _yaw %= 360f;

        _pitch += (-Input.GetAxisRaw("Mouse Y") * MOUSE_SENSITIVITY);
        _pitch = Mathf.Clamp(_pitch, -85f, +85f);
    }
}
// ...
This is pretty much standard Unity Input code, so not a lot to talk about - the only thing really interesting is the bool mouse parameter which tells us if we should poll the mouse input or not, more on this later.
Since Unity refreshes the state of the Input class inside Update, we are going to define a very simple Update function like this, just calling our PollKeys function.
We pass true to the PollKeys function so that we read our mouse movement too.
C#
// ...
void Update()
{
    PollKeys(true);
}
// ...
Now it's time to get into some Bolt specific stuff.
We are going to override a method called SimulateController, which is only invoked on the computer which has been assigned control of an entity, and it's responsible for getting the input for this player and queue it for processing.
The first thing we do is call PollKeys again, but we pass in false saying we don't want it to read the mouse data.
The reason for this is that if we had read the mouse data here again we would double our mouse movement.
Next, we are calling TutorialPlayerCommand.Create() to create an instance of our command input that Bolt has compiled for us from the TutorialPlayerCommand asset.
Now we just need to copy over all of the input data from our local variables to the input command.
The last thing we will do is to call QueueInput on our entity, this sends the input to both the server and client for processing.
This what alows Bolt to do the client prediction but still maintain authority on the server.
C#
// ...
public override void SimulateController()
{
    PollKeys(false);

    ITutorialPlayerCommandInput input = TutorialPlayerCommand.Create();

    input.Forward = _forward;
    input.Backward = _backward;
    input.Left = _left;
    input.Right = _right;
    input.Jump = _jump;
    input.Yaw = _yaw;
    input.Pitch = _pitch;

    entity.QueueInput(input);
}
// ...
Great, now there one more method implement.
This is the most important one in all of Bolt, this is where the magic happens when it comes to authoritative movement and control.
Meet ExecuteCommand, it executes on both the controller and the owner of an entity.
The first parameter of this function is always a command which contains the input you've sent with QueueInput from SimulateController.
The second parameter, called resetState, tells the controller (usually the client) that the owner (usually the server) sent a correction to it and we should reset the state of our motor.
It's important to note that this can only be true on the controller,
Inside the function we check if resetState is true, if it is we don't execute the command and we simply reset the local state of the motor.
Otherwise we apply the input of the command to the motor by calling Move, which returns a new state which we copy over to the Result property on the command that was passed in.
It's very important to assign the state of the motor to the received command, this is what lets Bolt apply correction, using the result of the command from the owner on the controller player.
C#
// ...
public override void ExecuteCommand(Command command, bool resetState)
{
    TutorialPlayerCommand cmd = (TutorialPlayerCommand)command;

    if (resetState)
    {
      // we got a correction from the server, reset (this only runs on the client)
        _motor.SetState(cmd.Result.Position, cmd.Result.Velocity, cmd.Result.IsGrounded, cmd.Result.JumpFrames);
    }
    else
    {
        // apply movement (this runs on both server and client)
        PlayerMotor.State motorState = _motor.Move(cmd.Input.Forward, cmd.Input.Backward, cmd.Input.Left, cmd.Input.Right, cmd.Input.Jump, cmd.Input.Yaw);

        // copy the motor state to the commands result (this gets sent back to the client)
        cmd.Result.Position = motorState.position;
        cmd.Result.Velocity = motorState.velocity;
        cmd.Result.IsGrounded = motorState.isGrounded;
        cmd.Result.JumpFrames = motorState.jumpFrames;
    }
}
// ...
Attach a copy of the TutorialPlayerController component to your TutorialPlayer prefab and if you hit Play As Server now, you should be able to run around in the world (without animations for now).
For reference here is the complete code for TutorialPlayerController.
C#
using Bolt;
using Bolt.AdvancedTutorial;
using UnityEngine;

public class TutorialPlayerController : Bolt.EntityBehaviour<ITutorialPlayerState>
{
    const float MOUSE_SENSITIVITY = 2f;

    bool _forward;
    bool _backward;
    bool _left;
    bool _right;
    bool _jump;

    float _yaw;
    float _pitch;

    PlayerMotor _motor;

    void Awake()
    {
        _motor = GetComponent<PlayerMotor>();
    }

    public override void Attached()
    {
        // This couples the Transform property of the State with the GameObject Transform
        state.SetTransforms(state.Transform, transform);
    }

    void PollKeys(bool mouse)
    {
        _forward = Input.GetKey(KeyCode.W);
        _backward = Input.GetKey(KeyCode.S);
        _left = Input.GetKey(KeyCode.A);
        _right = Input.GetKey(KeyCode.D);
        _jump = Input.GetKeyDown(KeyCode.Space);

        if (mouse)
        {
            _yaw += (Input.GetAxisRaw("Mouse X") * MOUSE_SENSITIVITY);
            _yaw %= 360f;

            _pitch += (-Input.GetAxisRaw("Mouse Y") * MOUSE_SENSITIVITY);
            _pitch = Mathf.Clamp(_pitch, -85f, +85f);
        }
    }

    void Update()
    {
        PollKeys(true);
    }

    public override void SimulateController()
    {
        PollKeys(false);

        ITutorialPlayerCommandInput input = TutorialPlayerCommand.Create();

        input.Forward = _forward;
        input.Backward = _backward;
        input.Left = _left;
        input.Right = _right;
        input.Jump = _jump;
        input.Yaw = _yaw;
        input.Pitch = _pitch;

        entity.QueueInput(input);
    }

    public override void ExecuteCommand(Command command, bool resetState)
    {
        TutorialPlayerCommand cmd = (TutorialPlayerCommand) command;

        if (resetState)
        {
            // we got a correction from the server, reset (this only runs on the client)
            _motor.SetState(cmd.Result.Position, cmd.Result.Velocity, cmd.Result.IsGrounded, cmd.Result.JumpFrames);
        }
        else
        {
            // apply movement (this runs on both server and client)
            PlayerMotor.State motorState = _motor.Move(cmd.Input.Forward, cmd.Input.Backward, cmd.Input.Left, cmd.Input.Right, cmd.Input.Jump, cmd.Input.Yaw);

            // copy the motor state to the commands result (this gets sent back to the client)
            cmd.Result.Position = motorState.position;
            cmd.Result.Velocity = motorState.velocity;
            cmd.Result.IsGrounded = motorState.isGrounded;
            cmd.Result.JumpFrames = motorState.jumpFrames;
        }
    }
}
Here we finished Chapter 3, you should have a game working similar to the one shown below by now:
