4 - Animations
In this chapter, it will be explained how to replicate animations over the networking using Bolt.
There are many ways to do this, even many ways inside Bolt, but we are going to look at the default way of replicating mecanim parameters over the network.
This chapter will be rather short, as there is not that much to write about mecanim replication, but it's such an important topic that it deserves its own chapter.
Creating A Mecanim Asset
The first thing we are going to do is to hook up the Animator Controller for the character we are using.
Follow the next steps:
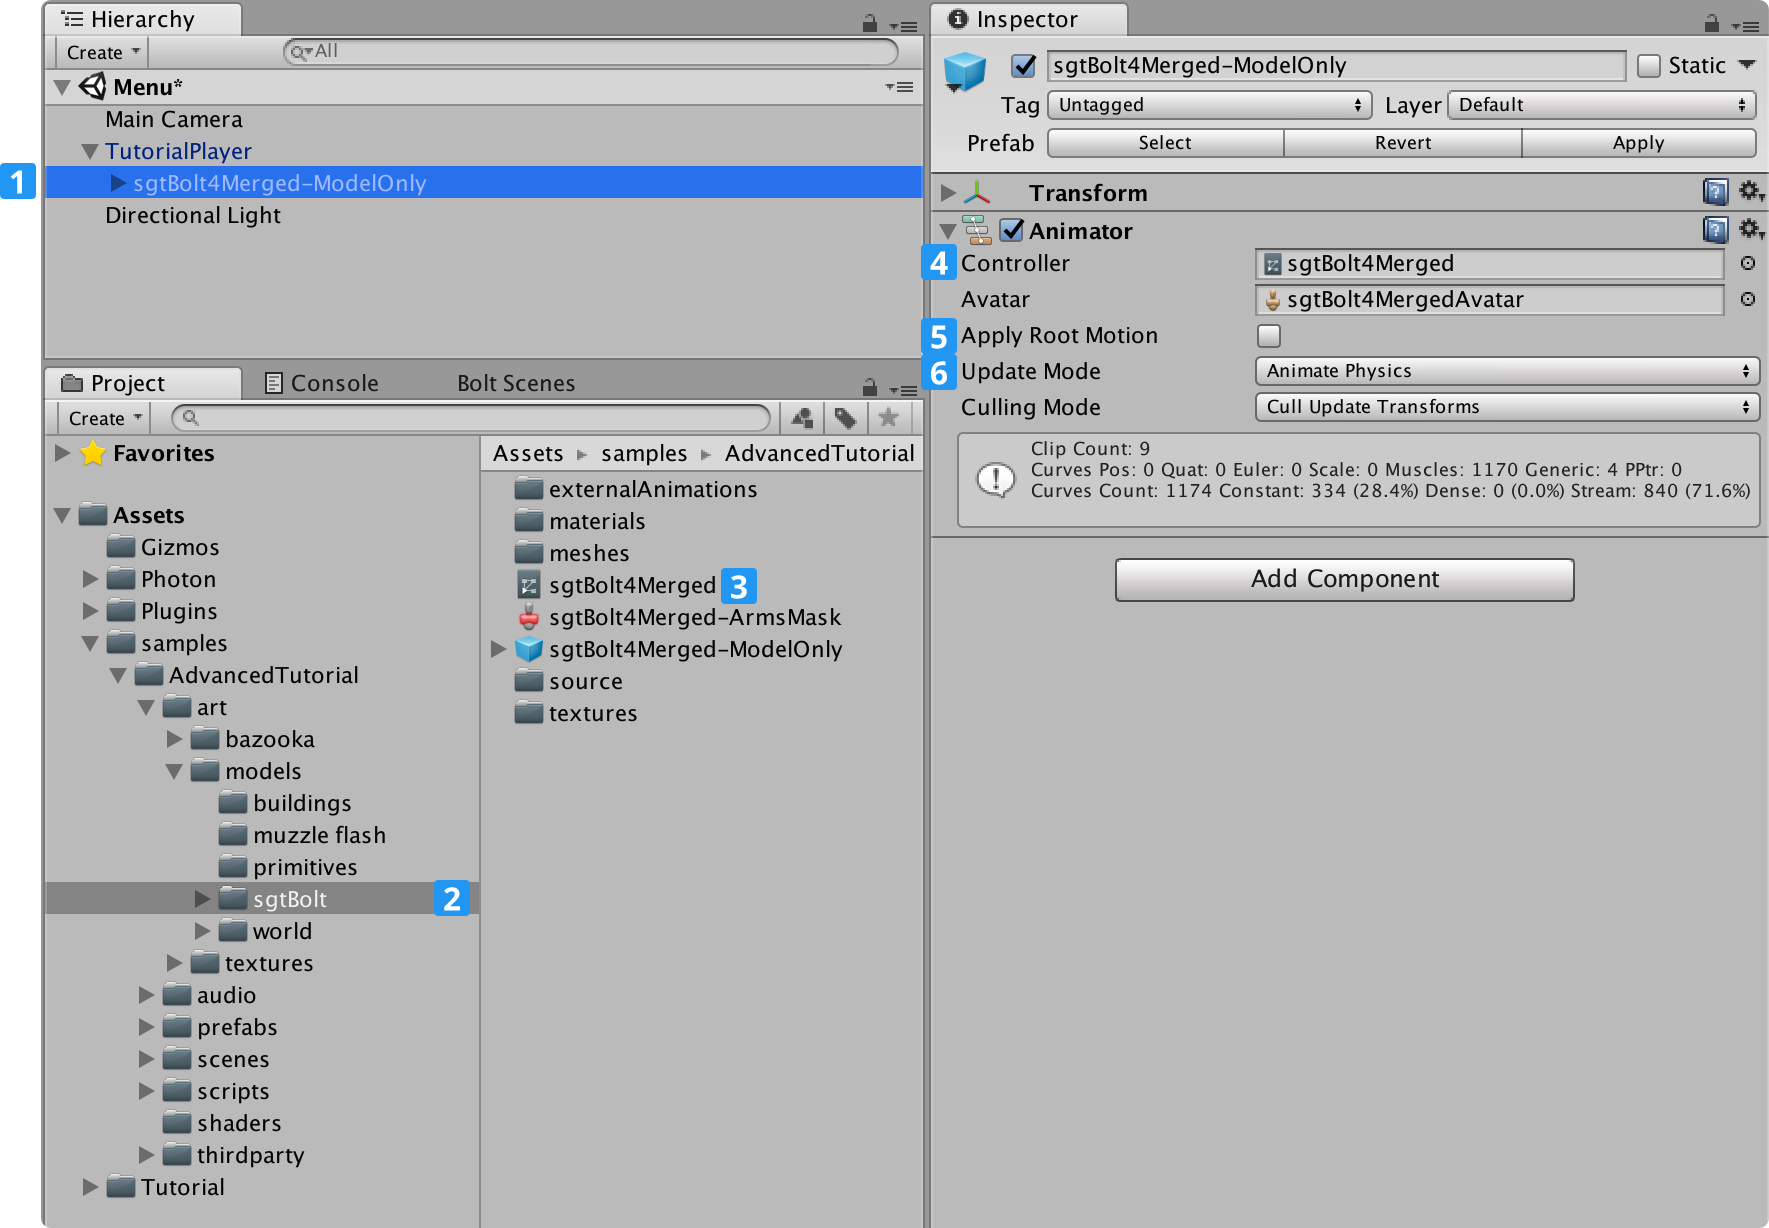
- Select the sgtBolt4Merged-ModelOnly sub-object on your TutorialPlayer prefab;
- Open the folder Assets/samples/AdvancedTutorial/art/models/sgtBolt;
- Find the Animator Controller sgtBolt4merged;
- Drag it into the Controller slot on the Animator component;
- Disable Apply Root Motion;
- Set Update Mode to Animate Physics.
When the animator controller is connected, double-click on it to open the Unity Animator Editor.
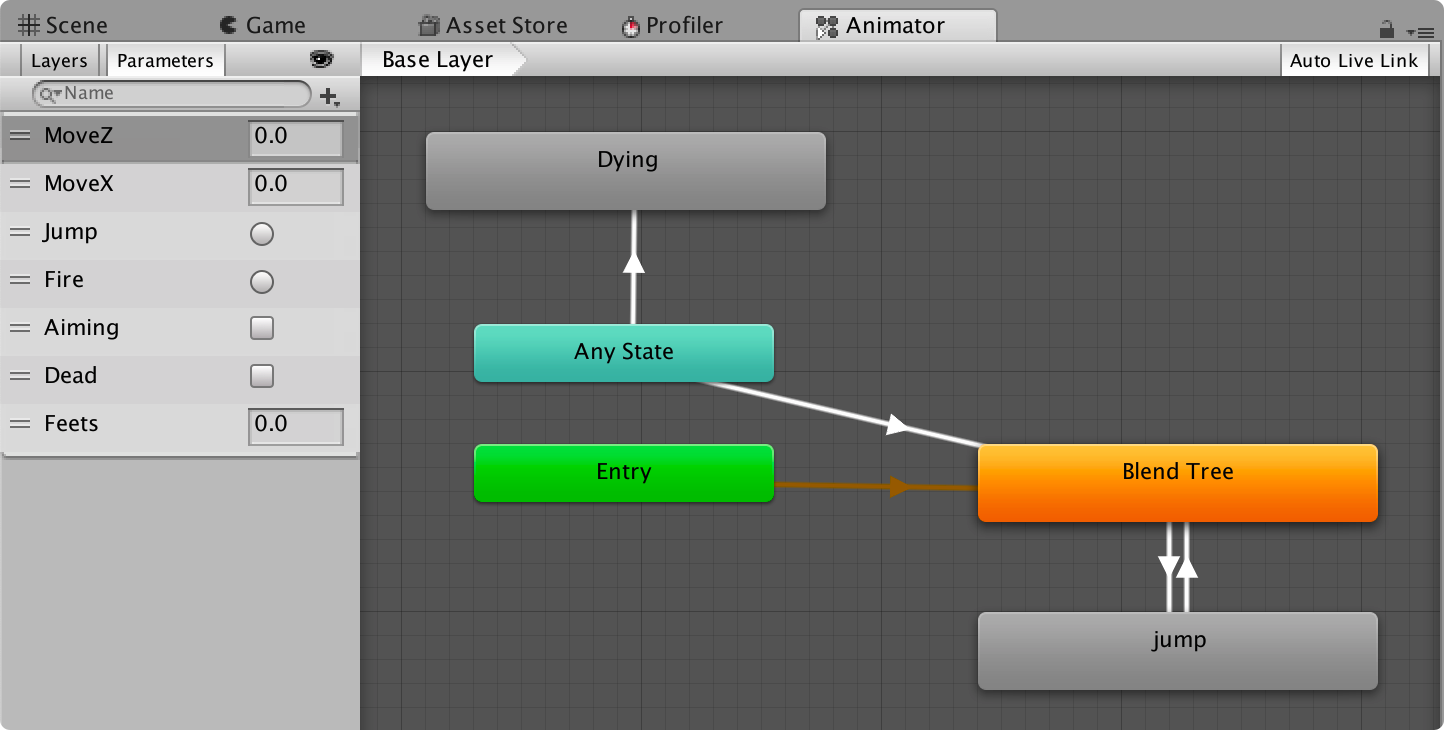
To explore the available parameters, click on the Parameters tab. Here you can see several parameters, but for now, we are only going to use MoveZ, MoveX, and Jump. MoveZ and MoveX are floats and Jump is a trigger. Go to the Bolt/Assets window and open up the TutorialPlayerState we've created earlier.
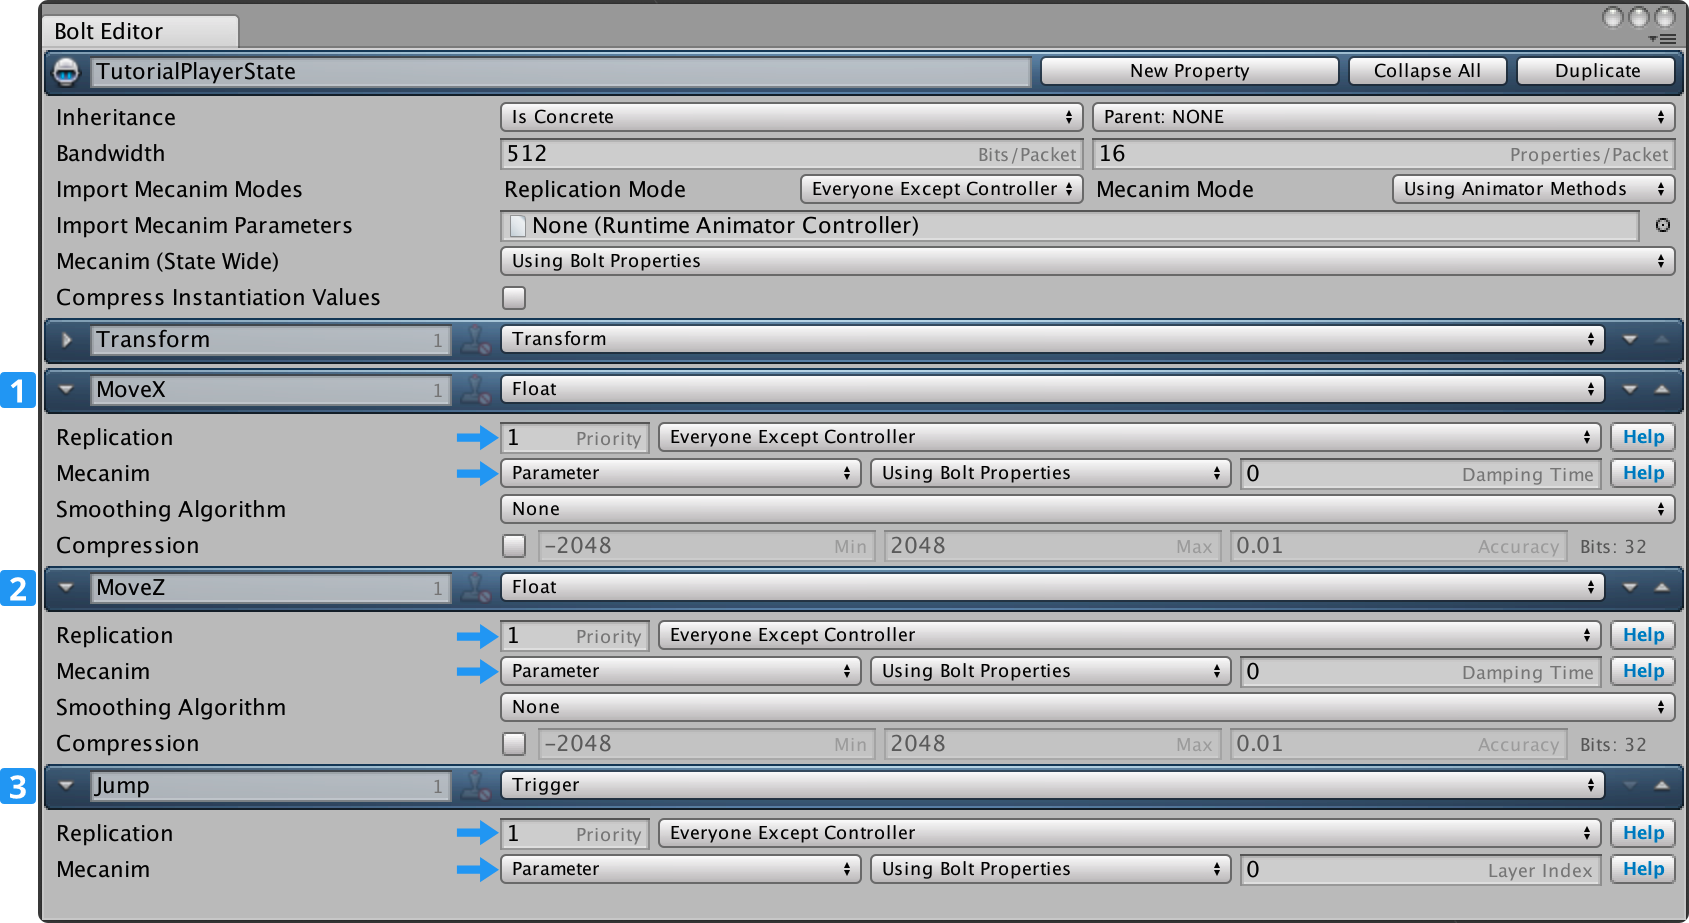
We are going to define three new properties here, called the same thing as the three ones from the mecanim animator we are using.
- MoveX [Float];
- MoveZ [Float];
- Jump [Trigger].
In the settings for each property, switch the Mecanim setting from Disabled to Parameter and Replication from Everyone to Everyone Except Controller.
There is one more option we need configure, on the State settings, you can find a Mecanim Mode option, that can be set to Use Animator Methods or Use Bolt Properties.
- Use Animator Methods: means that you want to use the normal
SetFloat,SetInteger, etc. methods of mecanim and have Bolt automatically pull the value out. - Use Bolt Parameters: means that you want to use the Bolt parameters to set the mecanim values and have Bolt apply them to mecanim for you.
You can also configure this state wide at the top in the state specific settings or by property, in the last dropdown on the Mecanim configuration.
We are going to select Use Bolt Properties on MoveZ, MoveX and Jump.
We are almost done, it's time to compile Bolt again, go to Bolt/Compile Assembly and let Bolt do it's thing.
Now open up the TutorialPlayerController.cs script.
We are going to add a new method called AnimatePlayer, its pretty much standard mecanim code where we set a MoveZ parameter to -1 or +1 depending on if we are moving forward/backward and the same with MoveX for left/right.
C#
void AnimatePlayer(TutorialPlayerCommand cmd)
{
    // FWD <> BWD movement
    if (cmd.Input.Forward ^ cmd.Input.Backward)
    {
        state.MoveZ = cmd.Input.Forward ? 1 : -1;
    }
    else
    {
        state.MoveZ = 0;
    }

    // LEFT <> RIGHT movement
    if (cmd.Input.Left ^ cmd.Input.Right)
    {
        state.MoveX = cmd.Input.Right ? 1 : -1;
    }
    else
    {
        state.MoveX = 0;
    }

    // JUMP
    if (_motor.jumpStartedThisFrame)
    {
        state.Jump();
    }
}
Inside of the ExecuteCommand function we are going to call our new AnimatePlayer function, we are going to access a very specific property on our command called IsFirstExecution.
If this is true it means that this is the first time the command is being executed, in that case we want to apply our animations.
C#
public override void ExecuteCommand(Command command, bool resetState)
{
    TutorialPlayerCommand cmd = (TutorialPlayerCommand) command;

    if (resetState)
    {
        // we got a correction from the server, reset (this only runs on the client)
        _motor.SetState(cmd.Result.Position, cmd.Result.Velocity, cmd.Result.IsGrounded, cmd.Result.JumpFrames);
    }
    else
    {
        // apply movement (this runs on both server and client)
        PlayerMotor.State motorState = _motor.Move(cmd.Input.Forward, cmd.Input.Backward, cmd.Input.Left, cmd.Input.Right, cmd.Input.Jump, cmd.Input.Yaw);

        // copy the motor state to the commands result (this gets sent back to the client)
        cmd.Result.Position = motorState.position;
        cmd.Result.Velocity = motorState.velocity;
        cmd.Result.IsGrounded = motorState.isGrounded;
        cmd.Result.JumpFrames = motorState.jumpFrames;

        // NEW CODE
        if (cmd.IsFirstExecution)
        {
            AnimatePlayer(cmd);
        }
    }
}
The last thing we need to do is to pass in the correct Animator to Bolt.
This is done inside the Attached callback where we are setting our transform:
C#
public override void Attached()
{
    // This couples the Transform property of the State with the GameObject Transform
    state.SetTransforms(state.Transform, transform);
    state.SetAnimator(GetComponentInChildren<Animator>());

    // Configure Animator
    state.Animator.SetLayerWeight(0, 1);
    state.Animator.SetLayerWeight(1, 1);
}
You can start the game and run around with our character now, you can choose to just Play As Server or also connect clients if you want.