3 - Photon Bolt PlayFab Server Integration
Our main goal when implementing the integration between Photon Bolt and PlayFab Server 2.0 is to prepare a simple way to build and run headless game servers directly on the virtual machines provided by service.
Towards this ideal, we've built a simple sample using all the necessary APIs that can be incorporated into your own game.
In this chapter, we will describe this sample and how to use it properly.
All the necessary files can be found in to our Bolt Samples repository here, and more specifically on the PlayFab folder. You can access it using this link: https://github.com/BoltEngine/Bolt-Sample/tree/master/PlayFab.
Please download and import the files from this folder into your project.
Inside the Scripts folder, you will find a set of classes that can be described as:
PlayFabHeadlessServer: this class will act as the Headless Server controller. Using thePlayFabandBoltAPIs to control the communication with the service and also to start the game server.PlayFabMenuClient: just a simple Menu implementation to be used on the Game Client. It will start the game as a Bolt client and join a random session.PlayfabLogger: a special logger class that hooks into the Logging system of Bolt to output logs from the server execution to the right folder inside thePlayFabstack, this way, it's possible to debug the server after it's execution finishes. Read more about this here.
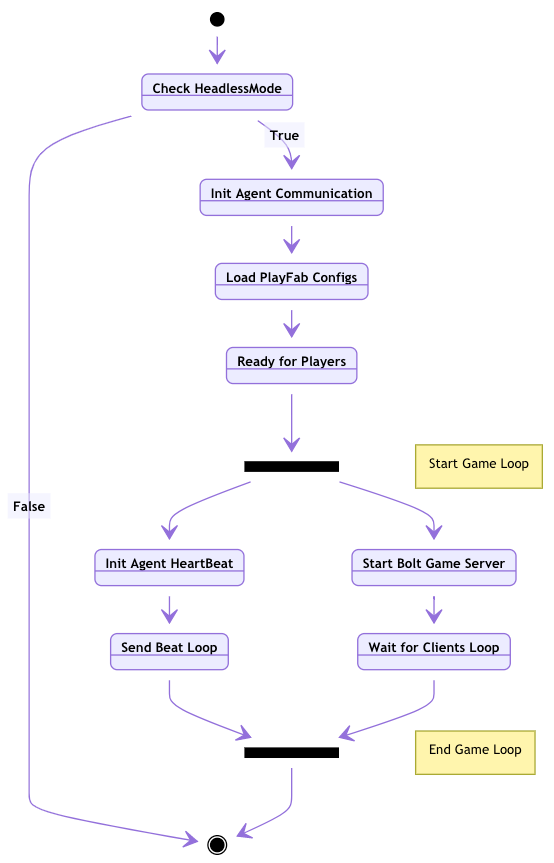
The process of having the Game Server running and communicating with the PlayFab Agent involves a set of coordinated actions, that guarantees that our executable will keeped running and PlayFab will not kill our instance.
Those steps are described below and are all performed by our sample code:
Using the PlayFab Integration
The set of scripts alone don't do much, that is why it is included on the sample some simple scenes showing a use case of those scripts.
The scenes can be found in the Scenes folder of the sample.
PlayFabHeadlessServer: this scene contains only one Game Object that holds ourPlayFabHeadlessServerscript, but also includes thePlayFabMultiplayerAgentViewcomponent, included into theMultiplayer Agent API Packagethat we've imported on the last chapter;PlayFabClient: this scene will load the client menu and let the player join any open session;PlayFabGame: just a placeholder game scene.
About the PlayFabMultiplayerAgentView component: it is responsible for sending hearth beats to the PlayFab Agent to signal that our server is alive and running.
If this component is not present, the PlayFab Orchestrator (an oversee system that maintain the virtual machines and containers) will not be aware if the server should stay alive and will kill it eventually.
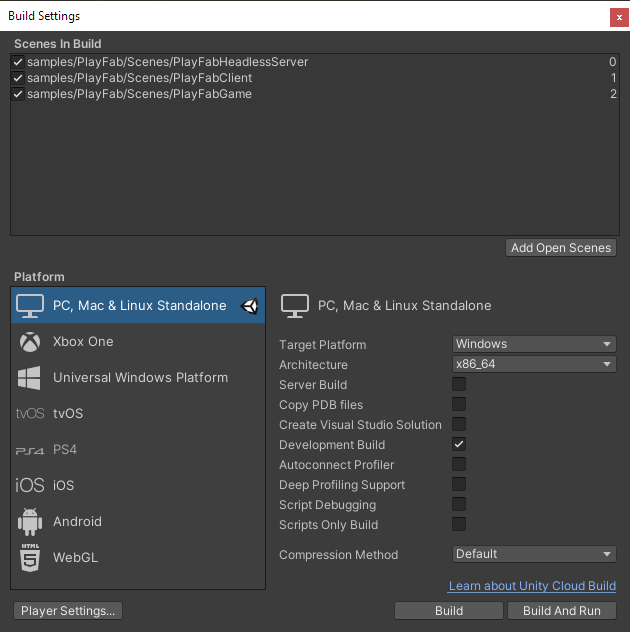
Include the scenes into your Build Settings in the following order: (0) PlayFabHeadlessServer, (1) PlayFabClient and (2) PlayFabGame.
By default, the PlayFabHeadlessServer script will load the next scene in the build list if it's was not started in batchmode, which means, the Client Menu scene will be loaded if you run the project normally.
Another important aspect that you need to consider is the Region that your game will be using.
By default, Bolt is configured to connect to the Best Region, so if you will be running the Game Server on the PlayFab infrastructure, it will connect to the nearest region of where its deployed.
This behavior is expected as it grants as lower delay as possible among the peers, but this also determines where your game session will be published.
If your game session is published on a certain region A, and your player connects to region B, it will never receive any information about the running game.
So, for testing purposes, go to the Bolt Settings window (Bolt/Settings menu), and choose a fixed region on the Photon Services section at the Region field.
You can choose any arbitrary region (read more about the Photon Regions here) but we suggest to be one near the region you server will be deployed.
This way, both your game server and your player will connect to the same region, making sure they can connect properly.
Run the Bolt Compiler at Bolt/Compile Assembly menu, to make sure Bolt is aware of your changes.
Build the project into a standalone executable for the Windows Platform using as Architecture x86_64 like it's shown below.
This is very important, as the service we will be using mainly supports Windows builds.
It's also possible to run Linux builds, but it uses a different approach to make the server container.
We will use this executable on the next chapter to run our headless server.