Bolt 106 - Animations
Bolt has built in support for replicating mecanim animations over the network, in this chapter we will look in detail on how you can play your animations over the network properly.
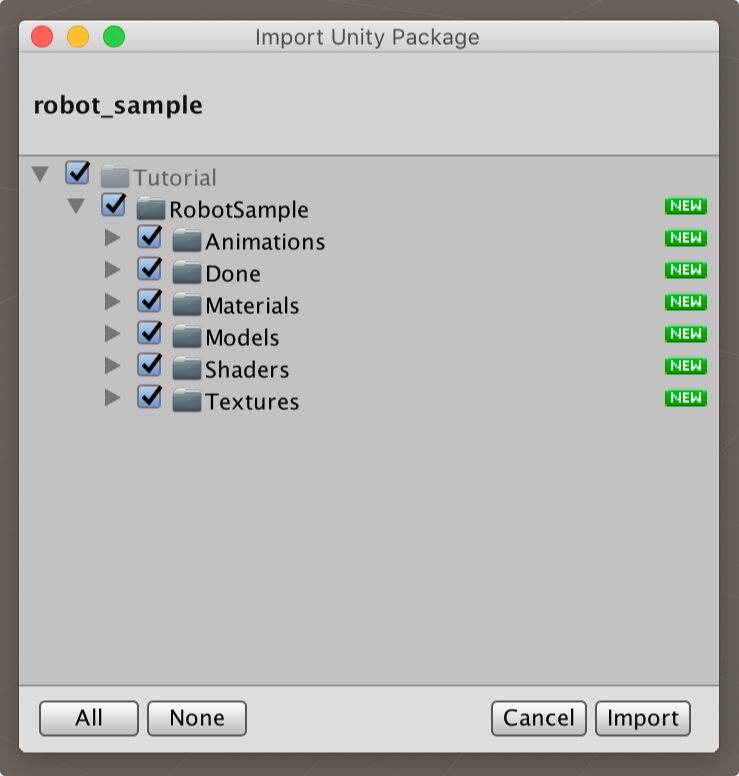
The first thing we need to do is to download a package that contains a model and some animations. This has just been ripped out of the Unity 'Stealth' sample from the asset store. If you prefer you can download the 'Stealth' package from the asset store and export the character yourself, or download this package:
For the rest of this tutorial we will assume that you downloaded the package above. Import the package into your Tutorial project, create a new folder Robot and drag all related files to it.
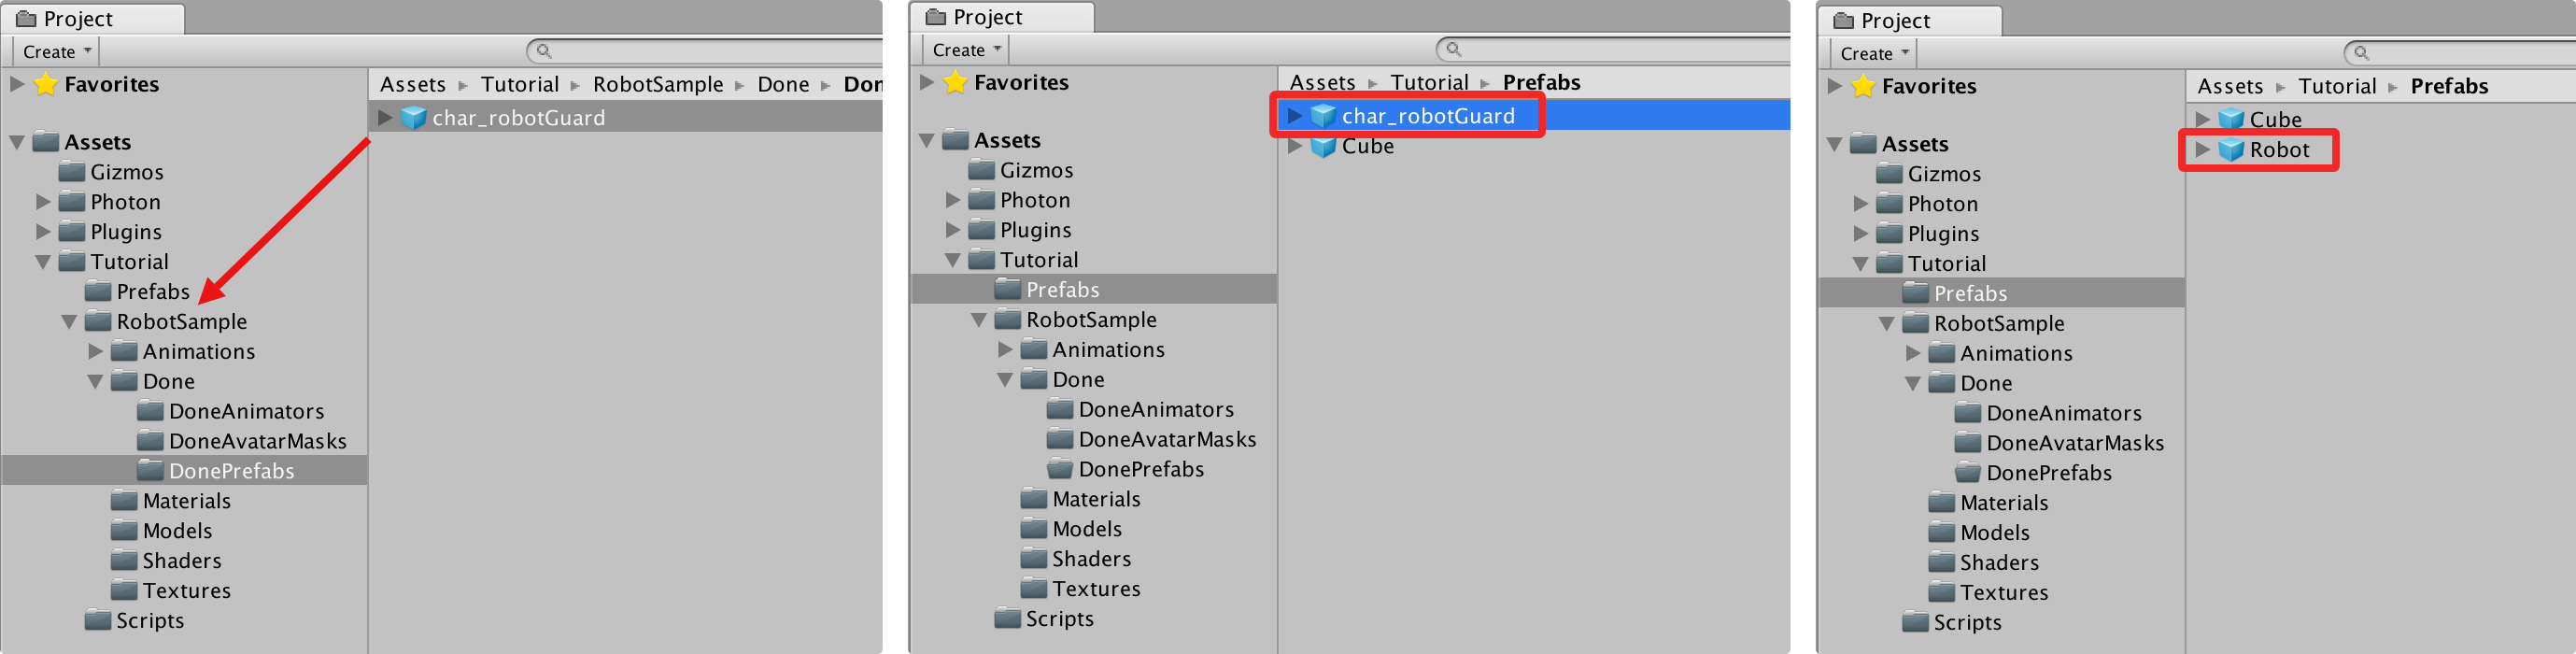
Find the Tutorial/Robot/Done/DonePrefabs/char_robotGuard prefab and drag it into our Tutorial/Prefabs folder and then rename it to Robot.
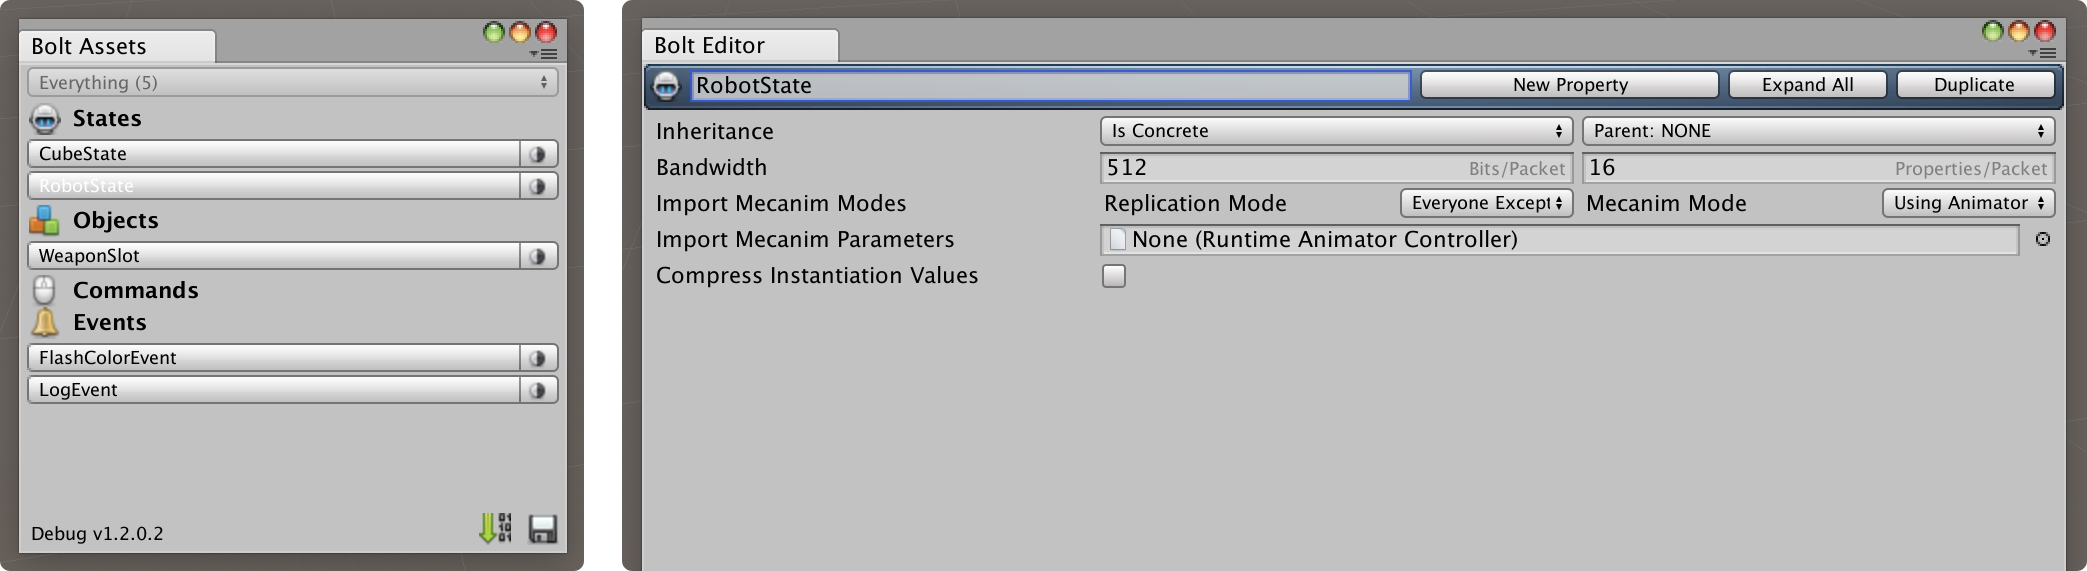
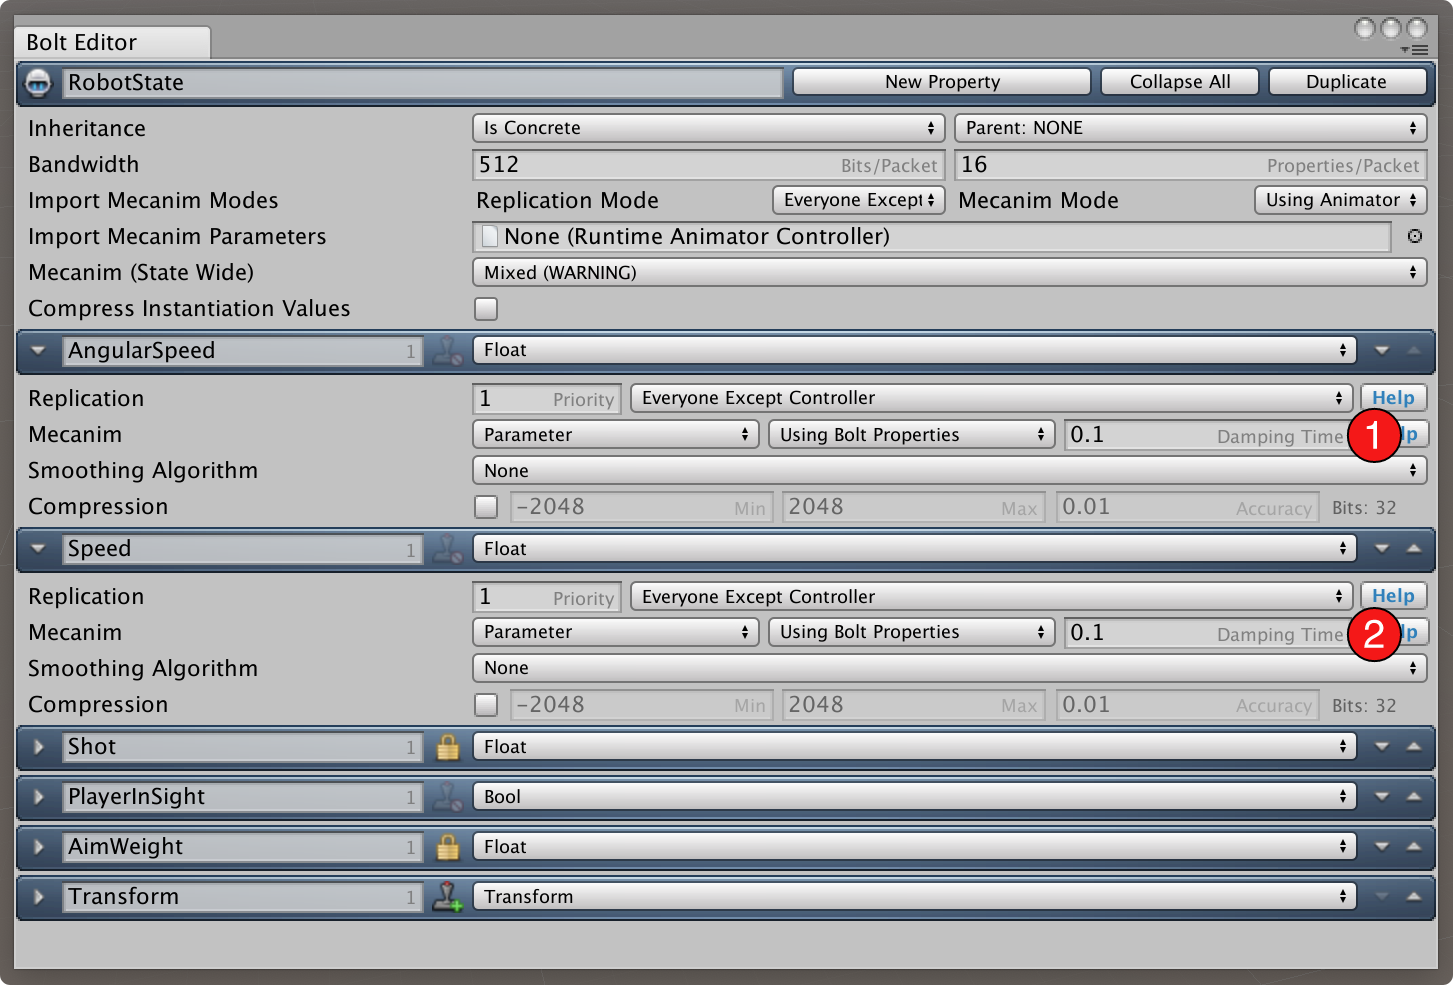
Open up the Bolt Assets window and create a new state, call it RobotState. After you have create and named the state find the Import Mecanim Parameters setting on the state itself.
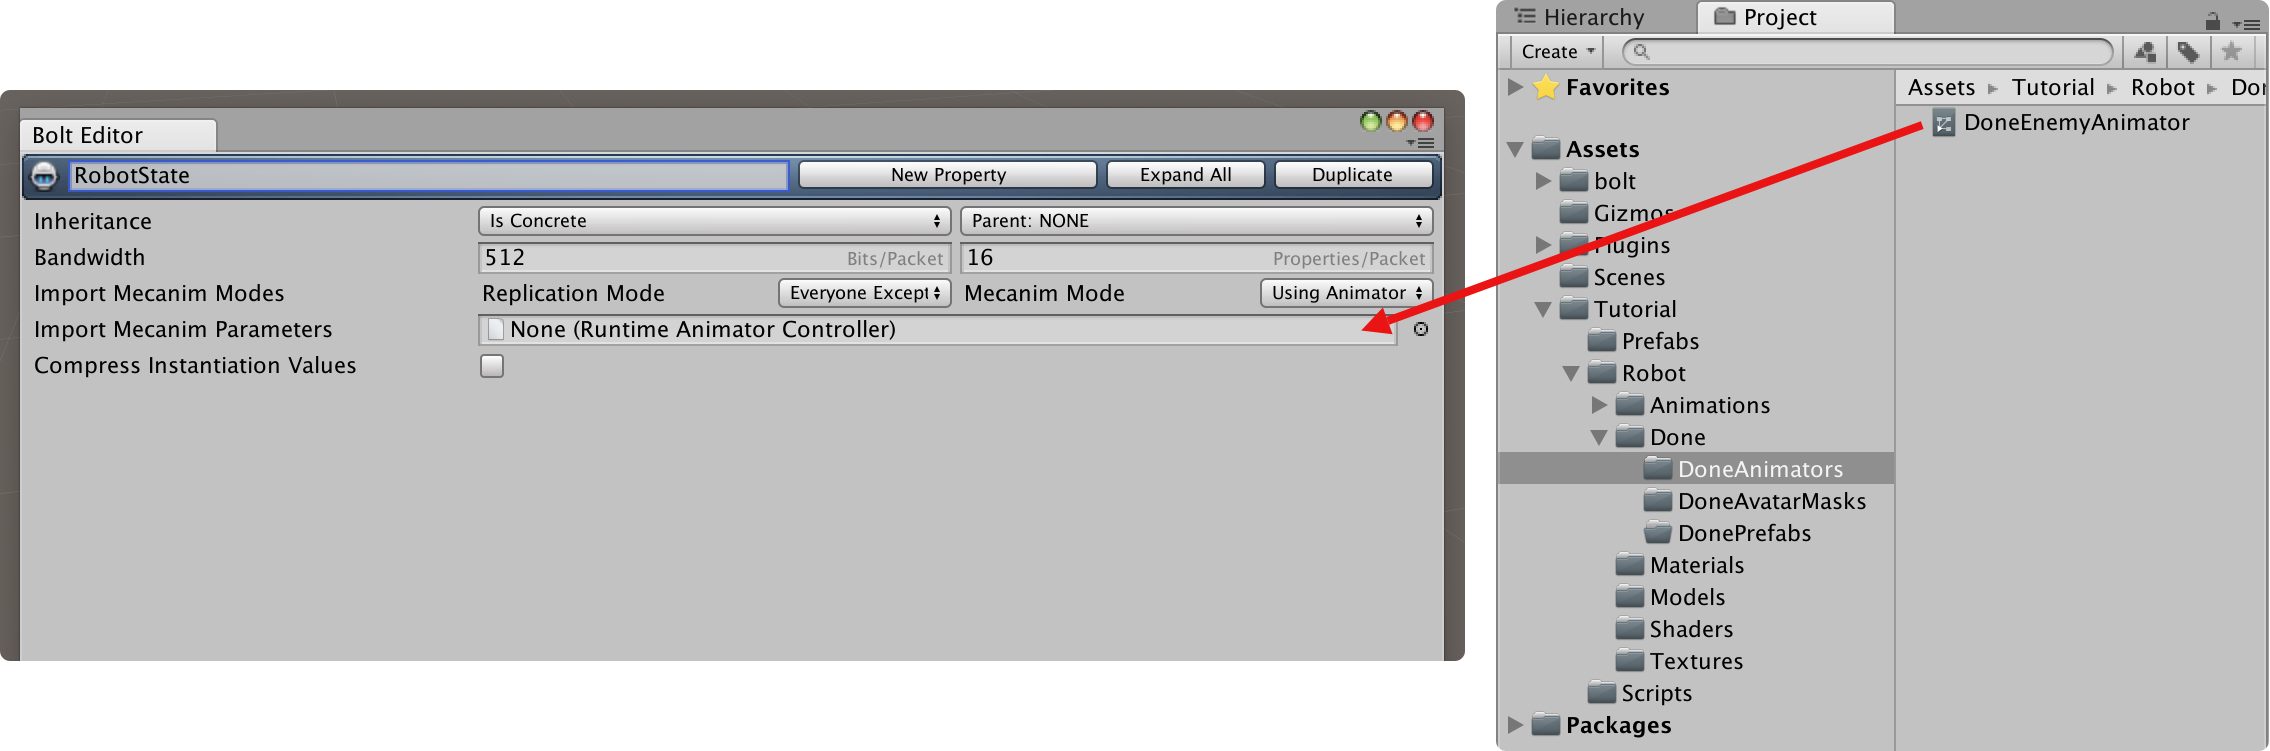
Drag the mecanim controller for the Robot into the slot, you can find it in Tutorial/Robot/DoneAnimations/DoneEnemyAnimator.
Click the Import button.
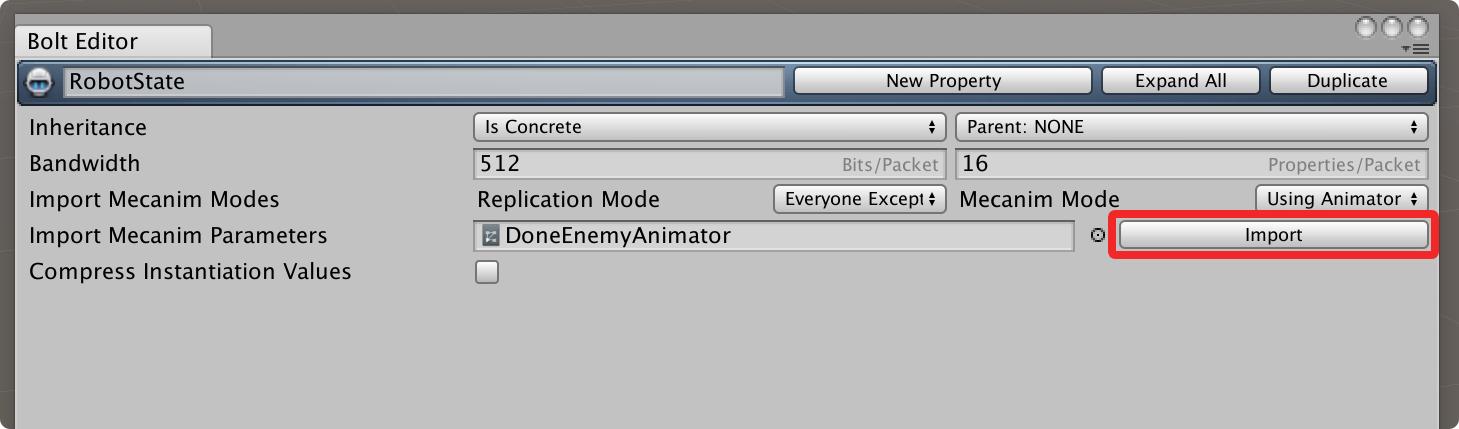
Bolt will automatically import all the parameters in the mecanim controller for you into the state.
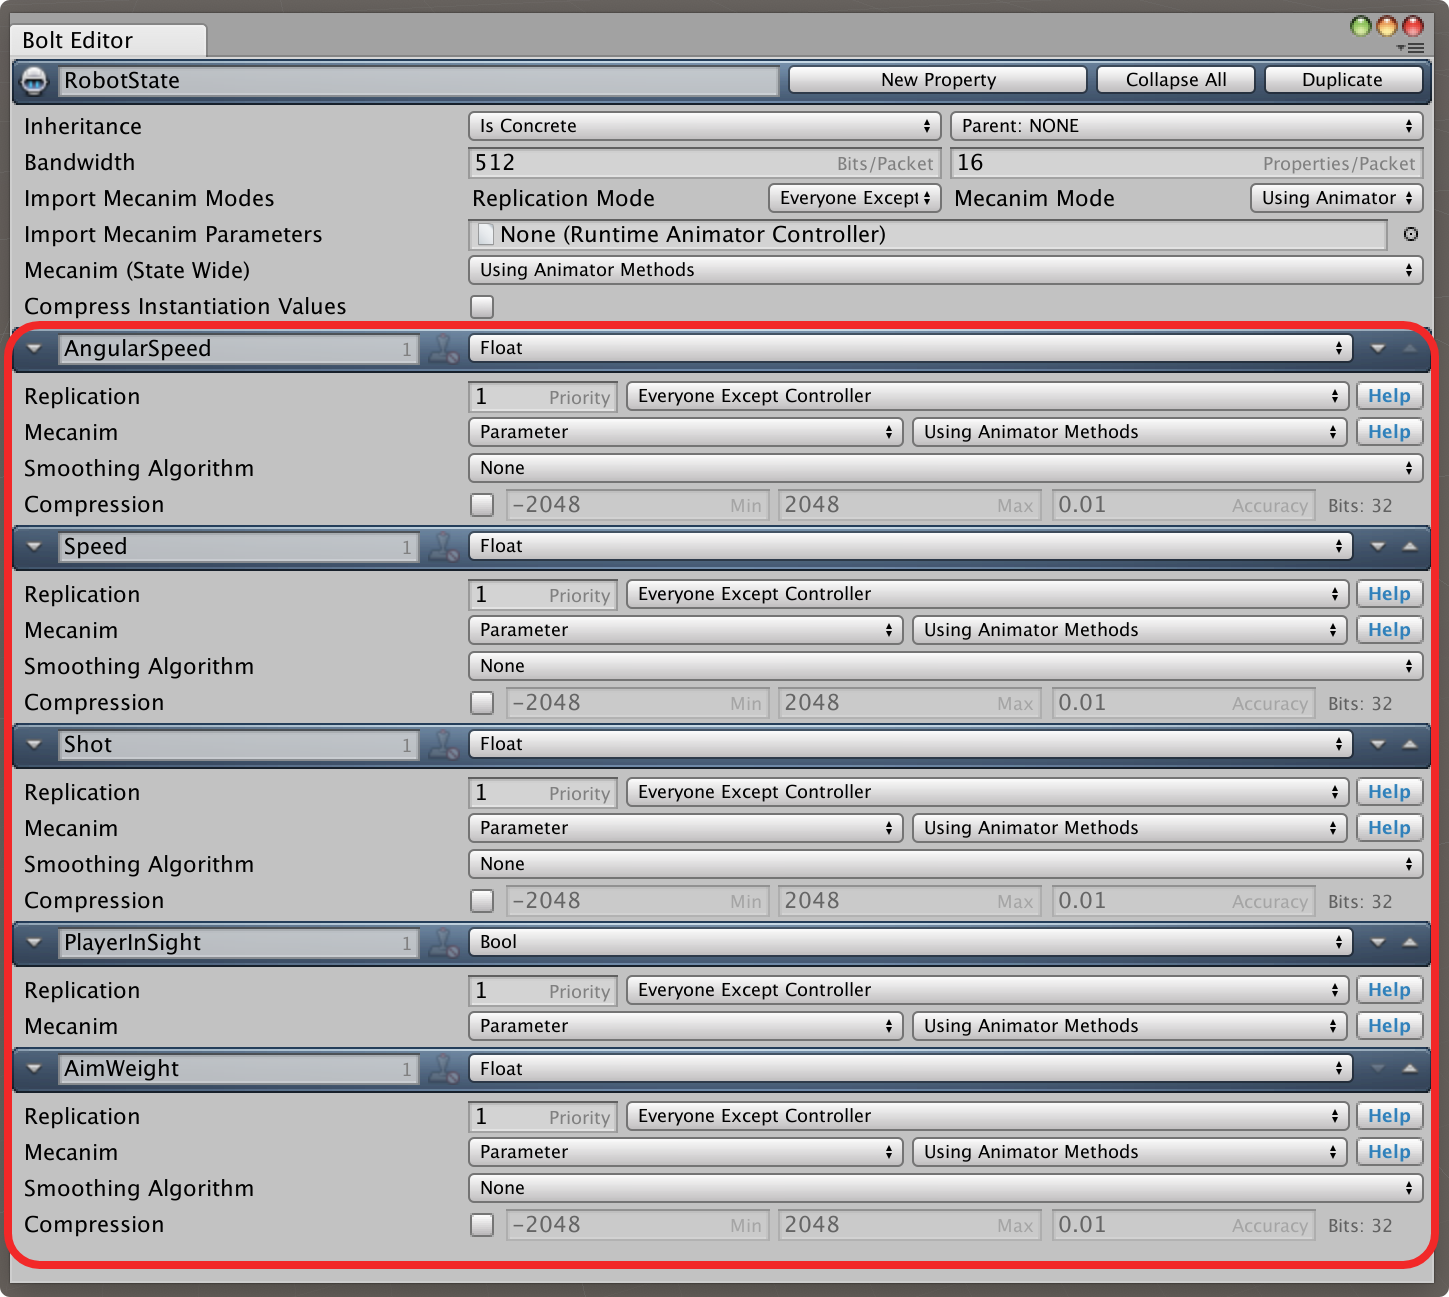
After you imported the parameters from the animation controller a new setting pops up on the state called Mecanim (State Wide), this lets you control if you want to use the normal mecanim methods like animator.SetFloat and animator.SetBool to change the animator values or if you want to use the Bolt state properties instead.
If you are adding Bolt to a game that already exists and that's using the standard mecanim way of setting parameters on the animation controller it is best to leave this at the default Using Animator Methods setting. If you are building a new game with Bolt you should usually pick the Using Bolt Properties option, which is what we will do here.
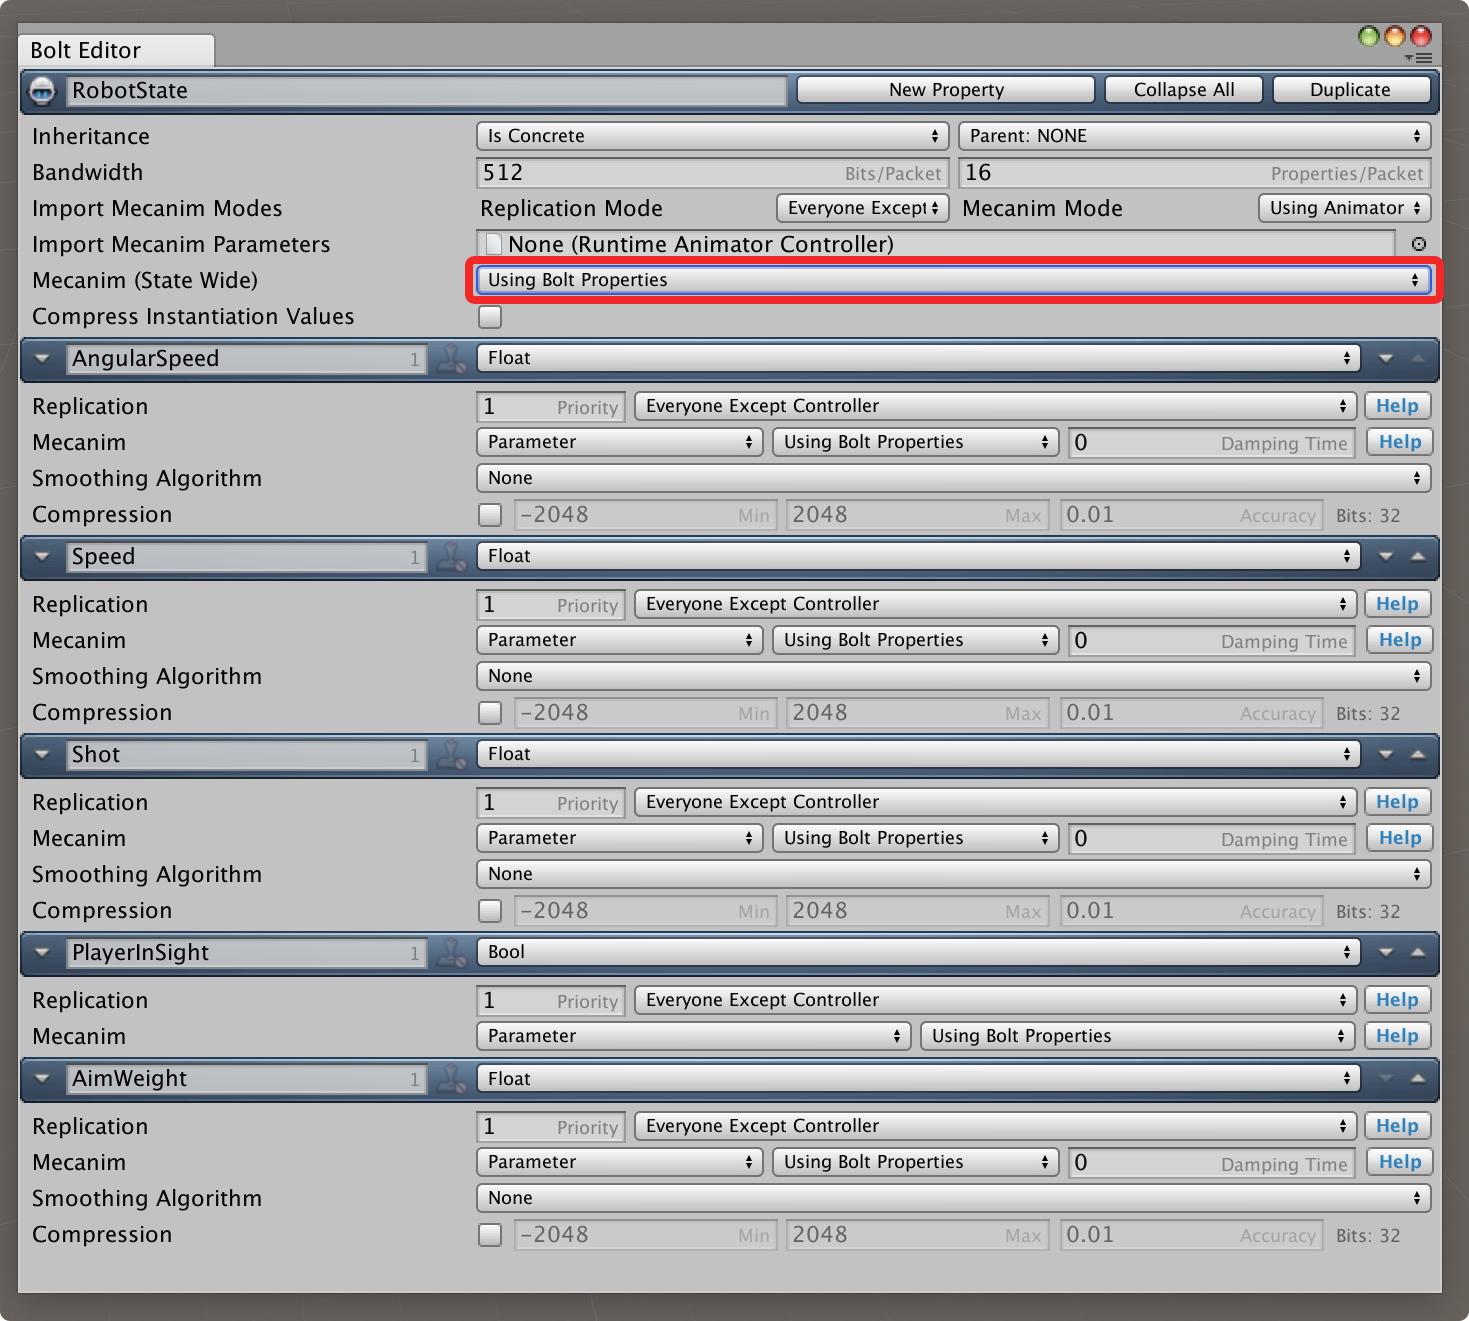
You will see that all of the parameters added by the import also get changed to Using Bolt Properties, you also get an additional option for controlling the mecanim damping time of the values. If you want you can run Bolt in Mixed Mode, where some properties are set to Using Animator Methods and some are set to Using Bolt Properties, in general we advice against this due to the confusion that can arise.
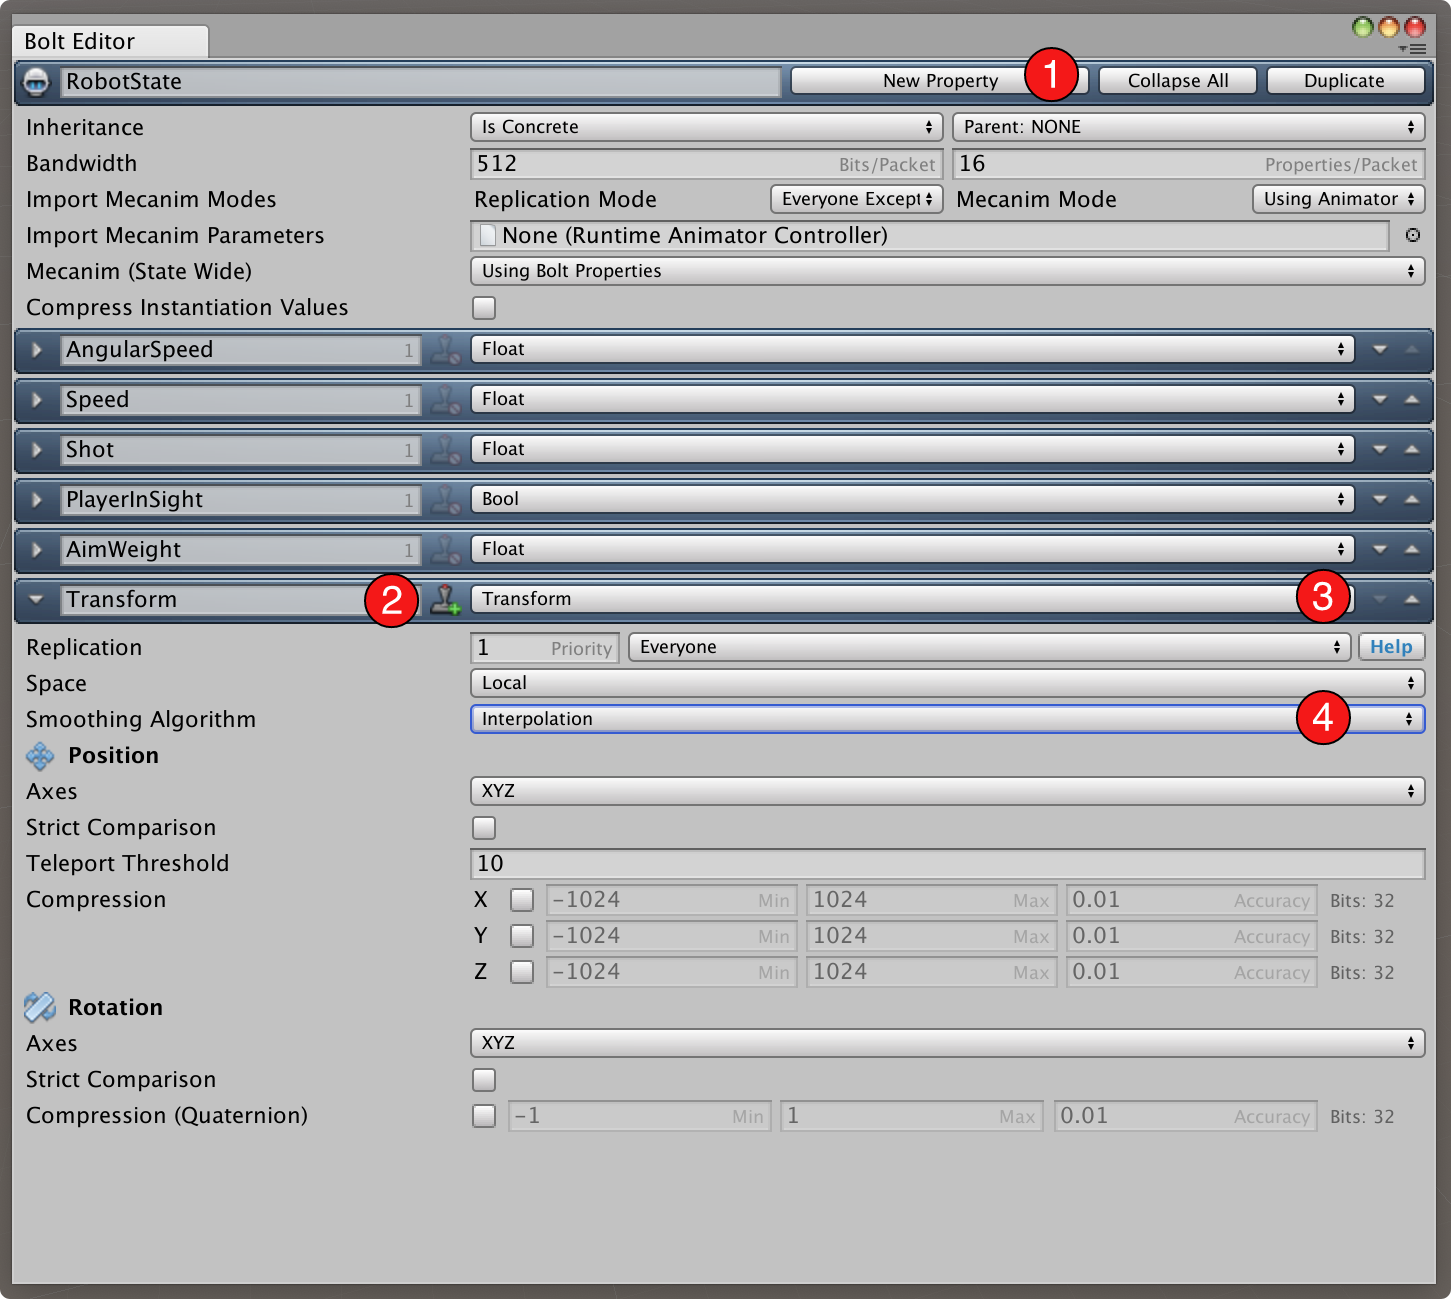
The last thing we need to do is to add a Transform property to our RobotState, we do the same as for the CubeState before.
- Click on 'New Property' at the top
- Name the created property 'Transform'
- Set the type of the property to 'Transform'
- Set 'Smoothing Algorithm' to 'Interpolation'
Before we continue we need to do some configuration of our mecanim parameters also. First we want to disable network replication for the Shot and AimWeight parameters, as these are controlled by curves inside of the animations and not directly by the user. We don't actually use these parameters in the example, but if we don't disable them mecanim will complain as Bolt will try to set them.
There are two ways of disabling them, the easiest is just to remove them. The other way you can disable them is to set the Mecanim setting to Using Animator Methods and then Replication to Local. This means that Bolt will read out the values from the curves and expose them in properties for you, but it will not send anything over the network.

The second part that we need to configure is the Damping Time on the Speed and AngularSpeed property, set it to 0.1 on both.
Important: We are now done with the state for the robot character, make sure to compile Bolt before continuing.
It's time to setup our Robot prefab as a Bolt Entity, select the prefab in the Tutorial/Prefabs folder and add a Bolt Entity component to it.
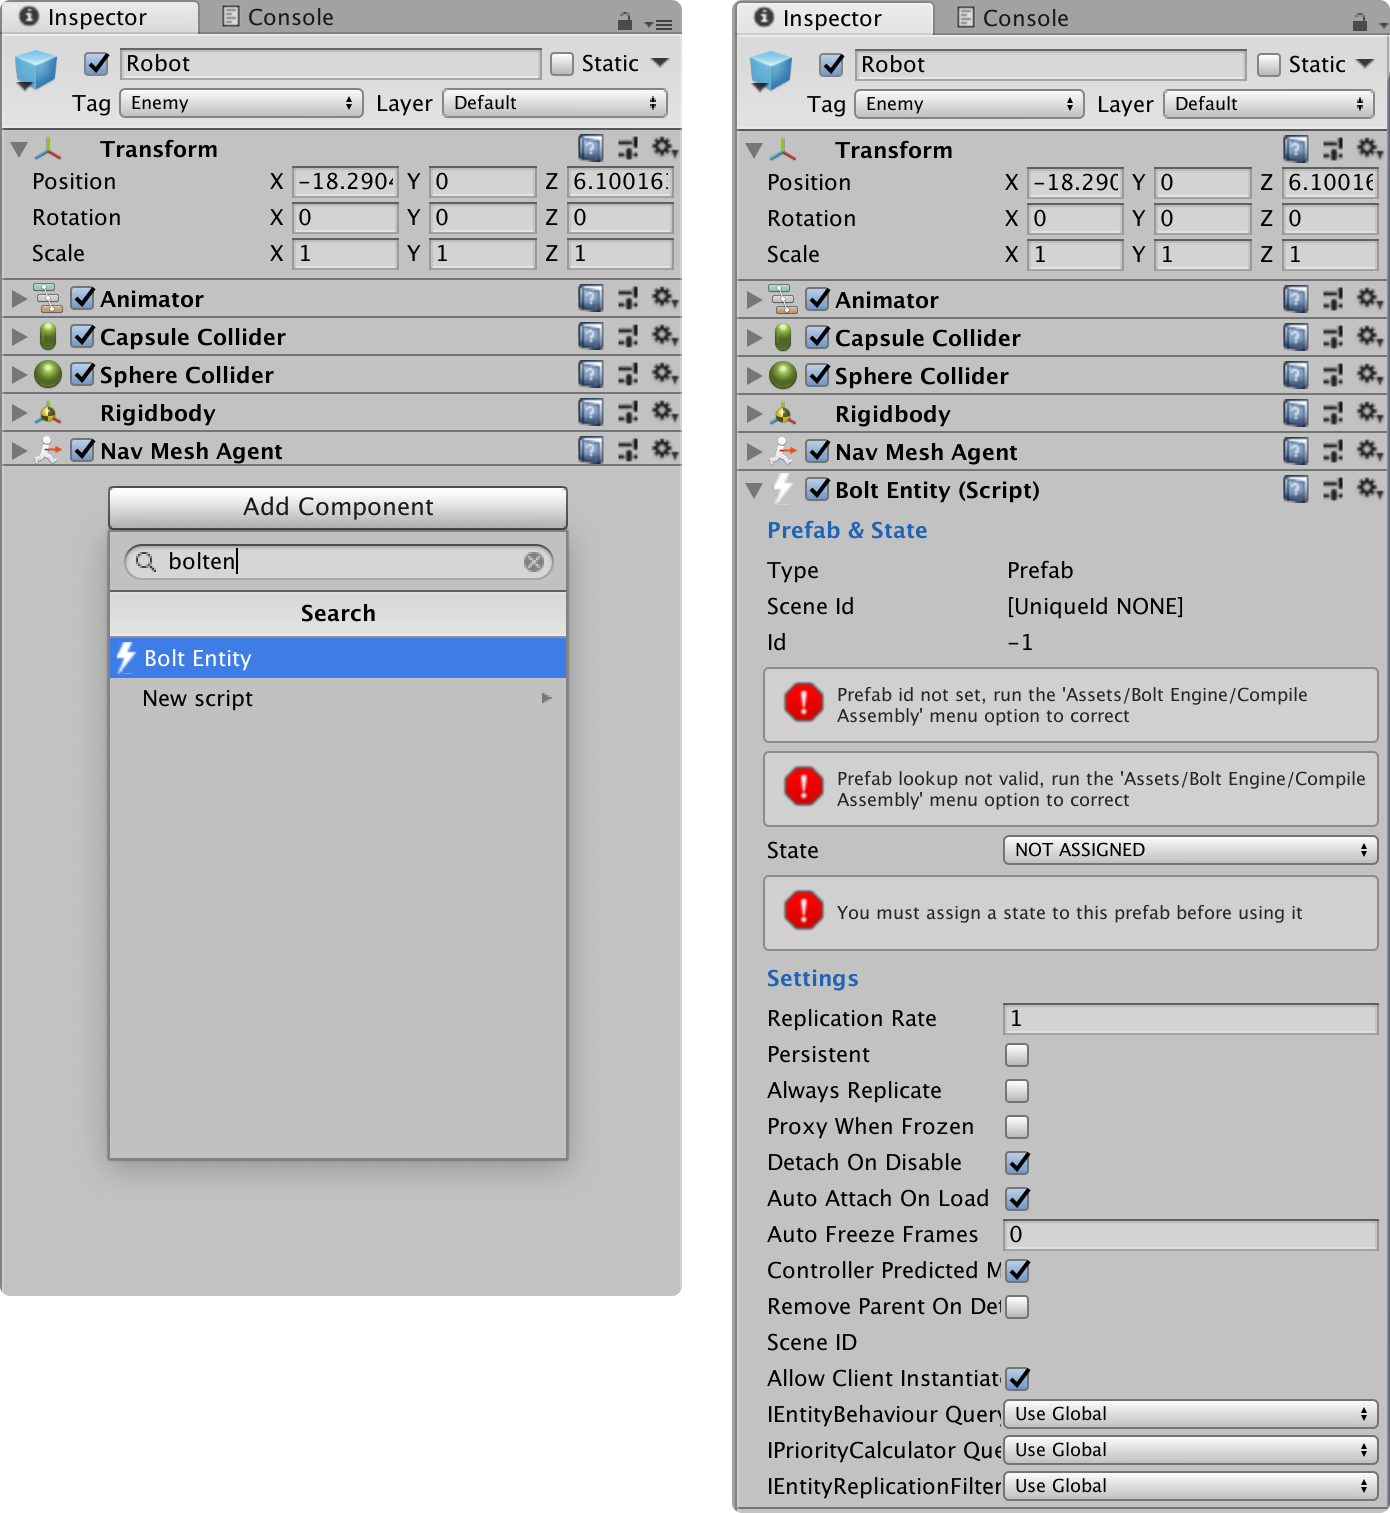
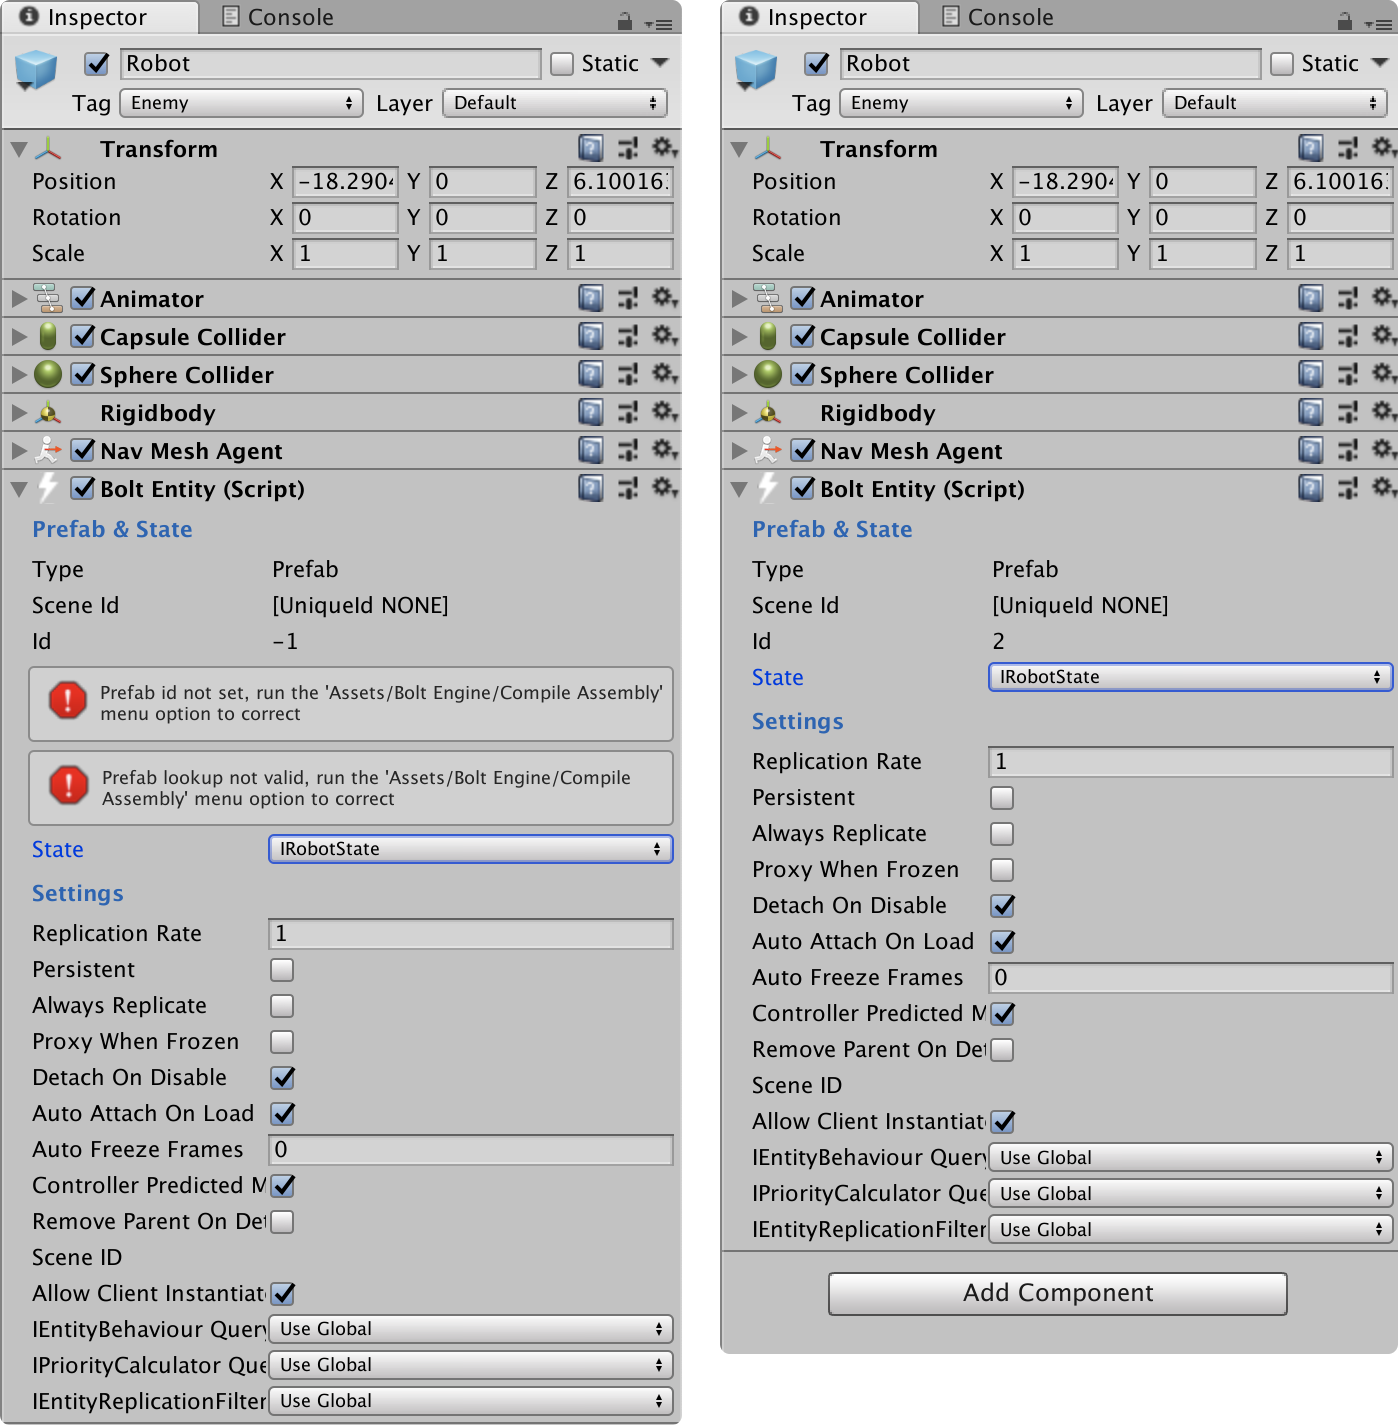
Change the State setting on the Bolt Entity component to IRobotState, and then compile Bolt again to get it to pick up the Robot prefab.
Before we try out spawning our Robots in the world, we need to just tell Bolt to instantiate our new Robot prefab instead of the old Cube one. We do that by going into our NetworkCallbacks script and changing the BoltNetwork.Instantiate call to reference BoltPrefabs.Robot instead.
C#
// ...

public override void SceneLoadLocalDone(string map)
{
    // randomize a position
    var spawnPosition = new Vector3(Random.Range(-8, 8), 0, Random.Range(-8, 8));

    // instantiate cube
    BoltNetwork.Instantiate(BoltPrefabs.Robot, spawnPosition, Quaternion.identity);
}

// ...
If we build our game and start two instances, you should see something like below. Bolt will also report the following error to you, because we have not properly assigned an 'Animator' that we want to use to Bolt.
You have not assigned a mecanim animator to the state on Robot(Clone), but you have properties set to use mecanim.

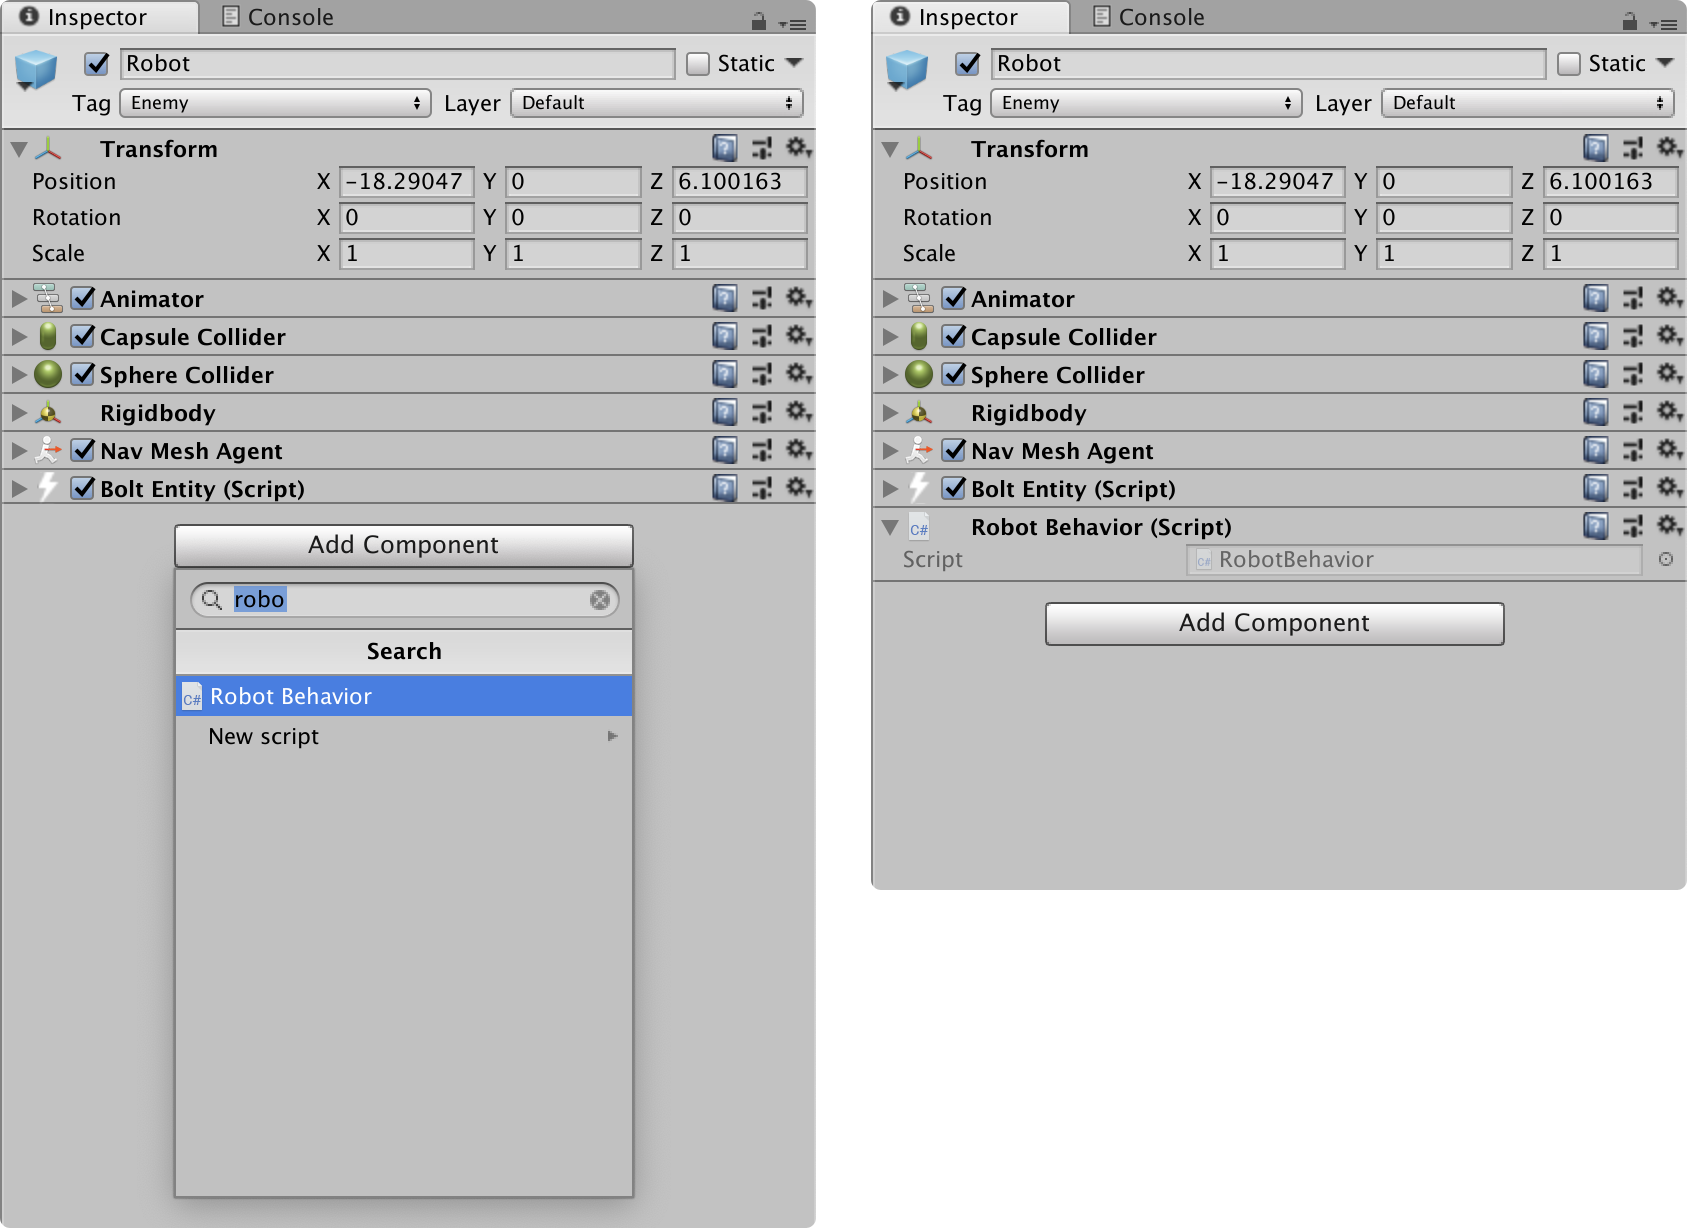
Create a new C# script called RobotBehaviour in the Tutorial/Scripts folder and like we did with our CubeBehaviour remove the default Unity methods and make the class inherit from Bolt.EntityBehaviour<IRobotState>.
C#
using System.Collections;
using UnityEngine;
using Bolt;

public class RobotBehaviour : Bolt.EntityBehaviour<IRobotState>
{

}
We are now going to override the Attached method and setup both our Transform property and assign an animator to the state for Bolt to use. The transform is assigned with state.SetTransforms(state.Transform, transform) like we did before with the CubeTransform property. The animator is assigned by calling state.SetAnimator and passing in the existing Animator component from our prefab.
We also want to make sure that 'root motion' is only used if you are the Owner, as otherwise the motion applied by it would be doubled on all remote peers seeing an entity, we simply assign entity.IsOwner to the state.Animator.applyRootMotion property.
C#
using UnityEngine;
using System.Collections;
using Bolt;

public class RobotBehaviour : Bolt.EntityBehaviour<IRobotState>
{
    public override void Attached()
    {
        state.SetTransforms(state.Transform, transform);
        state.SetAnimator(GetComponent<Animator>());

        state.Animator.applyRootMotion = entity.IsOwner;
    }
}
We also need to attach the RobotBehaviour component we just created to the actual Robot prefab.
If you build and start the game now, our robot will keep standing still but we won't see any warnings. The last thing we need to do is to just add the code for controlling the root motion. We open up our RobotBehaviour again and implement the SimulateOwner method. The code in this method might look complex at first, but it's pretty simple.
- If
Wis down, we increase our speed (towards+1.5); - If
Wis not down, we decrease our speed towards0; - If
Ais down, we change our angular velocity to negative (towards-1) - If
Dis down, we change our angular velocity to positive (towards+1) - If neither
AorDis down, we move our angular velocity towards0
C#
// ...

public override void SimulateOwner()
{
    var speed = state.Speed;
    var angularSpeed = state.AngularSpeed;

    if (Input.GetKey(KeyCode.W))
    {
        speed += 0.025f;
    }
    else
    {
        speed -= 0.025f;
    }

    if (Input.GetKey(KeyCode.A))
    {
        angularSpeed -= 0.025f;
    }
    else if (Input.GetKey(KeyCode.D))
    {
        angularSpeed += 0.025f;
    }
    else
    {
        if (angularSpeed < 0)
        {
            angularSpeed += 0.025f;
            angularSpeed = Mathf.Clamp(angularSpeed, -1f, 0);
        }
        else if (angularSpeed > 0)
        {
            angularSpeed -= 0.025f;
            angularSpeed = Mathf.Clamp(angularSpeed, 0, +1f);
        }
    }

    state.Speed = Mathf.Clamp(speed, 0f, 1.5f);
    state.AngularSpeed = Mathf.Clamp(angularSpeed, -1f, +1f);
}

// ...
At the start of the method we read out the state.Speed and state.AngularSpeed and store them in two local variables, we do this simply because it's easier to work with. At the end of the method we assign them back into the state and clamp speed between 0.0 and 1.5f, and clamp angularSpeed between -1 and +1.
If we build our game again, we can now walk around with the robot character using the WAD keys, below is a demonstration of the result.

Congratulations, you have finished the Getting Started Tutorial! Great! Now you can go to the Advanced Tutorial and get a deeper look at the power of Bolt.