4 - 애니메이션
이 챕터에서는 Bolt를 사용하여 네트워크를 통해 애니메이션을 복제하는 방법에 대해서 설명할 것입니다.
여러 가지 방법이 많이 있으며, 심지어 Bolt에서도 여러 가지 많은 방법이 있지만 우리는 네트워크 상에서 메카님 파라미터 상태를 복제하는 기본 방법에 대해서 살펴볼 것입니다.
메카님 복제에 대해서 언급할 사항이 많지 않기 때문에 이 챕터는 좀 짧긴 하지만 중요한 주제이기 때문에 자체 챕터로 다룰만한 가치가 있습니다.
메카님 에셋 생성하기
첫 번째로 우리가 할 일은 사용하고 있는 캐릭터의 Animator Controller 를 연결합니다.
다음 단계들을 따라 하세요:
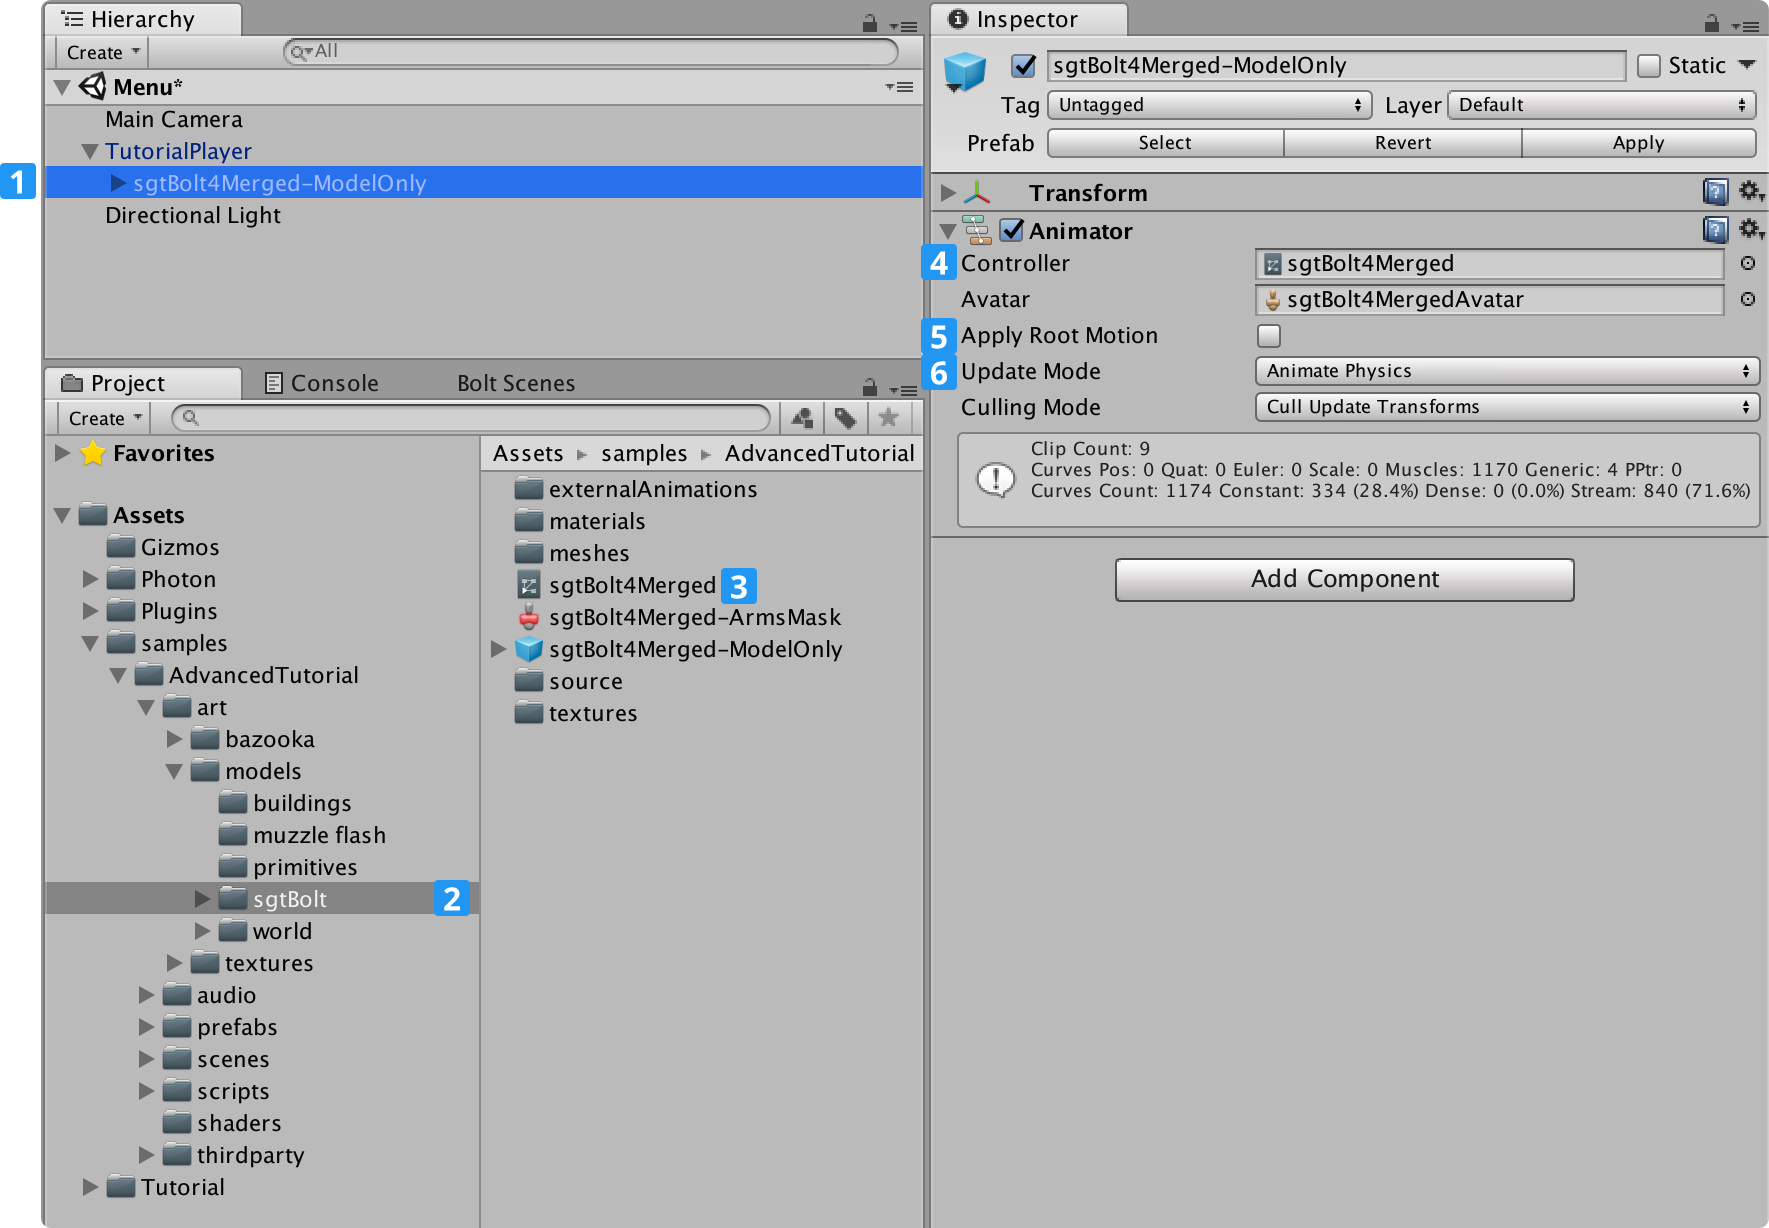
- TutorialPlayer 프리팹에서 sgtBolt4Merged-ModelOnly 하위 객체를 선택합니다.
- Assets/samples/AdvancedTutorial/art/models/sgtBolt 폴더를 오픈합니다.
- Animator Controller sgtBolt4merged를 찾습니다.
- 이것을 Animator 컴포넌트의 Controller 슬롯에 드래그합니다.
- Apply Root Motion 을 사용 불가로 합니다.
- Update Mode를 Animate Physics로 설정합니다.
애니메이터 컨트롤러가 연결되었을 때, Unity 애니메이터 에디터에서 여시기 바랍니다.
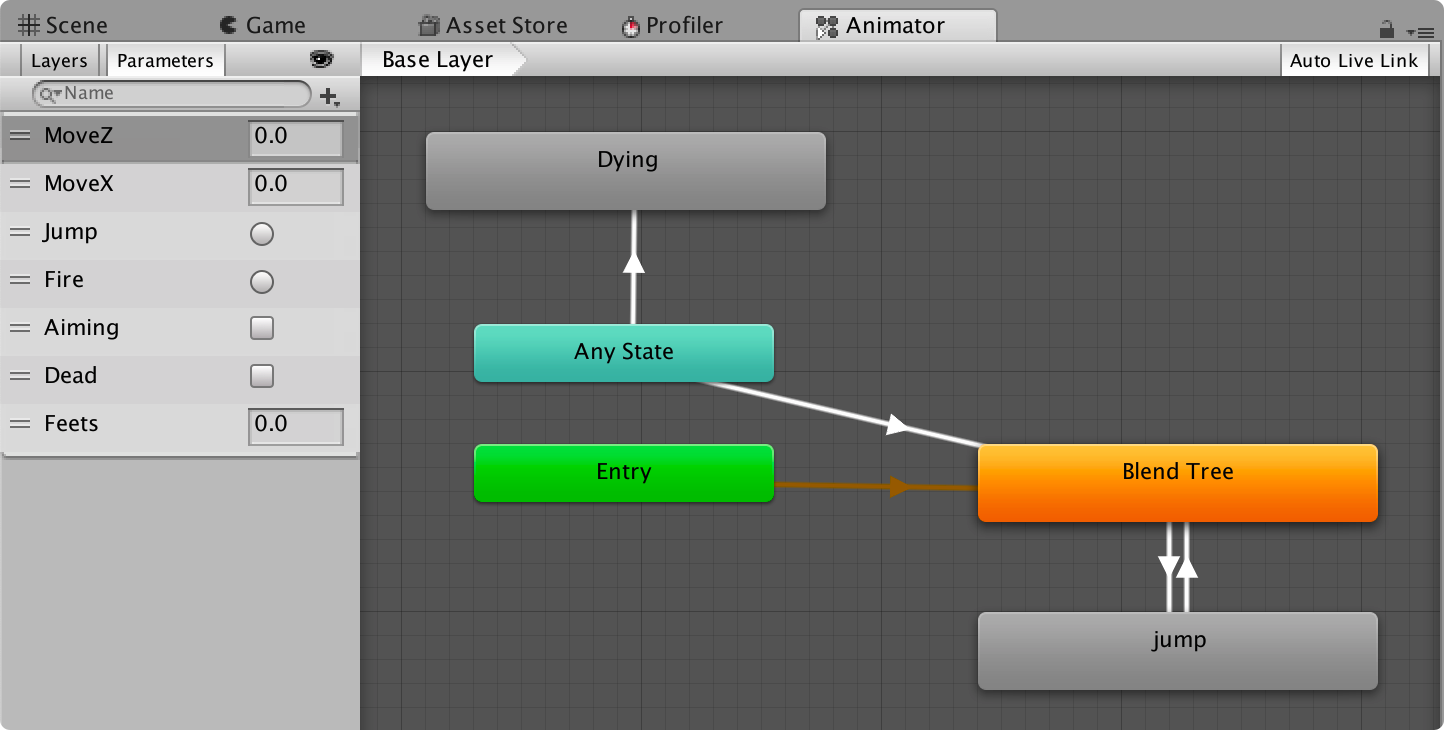
Parameters 탭을 클릭하여 사용할 수 있는 파라미터를 확인할 수 있습니다. 하지만, 우리는 MoveZ, MoveX와 Jump만을 사용할 것입니다. MoveZ와 MoveX는 flota이며 Jump는 트리거입니다. Bolt/Assets 윈도우로 이동하여 전에 생성했던 TutorialPlayerState를 엽니다.
여기에서 세 개의 새로운 속성들을 정의할 것 입니다. 메카님 애니메이터에서 사용하고 있는 세 개와 동일하게 부릅니다.
- MoveX [Float]
- MoveZ [Float]
- Jump [Trigger]
각 속성의 설정에서 메카님 설정을 Disabled에서 Parameter로 변경하고, Replication을 Everyone에서 Everyone Except Controller로 변경합니다.
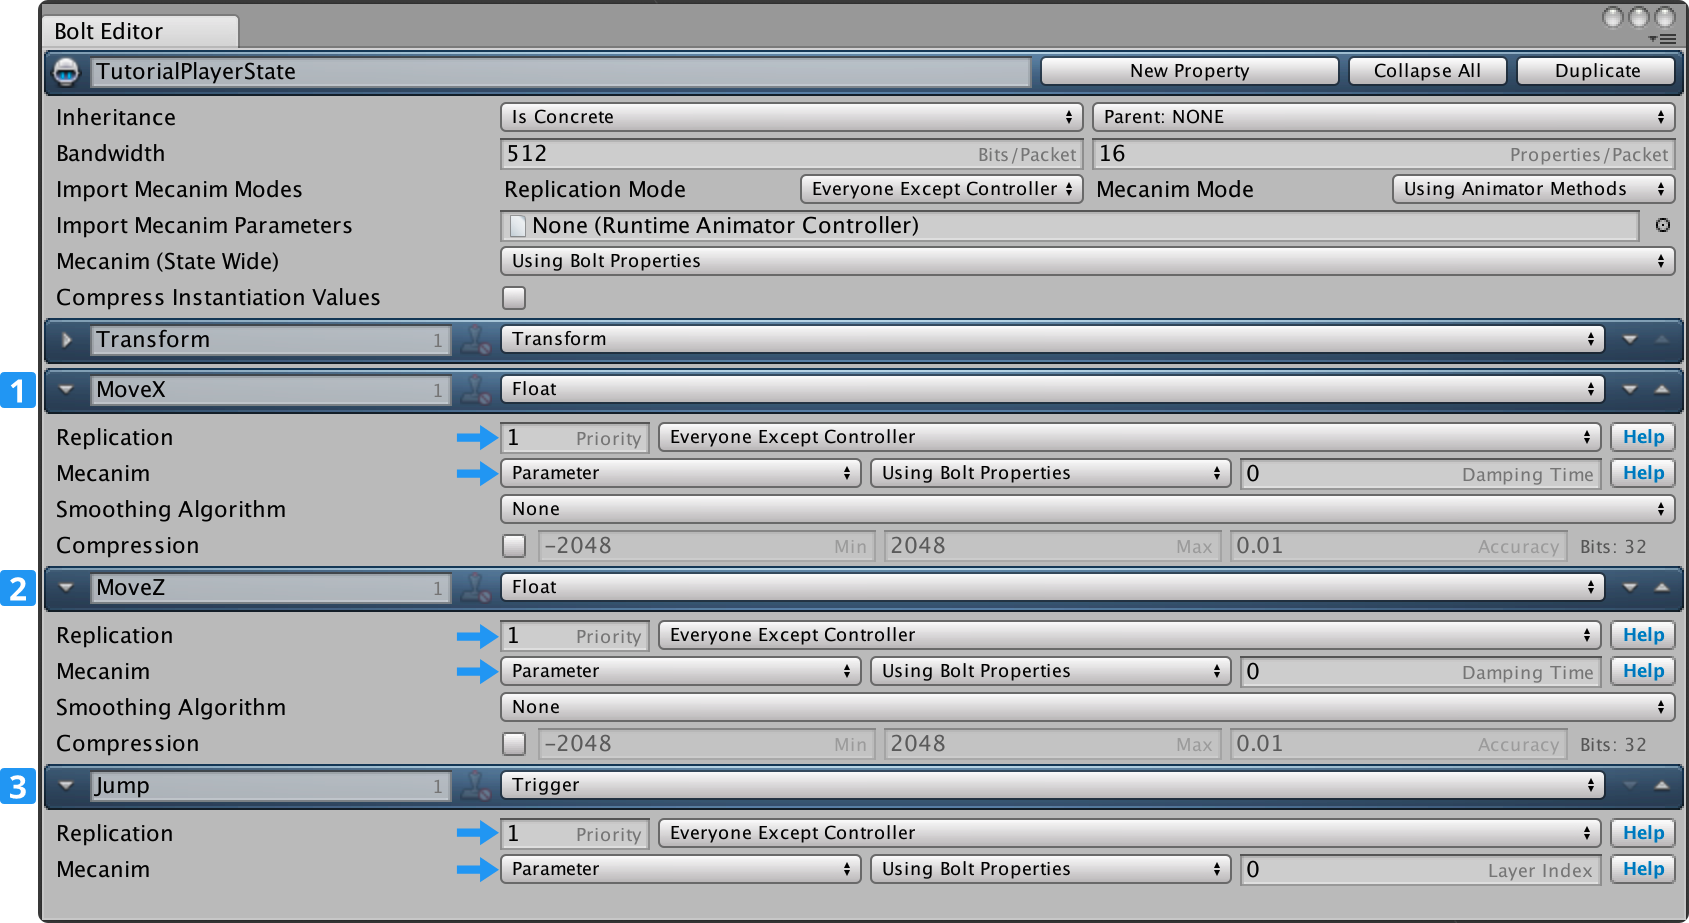
State 설정에서 구성이 필요한 한 가지 옵션이 더 있으며, 이것은 Mecanim Mode 옵션에서 찾을 수 있고 Use Animator Methods 또는 Use Bolt Properties로 설정할 수 있습니다.
- Use Animator Methods 의 의미는 메카님의 일반적인
SetFloat,SetInteger등의 메카님 메소드를 사용한다는 것으로 Bolt가 자동적으로 이 값을 뽑아 낸다는 것입니다. - Use Bolt Parameters 는 메카님 값을 설정하기 위해 Bolt 파라미터를 사용하여 Bolt가 파라미터들을 메카님에 적용한다는 것입니다.
또한 상태만을 위한 설정 내의 상단 또는 Mecanim 구성의 최근 드롭 다운 속성에서 이 상태를 구성할 수도 있습니다.
우리는 MoveZ, MoveX와 Jump에 대해서 Use Bolt Properties 으로 선택할 것입니다.
이제 거의 완료되었습니다. 이제 다시 Bolt를 컴파일 하면 됩니다. Bolt/Compile Assembly로 이동하여 Bolt가 컴파일하도록 해주세요.
이제 TutorialPlayerController.cs 스크립트를 엽니다.
AnimatePlayer 라고 하는 새로운 메소드를 추가할 것이며 이 메소드는 앞/뒤로 움직이는 것에 따라 MoveZ 파라미터를 -1 또는 +1로 설정하고 좌/우에 대한 MoveX를 설정하는 표준 메카님 코드와 거의 유사합니다.
C#
void AnimatePlayer(TutorialPlayerCommand cmd)
{
    // FWD <> BWD movement
    if (cmd.Input.Forward ^ cmd.Input.Backward)
    {
        state.MoveZ = cmd.Input.Forward ? 1 : -1;
    }
    else
    {
        state.MoveZ = 0;
    }

    // LEFT <> RIGHT movement
    if (cmd.Input.Left ^ cmd.Input.Right)
    {
        state.MoveX = cmd.Input.Right ? 1 : -1;
    }
    else
    {
        state.MoveX = 0;
    }

    // JUMP
    if (_motor.jumpStartedThisFrame)
    {
        state.Jump();
    }
}
ExecuteCommand 함수 내에서 새로운 AnimatePlayer 함수를 호출할 것이며, 커맨드에서 아주 특별한 프로퍼티인 IsFirstExecution에 접근할 것 입니다.
만약 이것이 true이면 이 커맨드가 처음으로 실행되었다는 의미입니다. 이 경우에 애니메이션이 적용되기를 원하는 것입니다.
C#
public override void ExecuteCommand(Command command, bool resetState)
{
    TutorialPlayerCommand cmd = (TutorialPlayerCommand) command;

    if (resetState)
    {
        // we got a correction from the server, reset (this only runs on the client)
        _motor.SetState(cmd.Result.Position, cmd.Result.Velocity, cmd.Result.IsGrounded, cmd.Result.JumpFrames);
    }
    else
    {
        // apply movement (this runs on both server and client)
        PlayerMotor.State motorState = _motor.Move(cmd.Input.Forward, cmd.Input.Backward, cmd.Input.Left, cmd.Input.Right, cmd.Input.Jump, cmd.Input.Yaw);

        // copy the motor state to the commands result (this gets sent back to the client)
        cmd.Result.Position = motorState.position;
        cmd.Result.Velocity = motorState.velocity;
        cmd.Result.IsGrounded = motorState.isGrounded;
        cmd.Result.JumpFrames = motorState.jumpFrames;

        // NEW CODE
        if (cmd.IsFirstExecution)
        {
            AnimatePlayer(cmd);
        }
    }
}
마지막으로 해야 할 일은 Bolt에게 올바른 Animator를 전달하는 것입니다.
이 작업은 트랜스폼 설정을 해 놓은 Attached 콜백 내에서 수행할 것입니다.
C#
public override void Attached()
{
    // This couples the Transform property of the State with the GameObject Transform
    state.SetTransforms(state.Transform, transform);
    state.SetAnimator(GetComponentInChildren<Animator>());

    // Configure Animator
    state.Animator.SetLayerWeight(0, 1);
    state.Animator.SetLayerWeight(1, 1);
}
이제 게임을 시작 할 수 있으며, 캐릭터가 돌아다닐수있습니다. Play As Server 또는 필요시 클라이언트로 연결하는 것을 선택할 수 있습니다.