Bolt 튜토리얼 - 챕터 5
제목은 매우 복잡해 보이지만, 구현을 한번 해 보겠습니다.
다음의 챕터들에서는 네트워크 프로그램의 "holy grail" 스타일 중 하나를 다룰 것입니다.
몇 가지 주요 사항을 설명하도록 하겠습니다.
- 신뢰성 있는 무기 변경
- 신뢰성 있는 발사
- 클라이언트에서 지연 보상
무기 설정
첫 번째로 할 일은 게임 플레이에서 무기를 관리하는 일반적인 Weapon 컴포넌트를 설정하는 것입니다.
이 클래스를 사용하여, 모든 종류의 총을 나타낼 수 있어야 합니다.
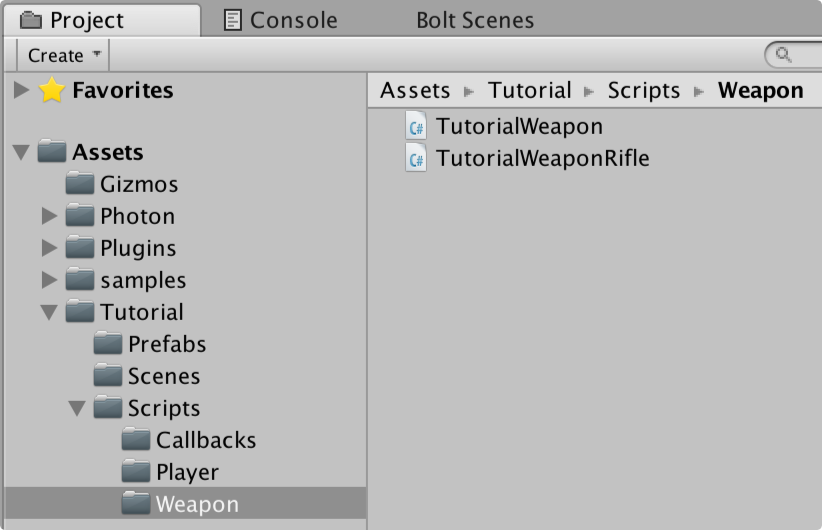
Tutorial/Scripts 폴더에서 새로운 Weapons 폴더를 생성하고 이 폴더 안에 TutorialWeapon.cs 그리고 TutorialWeaponRifle.cs. C# 스크립트를 생성하는 것으로 시작하겠습니다.
이 TutorialWeapon 안에서 표준 유니티 MonoBehaviour 를 작성할 것이며, 여기에는 무기를 구성할 몇 개의 변수들을 가지게 할 것입니다. 이것은 표준 유니티와 거의 같기 때문에 이에 대한 상세사항에 대해서는 설명하지 않을 것입니다.
튜토리얼을 진행하면서 모든 변수들을 사용할 것이므로, 변수들에 대해서는 개별적으로 설명됩니다.
C#
using UnityEngine;

public class TutorialWeapon : MonoBehaviour
{
    [SerializeField]
    public GameObject shellPrefab;

    [SerializeField]
    public GameObject impactPrefab;

    [SerializeField]
    public GameObject trailPrefab;

    [SerializeField]
    public Transform muzzleFlash;

    [SerializeField]
    public Transform shellEjector;

    [SerializeField]
    public AudioClip fireSound;

    [SerializeField]
    public byte damage = 25;

    [SerializeField]
    public int rpm = 600;

    public int FireInterval
    {
        get
        {
            // calculate rounds per second
            int rps = (rpm / 60);

            // calculate frames between each round
            return BoltNetwork.FramesPerSecond / rps;
        }
    }

    public int FireFrame
    {
        get;
        set;
    }

    public virtual void HitDetection(TutorialPlayerCommand cmd, BoltEntity entity)
    { }

    public virtual void DisplayEffects(BoltEntity entity)
    { }
}
다음으로 해야 할 일은 하나의 스크립트를 생성하는 것으로 TutorialWeapon옆에 TutorialWeaponRifle이라고하는 스크립트를 생성합니다.
지금까지는 거의 비어있을 것이고 TutorialWeapon 클래스로부터 상속을 받습니다.
C#
using UnityEngine;

public class TutorialWeaponRifle : TutorialWeapon
{
}
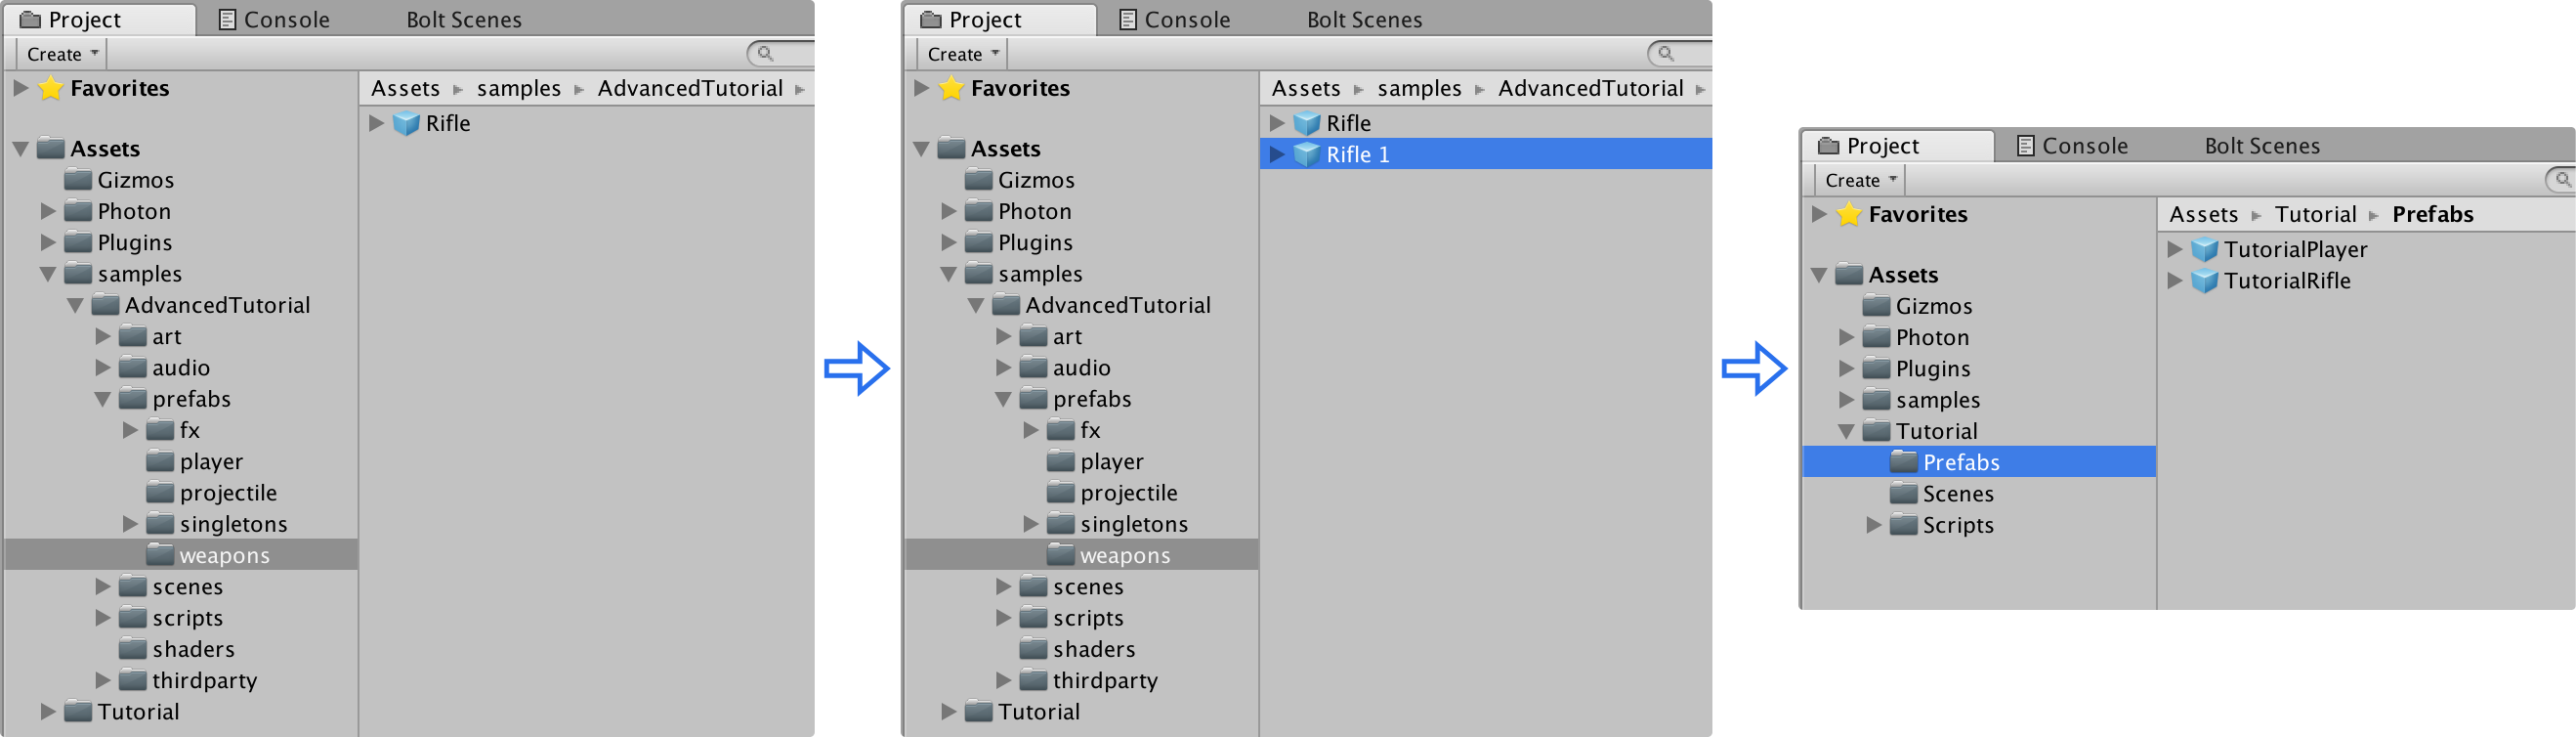
Assets/samples/AdvancedTutorial/prefabs/weapons 폴더로 이동하여 Rifle 프리팹을 찾아 복제본을 생성(Windows에서는 CTRL+D, OS X에서는 CMD+D)합니다.
복제본은 Rifle 1이라고 명명될 것이고, Tutorial/Prefabs 폴더로 드래그하여 TutorialRifle로 이름을 변경합니다.
새롭게 생성된 TutorialRifle 프리팹을 선택하고 여기에 TutorialWeaponRifle 스크립트를 추가합니다.
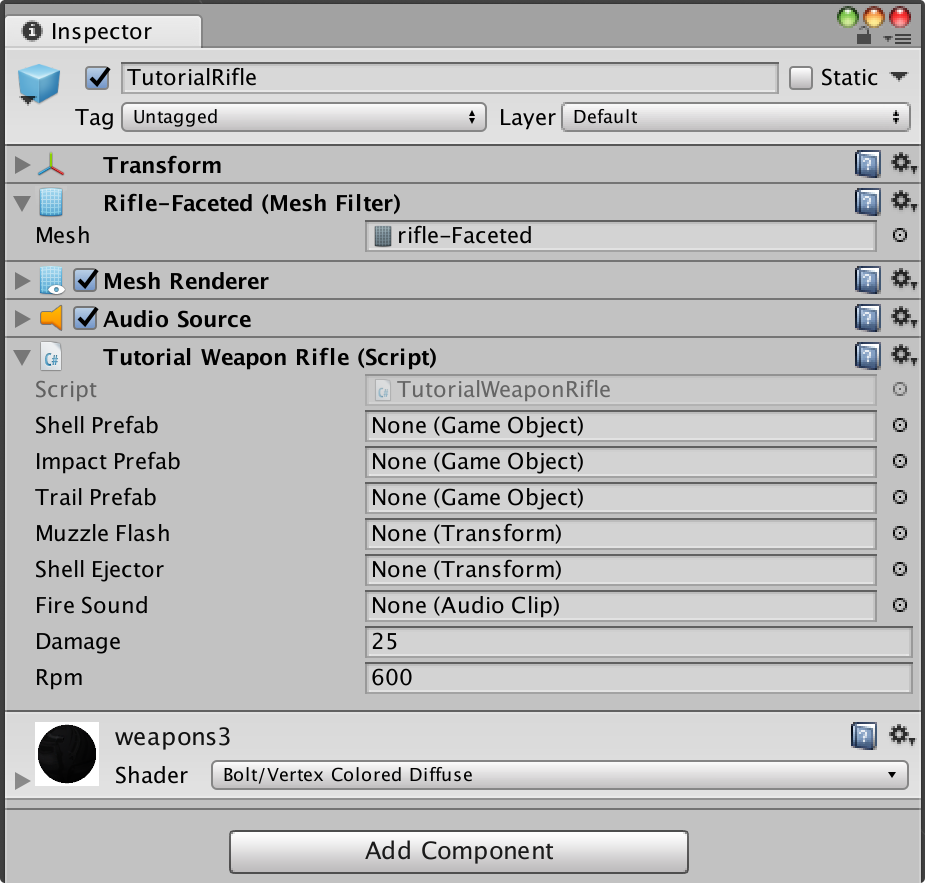
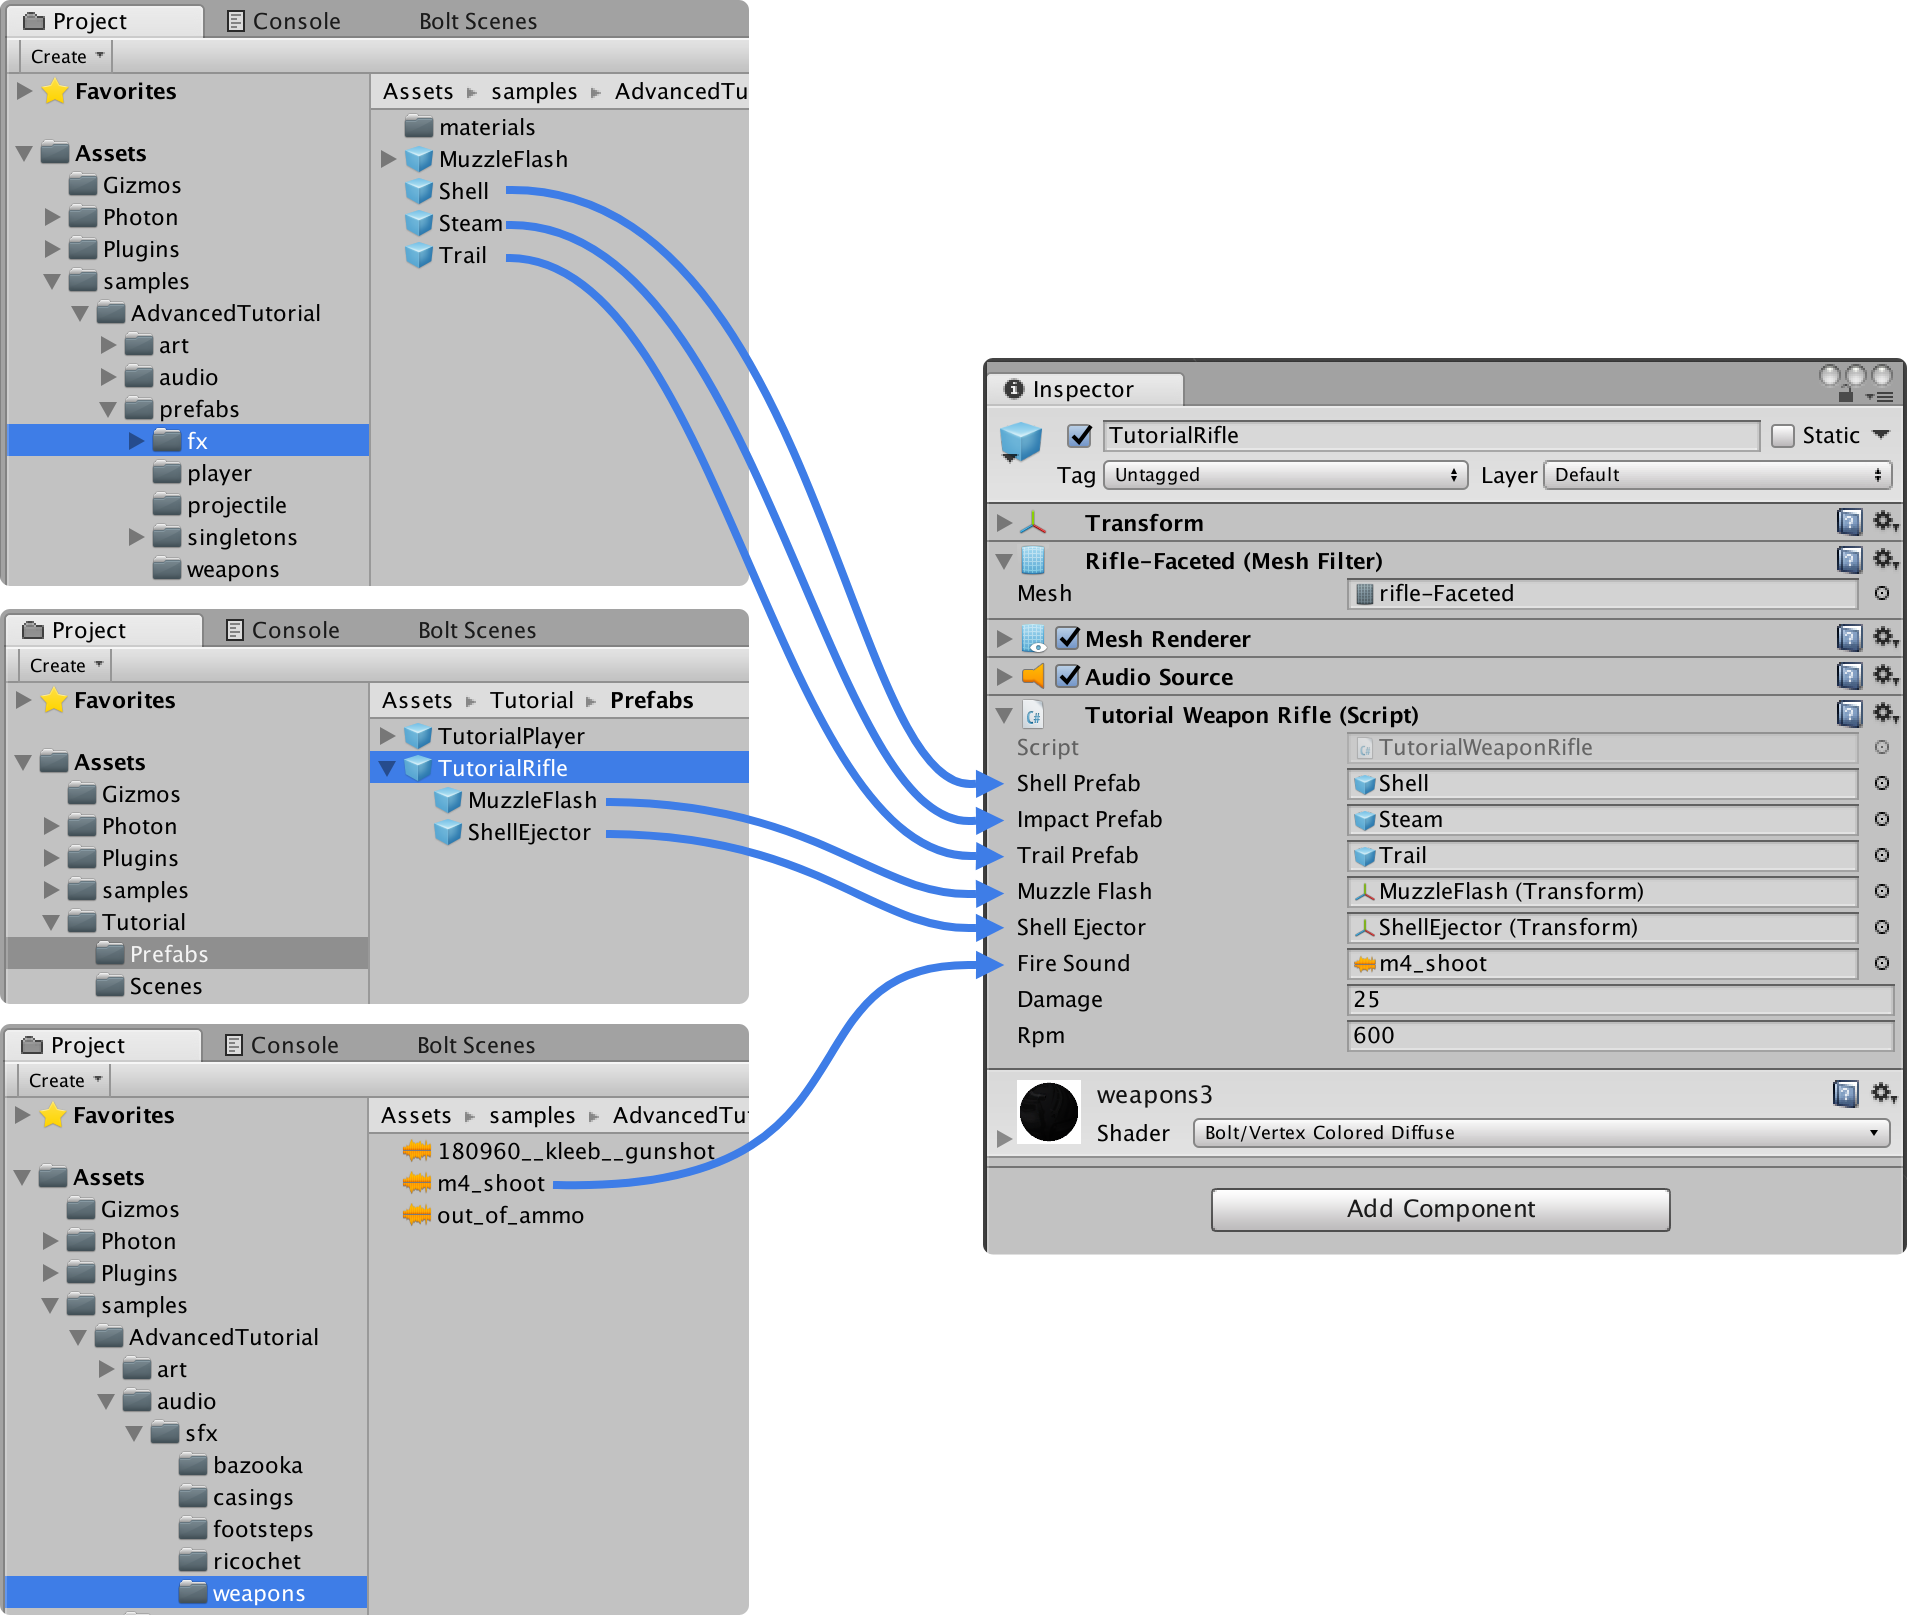
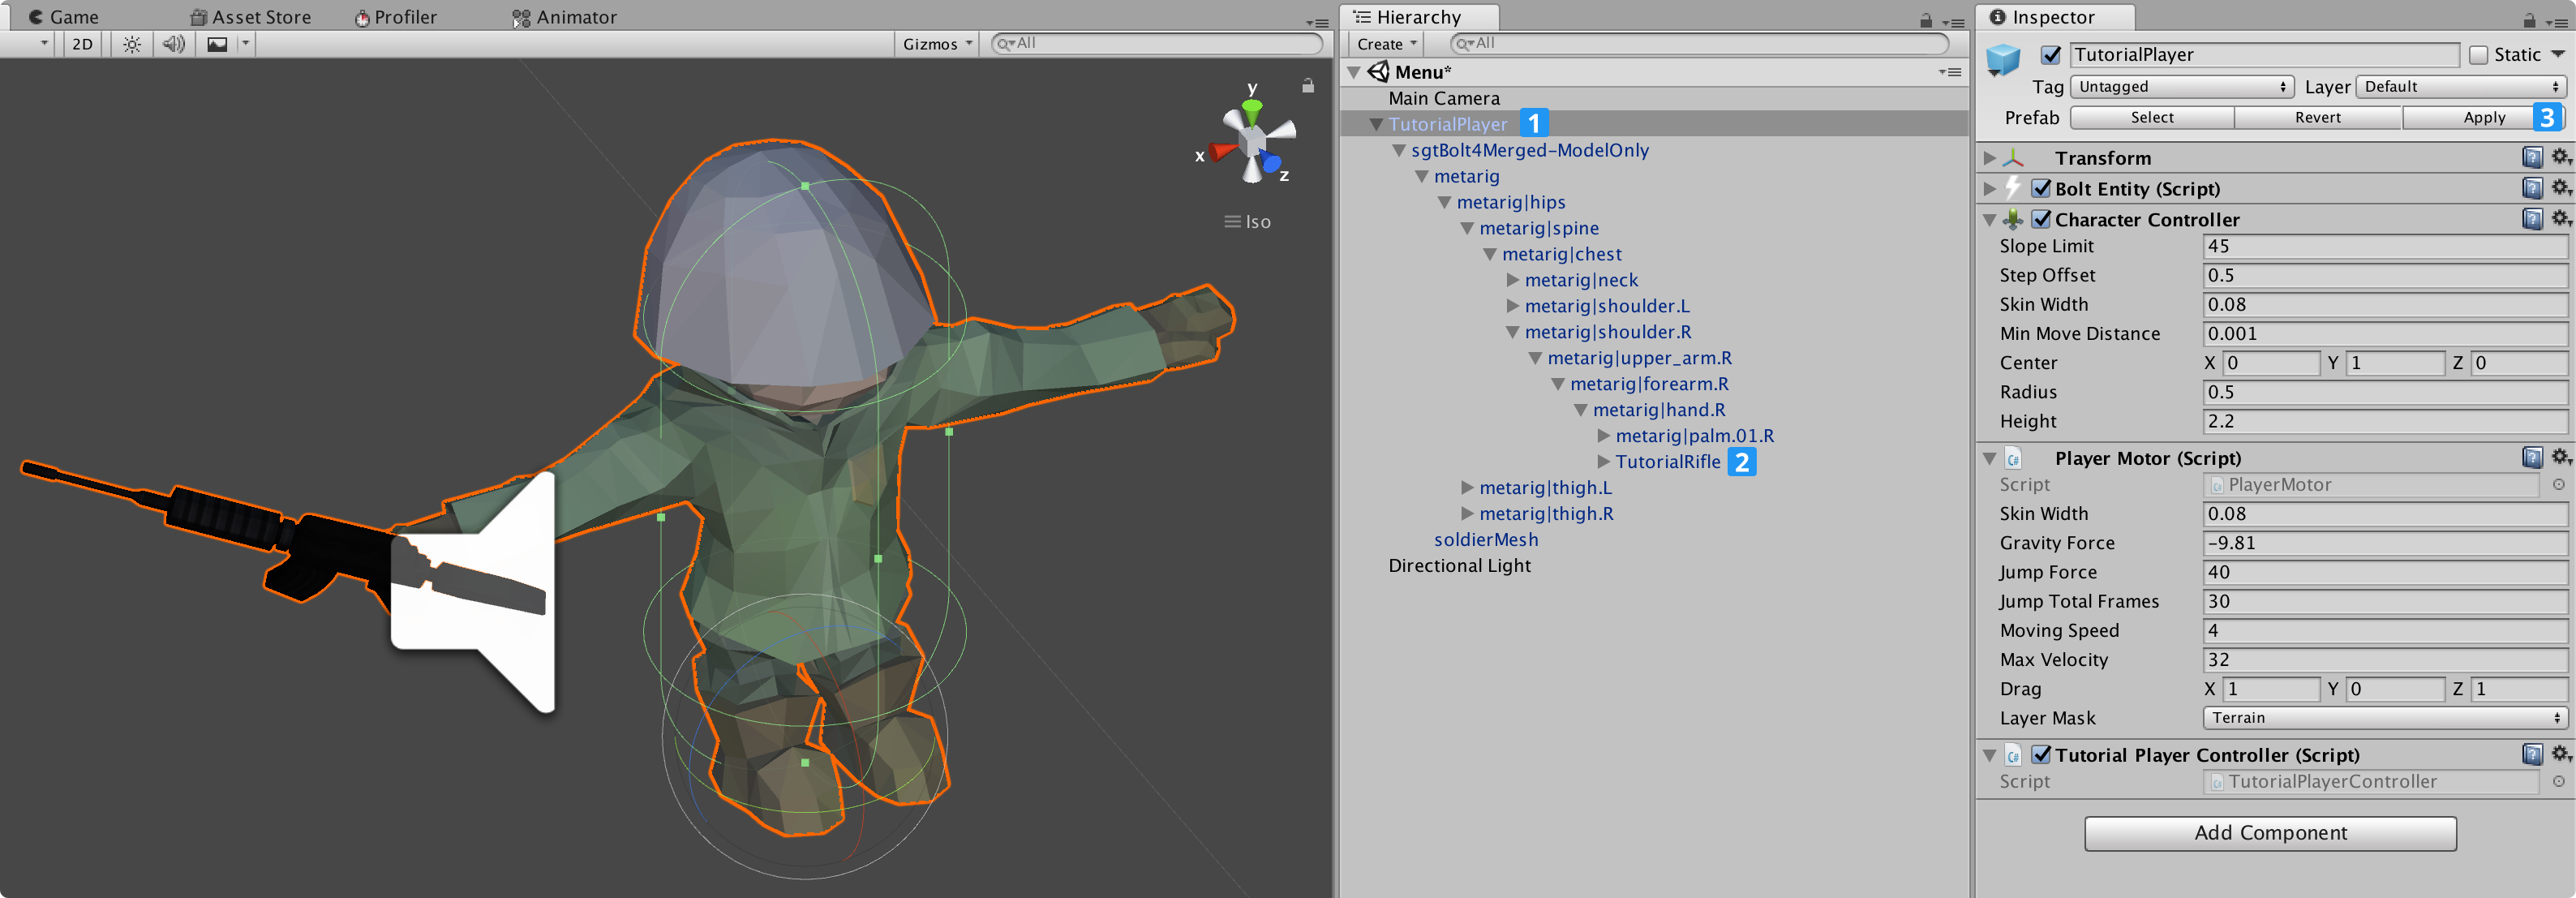
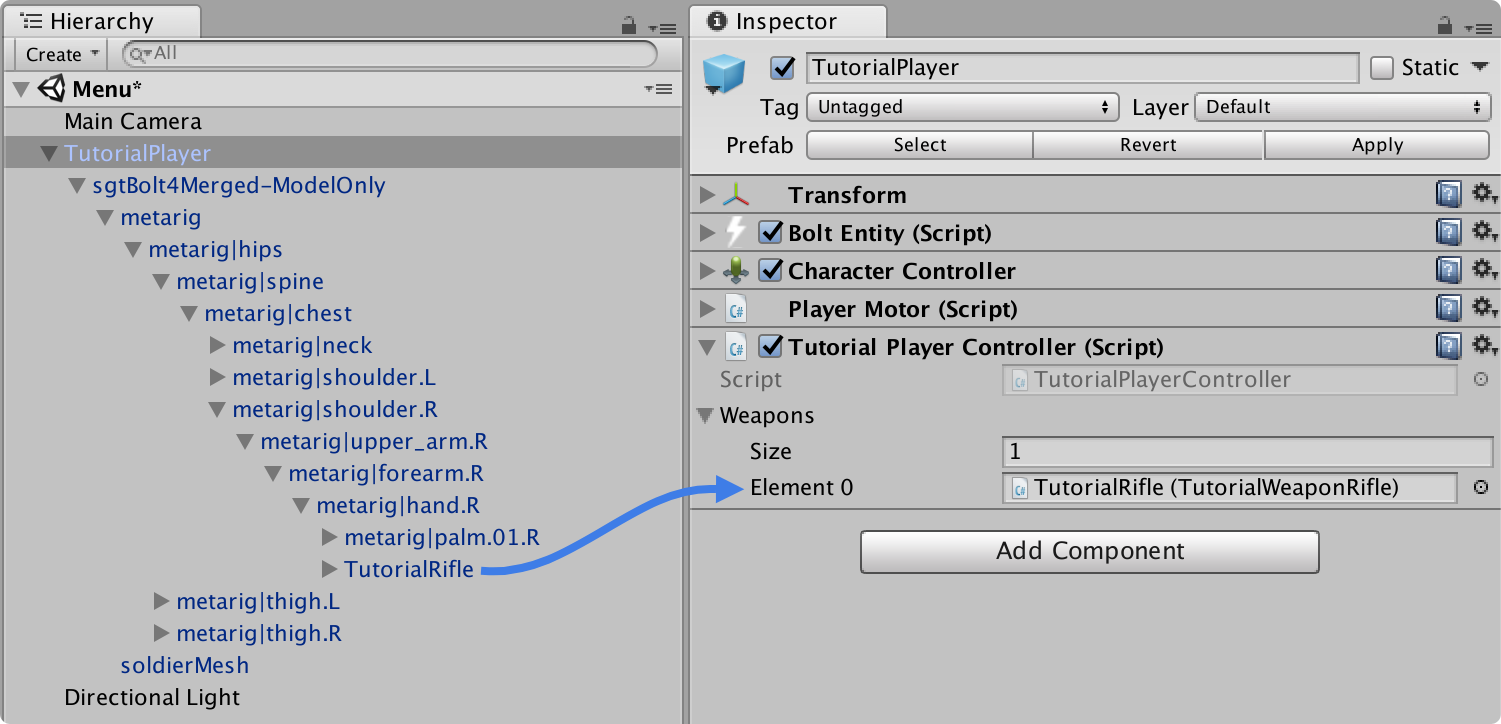
변수들이 어떤 역할을 하는지 설명하는 대신, 인스펙터를 통해 TutorialWeaponRifle상의 모든 공개 변수를 연결합니다. 다음은 올바르게 연결하는 것에 대한 그림입니다.
이제 우리의 꼬마 군인에게 무기를 쥐여줄 시간입니다:
- TutorialPlayer 프리팹을 선택합니다.
- 총은 이미 올바르게 회전해야 하며 군인의 오른 팔 아래에 TutorialRifle 프리팹이 떨어져 있어야 합니다.
- Apply 버튼 클릭 또는 Project 윈도우에서 자체의 상단에 드래그하는 것으로 저장하는 것을 잊지 마세요.
게임을 플레이한다면 캐릭터의 손에 소총이 있는 것을 볼 수 있어야 합니다.
회전이 잘되지 않으면 TutorialPlayer 프리팹으로 돌아가서 재조정을 해주세요.
눈치채셨겠지만 카메라를 피치하는 것이 가능하지 않습니다. 작업하기 충분한 미완성된 상태인 튜토리얼 코드로 PlayerCamera 클래스로 만들었기 때문입니다.
Bolt/Assets 윈도우를 열고 TutorialPlayerState 상태를 선택하여 여기에 pitch 속성을 추가할 필요가 있습니다.
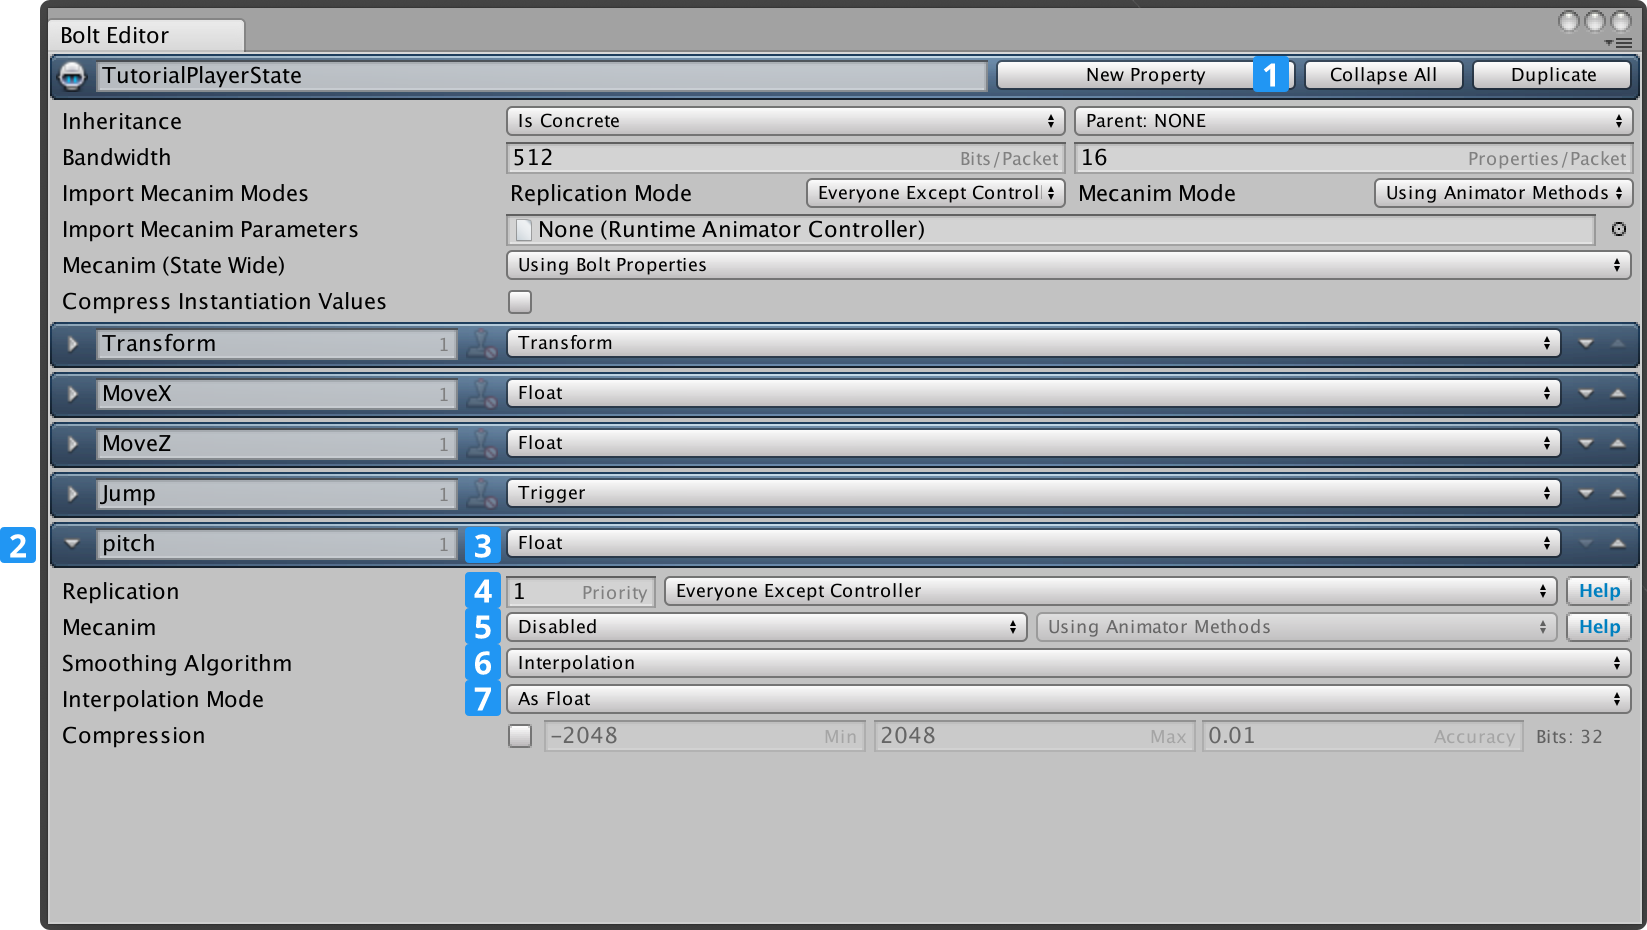
다음 지침을 따라 하세요:
- TutorialPlayerState 에셋에 새로운 속성을 생성합니다.
- 속성을 pitch로 이름을 변경합니다.
- Float 형으로 변경합니다.
- Replication 속성을 Everyone Except Controller로 설정합니다.
- Mecanim 을 Disable로 설정합니다.
- Smoothing Algorithm을 Interpolation로 설정합니다.
- Interpolation Mode을 As Float로 설정합니다.
플레이어의 상태를 이미 편집하고 있다는 점을 이용하여 Fire라는 이름의 속성을 하나 더 추가할 것입니다.
이 속성은 플레이어가 무기를 발사할 때 신호를 보냅니다.
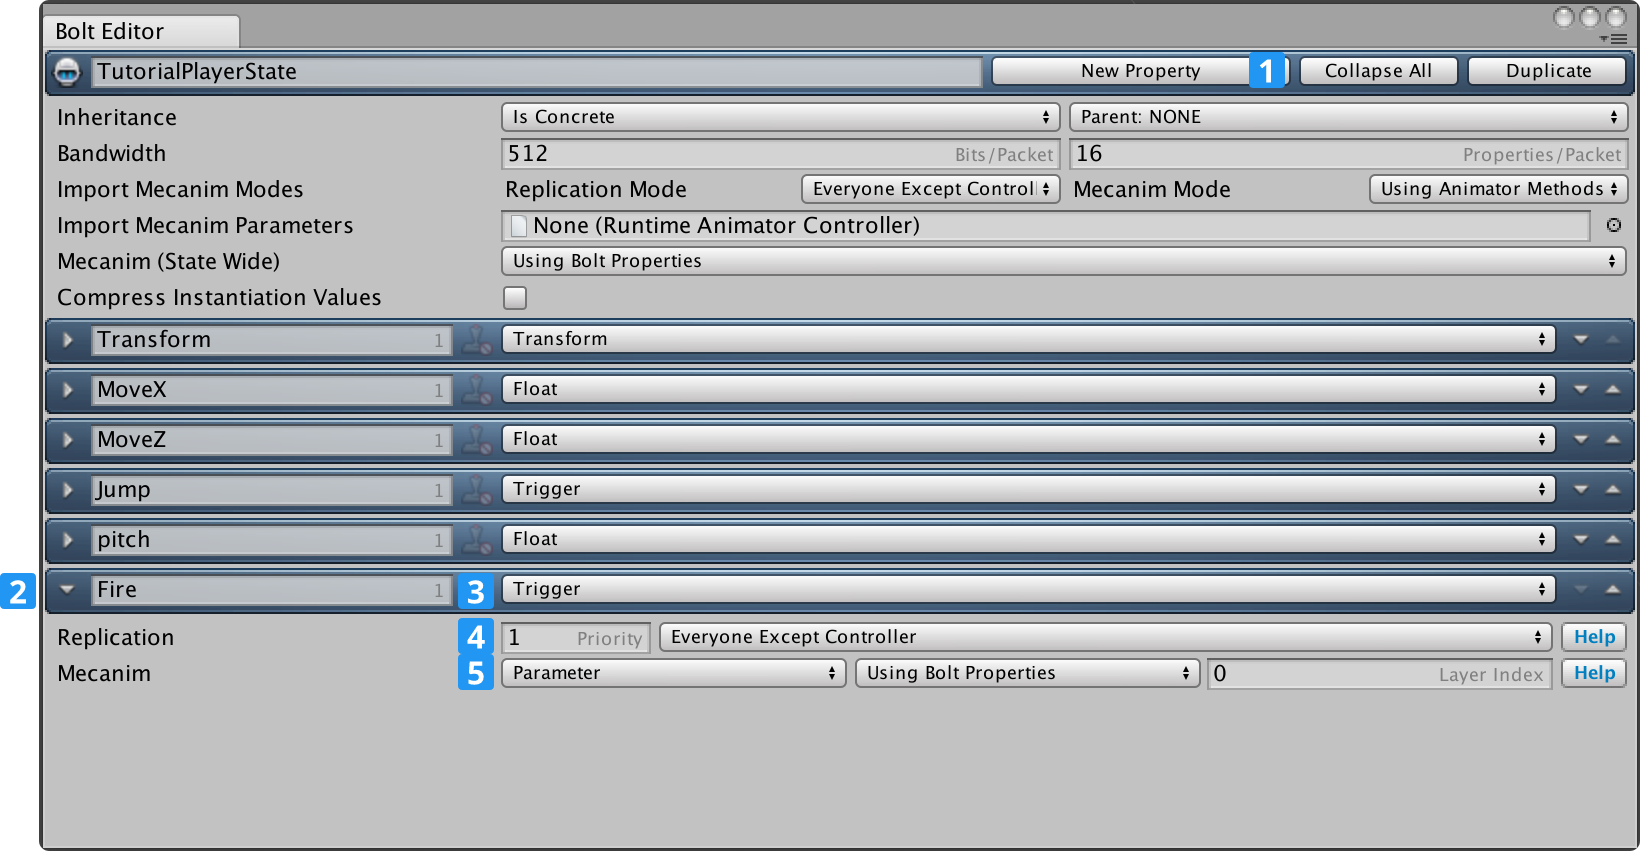
다음 지침을 따라 하세요:
- TutorialPlayerState 에셋에 새로운 속성을 생성합니다.
- 속성 이름을 Fire로 변경합니다.
- Trigger 형으로 변경합니다.
- Replication 속성을Everyone Except Controller로 설정합니다.
- Mecanim을 Parameter - Using Bolt Properties로 설정합니다.
이제 컴파일 할 시간이 되었으므로, Bolt/Compile Assembly를 클릭합니다.
마법처럼 Bolt가 이를 수행하도록 하고 TutorialPlayerController 스크립트를 오픈합니다.
ExecuteCommand 메소드를 수정하려고 하며, cmd.isFirstExecution이 if-블럭으로 되어 있는 내부를 확인합니다.
명령에서 우리의 상태로 pitch를 복사하는 라인을 추가할 것입니다.
C#
// ...
if (cmd.isFirstExecution)
{
  AnimatePlayer(cmd);

  // set state pitch
  state.pitch = cmd.Input.Pitch;
}
// ...
이제 TutorialPlayerCallbacks 스크립트로 가서 ControlOfEntityGained를 다음과 같이 변경해 줍니다.
C#
// ...
public override void ControlOfEntityGained(BoltEntity entity)
{
    // give the camera our players pitch
    PlayerCamera.instance.getPitch = () => entity.GetState<ITutorialPlayerState>().pitch;

    // this tells the player camera to look at the entity we are controlling
    PlayerCamera.instance.SetTarget(entity);

    // add an audio listener for our character
    entity.gameObject.AddComponent<AudioListener>();
}
// ...
이 작은 우회적 방식으로 카메라에 피치를 얻는 이유는 처음부터 모든 상태들을 컴파일 하지 않고도 카메라가 동작할 수 있기 때문에 보다 자연스러운 방법으로 튜토리얼을 진행할 수 있습니다.
우리의 엔티티 게임 오브젝트에 AudioListener 컴포넌트도 추가하여 캐릭터의 관점에서 들을 수 있습니다.
이제 무기를 연결하여 무엇인가를 쏘아야 할 시간입니다.
우선 ExecuteCommand 안에서 무기를 찾는 방식이 필요합니다. TutorialPlayerController 스크립트에서 weapons라는 인스펙터 변수를 추가하고 다음과 같이 TutorialWeapon 객체들의 배열을 가지도록 해주세요:
C#
public class TutorialPlayerController : Bolt.EntityBehaviour<ITutorialPlayerState>
{
// ...
    [SerializeField]
    TutorialWeapon[] weapons;
// ...
}
유니티 인스펙터에서 TutorialRifle 객체를 TutorialPlayerController 위의 새로운 weapons에 캐릭터의 오른손에 붙입니다.
변경사항 적용하는 것을 잊지 마세요.
무기를 발사하는 것과 올바르게 통신하기 위해서 커맨드에 몇 개의 입력이 필요합니다.
Bolt/Assets 윈도우를 열고 TutorialPlayerCommand를 클릭합니다.
aiming 과 fire 속성을 Input 부분에 추가합니다. 두 개 속성 모두 boolean 이 되어야 합니다.
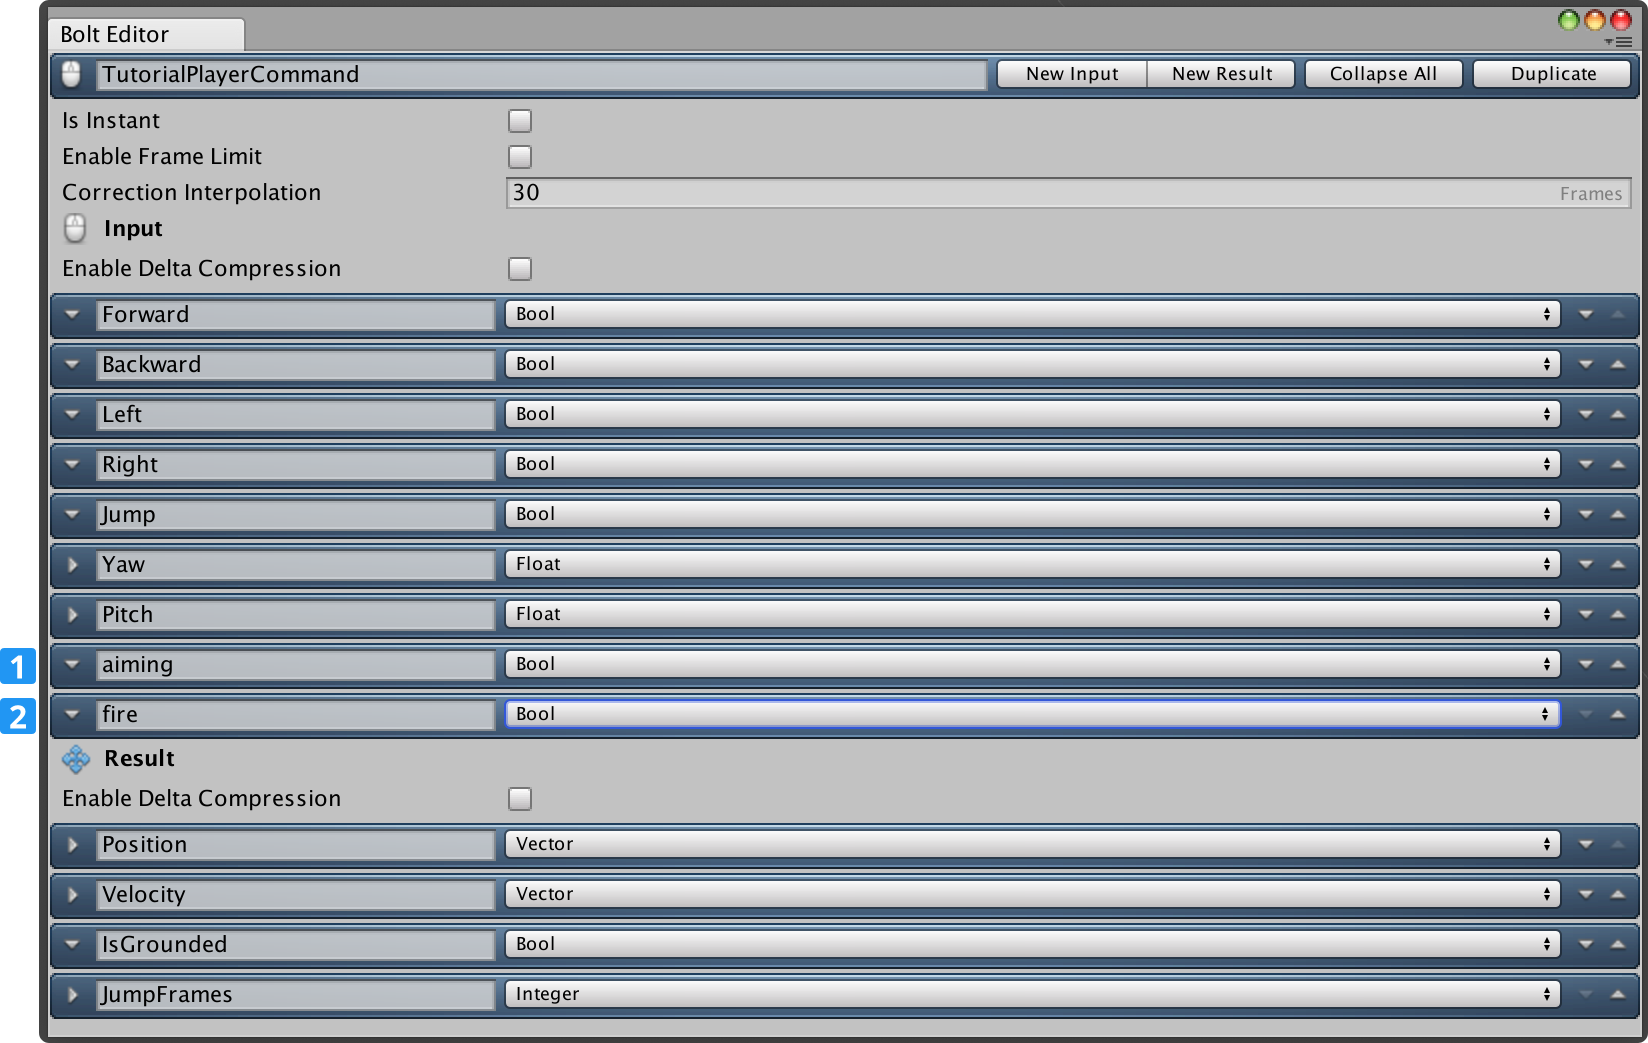
무기를 발사했을 때 올바르게 통신할 수 있는 command에 몇 가지 입력이 필요합니다. 다시 Bolt를 컴파일(Bolt/Compile Assembly) 하고 TutorialPlayerController 스크립트를 다시 엽니다 . PollKeys 안에서 왼쪽과 오른쪽 마우스 버튼의 상태를 질의할 것입니다.
C#
public class TutorialPlayerController : Bolt.EntityBehaviour<ITutorialPlayerState>
{
// ...

    bool _fire;
    bool _aiming;

// ...

    void PollKeys(bool mouse)
    {
        _forward = Input.GetKey(KeyCode.W);
        _backward = Input.GetKey(KeyCode.S);
        _left = Input.GetKey(KeyCode.A);
        _right = Input.GetKey(KeyCode.D);
        _jump = Input.GetKeyDown(KeyCode.Space);

        // mouse buttons
        _fire = Input.GetMouseButton(0);
        _aiming = Input.GetMouseButton(1);

        if (mouse)
        {
            _yaw += (Input.GetAxisRaw("Mouse X") * MOUSE_SENSITIVITY);
            _yaw %= 360f;

            _pitch += (-Input.GetAxisRaw("Mouse Y") * MOUSE_SENSITIVITY);
            _pitch = Mathf.Clamp(_pitch, -85f, +85f);
        }
    }
// ...
}
SimulateController 함수 안에서, 나중에 사용하기 위한 값을 명령어를 큐에 넣어야 할 필요가 있습니다
script를 수정하고 다음 2개의 라인을 추가해 주세요.
C#
public override void SimulateController()
{
// ...
    // new lines
    input.aiming = _aiming;
    input.fire = _fire;

    entity.QueueInput(input);
}
TutorialPlayerController 안의 ExecuteCommand 함수로 이동합니다. ExecuteCommand 이후에 명령어 입력 피치에서 상태 속성으로 복사하고 FireWeapon 함수(생성 예정)를 호출했다면 조준과 발사가 동시에 눌렸는지를 체크하는 것을 추가합니다.
C#
// ...
public override void ExecuteCommand(Bolt.Command command, bool resetState)
{
    TutorialPlayerCommand cmd = (TutorialPlayerCommand) command;

    // ...

    if (cmd.IsFirstExecution)
    {
        AnimatePlayer(cmd);

        // set state pitch
        state.pitch = cmd.Input.Pitch;

        // New Code
        // check if we should try to fire our weapon
        if (cmd.Input.aiming && cmd.Input.fire)
        {
            FireWeapon(cmd);
        }
    }
}
// ...
아규먼트로 TutorialPlayerCommand 을 받는 FireWeapon이라고 하는 함수를 생성합니다.
C#
// ...
void FireWeapon(TutorialPlayerCommand cmd)
{
    if (weapons[0].FireFrame + weapons[0].FireInterval <= BoltNetwork.ServerFrame)
    {
        weapons[0].FireFrame = BoltNetwork.ServerFrame;
        state.Fire();
    }
}
// ...
현재 우리는 단 하나의 무기만을 가지고 있기 때문에 무기 배열에 곧바로 인덱스를 붙일 수 있습니다. 마지막으로 발사한 시점과 각 총알 사이에 통과해야 하는 프레임 수를 확인합니다(fireinterval 은 무기의 RPM 설정에서 계산됩니다). 설정한 충분한 프레임이 지나갔다면 다시 fileFrame 속성을 설정하고 메카님 Fire() 트리거를 호출합니다.
커뮤니케이션에서 메카님 트리거를 사용하는 이유는 무기를 발사하는 것이 엄청나게 가벼웠다는 것입니다. 사실 2비트만 사용하기 때문에 상대적으로 큰 이벤트보다 수시로 발사를 전송하는 것은 크게 부하가 없습니다.
따라서, 이 메카님 트리거를 연결하는 법이 필요합니다. 다행스럽게도 Bolt는 메카님을 연결하여 트리거가 발생했을 때마다 콜백을 받을 수 있도록 해줍니다.
TutorialPlayerController 스크립트 내에서는 여전히 Bolt가 제공하는 Attached 메소드를 오버라이드합니다.
C#
// ...
public override void Attached()
{
    // ...

    // Listen for the OnFire trigger
    state.OnFire = () =>
    {
        weapons[0].DisplayEffects(entity);
    };
}
// ...
C# 람바다 메소드를 메카님 상태의 OnFire 콜백에 붙였고 무기의 DisplayEffects 메소드를 호출했습니다.
아직은 완료되지 않았으나 참조용으로 TutorialPlayerController 전체 스크립트는 아래와 같습니다.
C#
using Bolt;
using Bolt.AdvancedTutorial;
using UnityEngine;

public class TutorialPlayerController : Bolt.EntityBehaviour<ITutorialPlayerState>
{
    [SerializeField]
    TutorialWeapon[] weapons;

    const float MOUSE_SENSITIVITY = 2f;

    bool _forward;
    bool _backward;
    bool _left;
    bool _right;
    bool _jump;

    float _yaw;
    float _pitch;

    bool _fire;
    bool _aiming;

    PlayerMotor _motor;

    void Awake()
    {
        _motor = GetComponent<PlayerMotor>();
    }

    public override void Attached()
    {
        // This couples the Transform property of the State with the GameObject Transform
        state.SetTransforms(state.Transform, transform);
        state.SetAnimator(GetComponentInChildren<Animator>());

        // Configure Animator
        state.Animator.SetLayerWeight(0, 1);
        state.Animator.SetLayerWeight(1, 1);

        // Listen for the OnFire trigger
        state.OnFire = () =>
        {
            weapons[0].DisplayEffects(entity);
        };
    }

    void PollKeys(bool mouse)
    {
        _forward = Input.GetKey(KeyCode.W);
        _backward = Input.GetKey(KeyCode.S);
        _left = Input.GetKey(KeyCode.A);
        _right = Input.GetKey(KeyCode.D);
        _jump = Input.GetKeyDown(KeyCode.Space);

        // mouse buttons
        _fire = Input.GetMouseButton(0);
        _aiming = Input.GetMouseButton(1);

        if (mouse)
        {
            _yaw += (Input.GetAxisRaw("Mouse X") * MOUSE_SENSITIVITY);
            _yaw %= 360f;

            _pitch += (-Input.GetAxisRaw("Mouse Y") * MOUSE_SENSITIVITY);
            _pitch = Mathf.Clamp(_pitch, -85f, +85f);
        }
    }

    void Update()
    {
        PollKeys(true);
    }

    public override void SimulateController()
    {
        PollKeys(false);

        ITutorialPlayerCommandInput input = TutorialPlayerCommand.Create();

        input.Forward = _forward;
        input.Backward = _backward;
        input.Left = _left;
        input.Right = _right;
        input.Jump = _jump;
        input.Yaw = _yaw;
        input.Pitch = _pitch;

        // new lines
        input.aiming = _aiming;
        input.fire = _fire;

        entity.QueueInput(input);
    }

    public override void ExecuteCommand(Command command, bool resetState)
    {
        TutorialPlayerCommand cmd = (TutorialPlayerCommand) command;

        if (resetState)
        {
            // we got a correction from the server, reset (this only runs on the client)
            _motor.SetState(cmd.Result.Position, cmd.Result.Velocity, cmd.Result.IsGrounded, cmd.Result.JumpFrames);
        }
        else
        {
            // apply movement (this runs on both server and client)
            PlayerMotor.State motorState = _motor.Move(cmd.Input.Forward, cmd.Input.Backward, cmd.Input.Left, cmd.Input.Right, cmd.Input.Jump, cmd.Input.Yaw);

            // copy the motor state to the commands result (this gets sent back to the client)
            cmd.Result.Position = motorState.position;
            cmd.Result.Velocity = motorState.velocity;
            cmd.Result.IsGrounded = motorState.isGrounded;
            cmd.Result.JumpFrames = motorState.jumpFrames;

            if (cmd.IsFirstExecution)
            {
                AnimatePlayer(cmd);

                // set state pitch
                state.pitch = cmd.Input.Pitch;

                // check if we should try to fire our weapon
                if (cmd.Input.aiming && cmd.Input.fire)
                {
                    FireWeapon(cmd);
                }
            }
        }
    }

    void FireWeapon(TutorialPlayerCommand cmd)
    {
        if (weapons[0].FireFrame + weapons[0].FireInterval <= BoltNetwork.ServerFrame)
        {
            weapons[0].FireFrame = BoltNetwork.ServerFrame;
            state.Fire();
        }
    }

    void AnimatePlayer(TutorialPlayerCommand cmd)
    {
        // FWD <> BWD movement
        if (cmd.Input.Forward ^ cmd.Input.Backward)
        {
            state.MoveZ = cmd.Input.Forward ? 1 : -1;
        }
        else
        {
            state.MoveZ = 0;
        }

        // LEFT <> RIGHT movement
        if (cmd.Input.Left ^ cmd.Input.Right)
        {
            state.MoveX = cmd.Input.Right ? 1 : -1;
        }
        else
        {
            state.MoveX = 0;
        }

        // JUMP
        if (_motor.jumpStartedThisFrame)
        {
            state.Jump();
        }
    }
}
지금 유일하게 남은 것은 TutorialWeaponRifle 스크립트의 DisplayEffects 함수를 구현하는 것입니다. 이 함수는 꽤 길지만, Bolt에 특수화된 것이 아닌 일반 유니티 메소드를 사용하여 화려한 효과를 보여줍니다.
C#
using Bolt.AdvancedTutorial;
using UnityEngine;

public class TutorialWeaponRifle : TutorialWeapon
{
    public override void DisplayEffects(BoltEntity entity)
    {
        Vector3 pos;
        Quaternion rot;
        PlayerCamera.instance.CalculateCameraAimTransform(entity.transform, entity.GetState<ITutorialPlayerState>().pitch, out pos, out rot);

        Ray r = new Ray(pos, rot * Vector3.forward);
        RaycastHit rh;

        if (Physics.Raycast(r, out rh) && impactPrefab)
        {
            var en = rh.transform.GetComponent<BoltEntity>();
            var hit = GameObject.Instantiate(impactPrefab, rh.point, Quaternion.LookRotation(rh.normal)) as GameObject;

            if (en)
            {
                hit.GetComponent<RandomSound>().enabled = false;
            }

            if (trailPrefab)
            {
                var trailGo = GameObject.Instantiate(trailPrefab, muzzleFlash.position, Quaternion.identity) as GameObject;
                var trail = trailGo.GetComponent<LineRenderer>();

                trail.SetPosition(0, muzzleFlash.position);
                trail.SetPosition(1, rh.point);
            }
        }

        GameObject go = (GameObject) GameObject.Instantiate(shellPrefab, shellEjector.position, shellEjector.rotation);
        go.GetComponent<Rigidbody>().AddRelativeForce(0, 0, 2, ForceMode.VelocityChange);
        go.GetComponent<Rigidbody>().AddTorque(new Vector3(Random.Range(-32f, +32f), Random.Range(-32f, +32f), Random.Range(-32f, +32f)), ForceMode.VelocityChange);

        // show flash
        muzzleFlash.gameObject.SetActive(true);
    }
}
이제 서버와 수많은 클라이언트들이 플레이할 수 있으며 총을 쏘며 효과를 내는 것이 올바르게 복제될 것입니다.
Back to top