5 - オーソリテーティブラグ補正
やや長いタイトルですが、実装を行っていきます。
以下のチャプターでは、ネットワークプログラミングの傑作を扱います。
いくつかの重要なポイントについてデモンストレーションしていきましょう。
- オーソリテーティブな武器変更
- オーソリテーティブなシューティング
- クライアント上のラグ補正
武器の設定
最初に、Weapon のコンポーネント全般について若干の設定をする必要があります。
このクラスを使用すると、どのような種類の銃でも表現できるようになります。
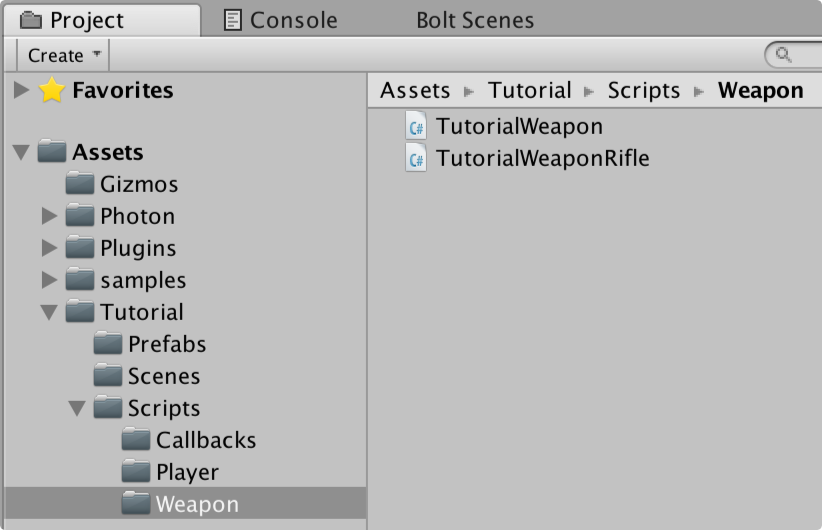
Weapons というフォルダを tutorial/Scripts 内に新たに作成し、その内部に新たに2つの TutorialWeapon.cs と TutorialWeaponRifle.cs というC#スクリプトを作成してください。
TutorialWeaponスクリプトの内部に、標準的なUnityの単純な挙動を置きます。これには、武器を設定するための変数を入れることになります。これは標準的なUnityのものであるため、ここで深く掘り下げることはしません。チュートリアル内ではこうした変数の全てを使うことになりますので、それぞれについては個別に説明することとします。
C#
using UnityEngine;

public class TutorialWeapon : MonoBehaviour
{
    [SerializeField]
    public GameObject shellPrefab;

    [SerializeField]
    public GameObject impactPrefab;

    [SerializeField]
    public GameObject trailPrefab;

    [SerializeField]
    public Transform muzzleFlash;

    [SerializeField]
    public Transform shellEjector;

    [SerializeField]
    public AudioClip fireSound;

    [SerializeField]
    public byte damage = 25;

    [SerializeField]
    public int rpm = 600;

    public int FireInterval
    {
        get
        {
            // calculate rounds per second
            int rps = (rpm / 60);

            // calculate frames between each round
            return BoltNetwork.FramesPerSecond / rps;
        }
    }

    public int FireFrame
    {
        get;
        set;
    }

    public virtual void HitDetection(TutorialPlayerCommand cmd, BoltEntity entity)
    { }

    public virtual void DisplayEffects(BoltEntity entity)
    { }
}
次に、TutorialWeaponRifle スクリプトを編集します。
現状これはほとんど空で、単に TutorialWeapon クラスから継承されているだけです。
C#
using UnityEngine;

public class TutorialWeaponRifle : TutorialWeapon
{
}
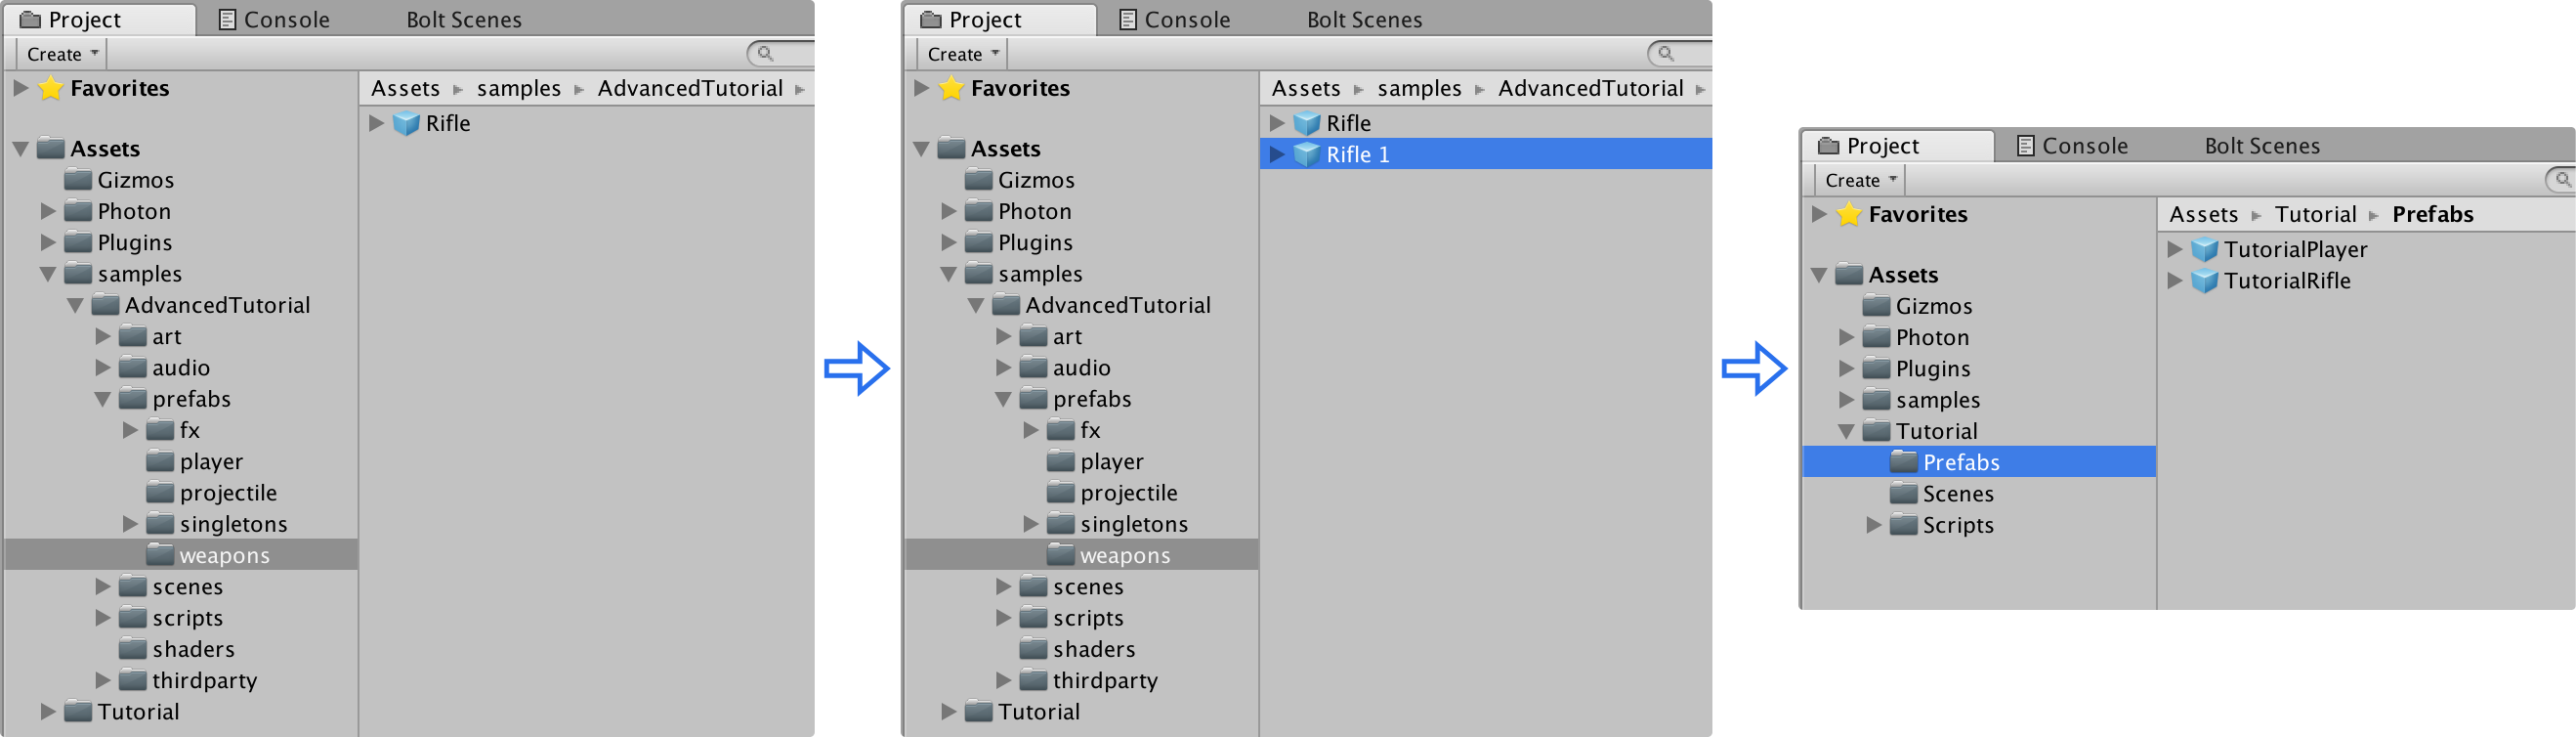
Assets/samples/AdvancedTutorial/prefabs/weaponsフォルダから Rifle プレハブを確認し、それを複製してください(WindowsならCtrl+D、OS XならCMD+Dで可能です)。
この複製は"Rifle 1"となります。それをTutorial/Prefabsフォルダにドラッグして、それを TutorialRifle とリネームしてください。
TutorialRifle プレハブを選択し、TutorialWeaponRifle スクリプトをそれに追加してください。
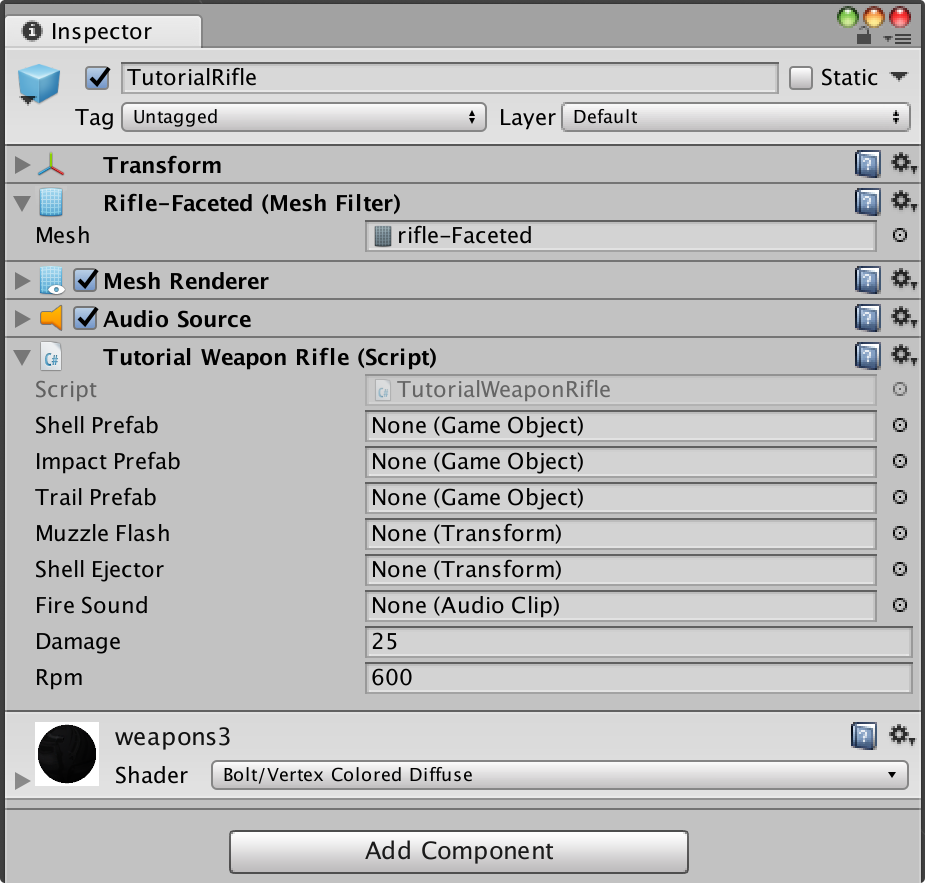
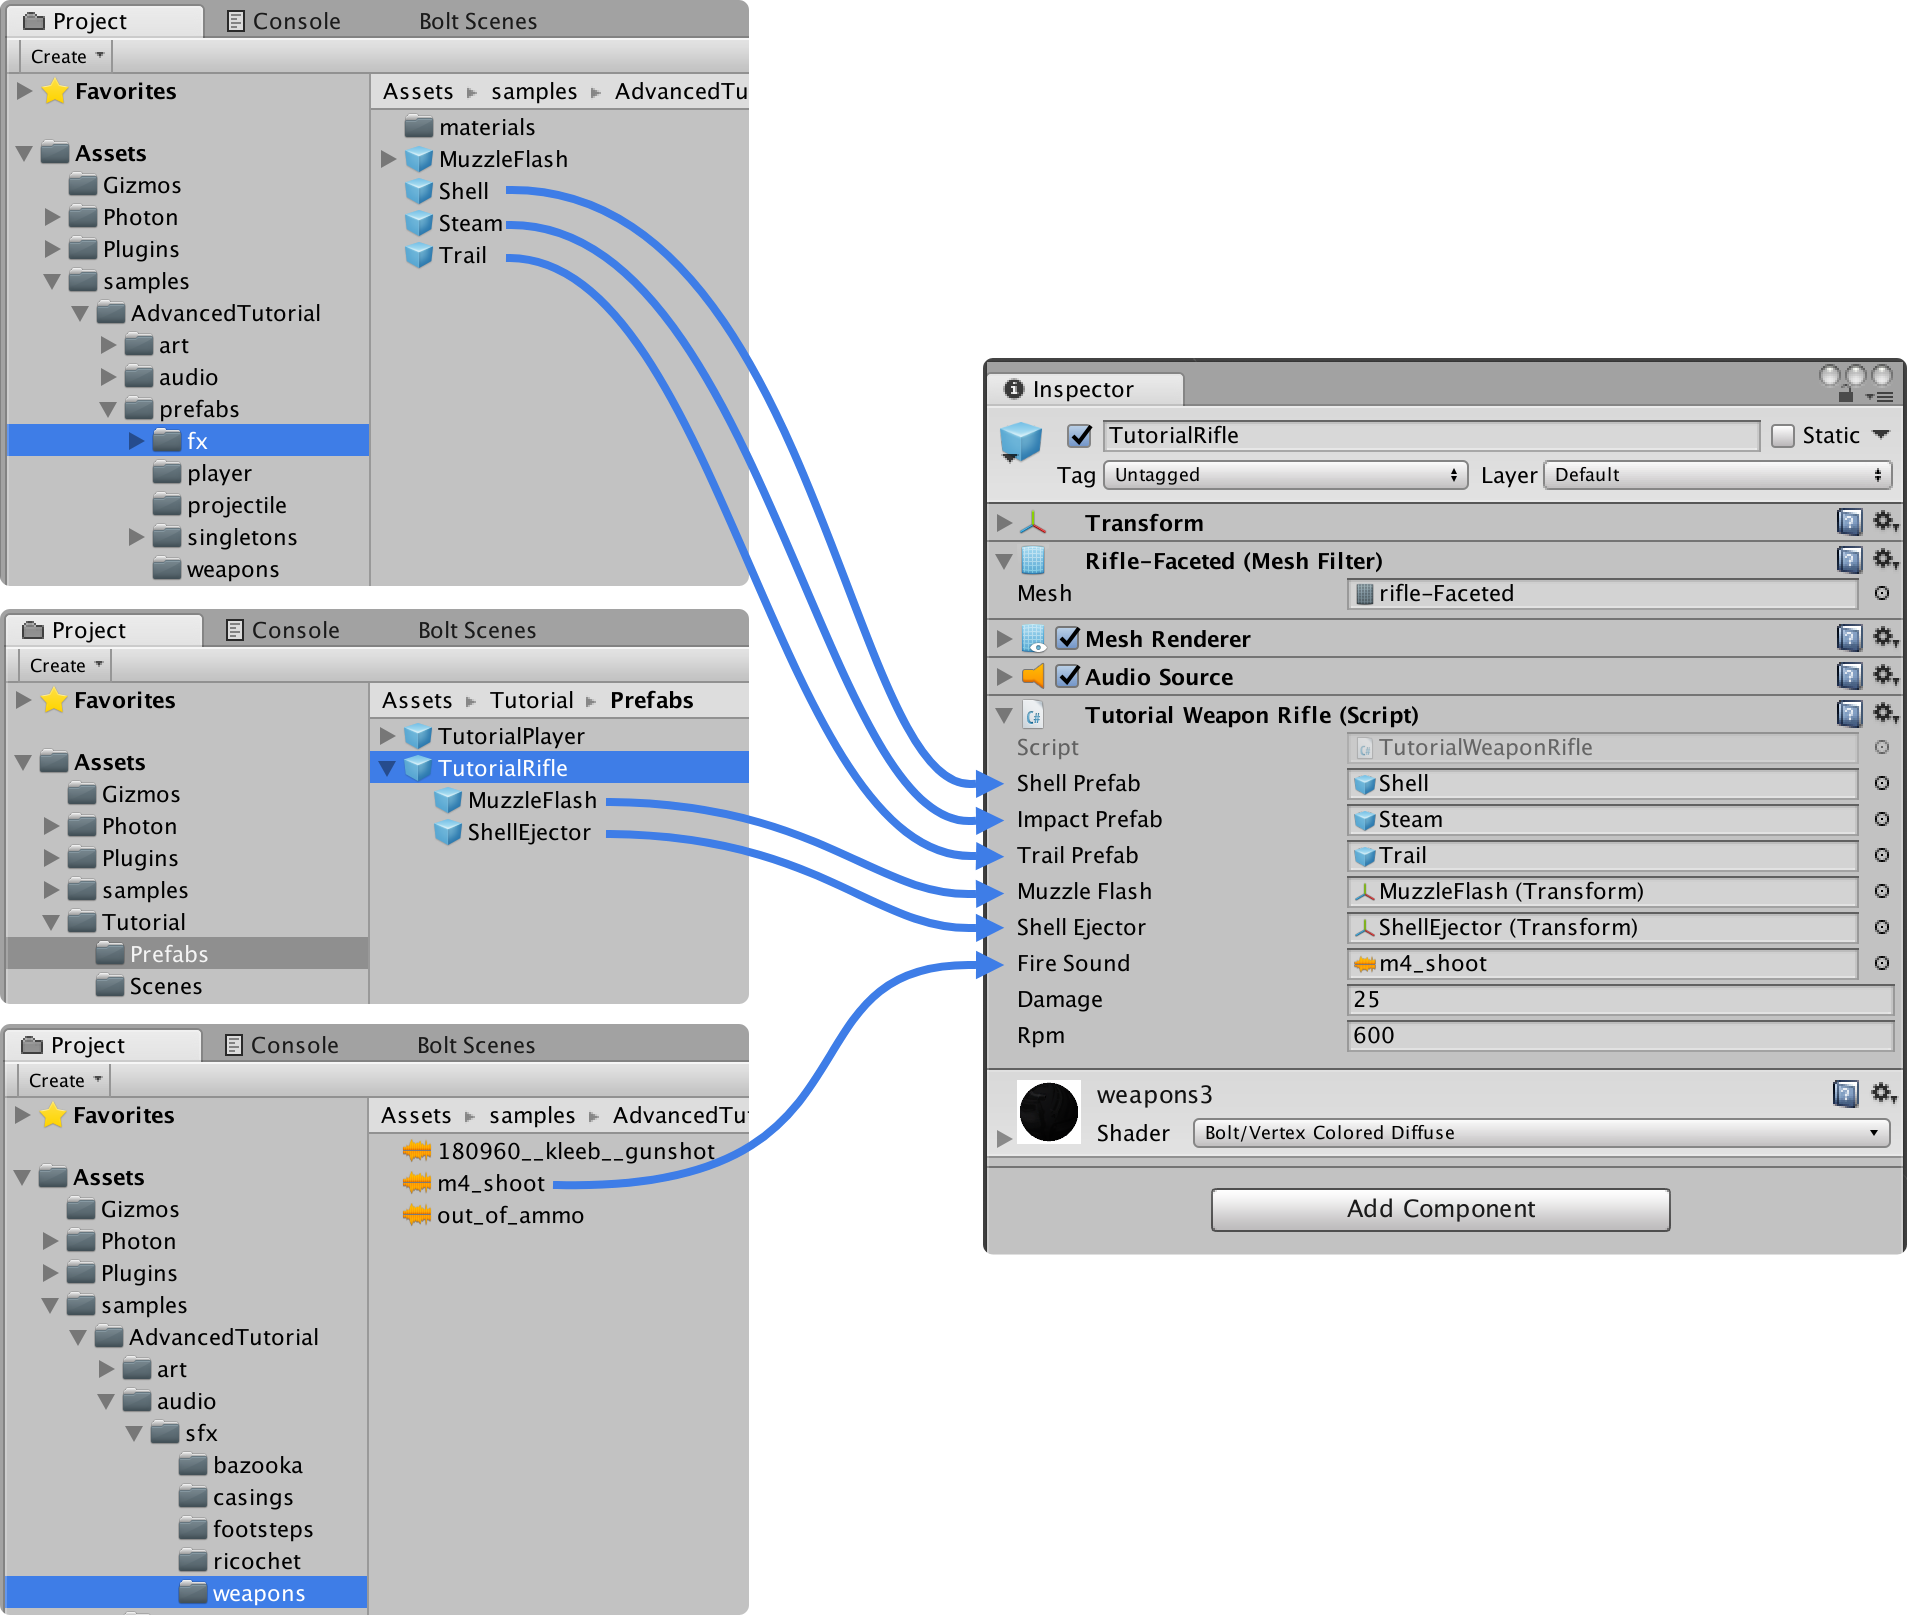
インスペクターを通じて、TutorialWeaponRifle のすべてのパブリック変数に接続します。詳細を説明するのではなく、ここではすべてを正常に接続するための概要を説明します。
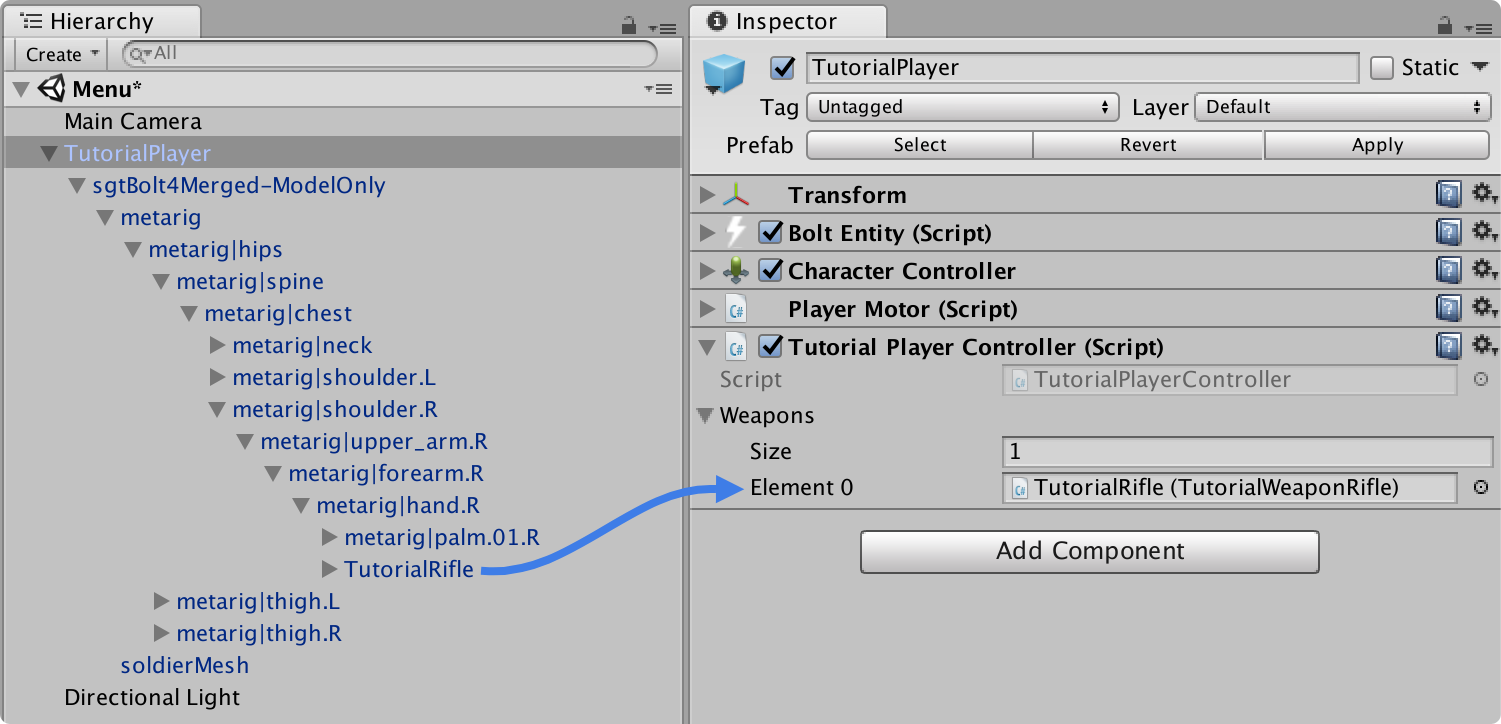
ゲーム内のキャラクターに武器を持たせましょう。
- TutorialPlayer プレハブを選択します;
- ライフルは正しく回転するようにしなけれななりません。また、以下のように、TutorialRifle プレハブをキャラクターの右手の下に落とす必要があります;
- Apply (3) をクリックするか、それを Project ウィンドウのトップに再度ドラッグし、必ず TutorialPlayer プレハブを保存してください
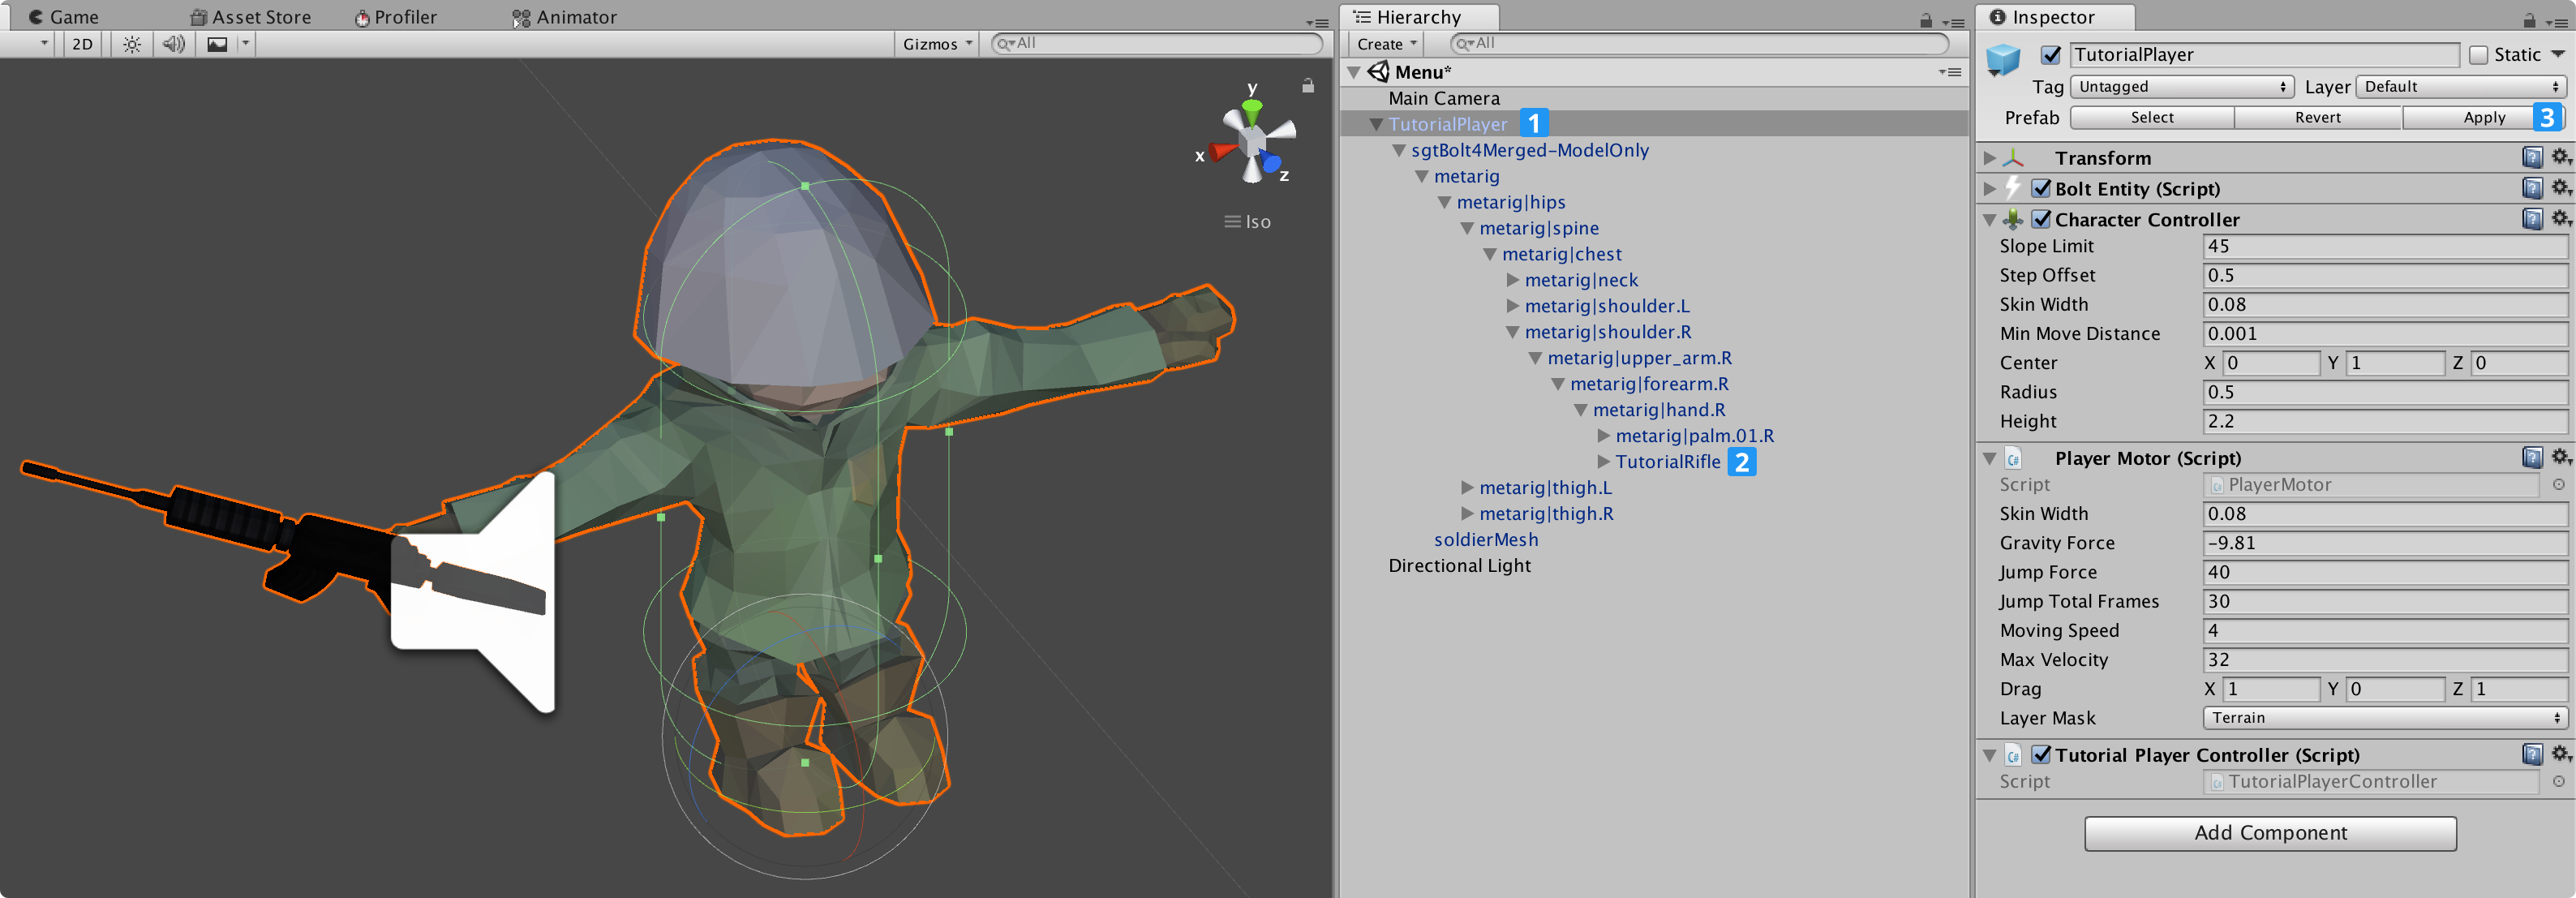
ゲームをプレイすると、キャラクターの手にライフルがあることが確認できます。
正しく回転しないようであれば、TutorialPlayer プレハブに戻って、再調整してください。
カメラをピッチすることはできません。これは、PlayerCamera のクラスを作成したものの、これをチュートリアルコードに対応させるために汎用性を高くしているためです。
Bolt/Assetsウィンドウを開き、TutorialPlayerState状態を選択します。この状態に pitch プロパティを追加します。
ここで、TutorialPlayerState アセットに pitch のプロパティを追加します。
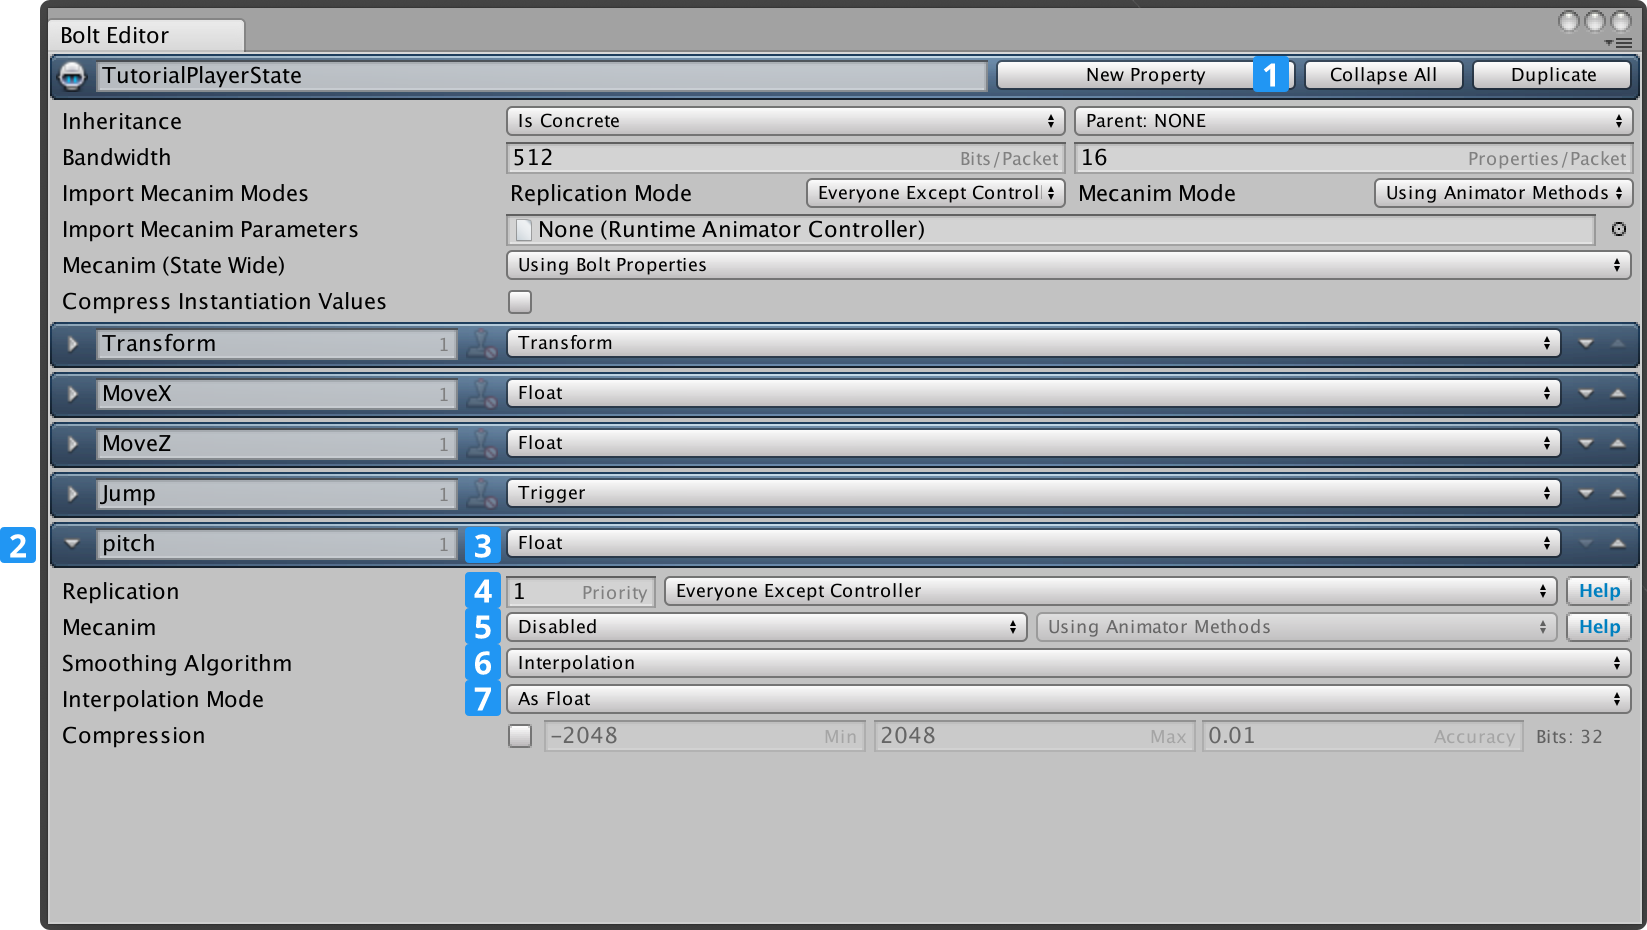
以下の手順にしたがってください:
- TutorialPlayerState アセットを開きます。
- プロパティを pitch にリネームします。
- 型を Float に変更します。
- Replication プロパティを Everyone Except Controller に設定します。
- Mecanim を Disable に設定します。
- Smoothing Algorithm を Interpolation に設定します。
- Interpolation Mode を As Float に設定します。
すでにプレイヤーの状態を編集していますので、Fire という名前のプロパティを追加しましょう。
このプロパティは、プレイヤーが武器を発砲することを示します。
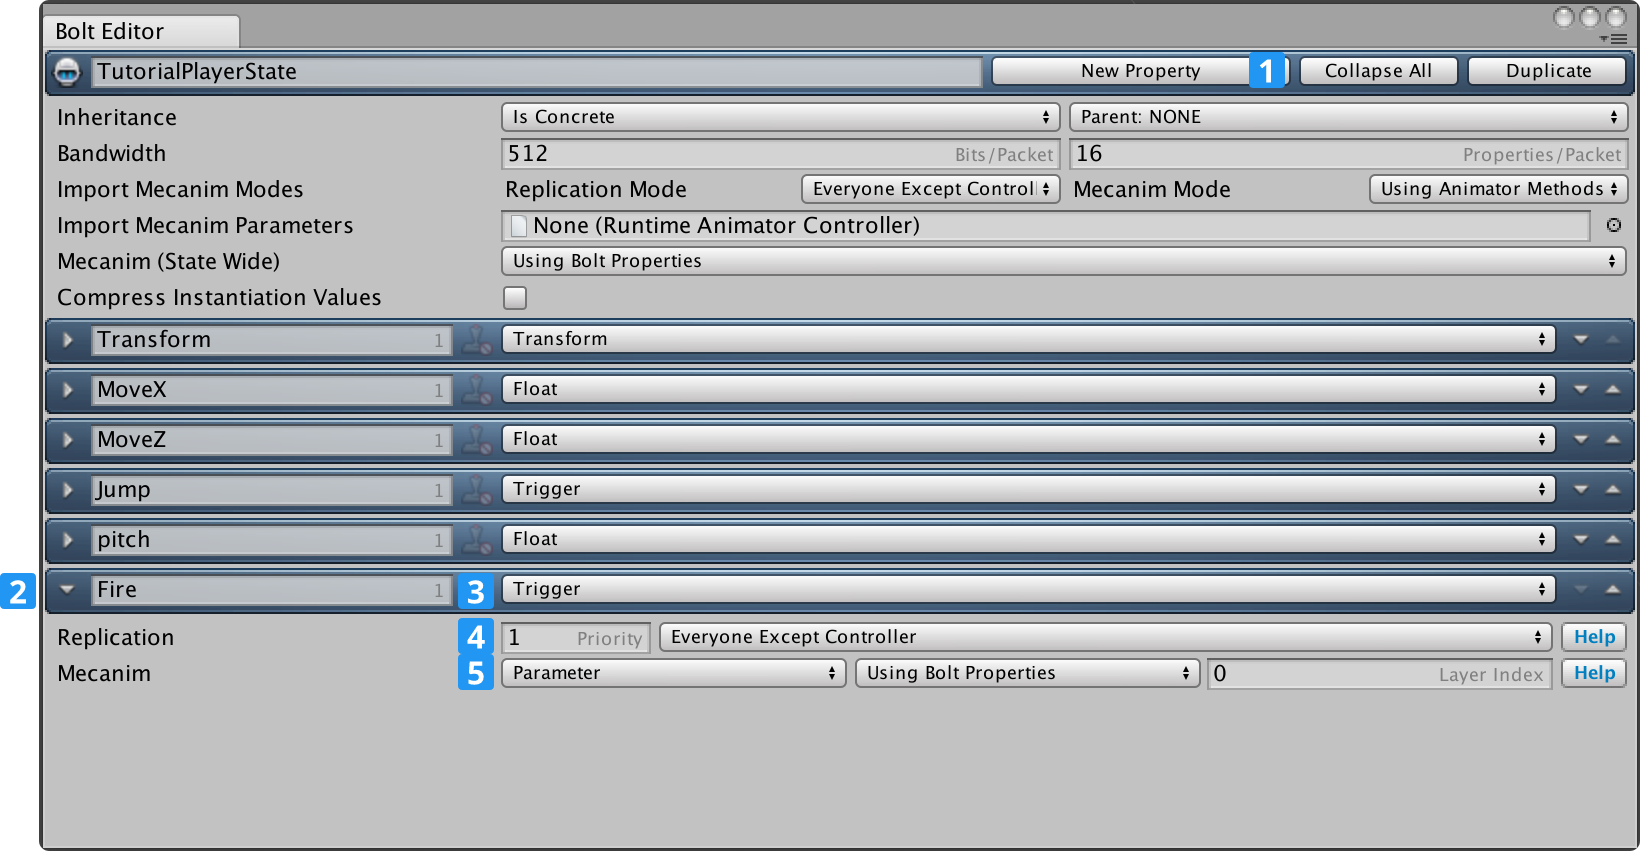
以下の手順にしたがってください:
- TutorialPlayerState アセット上で新たなプロパティを作成します
- プロパティを Fire にリネームします。
- 型を Trigger に変更します。
- Replication プロパティを Everyone Except Controller に設定します。
- Mecanim を Parameter に設定します。- Using Bolt Properties
Bolt/Compile Assemblyをクリックし、Boltをコンパイルします。
TutorialPlayerController スクリプトを開きます。
cmd.isFirstExecution チェックで保護されたIFブロック内の ExecuteCommand メソッドをアップデートします。
コマンドから状態にピッチをコピーする行を追加します。
C#
// ...
if (cmd.isFirstExecution)
{
  AnimatePlayer(cmd);

  // set state pitch
  state.pitch = cmd.Input.Pitch;
}
// ...
TutorialPlayerCallbacks スクリプトを開き、ControlOfEntityGained メソッドを以下のようにアップデートします。
C#
// ...
public override void ControlOfEntityGained(BoltEntity entity)
{
    // give the camera our players pitch
    PlayerCamera.instance.getPitch = () => entity.GetState<ITutorialPlayerState>().pitch;

    // this tells the player camera to look at the entity we are controlling
    PlayerCamera.instance.SetTarget(entity);

    // add an audio listener for our character
    entity.gameObject.AddComponent<AudioListener>();
}
// ...
カメラへのピッチにやや回りくどい方法をとっていますが、これは最初からコンパイルされた状態の全てを持つことなくカメラが動作するようにするためです。これにより、より自然な形でチュートリアルを進めることができます。
AudioListenerコンポーネントをゲームのオブジェクトに追加し、キャラクターの視点をリッスンできるようにしてください。
ここで武器に接続し、シューティングに関する設定を行います。
まず ExecuteCommand 内に武器を見つけるための方法が必要になります。TutorialPlayerController スクリプト上に、新たなインスペクター変数である weapons を追加し、それがTutorialWeaponオブジェクトの配列になるようにしてください。以下をご確認ください:
C#
public class TutorialPlayerController : Bolt.EntityBehaviour<ITutorialPlayerState>
{
// ...
    [SerializeField]
    TutorialWeapon[] weapons;
// ...
}
Unityのインスペクター内で、キャラクターの右手に付属されている TutorialRifle オブジェクトを TutorialPlayerController 上の weapons
フィールドにドラッグしてください。その後、変更を適用してください。
適切に武器を発砲できるように、コマンドに複数の入力をおこなう必要があります。
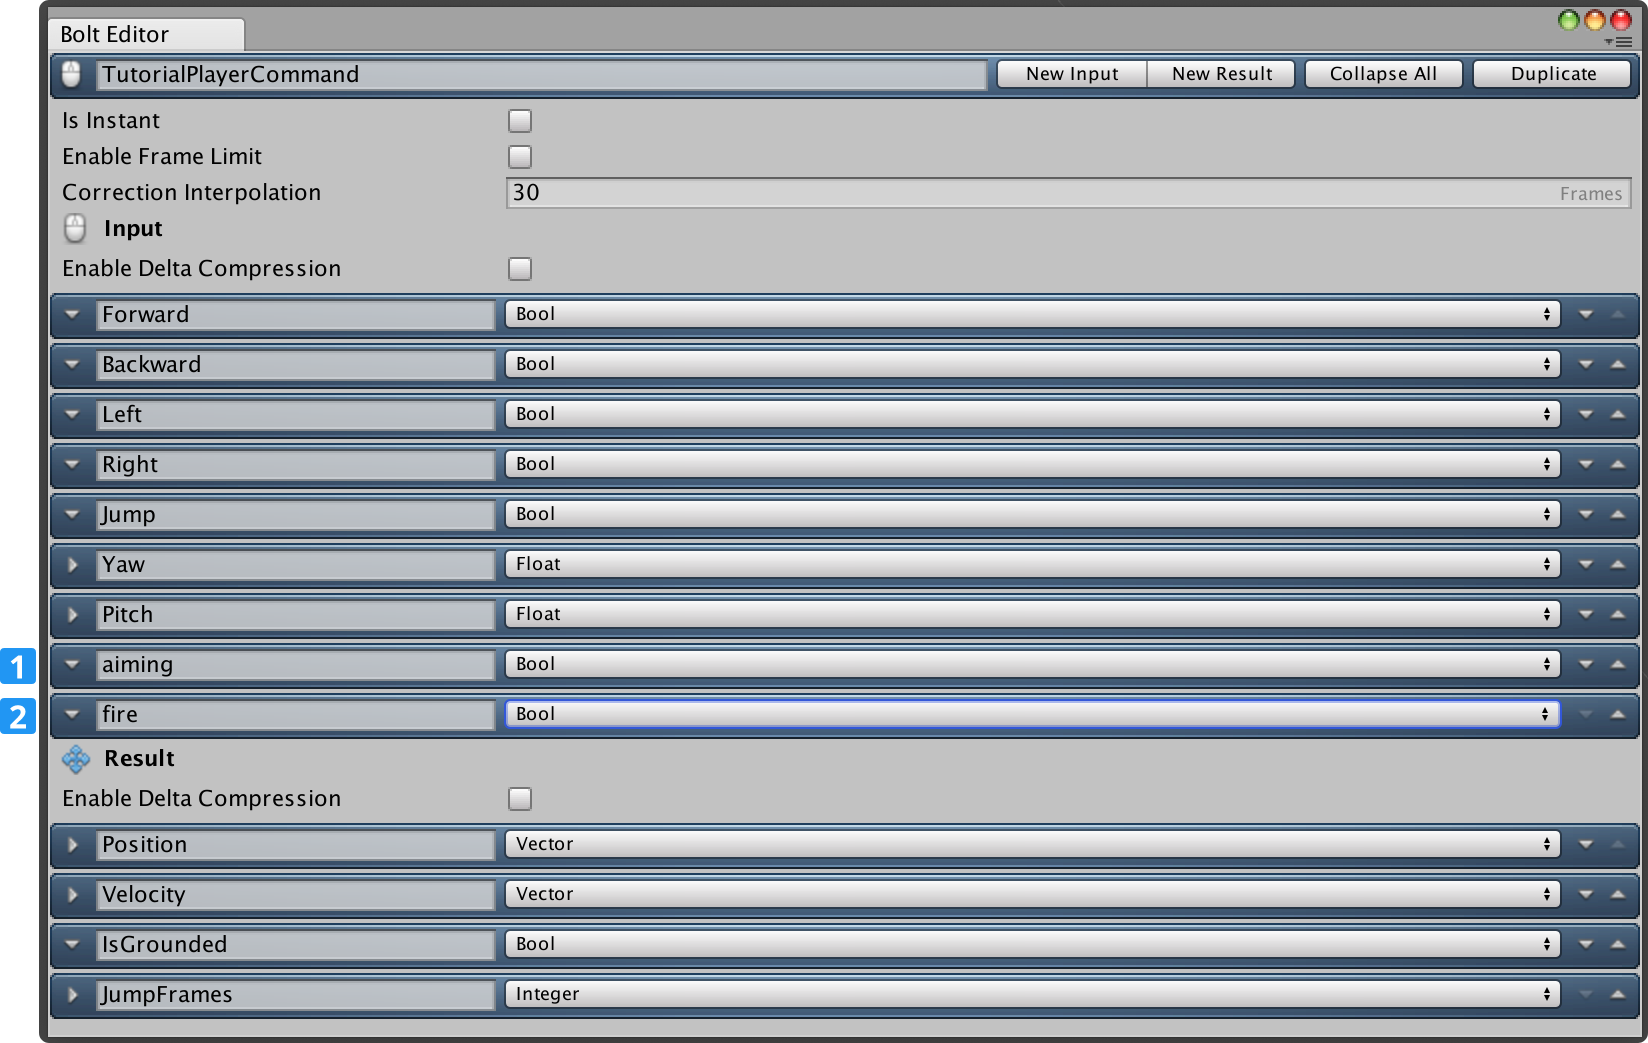
Bolt/Assetsウィンドウを開き TutorialPlayerCommand をクリックします。
Input 部分に aiming と fire プロパティを追加します。これらはブールにする必要があります。
Boltを再度コンパイルして (Bolt/Compile Assembly)、TutorialPlayerController スクリプトを再度開いてください。PollKeys内で、マウスの左ボタンと右ボタンの状態をクエリしてください。
C#
public class TutorialPlayerController : Bolt.EntityBehaviour<ITutorialPlayerState>
{
// ...

    bool _fire;
    bool _aiming;

// ...

    void PollKeys(bool mouse)
    {
        _forward = Input.GetKey(KeyCode.W);
        _backward = Input.GetKey(KeyCode.S);
        _left = Input.GetKey(KeyCode.A);
        _right = Input.GetKey(KeyCode.D);
        _jump = Input.GetKeyDown(KeyCode.Space);

        // mouse buttons
        _fire = Input.GetMouseButton(0);
        _aiming = Input.GetMouseButton(1);

        if (mouse)
        {
            _yaw += (Input.GetAxisRaw("Mouse X") * MOUSE_SENSITIVITY);
            _yaw %= 360f;

            _pitch += (-Input.GetAxisRaw("Mouse Y") * MOUSE_SENSITIVITY);
            _pitch = Mathf.Clamp(_pitch, -85f, +85f);
        }
    }
// ...
}
SimulateController機能で、システムにキューされるコマンドにこれらの値を入力する必要もあります。これらは後で使用されます。
script をアップデートし、以下の2行を追加します。
C#
public override void SimulateController()
{
// ...
    // new lines
    input.aiming = _aiming;
    input.fire = _fire;

    entity.QueueInput(input);
}
ExecuteCommand機能を開いてください。コマンド入力から状態プロパティに pitch をコピーしたすぐ隣に、照準と発砲の両方が押されているかどうかを見るためのチェックを追加してください。押されている場合、FireWeapon機能を呼び出してください(この機能は後に作成します)。
C#
// ...
public override void ExecuteCommand(Bolt.Command command, bool resetState)
{
    TutorialPlayerCommand cmd = (TutorialPlayerCommand) command;

    // ...

    if (cmd.IsFirstExecution)
    {
        AnimatePlayer(cmd);

        // set state pitch
        state.pitch = cmd.Input.Pitch;

        // New Code
        // check if we should try to fire our weapon
        if (cmd.Input.aiming && cmd.Input.fire)
        {
            FireWeapon(cmd);
        }
    }
}
// ...
唯一の引数としてTutorialPlayerCommand クラスを取るFireWeaponという名前の機能を作成してください
C#
// ...
void FireWeapon(TutorialPlayerCommand cmd)
{
    if (weapons[0].FireFrame + weapons[0].FireInterval <= BoltNetwork.ServerFrame)
    {
        weapons[0].FireFrame = BoltNetwork.ServerFrame;
        state.Fire();
    }
}
// ...
武器配列にインデックス化する武器が現在1つしかないため、最後に発砲したときと、それぞれの発砲の間に経過すべきフレームがいくつあるかをチェックします(FireInterval の計算は、武器のRPM設定により求められます)。十分なフレーム数が経過している場合、FireFrameプロパティを再度設定し、state.Fire()トリガーを呼び出します。
Mecanimトリガーを武器を実際に発砲したかどうかのやり取りに用いるのは、これが非常に軽く、実際2ビットしか使用しないためです。
発砲回数は多くなりますので、大きなイベントの送信には適していません。
ここで、このMecanimトリガーに接続する方法が必要となります。Boltではトリガーが引かれる度にMecanimに接続し、コールバックを取得します。
ただし、TutorialPlayerController スクリプト内で、Attached メソッドに行を追加してください。
C#
// ...
public override void Attached()
{
    // ...

    // Listen for the OnFire trigger
    state.OnFire = () =>
    {
        weapons[0].DisplayEffects(entity);
    };
}
// ...
C#ラムダメソッドをMecanim状態上のOnFireコールバックに付属させ、そこで武器のDisplayEffectsメソッドを呼び出してください。
まだ完成はしていませんが、参照用に完了している TutorialPlayerController スクリプトが確認できます。
C#
using Bolt;
using Bolt.AdvancedTutorial;
using UnityEngine;

public class TutorialPlayerController : Bolt.EntityBehaviour<ITutorialPlayerState>
{
    [SerializeField]
    TutorialWeapon[] weapons;

    const float MOUSE_SENSITIVITY = 2f;

    bool _forward;
    bool _backward;
    bool _left;
    bool _right;
    bool _jump;

    float _yaw;
    float _pitch;

    bool _fire;
    bool _aiming;

    PlayerMotor _motor;

    void Awake()
    {
        _motor = GetComponent<PlayerMotor>();
    }

    public override void Attached()
    {
        // This couples the Transform property of the State with the GameObject Transform
        state.SetTransforms(state.Transform, transform);
        state.SetAnimator(GetComponentInChildren<Animator>());

        // Configure Animator
        state.Animator.SetLayerWeight(0, 1);
        state.Animator.SetLayerWeight(1, 1);

        // Listen for the OnFire trigger
        state.OnFire = () =>
        {
            weapons[0].DisplayEffects(entity);
        };
    }

    void PollKeys(bool mouse)
    {
        _forward = Input.GetKey(KeyCode.W);
        _backward = Input.GetKey(KeyCode.S);
        _left = Input.GetKey(KeyCode.A);
        _right = Input.GetKey(KeyCode.D);
        _jump = Input.GetKeyDown(KeyCode.Space);

        // mouse buttons
        _fire = Input.GetMouseButton(0);
        _aiming = Input.GetMouseButton(1);

        if (mouse)
        {
            _yaw += (Input.GetAxisRaw("Mouse X") * MOUSE_SENSITIVITY);
            _yaw %= 360f;

            _pitch += (-Input.GetAxisRaw("Mouse Y") * MOUSE_SENSITIVITY);
            _pitch = Mathf.Clamp(_pitch, -85f, +85f);
        }
    }

    void Update()
    {
        PollKeys(true);
    }

    public override void SimulateController()
    {
        PollKeys(false);

        ITutorialPlayerCommandInput input = TutorialPlayerCommand.Create();

        input.Forward = _forward;
        input.Backward = _backward;
        input.Left = _left;
        input.Right = _right;
        input.Jump = _jump;
        input.Yaw = _yaw;
        input.Pitch = _pitch;

        // new lines
        input.aiming = _aiming;
        input.fire = _fire;

        entity.QueueInput(input);
    }

    public override void ExecuteCommand(Command command, bool resetState)
    {
        TutorialPlayerCommand cmd = (TutorialPlayerCommand) command;

        if (resetState)
        {
            // we got a correction from the server, reset (this only runs on the client)
            _motor.SetState(cmd.Result.Position, cmd.Result.Velocity, cmd.Result.IsGrounded, cmd.Result.JumpFrames);
        }
        else
        {
            // apply movement (this runs on both server and client)
            PlayerMotor.State motorState = _motor.Move(cmd.Input.Forward, cmd.Input.Backward, cmd.Input.Left, cmd.Input.Right, cmd.Input.Jump, cmd.Input.Yaw);

            // copy the motor state to the commands result (this gets sent back to the client)
            cmd.Result.Position = motorState.position;
            cmd.Result.Velocity = motorState.velocity;
            cmd.Result.IsGrounded = motorState.isGrounded;
            cmd.Result.JumpFrames = motorState.jumpFrames;

            if (cmd.IsFirstExecution)
            {
                AnimatePlayer(cmd);

                // set state pitch
                state.pitch = cmd.Input.Pitch;

                // check if we should try to fire our weapon
                if (cmd.Input.aiming && cmd.Input.fire)
                {
                    FireWeapon(cmd);
                }
            }
        }
    }

    void FireWeapon(TutorialPlayerCommand cmd)
    {
        if (weapons[0].FireFrame + weapons[0].FireInterval <= BoltNetwork.ServerFrame)
        {
            weapons[0].FireFrame = BoltNetwork.ServerFrame;
            state.Fire();
        }
    }

    void AnimatePlayer(TutorialPlayerCommand cmd)
    {
        // FWD <> BWD movement
        if (cmd.Input.Forward ^ cmd.Input.Backward)
        {
            state.MoveZ = cmd.Input.Forward ? 1 : -1;
        }
        else
        {
            state.MoveZ = 0;
        }

        // LEFT <> RIGHT movement
        if (cmd.Input.Left ^ cmd.Input.Right)
        {
            state.MoveX = cmd.Input.Right ? 1 : -1;
        }
        else
        {
            state.MoveX = 0;
        }

        // JUMP
        if (_motor.jumpStartedThisFrame)
        {
            state.Jump();
        }
    }
}
最後に、TutorialWeaponRifleスクリプト上のDisplayEffects機能を実行します。この機能は非常に大きいものですが、内部的にBolt特有のものはなく、基本的なUnityメソッドを用いてすぐれた機能を実現しています。
C#
using Bolt.AdvancedTutorial;
using UnityEngine;

public class TutorialWeaponRifle : TutorialWeapon
{
    public override void DisplayEffects(BoltEntity entity)
    {
        Vector3 pos;
        Quaternion rot;
        PlayerCamera.instance.CalculateCameraAimTransform(entity.transform, entity.GetState<ITutorialPlayerState>().pitch, out pos, out rot);

        Ray r = new Ray(pos, rot * Vector3.forward);
        RaycastHit rh;

        if (Physics.Raycast(r, out rh) && impactPrefab)
        {
            var en = rh.transform.GetComponent<BoltEntity>();
            var hit = GameObject.Instantiate(impactPrefab, rh.point, Quaternion.LookRotation(rh.normal)) as GameObject;

            if (en)
            {
                hit.GetComponent<RandomSound>().enabled = false;
            }

            if (trailPrefab)
            {
                var trailGo = GameObject.Instantiate(trailPrefab, muzzleFlash.position, Quaternion.identity) as GameObject;
                var trail = trailGo.GetComponent<LineRenderer>();

                trail.SetPosition(0, muzzleFlash.position);
                trail.SetPosition(1, rh.point);
            }
        }

        GameObject go = (GameObject) GameObject.Instantiate(shellPrefab, shellEjector.position, shellEjector.rotation);
        go.GetComponent<Rigidbody>().AddRelativeForce(0, 0, 2, ForceMode.VelocityChange);
        go.GetComponent<Rigidbody>().AddTorque(new Vector3(Random.Range(-32f, +32f), Random.Range(-32f, +32f), Random.Range(-32f, +32f)), ForceMode.VelocityChange);

        // show flash
        muzzleFlash.gameObject.SetActive(true);
    }
}
以上の設定で、サーバーとしても、クライアントを何台接続してもプレイすることができます。全ての発砲とそのエフェクトは正しく複製されます。
Back to top