5 - Authoritative Lag Shooting
The title is quite a mouthful, but so is what we are going to implement.
On this chapter we will handle one of those "holy grail" style things of network programming.
We are going to demonstrate several key things.
- Authoritative weapon switching;
- Authoritative shooting;
- Lag compensation on clients.
Weapon Setup
The first thing we are going to do is to setup a generic Weapon component responsible for manage a weapon in gameplay.
By using this class, you should be able to represent any kind of gun.
Start by creating a new folder called Weapons in Tutorial/Scripts and inside that create two new C# script called TutorialWeapon.cs and TutorialWeaponRifle.cs.
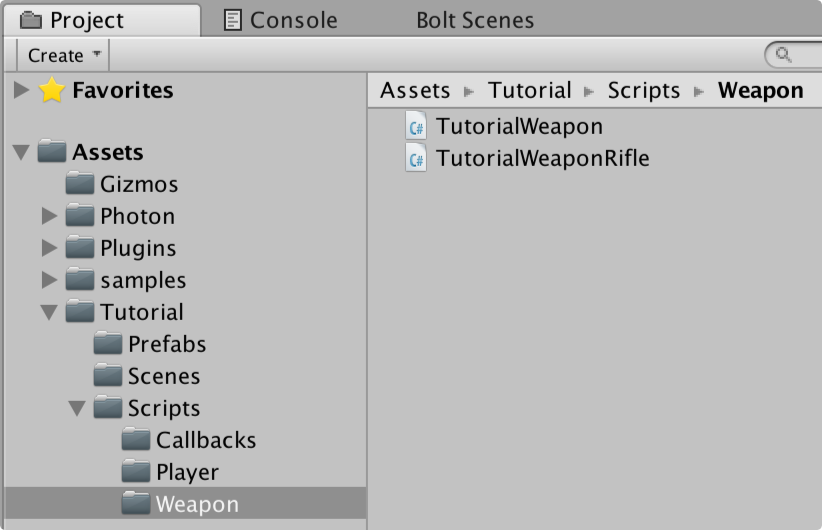
Inside the TutorialWeapon script we are going to put a pretty standard Unity MonoBehaviour, which is just going to have some variables for configuring our weapon, as this is pretty much standard Unity stuff we will not go into more details on it here.
We will end up using all of these variables during the tutorial, so they will all be explained individually.
C#
using UnityEngine;

public class TutorialWeapon : MonoBehaviour
{
    [SerializeField]
    public GameObject shellPrefab;

    [SerializeField]
    public GameObject impactPrefab;

    [SerializeField]
    public GameObject trailPrefab;

    [SerializeField]
    public Transform muzzleFlash;

    [SerializeField]
    public Transform shellEjector;

    [SerializeField]
    public AudioClip fireSound;

    [SerializeField]
    public byte damage = 25;

    [SerializeField]
    public int rpm = 600;

    public int FireInterval
    {
        get
        {
            // calculate rounds per second
            int rps = (rpm / 60);

            // calculate frames between each round
            return BoltNetwork.FramesPerSecond / rps;
        }
    }

    public int FireFrame
    {
        get;
        set;
    }

    public virtual void HitDetection(TutorialPlayerCommand cmd, BoltEntity entity)
    { }

    public virtual void DisplayEffects(BoltEntity entity)
    { }
}
The next thing we are going to edit the TutorialWeaponRifle script.
For now this is going to be mostly empty and simply inherit from our TutorialWeapon class.
C#
using UnityEngine;

public class TutorialWeaponRifle : TutorialWeapon
{
}
Go into the Assets/samples/AdvancedTutorial/prefabs/weapons folder and find the Rifle prefab, create a duplicate of it (CTRL+D on Windows, CMD+D on OS X).
The duplicate will be called Rifle 1, drag it into our Tutorial/Prefabs folder and rename it to TutorialRifle.

Select our new TutorialRifle prefab and add our TutorialWeaponRifle script to it.
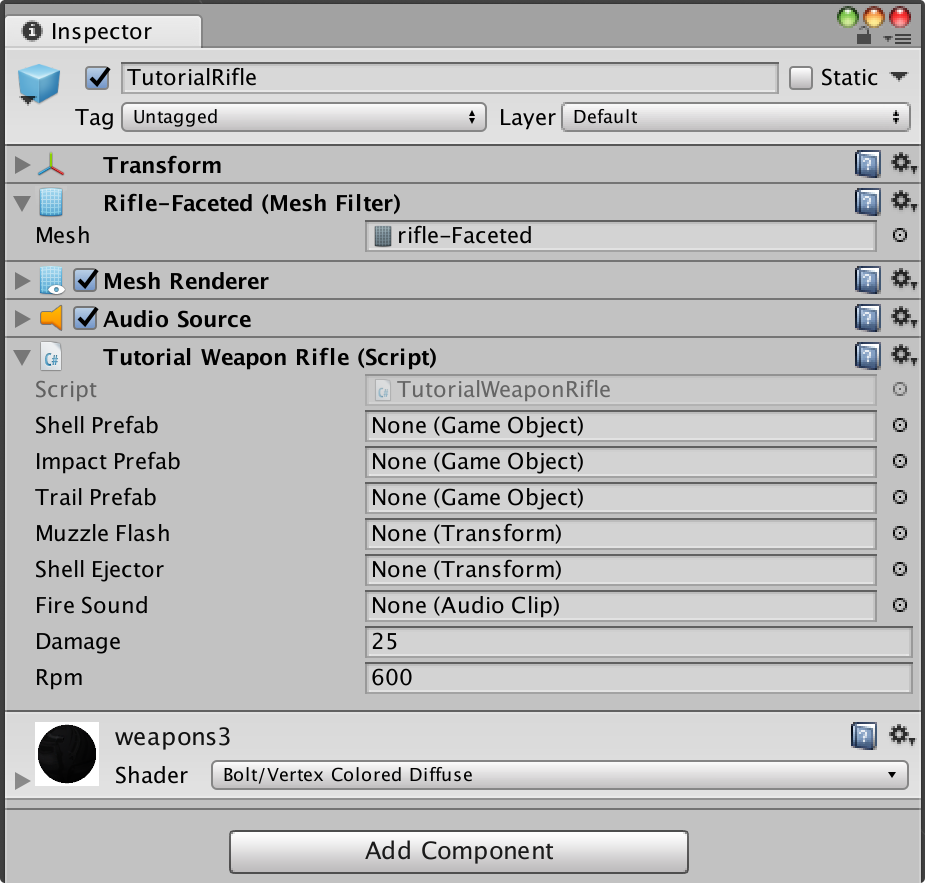
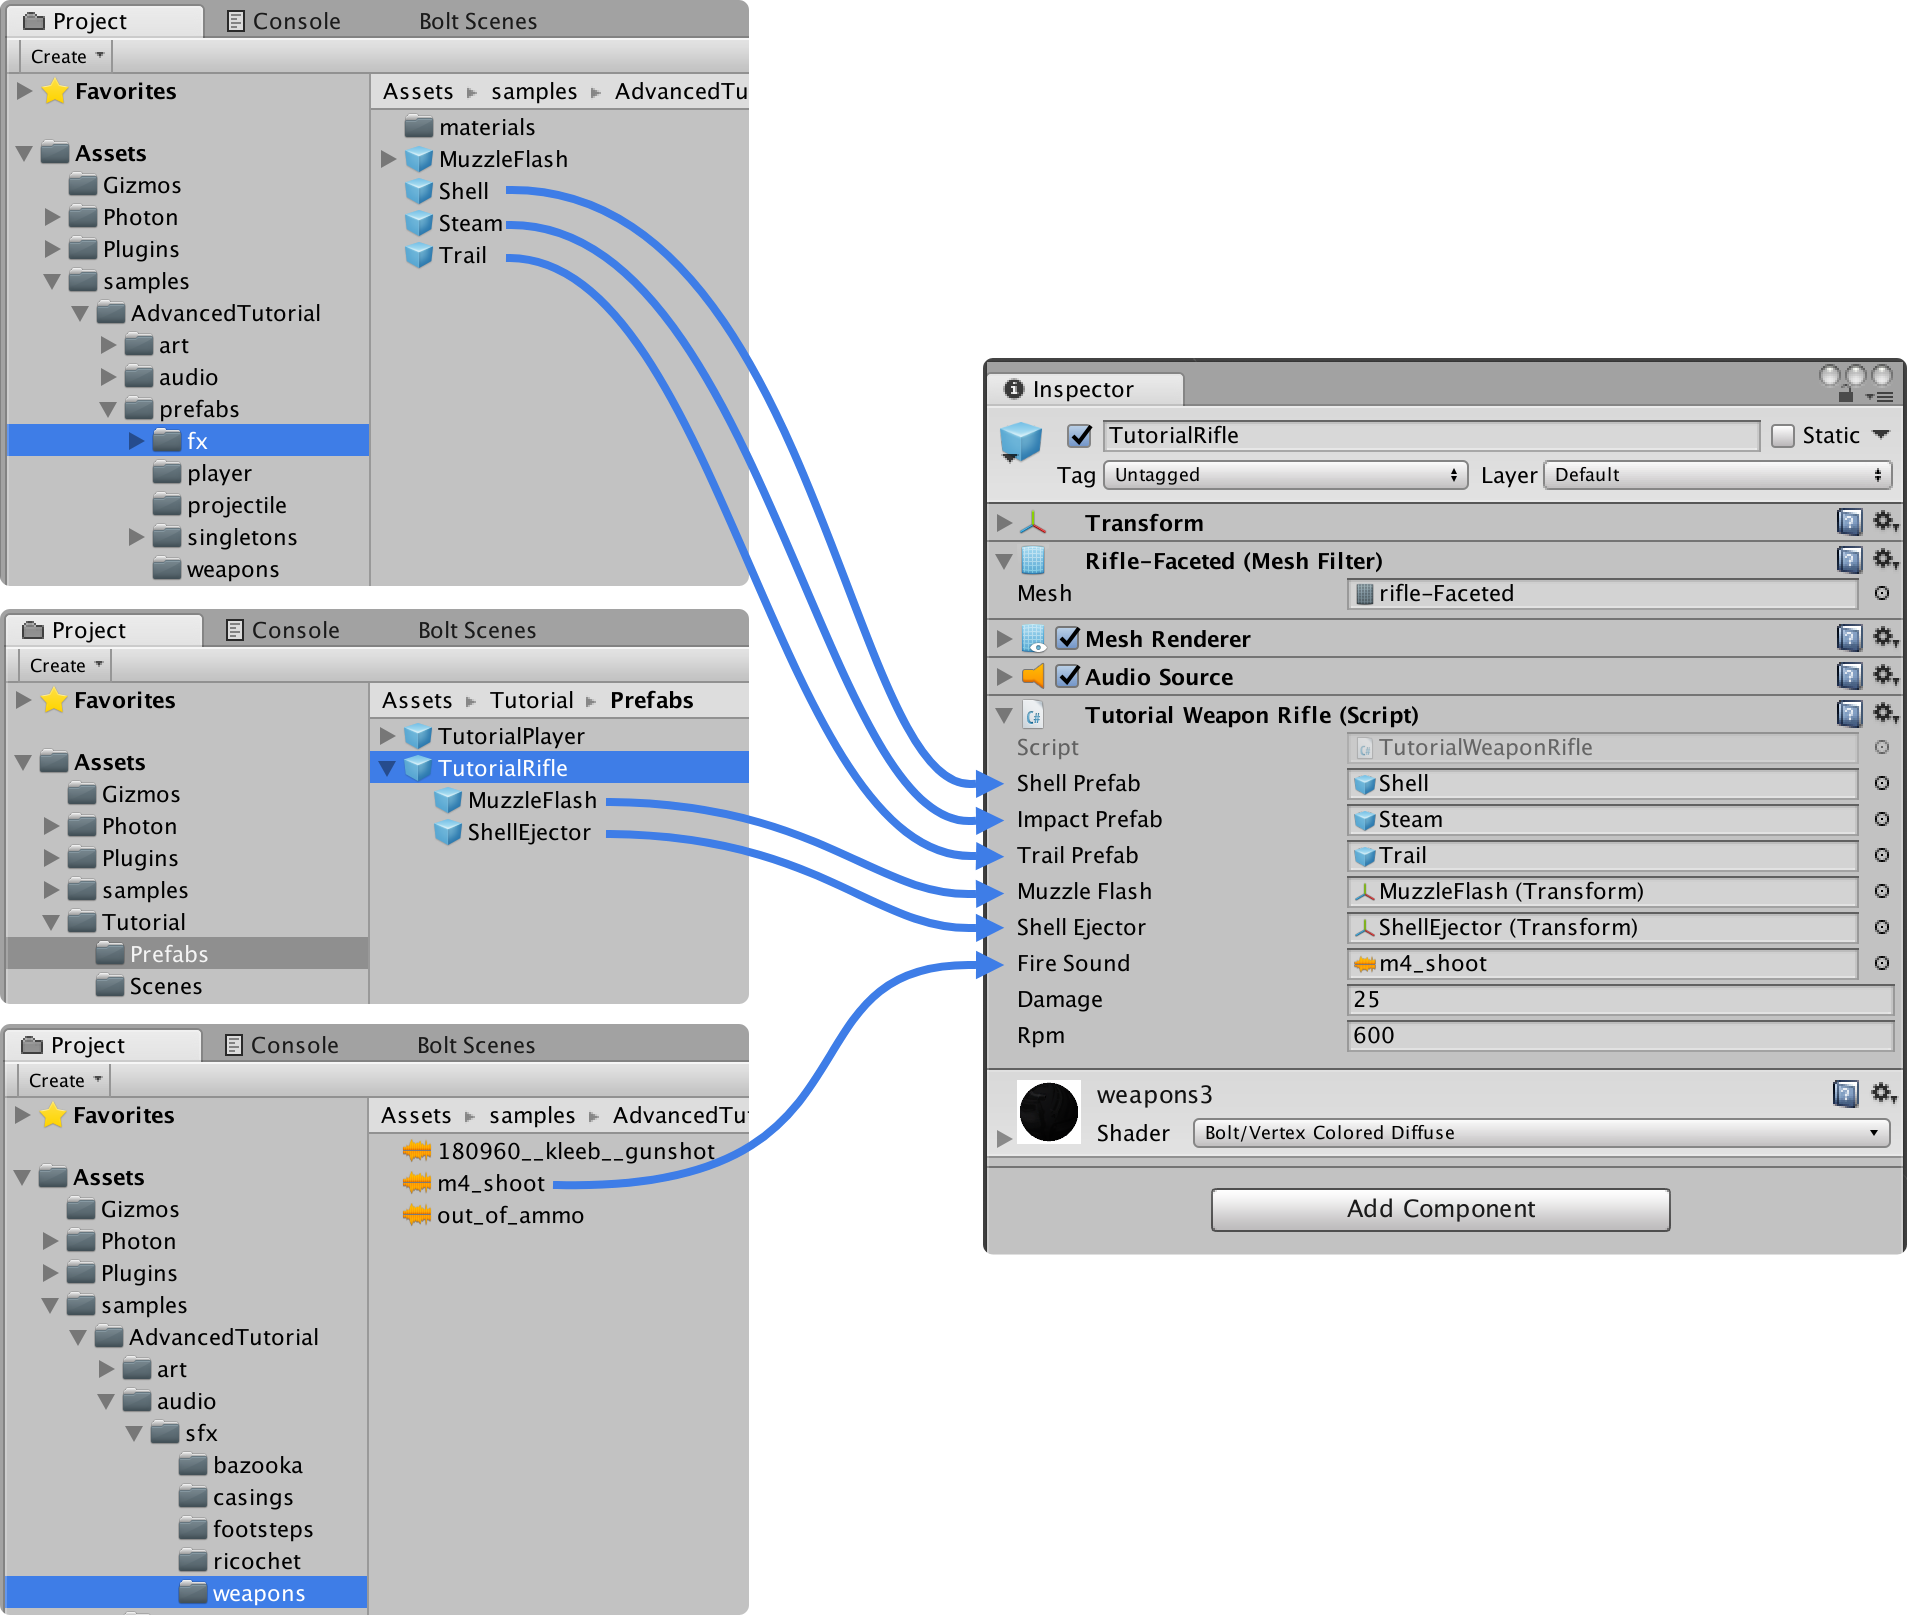
Lets hook up all of the public variables on the TutorialWeaponRifle through the inspector, instead of trying to explain exactly what goes where, here's a picture on how to hook everything up properly.
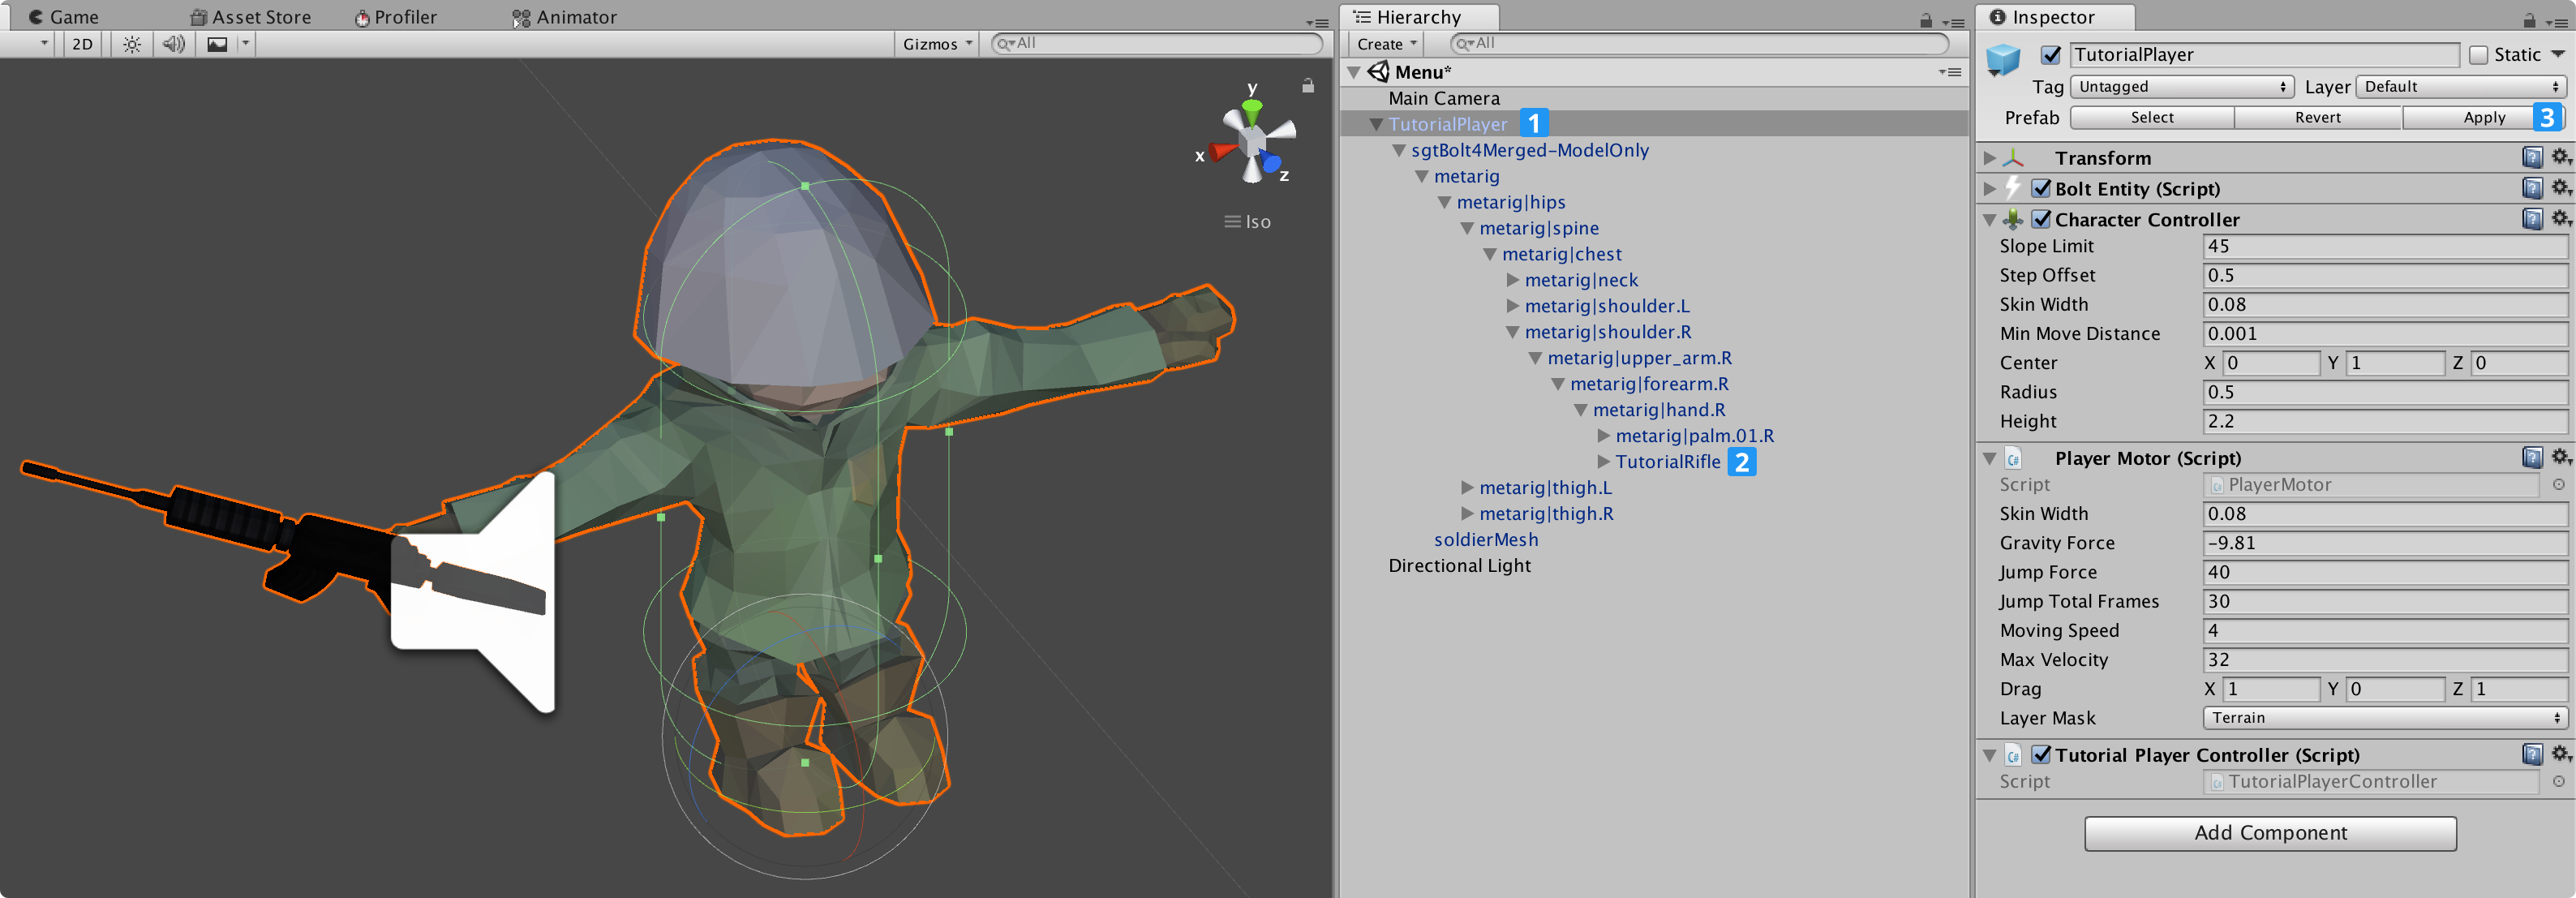
Time to get our little soldier to hold his weapon:
- Select our TutorialPlayer prefab;
- The rifle should be rotated properly already and you just have to drop the TutorialRifle prefab it under his right hand;
- Don't forget to save the TutorialPlayer prefab by either clicking Apply or dragging it back on-top itself in the Project window.
If you play the game you should see the rifle in your characters hands.
If it is rotated incorrectly go back to the TutorialPlayer prefab and re-adjust it.
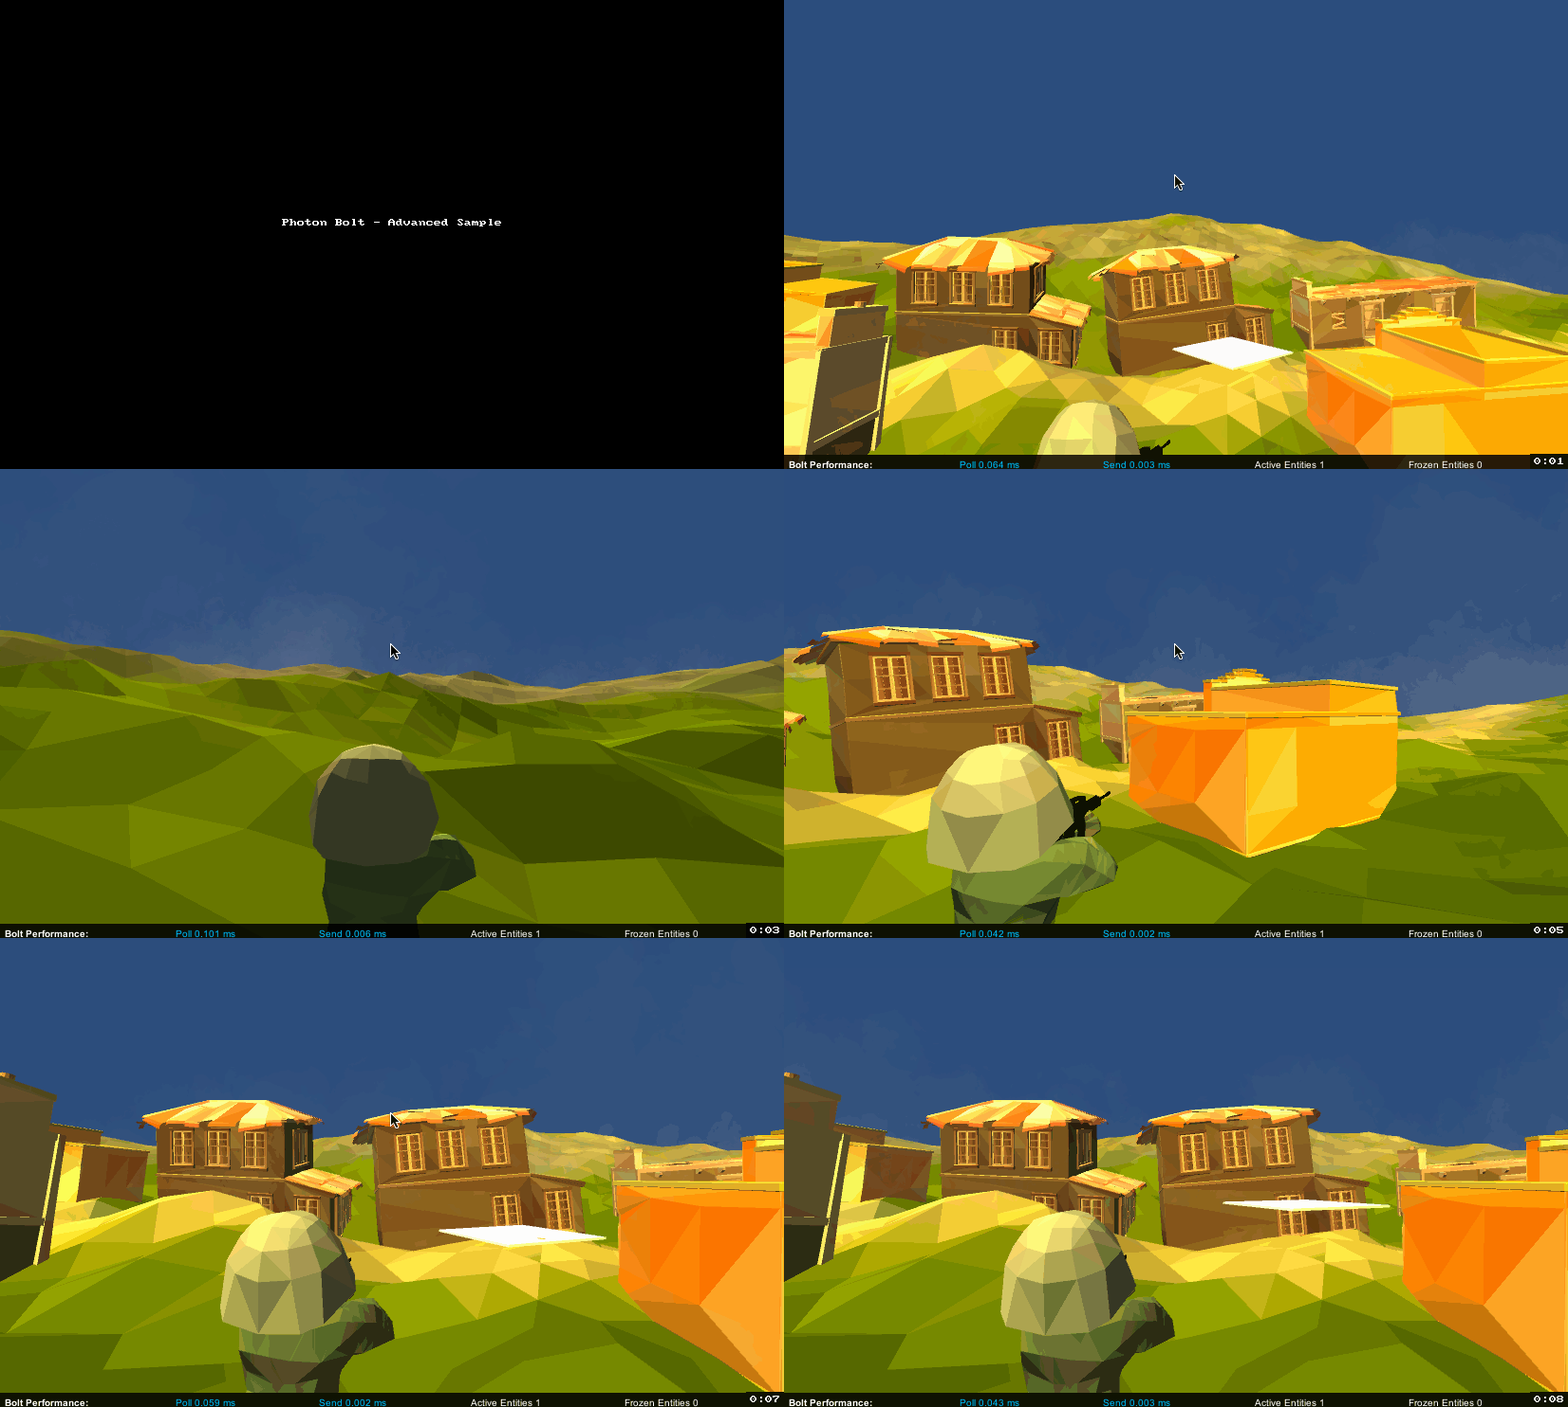
As you might have noticed it is not possible to pitch the camera, this is simply because we have made the PlayerCamera class we are working generic enough to work with the tutorial code in it's non-finished state.
Open the Bolt/Assets window and select the TutorialPlayerState state, we need to add a pitch property to it.
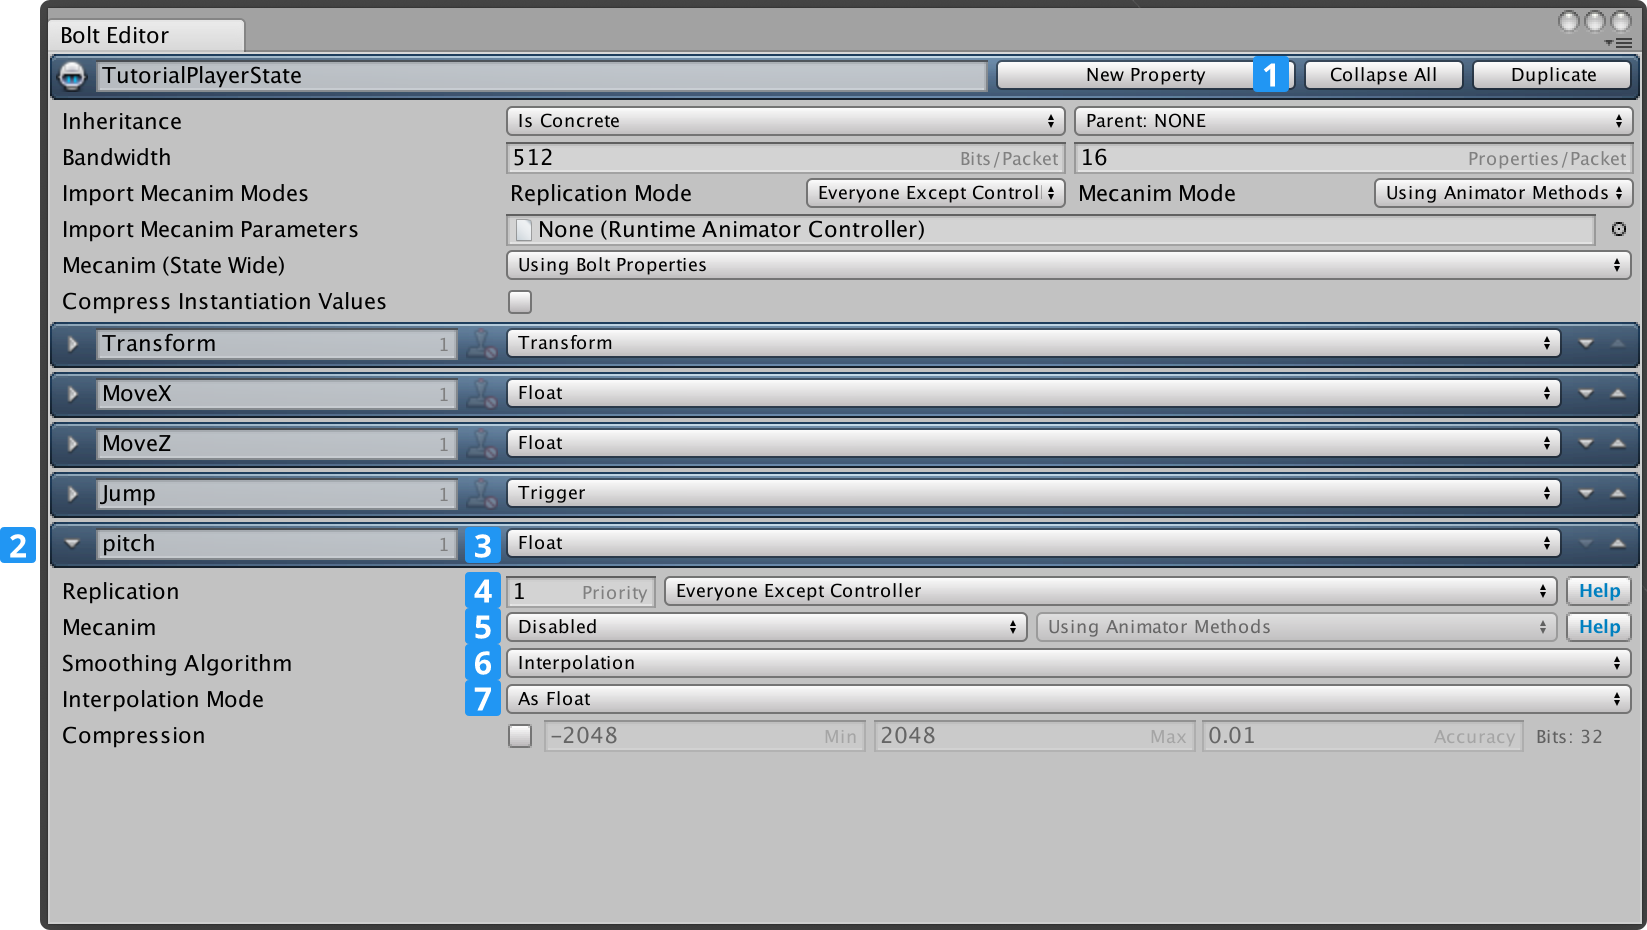
Follow the instructions:
- Create a new property on the TutorialPlayerState asset;
- Rename the property to pitch;
- Change the type to Float;
- Set Replication property to Everyone Except Controller;
- Set Mecanim to Disable;
- Set Smoothing Algorithm to Interpolation;
- Set Interpolation Mode to As Float.
Taking advantage that we are already editing the state the player, we will add one more property, named Fire.
This property will signal when our player is firing his weapon.
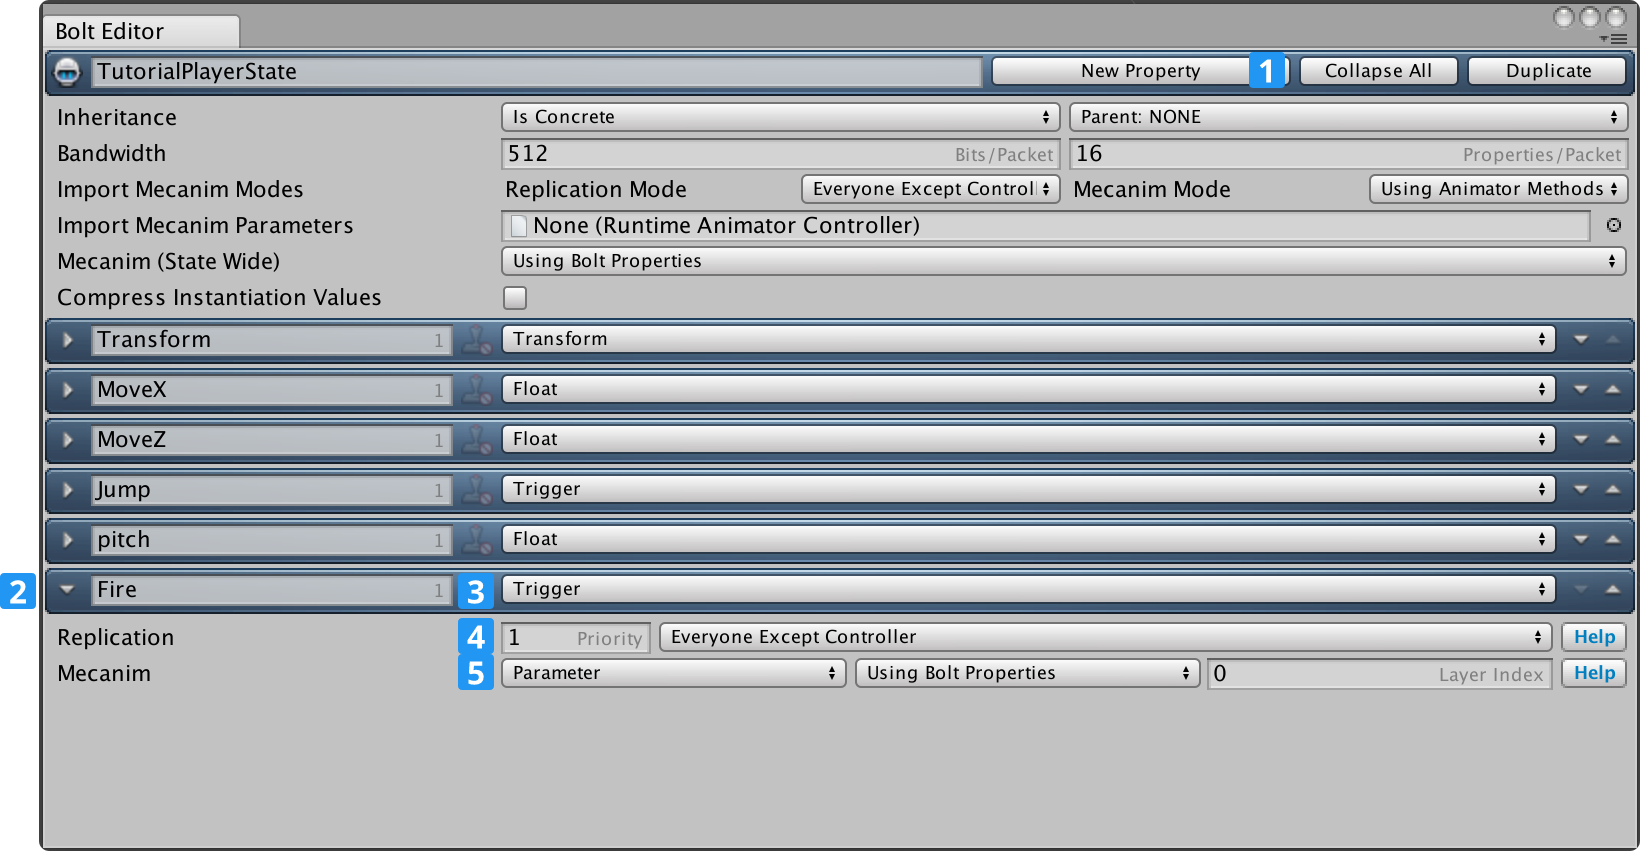
Follow the instructions:
- Create a new property on the TutorialPlayerState asset;
- Rename the property to Fire;
- Change the type to Trigger;
- Set Replication property to Everyone Except Controller;
- Set Mecanim to Parameter - Using Bolt Properties.
Time to compile Bolt, click to Bolt/Compile Assembly.
Let Bolt do it's magic and then open up the TutorialPlayerController script.
We are going to update the ExecuteCommand method, inside the if-block protected by the cmd.isFirstExecution check.
We're going to add a line which copies the pitch from our command into our state.
C#
// ...
if (cmd.isFirstExecution)
{
  AnimatePlayer(cmd);

  // set state pitch
  state.pitch = cmd.Input.Pitch;
}
// ...
We can then go to our TutorialPlayerCallbacks script and update the ControlOfEntityGained method so it looks like this.
C#
// ...
public override void ControlOfEntityGained(BoltEntity entity)
{
    // give the camera our players pitch
    PlayerCamera.instance.getPitch = () => entity.GetState<ITutorialPlayerState>().pitch;

    // this tells the player camera to look at the entity we are controlling
    PlayerCamera.instance.SetTarget(entity);

    // add an audio listener for our character
    entity.gameObject.AddComponent<AudioListener>();
}
// ...
The reason for this little roundabout way of getting the pitch into the camera is so that the camera can work without having all of the states compiled from the beginning, it allows us to progress in the tutorial in a more natural way.
We also add an AudioListener component to our entity game object so that we hear from the characters perspective.
It's time to hook up our weapons and get to some shooting.
First we need a way to find the weapons in ExecuteCommand, on the TutorialPlayerController script add a new inspector variable called weapons and have it be an array of TutorialWeapon objects, like this:
C#
public class TutorialPlayerController : Bolt.EntityBehaviour<ITutorialPlayerState>
{
// ...
    [SerializeField]
    TutorialWeapon[] weapons;
// ...
}
In the Unity inspector drag the TutorialRifle object attached to the right hand of our character to the new weapons field on the TutorialPlayerController.
Don't forget to apply your changes.
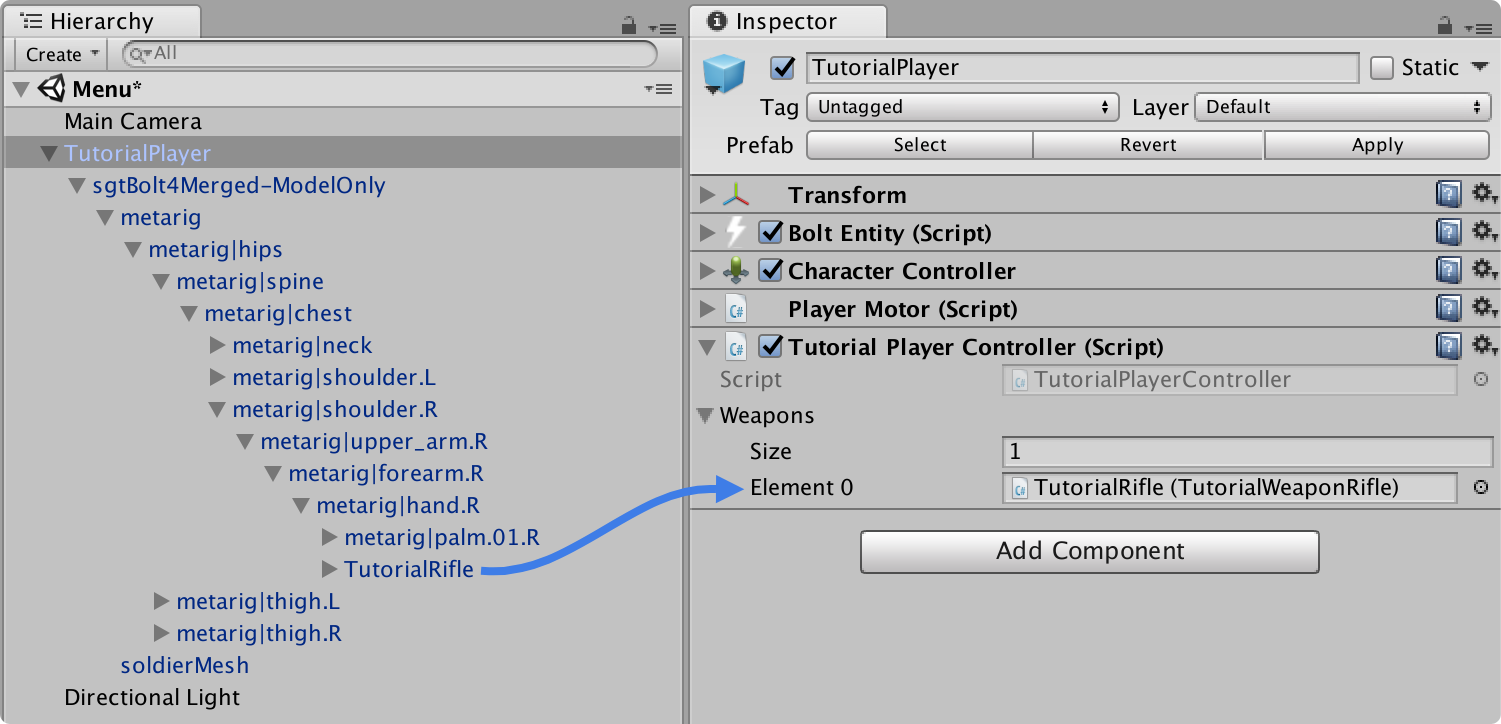
We need a couple of more pieces of input on our command so that we can properly communicate that we are firing our weapon.
Open up the Bolt/Assets window and click on the TutorialPlayerCommand.
Add a aiming and fire properties to the Input part, both should be booleans.
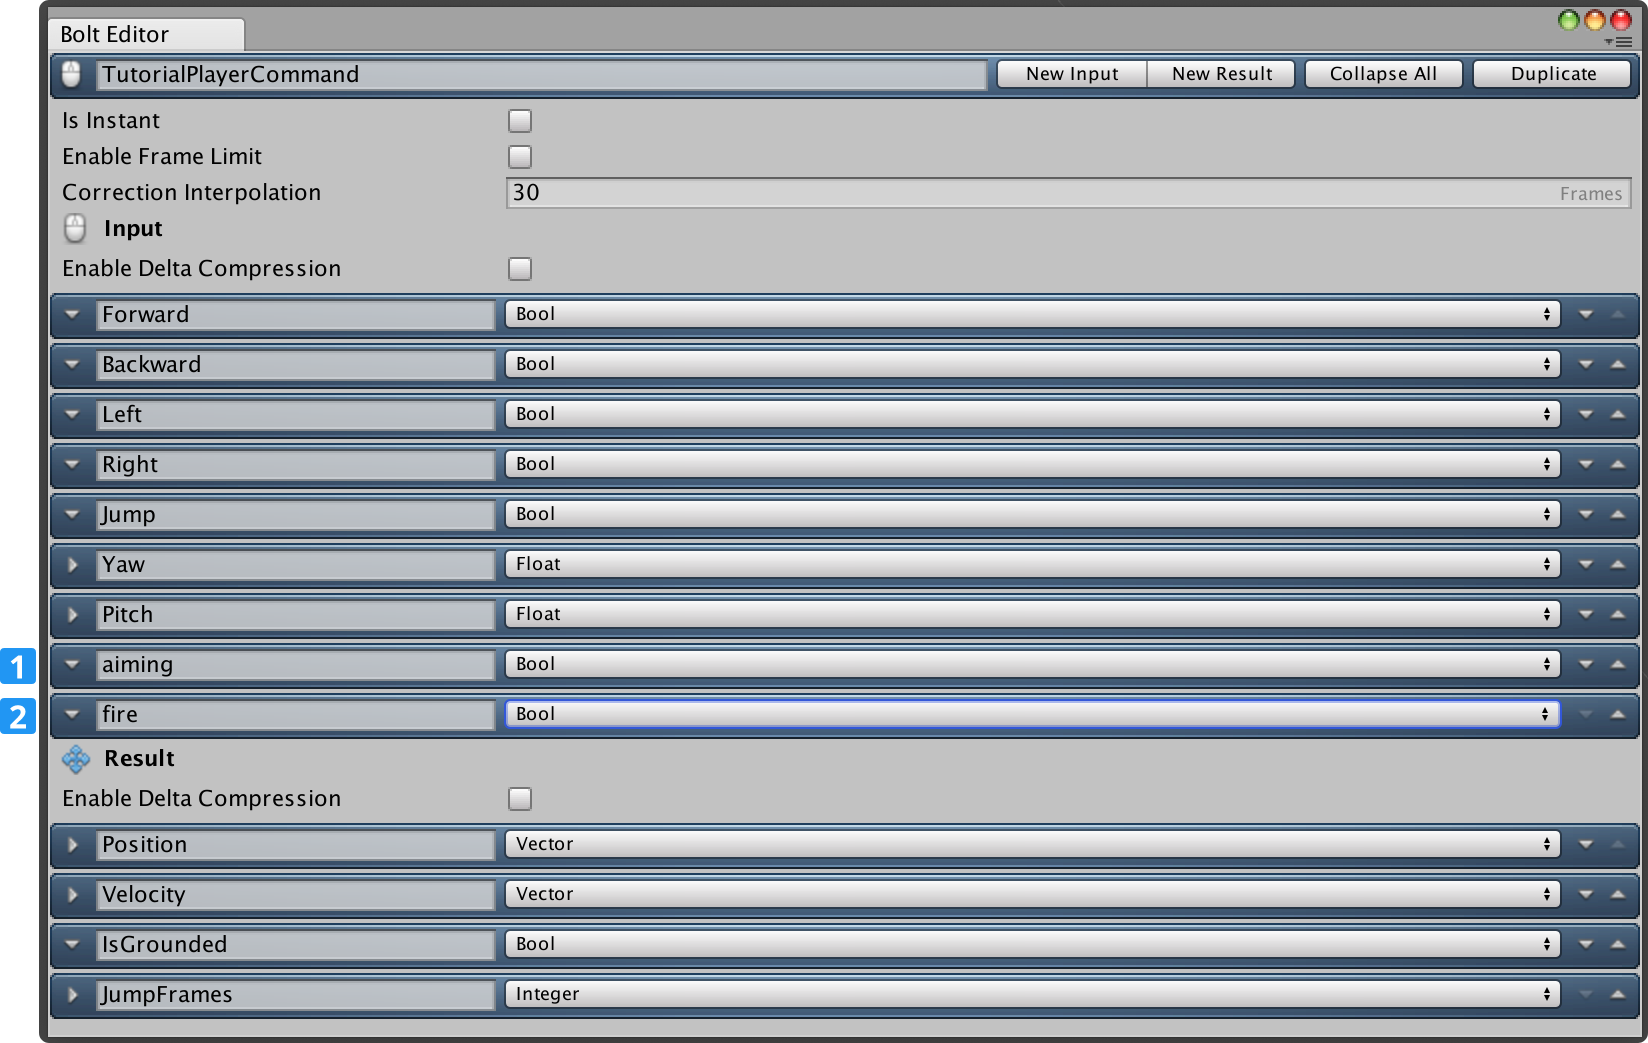
Compile Bolt again (Bolt/Compile Assembly) and open up our TutorialPlayerController script again, inside PollKeys we are going to query the state of our left and right mouse buttons.
C#
public class TutorialPlayerController : Bolt.EntityBehaviour<ITutorialPlayerState>
{
// ...

    bool _fire;
    bool _aiming;

// ...

    void PollKeys(bool mouse)
    {
        _forward = Input.GetKey(KeyCode.W);
        _backward = Input.GetKey(KeyCode.S);
        _left = Input.GetKey(KeyCode.A);
        _right = Input.GetKey(KeyCode.D);
        _jump = Input.GetKeyDown(KeyCode.Space);

        // mouse buttons
        _fire = Input.GetMouseButton(0);
        _aiming = Input.GetMouseButton(1);

        if (mouse)
        {
            _yaw += (Input.GetAxisRaw("Mouse X") * MOUSE_SENSITIVITY);
            _yaw %= 360f;

            _pitch += (-Input.GetAxisRaw("Mouse Y") * MOUSE_SENSITIVITY);
            _pitch = Mathf.Clamp(_pitch, -85f, +85f);
        }
    }
// ...
}
Inside the SimulateController function, we also need to put these values into the command that will be queued to the system, for later use.
Update your script and add the two following lines:
C#
public override void SimulateController()
{
// ...
    // new lines
    input.aiming = _aiming;
    input.fire = _fire;

    entity.QueueInput(input);
}
Now go to the ExecuteCommand function and right next where we copy our pitch from the command input to the state property, add a check to see if both aiming and fire are pressed down and if they are call the FireWeapon function (which we are going to create).
C#
// ...
public override void ExecuteCommand(Bolt.Command command, bool resetState)
{
    TutorialPlayerCommand cmd = (TutorialPlayerCommand) command;

    // ...

    if (cmd.IsFirstExecution)
    {
        AnimatePlayer(cmd);

        // set state pitch
        state.pitch = cmd.Input.Pitch;

        // New Code
        // check if we should try to fire our weapon
        if (cmd.Input.aiming && cmd.Input.fire)
        {
            FireWeapon(cmd);
        }
    }
}
// ...
Create a function called FireWeapon which takes a TutorialPlayerCommand class as its only argument.
C#
// ...
void FireWeapon(TutorialPlayerCommand cmd)
{
    if (weapons[0].FireFrame + weapons[0].FireInterval <= BoltNetwork.ServerFrame)
    {
        weapons[0].FireFrame = BoltNetwork.ServerFrame;
        state.Fire();
    }
}
// ...
Since we only have one weapon currently we just index straight into the weapons array, we check when we last fired plus how many frames that have to pass between each shot (FireInterval is calculated from our RPM setting on the weapon), if enough frames have passed we set the FireFrame property again and call into the state.Fire() trigger.
The reason we are using mecanim triggers for communicating the fact that we have fired our weapon is that they are incredibly light weight, it will in fact only use two bits and since we are firing quite often sending a comparatively large event is not worth it.
So, we need a way to hook into this mecanim trigger, fortunately Bolt lets you hook into mecanim and get a callback whenever a trigger is raised.
Still inside of the TutorialPlayerController script, append to your Attached method the lines:
C#
// ...
public override void Attached()
{
    // ...

    // Listen for the OnFire trigger
    state.OnFire = () =>
    {
        weapons[0].DisplayEffects(entity);
    };
}
// ...
We simply attach a C# lambda method to the OnFire callback on the mecanim state and in that we call into the DisplayEffects method of our weapon.
We are not quite done yet, but here is the completed TutorialPlayerController script for reference.
C#
using Bolt;
using Bolt.AdvancedTutorial;
using UnityEngine;

public class TutorialPlayerController : Bolt.EntityBehaviour<ITutorialPlayerState>
{
    [SerializeField]
    TutorialWeapon[] weapons;

    const float MOUSE_SENSITIVITY = 2f;

    bool _forward;
    bool _backward;
    bool _left;
    bool _right;
    bool _jump;

    float _yaw;
    float _pitch;

    bool _fire;
    bool _aiming;

    PlayerMotor _motor;

    void Awake()
    {
        _motor = GetComponent<PlayerMotor>();
    }

    public override void Attached()
    {
        // This couples the Transform property of the State with the GameObject Transform
        state.SetTransforms(state.Transform, transform);
        state.SetAnimator(GetComponentInChildren<Animator>());

        // Configure Animator
        state.Animator.SetLayerWeight(0, 1);
        state.Animator.SetLayerWeight(1, 1);

        // Listen for the OnFire trigger
        state.OnFire = () =>
        {
            weapons[0].DisplayEffects(entity);
        };
    }

    void PollKeys(bool mouse)
    {
        _forward = Input.GetKey(KeyCode.W);
        _backward = Input.GetKey(KeyCode.S);
        _left = Input.GetKey(KeyCode.A);
        _right = Input.GetKey(KeyCode.D);
        _jump = Input.GetKeyDown(KeyCode.Space);

        // mouse buttons
        _fire = Input.GetMouseButton(0);
        _aiming = Input.GetMouseButton(1);

        if (mouse)
        {
            _yaw += (Input.GetAxisRaw("Mouse X") * MOUSE_SENSITIVITY);
            _yaw %= 360f;

            _pitch += (-Input.GetAxisRaw("Mouse Y") * MOUSE_SENSITIVITY);
            _pitch = Mathf.Clamp(_pitch, -85f, +85f);
        }
    }

    void Update()
    {
        PollKeys(true);
    }

    public override void SimulateController()
    {
        PollKeys(false);

        ITutorialPlayerCommandInput input = TutorialPlayerCommand.Create();

        input.Forward = _forward;
        input.Backward = _backward;
        input.Left = _left;
        input.Right = _right;
        input.Jump = _jump;
        input.Yaw = _yaw;
        input.Pitch = _pitch;

        // new lines
        input.aiming = _aiming;
        input.fire = _fire;

        entity.QueueInput(input);
    }

    public override void ExecuteCommand(Command command, bool resetState)
    {
        TutorialPlayerCommand cmd = (TutorialPlayerCommand) command;

        if (resetState)
        {
            // we got a correction from the server, reset (this only runs on the client)
            _motor.SetState(cmd.Result.Position, cmd.Result.Velocity, cmd.Result.IsGrounded, cmd.Result.JumpFrames);
        }
        else
        {
            // apply movement (this runs on both server and client)
            PlayerMotor.State motorState = _motor.Move(cmd.Input.Forward, cmd.Input.Backward, cmd.Input.Left, cmd.Input.Right, cmd.Input.Jump, cmd.Input.Yaw);

            // copy the motor state to the commands result (this gets sent back to the client)
            cmd.Result.Position = motorState.position;
            cmd.Result.Velocity = motorState.velocity;
            cmd.Result.IsGrounded = motorState.isGrounded;
            cmd.Result.JumpFrames = motorState.jumpFrames;

            if (cmd.IsFirstExecution)
            {
                AnimatePlayer(cmd);

                // set state pitch
                state.pitch = cmd.Input.Pitch;

                // check if we should try to fire our weapon
                if (cmd.Input.aiming && cmd.Input.fire)
                {
                    FireWeapon(cmd);
                }
            }
        }
    }

    void FireWeapon(TutorialPlayerCommand cmd)
    {
        if (weapons[0].FireFrame + weapons[0].FireInterval <= BoltNetwork.ServerFrame)
        {
            weapons[0].FireFrame = BoltNetwork.ServerFrame;
            state.Fire();
        }
    }

    void AnimatePlayer(TutorialPlayerCommand cmd)
    {
        // FWD <> BWD movement
        if (cmd.Input.Forward ^ cmd.Input.Backward)
        {
            state.MoveZ = cmd.Input.Forward ? 1 : -1;
        }
        else
        {
            state.MoveZ = 0;
        }

        // LEFT <> RIGHT movement
        if (cmd.Input.Left ^ cmd.Input.Right)
        {
            state.MoveX = cmd.Input.Right ? 1 : -1;
        }
        else
        {
            state.MoveX = 0;
        }

        // JUMP
        if (_motor.jumpStartedThisFrame)
        {
            state.Jump();
        }
    }
}
The only thing left now is to implement the DisplayEffects function on our TutorialWeaponRifle script, this function is quite large, but there is nothing Bolt specific going on inside of it, as its just using plain Unity methods to show some fancy effects, etc.
C#
using Bolt.AdvancedTutorial;
using UnityEngine;

public class TutorialWeaponRifle : TutorialWeapon
{
    public override void DisplayEffects(BoltEntity entity)
    {
        Vector3 pos;
        Quaternion rot;
        PlayerCamera.instance.CalculateCameraAimTransform(entity.transform, entity.GetState<ITutorialPlayerState>().pitch, out pos, out rot);

        Ray r = new Ray(pos, rot * Vector3.forward);
        RaycastHit rh;

        if (Physics.Raycast(r, out rh) && impactPrefab)
        {
            var en = rh.transform.GetComponent<BoltEntity>();
            var hit = GameObject.Instantiate(impactPrefab, rh.point, Quaternion.LookRotation(rh.normal)) as GameObject;

            if (en)
            {
                hit.GetComponent<RandomSound>().enabled = false;
            }

            if (trailPrefab)
            {
                var trailGo = GameObject.Instantiate(trailPrefab, muzzleFlash.position, Quaternion.identity) as GameObject;
                var trail = trailGo.GetComponent<LineRenderer>();

                trail.SetPosition(0, muzzleFlash.position);
                trail.SetPosition(1, rh.point);
            }
        }

        GameObject go = (GameObject) GameObject.Instantiate(shellPrefab, shellEjector.position, shellEjector.rotation);
        go.GetComponent<Rigidbody>().AddRelativeForce(0, 0, 2, ForceMode.VelocityChange);
        go.GetComponent<Rigidbody>().AddTorque(new Vector3(Random.Range(-32f, +32f), Random.Range(-32f, +32f), Random.Range(-32f, +32f)), ForceMode.VelocityChange);

        // show flash
        muzzleFlash.gameObject.SetActive(true);
    }
}
You should now be able to play as server and any number of clients and all firing and effects will replicate properly.
Back to top