Bolt 튜토리얼 - 챕터 3
이 챕터에서는 엔티티들의 제어 추적과 세계를 돌아다니게 하는 것을 다룰 것입니다. 이를 통해 Bolt에서 어떻게 제어하는지에 대한 개념과 신뢰성 있는 움직임 처리 방법에 대해서 익숙해질 것입니다.
서버와 클라이언트의 차이점 없애기
엔티티 제어 추적을 하기 전에 앞서 우리는 Bolt와 일반적인 멀티플레이어 게임에서 많이 부딪히게 되는 것에 대해서 설명하고 다룰 것입니다.
문제: 서버를 게임 내에서 다른 플레이어와 같이 만들기를 원한다면, 연결 자체에는 서버가 존재하지 않는다는 사실을 어떻게 다룰까요?
서버에 연결하는 각 클라이언트는 BoltConnection 객체로 나타내어지며 각 클라이언트에서 서버는 하나의 BoltConnection 객체로 표현됩니다.
서버 자체에서 서버 플레이어에게 무엇인가 하길 원할 때, 서버를 쉽게 참조할 방법이 없습니다. 왜냐하면 서버 자체를 나타내는 객체가 없기 때문입니다.
이에 대한 답은 간단한 추상화를 생성하는 것으로 특정 연결 대신에 Player 객체로 다루어지는 것을 생성할 필요가 있습니다. 이 플레이어 객체 내에서 연결이 되었는지에 관계없이 감출 것이므로 나머지 코딩에서는 이에 대해 전혀 고려할 필요가 없습니다.
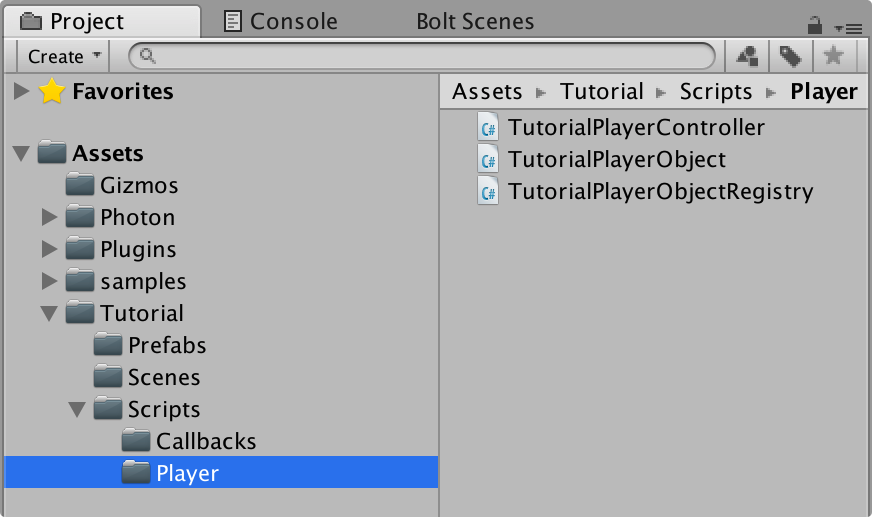
새로운 폴더 Tutorial/Scripts/Player를 생성하고 TutorialPlayerObject.cs 와 TutorialPlayerObjectRegistry.cs 두 개의 C# 파일을 생성합니다.
TutorialPlayerObject 클래스부터 시작하겠습니다.
C#
using UnityEngine;

public class TutorialPlayerObject
{
    public BoltEntity character;
    public BoltConnection connection;
}
이 코드는 표준 C# 클래스입니다. 유니티의 MonoBehaviour 클래스에서 상속받지 않았습니다.
이 사항은 매우 중요합니다.
두 개의 필드가 있습니다.
BoltEntity character: 이 필드에는 세계에서 플레이어의 캐릭터를 나타내는 인스턴스화한 객체를 포함할 것입니다.BoltConnection connection: 이 필드는 이 플레이어에게 있는 경우 연결을 포함합니다. 이 필드는 서버 플레이어 개체에 대해 서버에서는null이 될 것입니다.
두 개의 속성을 추가할 것이고 이를 통해 connection 필드를 직접 다루지 않고 클라이언트인지 서버 플레이어인지 체크할 수 있습니다.
C#
using UnityEngine;

public class TutorialPlayerObject
{
    public BoltEntity character;
    public BoltConnection connection;

    public bool IsServer
    {
        get { return connection == null; }
    }

    public bool IsClient
    {
        get { return connection != null; }
    }
}
isServer 와 isClient connection이 null 여부를 간단하게 체크하는 것으로, 플레이어가 서버인지 클라이언트인지를 나타내주는 것입니다.
TutorialPlayerObject에 기능을 더 추가하기 전에 TutorialPlayerObjectRegistry 클래스를 열겠습니다.
이 클래스는 TutorialPlayerObject 클래스 인스턴스를 관리하는데 사용되는 클래스입니다.
전체 클래스 코드 중에서 표준 C# 이 아닌 코드는 BoltConnection 클래스에서 UserData 속성에 접근하는 곳입니다.
이 속성은 단순히 연결과 쌍을 이루고 싶길 원하는 다른 유형의 객체/데이터를 가질 수 있는 곳입니다.
이 경우 우리가 만든 TutorialPlayerObject 와 그것이 속한 연결(만약 그것이 속한 경우)을 쌍으로 만들 것 입니다.
이 클래스의 나머지 부분은 Bolt에 관련된 아주 적은 부분입니다. 코드와 주석을 쭉 읽어보셔도 되지만 이에 대한 상세한 설명을 하지는 않을 것입니다.
C#
using System.Collections.Generic;

public static class TutorialPlayerObjectRegistry
{
    // keeps a list of all the players
    static List<TutorialPlayerObject> players = new List<TutorialPlayerObject>();

    // create a player for a connection
    // note: connection can be null
    static TutorialPlayerObject CreatePlayer(BoltConnection connection)
    {
        TutorialPlayerObject player;

        // create a new player object, assign the connection property
        // of the object to the connection was passed in
        player = new TutorialPlayerObject();
        player.connection = connection;

        // if we have a connection, assign this player
        // as the user data for the connection so that we
        // always have an easy way to get the player object
        // for a connection
        if (player.connection != null)
        {
            player.connection.UserData = player;
        }

        // add to list of all players
        players.Add(player);

        return player;
    }

    // this simply returns the 'players' list cast to
    // an IEnumerable<T> so that we hide the ability
    // to modify the player list from the outside.
    public static IEnumerable<TutorialPlayerObject> AllPlayers
    {
        get { return players; }
    }

    // finds the server player by checking the
    // .IsServer property for every player object.
    public static TutorialPlayerObject ServerPlayer
    {
        get { return players.Find(player => player.IsServer); }
    }

    // utility function which creates a server player
    public static TutorialPlayerObject CreateServerPlayer()
    {
        return CreatePlayer(null);
    }

    // utility that creates a client player object.
    public static TutorialPlayerObject CreateClientPlayer(BoltConnection connection)
    {
        return CreatePlayer(connection);
    }

    // utility function which lets us pass in a
    // BoltConnection object (even a null) and have
    // it return the proper player object for it.
    public static TutorialPlayerObject GetTutorialPlayer(BoltConnection connection)
    {
        if (connection == null)
        {
            return ServerPlayer;
        }

        return (TutorialPlayerObject) connection.UserData;
    }
}
TutorialServerCallbacks.cs 파일을 열고 클래스를 변경해 주세요.
BoltNetwork.Instantiate에서 2개의 호출을 제거합니다.- 유니티의
Awake함수를 구현하고 이 함수 내부에서TutorialPlayerObjectRegistry.CreateServerPlayer를 호출합니다. 이는 이 콜백 오브젝트가 활성화될 때마다 서버 플레이어가 생성됩니다. TutorialServerCallbacks오버라이딩 메소드에서Bolt.GlobalEventListener로 부터 상속된Connected메소드를 오버라이드 합니다.
Connected메소드 안에서TutorialPlayerObjectRegistry.CreateClientPlayer를 호출하고 connection 아규먼트를 전달합니다.
C#
using UnityEngine;

[BoltGlobalBehaviour(BoltNetworkModes.Server, "Level2")]
public class TutorialServerCallbacks : Bolt.GlobalEventListener
{
    void Awake()
    {
        TutorialPlayerObjectRegistry.CreateServerPlayer();
    }

    public override void Connected(BoltConnection connection)
    {
        TutorialPlayerObjectRegistry.CreateClientPlayer(connection);
    }

    public override void SceneLoadLocalDone(string map)
    {
    }

    public override void SceneLoadRemoteDone(BoltConnection connection)
    {
    }
}
이제 각 플레이어들에 대해 캐릭터를 스폰하고 이 캐릭터를 올바르게 제어를 지정하는 것이 마지막으로 남았습니다.
TutorialPlayerObject 클래스를 다시 열고 두 개의 새로운 메소드를 추가하겠습니다:
Spawn: 캐릭터를 스폰 합니다.RandomPosition: 스포할 위치를 무작위로 선택하는 메소드입니다.
C#
using UnityEngine;
using System.Collections.Generic;

public class TutorialPlayerObject
{
    // ...

    public void Spawn()
    {
        if (!character)
        {
            character = BoltNetwork.Instantiate(BoltPrefabs.TutorialPlayer, RandomPosition(), Quaternion.identity);

            if (IsServer)
            {
                character.TakeControl();
            }
            else
            {
                character.AssignControl(connection);
            }
        }

        // teleport entity to a random spawn position
        character.transform.position = RandomPosition();
    }

    Vector3 RandomPosition()
    {
        float x = Random.Range(-32f, +32f);
        float z = Random.Range(-32f, +32f);
        return new Vector3(x, 32f, z);
    }
}
Spawn 함수에서는 캐릭터의 유무를 먼저 확인하고 캐릭터가 없으면 BoltNetwork.Instantiate를 호출하여 캐릭터를 생성합니다.
그리고나서 서버인지를 체크하여 제어를 줄지 받을지에 대한 적절한 메소드를 호출합니다.
그리고 마지막으로, 캐릭터 객체에 세계에서 무작위 위치로 이동을 위해transform.position 속성을 설정합니다.
게임을 시작하기 전에, 처리할 두 가지가 더 있습니다.
첫 번째는 Tutorial/Scripts/Callbacks에 있는 TutorialPlayerCallbacks 클래스를 엽니다.
엔티티의 제어를 얻을 때 알림을 주는 ControlOfEntityGained 콜백을 오버라이드 할 것 입니다.
이 콜백에 대한 상세 내용은 API 페이지를 참고하세요.
C#
using Bolt.AdvancedTutorial;
using UnityEngine;

[BoltGlobalBehaviour("Level2")]
public class TutorialPlayerCallbacks : Bolt.GlobalEventListener
{
    public override void SceneLoadLocalDone(string map)
    {
        // this just instantiates our player camera,
        // the Instantiate() method is supplied by the BoltSingletonPrefab<T> class
        PlayerCamera.Instantiate();
    }

    public override void ControlOfEntityGained(BoltEntity entity)
    {
        // this tells the player camera to look at the entity we are controlling
        PlayerCamera.instance.SetTarget(entity);
    }
}
이제 마지막으로 해야 할 것은 이 행동이 서버에서 존재하기 때문에 TutorialServerCallbacks로 돌아가서 Spawn 씬 로딩이 완료되었을 때 Spawn 메소드를 호출합니다([BoltGlobalBehaviour(BoltNetworkModes.Host, "Level2")] 속성의 제공). 서버 자체의 SceneLoadLocalDone과 클라이언트의 SceneLoadRemoteDone을 검토해야 합니다.
C#
using UnityEngine;

[BoltGlobalBehaviour(BoltNetworkModes.Server, "Level2")]
public class TutorialServerCallbacks : Bolt.GlobalEventListener
{
    void Awake()
    {
        TutorialPlayerObjectRegistry.CreateServerPlayer();
    }

    public override void Connected(BoltConnection connection)
    {
        TutorialPlayerObjectRegistry.CreateClientPlayer(connection);
    }

    public override void SceneLoadLocalDone(string map)
    {
        TutorialPlayerObjectRegistry.ServerPlayer.Spawn();
    }

    public override void SceneLoadRemoteDone(BoltConnection connection)
    {
        TutorialPlayerObjectRegistry.GetTutorialPlayer(connection).Spawn();
    }
}
Bolt Scenes 윈도우로 가서 Play As Server를 클릭하면 아래 그림과 같은 화면을 볼 수 있을 것입니다.
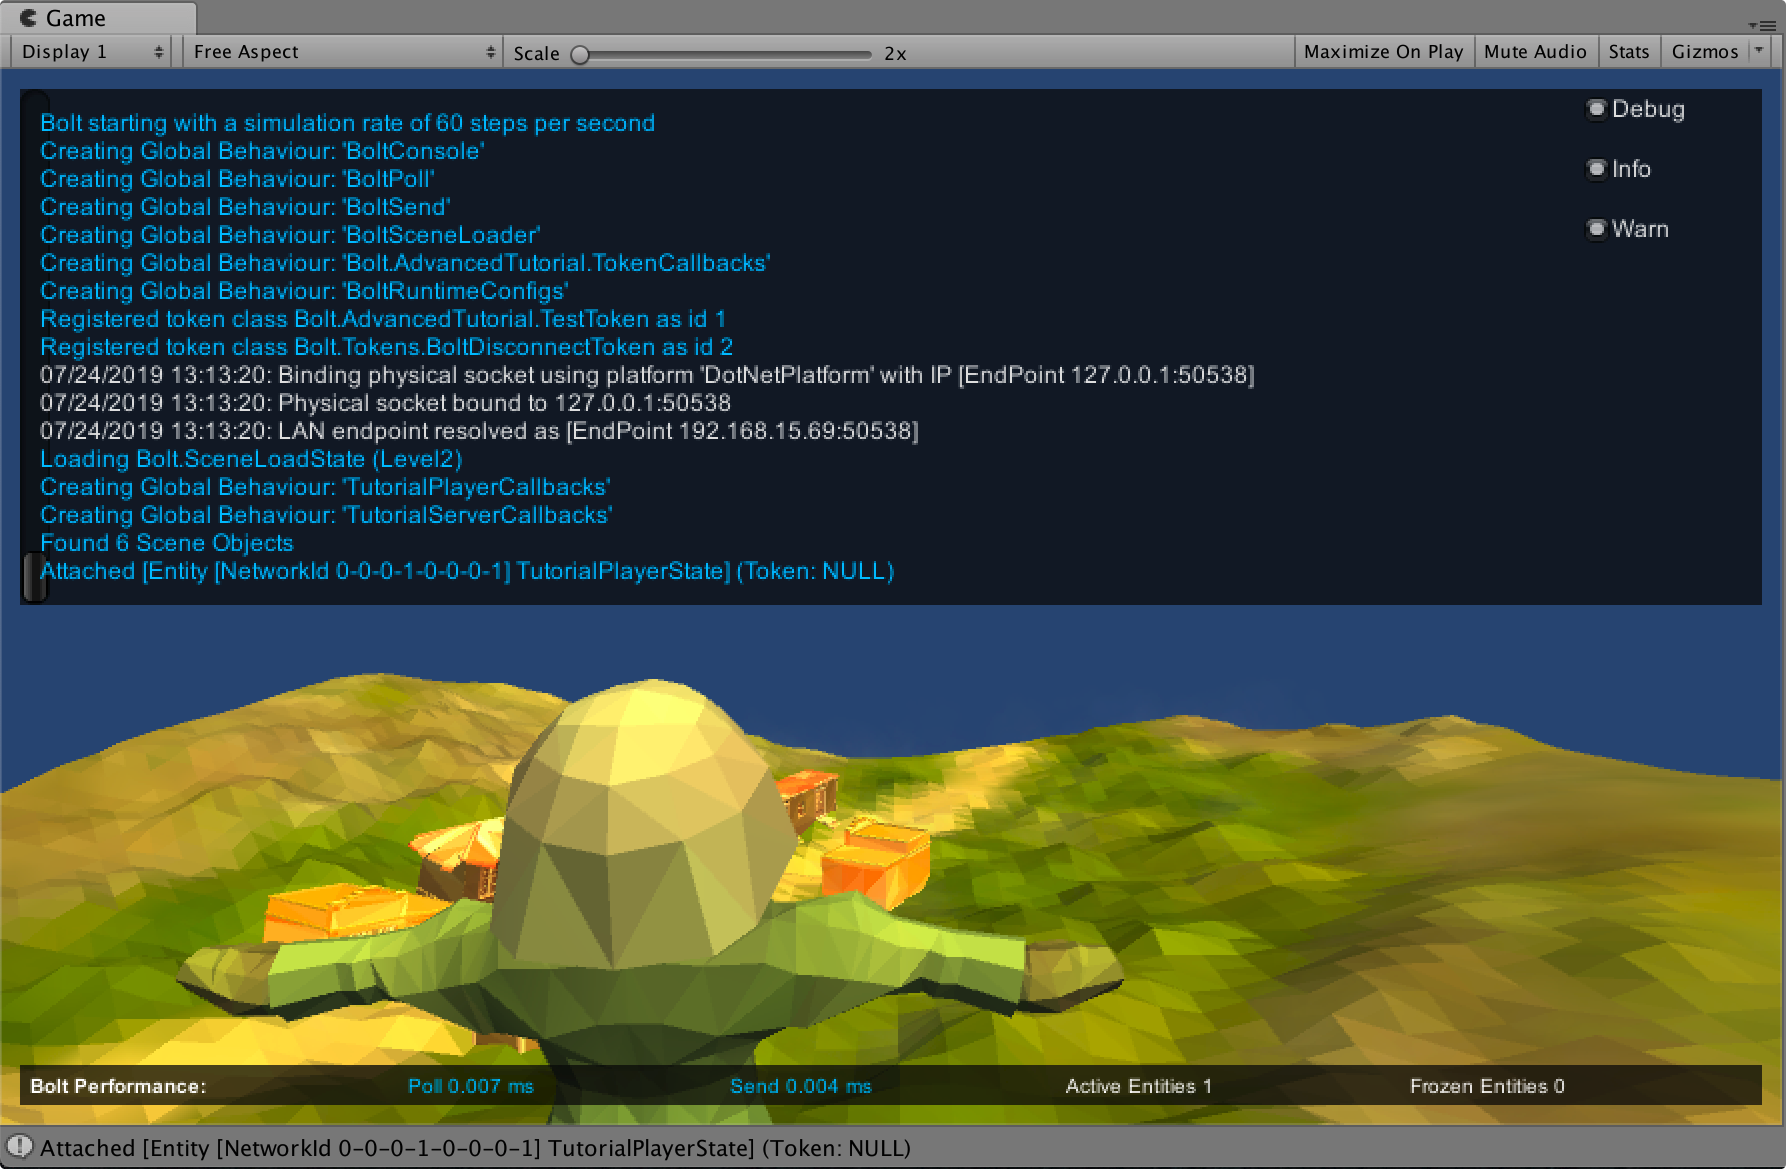
좋습니다. .캐릭터를 스폰 했으며 이 올바른 캐릭터에 제어를 할당했고 카메라가 캐릭터를 바라보고 있습니다.
다음은 캐릭터를 주변으로 움직이고 제어하는 것입니다.
별도로 클라이언트를 빌드 하여 에디터 내에서 시작하고 있는 서버로 연결할 수 있습니다. 이 클라이언트가 서버와 같이 캐릭터를 올바르게 스폰하고 캐릭터를 지정하는 것을 볼 수 있을 것입니다.
노트: 카메라 코드 동작 방식으로 인하여 캐릭터 주위로 회전시킬 수는 없습니다. 캐릭터가 움직이지 않는다면 완전하게 정적입니다. 일부러 이렇게 만들었습니다
이동
이 튜토리얼의 이 섹션에서는 많은 분들이 질문하시는 것에 대한 것을 다룹니다: 서버가 아직 제어 중이고 검증하고 있는 움직임을 클라이언트에서 즉시 움직임을 예측하는 신뢰성 있는 움직임입니다.
Bolt는 이동 코드 관점에서 클라이언트 와 서버 간의 차이점을 제거하여 완벽하게 투명성 있도록 해줍니다.
Photon Bolt는 이 개념을 달성하기 위해 Commands를 사용합니다: command는 컨트롤러에서 서버로 전달되는 제어 정보(입력)를 나타내는 데이터 집합입니다. 서버는 command를 실행하고 출력(결과)를 계산하고 네트워크 상에서 이 데이터 집합을 복제합니다. 전용 페이지에서 Commands에 대한 정보를 더 알아보세요.
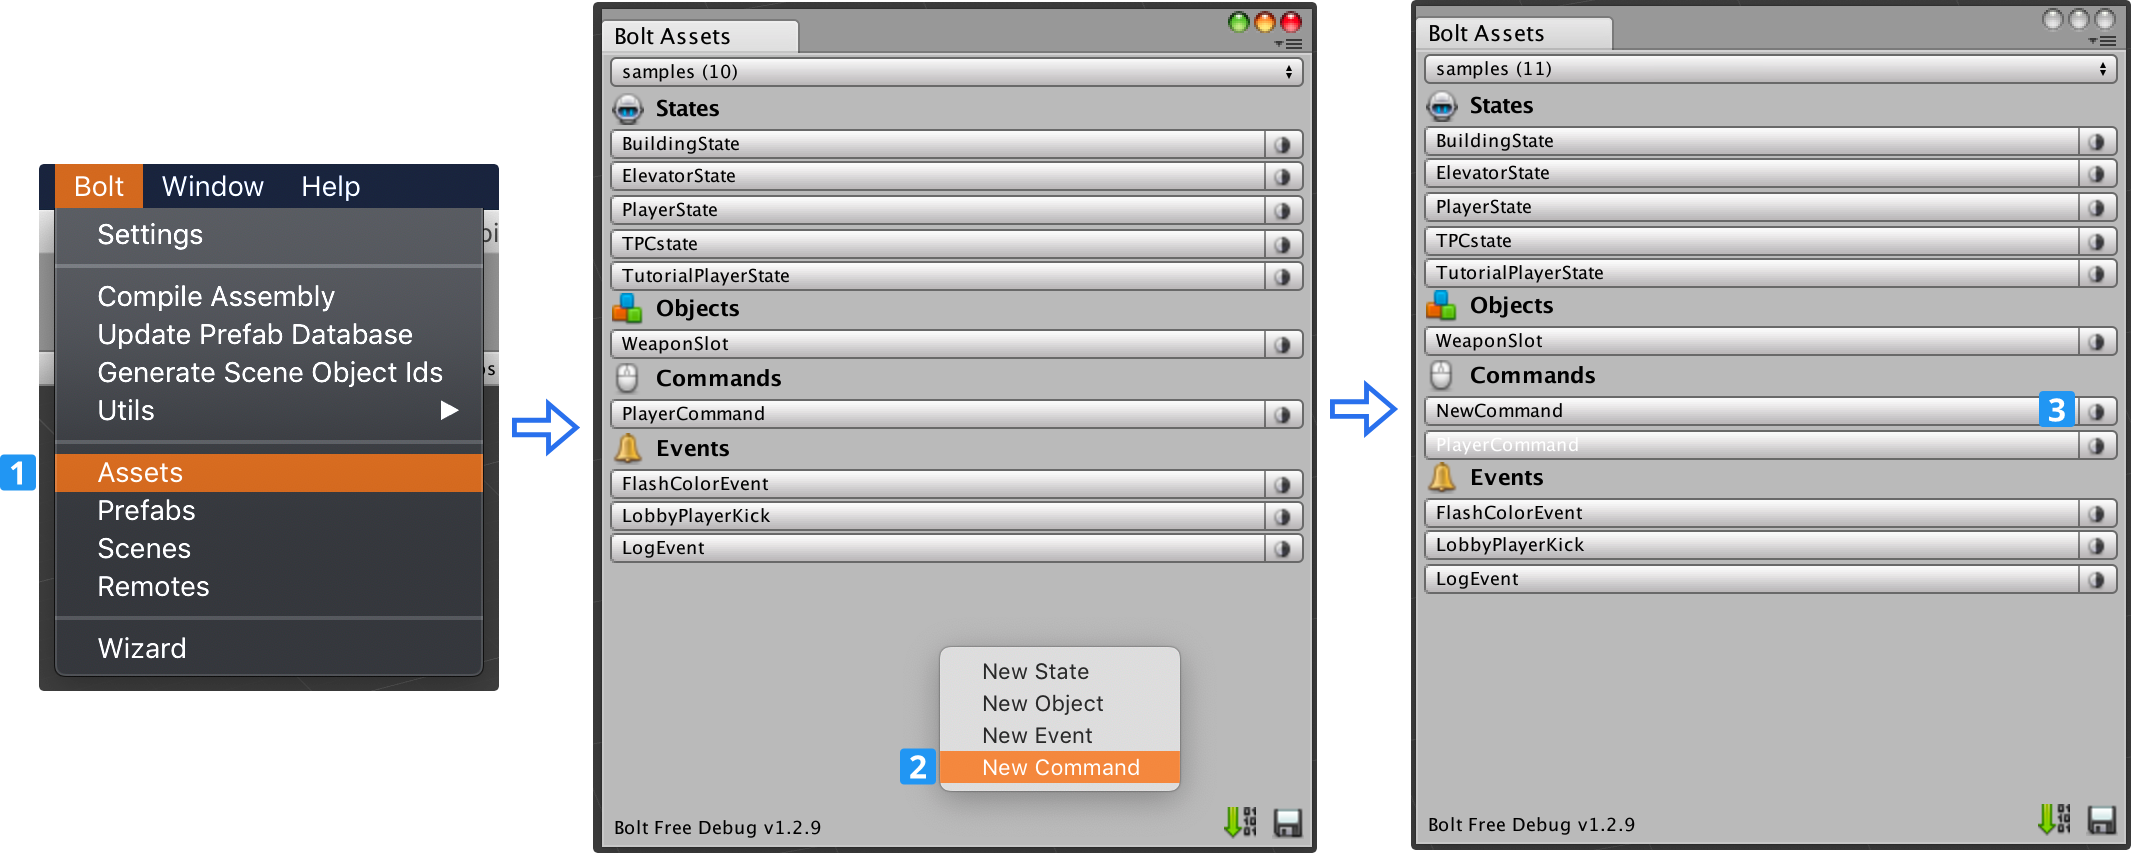
새로운 Command 를 생성하는 것으로 시작하겠습니다.
Bolt Assets 윈도우(Bolt/Assets)에서 우 클릭하여 New Command를 선택합니다.
새로운 Command를 구성하여 플레이어의 움직임에 필요한 입력과 결과를 수용하도록 하겠습니다.
Bolt Assets 창에서 해당 명령을 클릭하면 Bolt Editor 창이 나타나고 왼쪽 상단에 New Property 버튼 대신 New Input 및 New Result라는 두 개의 버튼이 있습니다.
명령에 데이터를 추가하기 전에 입력 및 결과가 정확히 무엇을 의미하는지 자세히 살펴보겠습니다.
- Input: 일반적인 의미는 하나의 플레이어로부터 입력받는 입력을 캡슐화하는 것입니다.
이동에 대한 "Forward" 와 "Backward" 또는 마우스 회전에 대한 "YRotation" 과 "XRotation" 과 같은 것입니다.
하지만 "SelectedWeapon" 과 같은 훨씬 더 추상적인 것이 될 수도 있습니다. - Result: Input 을 객체에 적용한 결과 상태를 캡슐화합니다. 여기에 있는 일반적인 속성들에는 position 와 velocity에 대한 속성들의 값일 뿐 만 아니라 isGrounded 와 같은 상태의 다른 유형의 플래그도 될 수 있습니다.
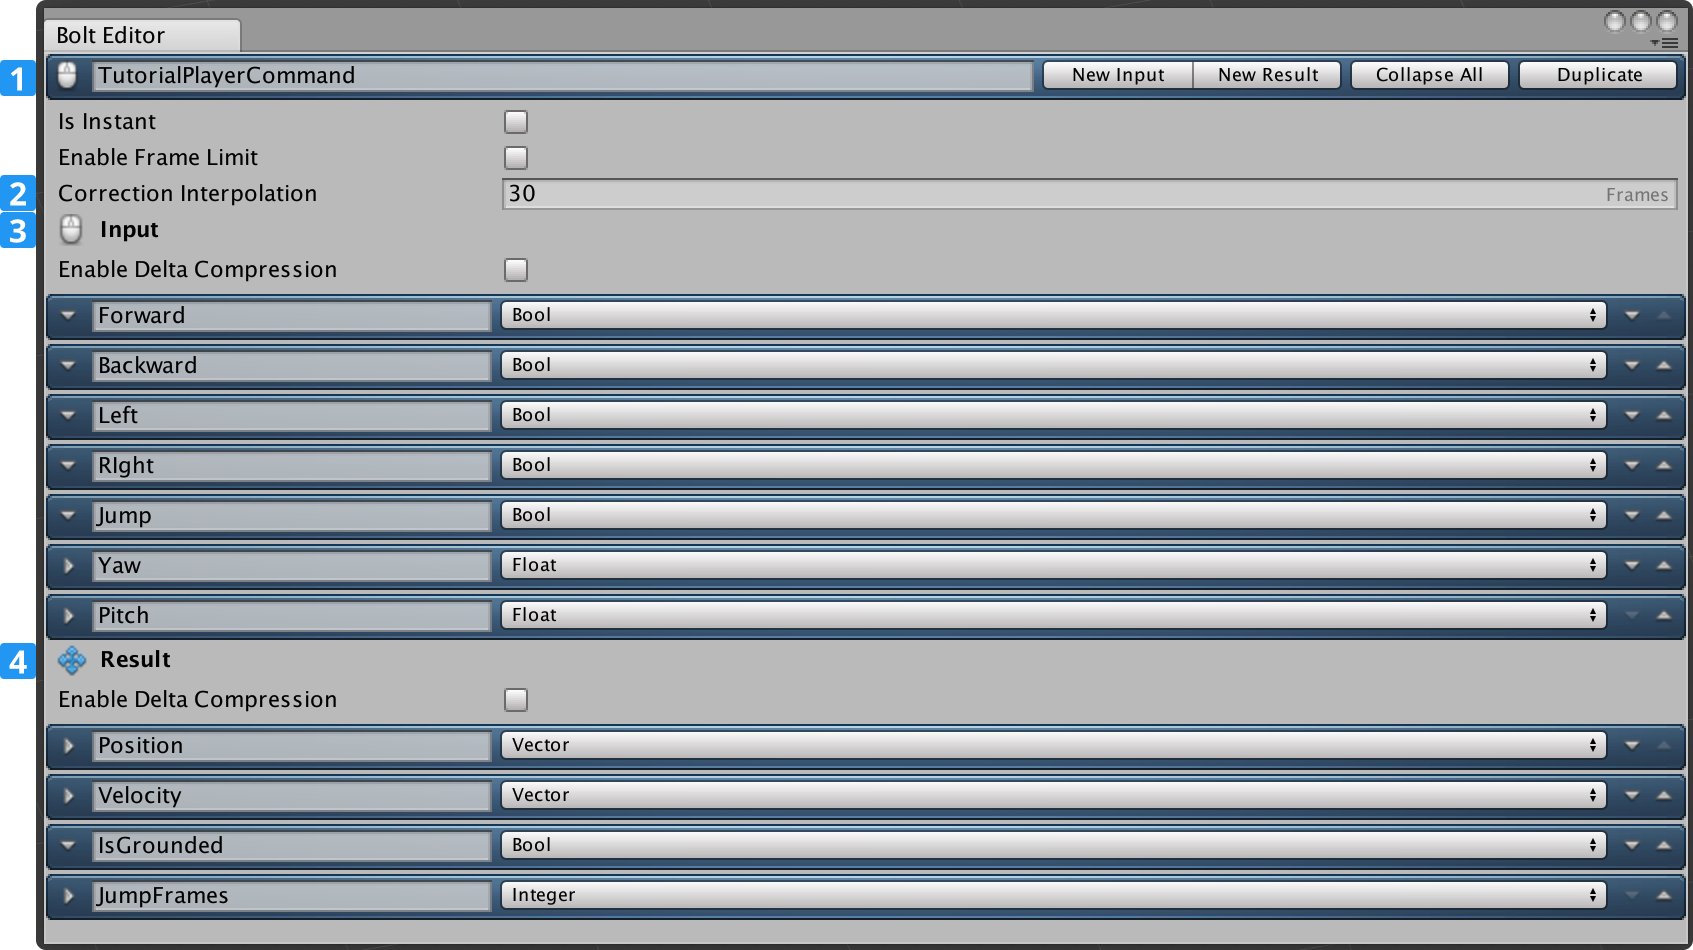
위 사항을 염두에 두고 Command를 구성하겠습니다:
- TutorialPlayerCommand로 이름을 변경합니다.
Correction Interpolation값을 30으로 설정합니다.- Input을 축합니다.
- Forward [Bool]: 전진 키를 누르고 있으면
- Backward [Bool]: 후진 키를 누르고 있으면.
- Left [Bool]: 왼쪽 키를 누르고 있으면.
- Right [Bool]: 우측 키를 누르고 있으면.
- Jump [Bool]: 점프 키를 눌렀으면.
- Yaw [Float]: Y 축의 현재 회전.
- Pitch [Float]: X 축의 현재 회전.
- 결과를 추가합니다:
- Position [Vector3]: 입력을 적용한 이후의 최종 위치
- Velocity [Vector3]: 입력을 적용한 이후의 현재 속도
- IsGrounded [Bool]: 땅에 닿았는지 여부.
- JumpFrames [Integer]: 이것은 약간 이상한 것으로 점프력을 적용할 때 남긴 프레임 수를 나타내는 숫자입니다. 우리가 사용할 캐릭터 모터의 특정 세부사항입니다.
이 Command에 대한 상세 내용을 생성한 이후, 다음과 같이 보여야 합니다:
명령은 완료되었으며, 나중에 몇 가지를 추가할 것이지만 지금은 움직임이 동작하는 것이 필요합니다.
Bolt/Compile Assembly로 이동하여 Bolt를 다시 컴파일합니다. 컴파일 해주면 Bolt는 우리가 생성한 새로운 명령으로 내부 데이터를 갱신할 것입니다.
다음에 설정할 필요가 있는 것은 캐릭터 모터로 고급 샘플에는 우리가 필요한 모든 것을 지원하는 캐릭터 모터 작동이 내장되어 있습니다.
Assets/samples/AdvancedTutorial/scripts/Player/PlayerMotor.cs에서 찾아볼 수 있습니다.
스크립트와 TutorialPlayer 프리팹을 찾고 프리팹에 모터의 사본을 붙여줍니다.
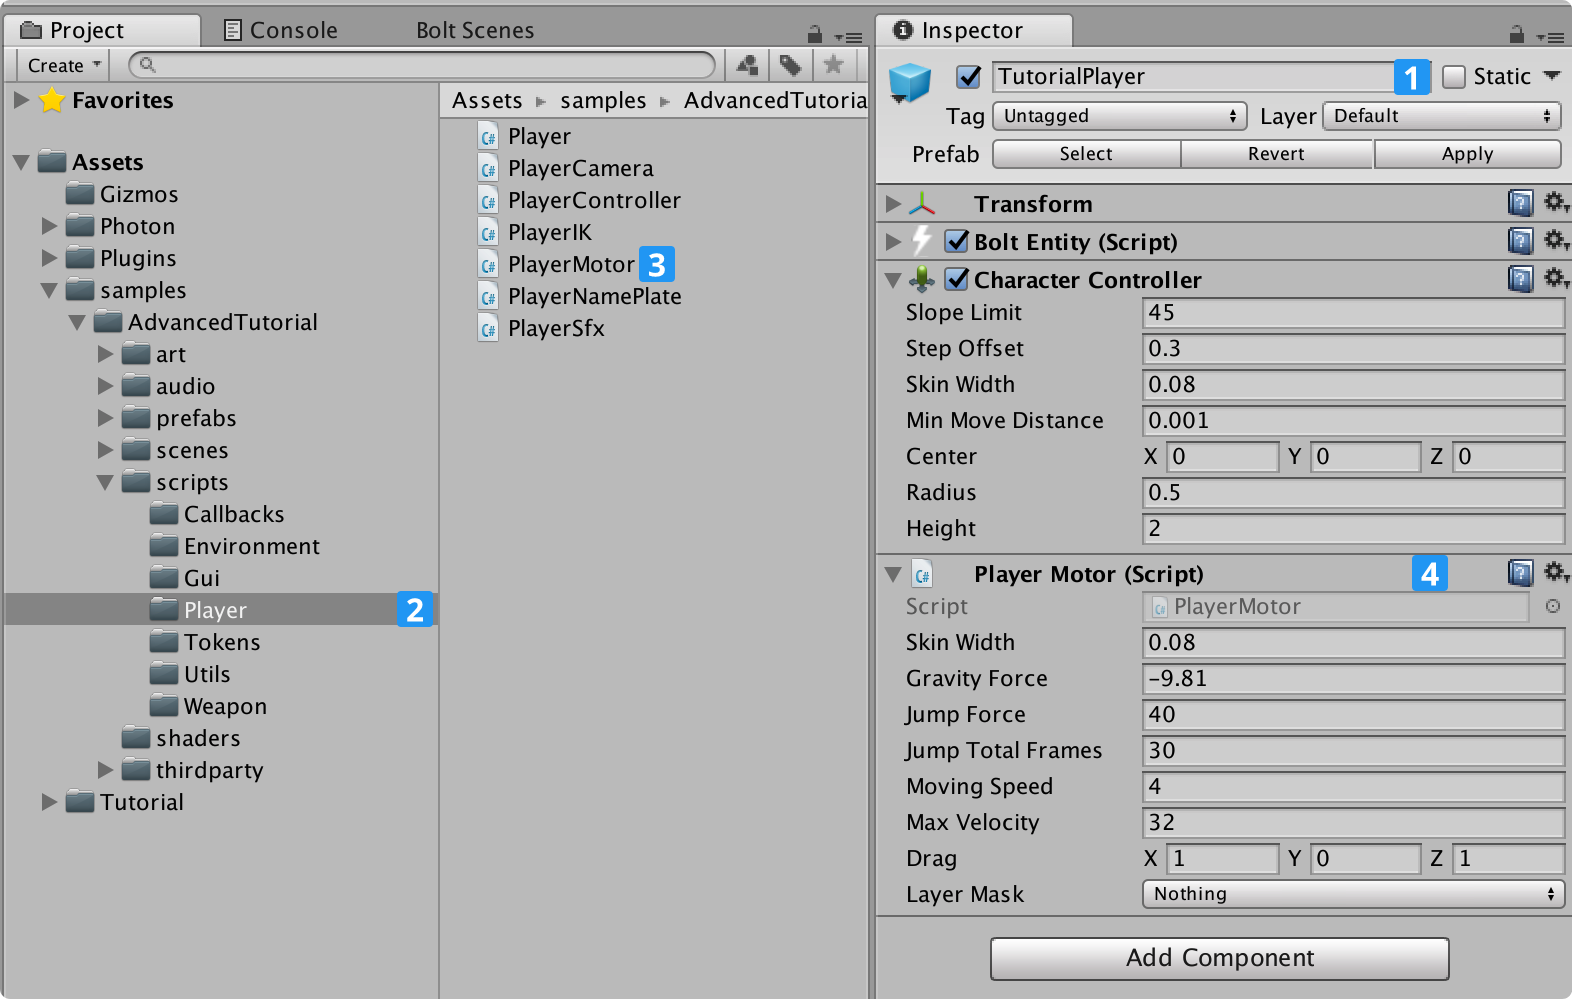
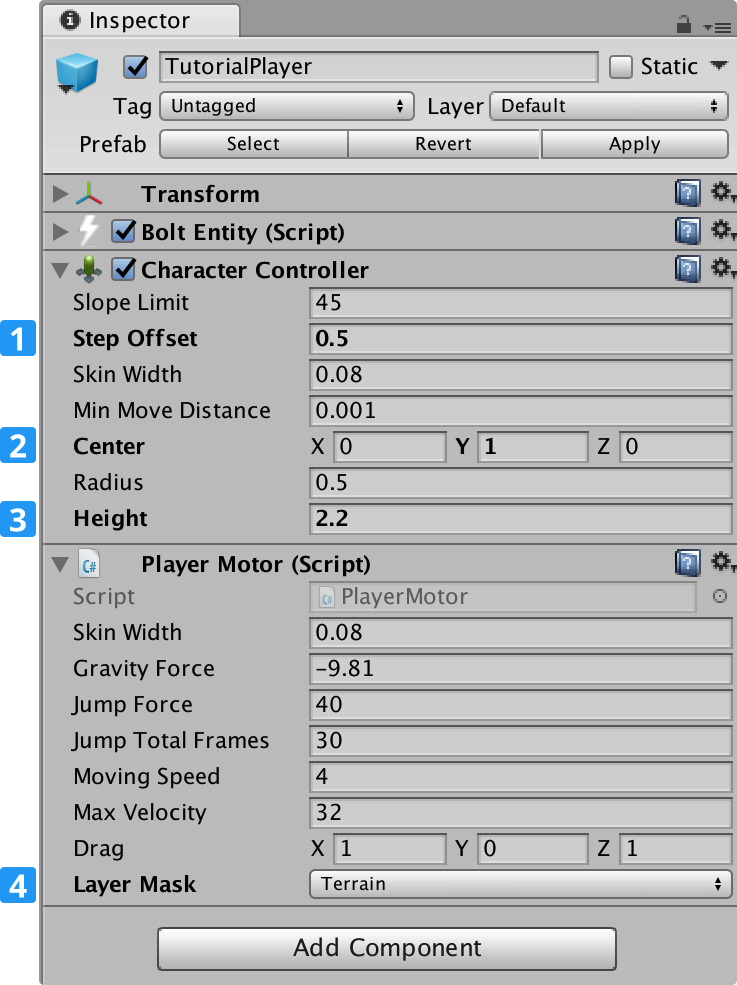
자동으로 추가된 Player Motor 컴포넌트와 Character Controller 컴포넌트의 2가지 설정을 조정할 필요가 있습니다.
- Step Offset을
0.5로 설정합니다. - Center를
(0, 1, 0)로 설정합니다. - Height을
2.2로 설정합니다. - Layer Mask를
Terrain으로 설정합니다.
입력을 받아 모터에 전송하는 스크립트가 필요하므로 컨트롤러가 필요합니다.
Tutorial/Scripts/Player 폴더에 새로운 TutorialPlayerController.cs 스크립트를 생성합니다.
새로운 클래스는 Bolt.EntityBehaviour<ITutorialPlayerState> 클래스에서 상속하여 TutorialPlayerState 에셋의 데이터에 직접적이고 정적인 접근을 할 수 있도록 합니다.
Bolt.EntityBehaviour는 Bolt.GlobalEventListener와 유사하지만, 각 Bolt Entities에서 사용되도록 고려한 것으로 게임 코드와 Bolt SDK 사이의 인터페이스로 동작합니다.
ITutorialPlayerState 상태를 generic 아규먼트로 사용함으로써, 이 클래스가 State 유형을 관리할 것이라고 Bolt에게 알려주게 됩니다.
C#
using Bolt;
using Bolt.AdvancedTutorial;
using UnityEngine;

public class TutorialPlayerController : Bolt.EntityBehaviour<ITutorialPlayerState>
{
}
player controller는 작성해야 할 부분이 많은 큰 클래스로 한 번에 조금씩 코드를 따라 해주세요.
입력, 모터를 추가하는 것으로 시작할 것이며, TutorialPlayerController 클래스에 대한 상수 필드를 추가합니다.
C#
using Bolt;
using Bolt.AdvancedTutorial;
using UnityEngine;

public class TutorialPlayerController : Bolt.EntityBehaviour<ITutorialPlayerState>
{
    const float MOUSE_SENSITIVITY = 2f;

    bool _forward;
    bool _backward;
    bool _left;
    bool _right;
    bool _jump;

    float _yaw;
    float _pitch;

    PlayerMotor _motor;

    // ...
}
다음은 표준 유니티 Awake 메소드를 정의하여 내부에서 모터의 참조를 취득합니다.
C#
// ...
void Awake()
{
    _motor = GetComponent<PlayerMotor>();
}
// ...
우리는 Bolt가 엔티티의 트랜스폼을 알 수 있도록 해야 합니다.
Bolt.EntityBehaviour 베이스 클래스(API)에서 제공하는 Attached 메소드를 오버라이드 합니다. 이 메소드 내에서 state.Transform에 접근하고 SetTransforms 메소드를 호출하여 우리 게임 오브젝트의 트랜스폼에 제공합니다.
Entity 트랜스폼 동기화를 위해 권장되는 방식입니다.
C#
// ...
public override void Attached()
{
    // This couples the Transform property of the State with the GameObject Transform
    state.SetTransforms(state.Transform, transform);
}
// ...
다음은 로컬 플레이어의 입력 데이터 버퍼링에 사용되는 PollKeys입니다. 여기에는 모든 버튼과 마우스 이동이 포함되어있습니다.
C#
// ...
void PollKeys(bool mouse)
{
    _forward = Input.GetKey(KeyCode.W);
    _backward = Input.GetKey(KeyCode.S);
    _left = Input.GetKey(KeyCode.A);
    _right = Input.GetKey(KeyCode.D);
    _jump = Input.GetKeyDown(KeyCode.Space);

    if (mouse)
    {
        _yaw += (Input.GetAxisRaw("Mouse X") * MOUSE_SENSITIVITY);
        _yaw %= 360f;

        _pitch += (-Input.GetAxisRaw("Mouse Y") * MOUSE_SENSITIVITY);
        _pitch = Mathf.Clamp(_pitch, -85f, +85f);
    }
}
// ...
표준 유니티 입력 코드와 거의 유사하니 이에 대해서 논하지 않도록 하겠습니다 - 정말 흥미로운 유일한 것은 bool mouse 파라미터로 마우스 입력을 폴(poll) 해야 되는지를 알려주는 것으로 나중에 자세히 보겠습니다.
유니티가 Update 안에서 Input 클래스의 상태를 갱신하기 때문에 다음과 같이 PollKeys 함수를 호출하는 간단한 Update 함수를 정의하겠습니다.
PollKeys 함수에 true를 전달하여 마우스 움직임도 읽을 수 있도록 했습니다.
C#
// ...
void Update()
{
    PollKeys(true);
}
// ...
이제 Bolt에 관련된 사항을 다루어 보겠습니다.
SimulateController라고 하는 메소드를 오버라이드 할 것이며, 이 메소드는 엔티티의 control 이 할당된 컴퓨터에서만 호출되고 이 플레이어의 입력을 가져와 처리를 위해 대기열에 넣는 역할을 합니다.
첫 번째로 우리가 해야 할 것은 다시 PollKeys를 호출하는 것이지만 false를 전달하여 마우스 데이터를 읽을 필요가 없다고 알려줍니다.
이렇게 하는 이유는 여기에서 마우스 움직임을 읽는다는 것은 이중으로 읽는 것이기 때문입니다.
다음은 Bolt가 TutorialPlayerCommand 에셋에서 컴파일을 해 놓은 명령 입력의 인스턴스 생성을 위해서 TutorialPlayerCommand.Create() 를 호출하는 것입니다.
이제 모든 입력 데이터를 로컬 변수에서 입력으로 복사하여 전달 해주는 것 입니다.
마지막으로 엔티티에서 QueueInput를 호출하는 것으로, 이것은 처리를 위해서 입력을 서버와 클라이언트로 전송합니다.
Bolt가 서버에서는 신뢰성에 대해서 여전히 유지하고 있지만 클라이언트 예측을 하도록 합니다.
C#
// ...
public override void SimulateController()
{
    PollKeys(false);

    ITutorialPlayerCommandInput input = TutorialPlayerCommand.Create();

    input.Forward = _forward;
    input.Backward = _backward;
    input.Left = _left;
    input.Right = _right;
    input.Jump = _jump;
    input.Yaw = _yaw;
    input.Pitch = _pitch;

    entity.QueueInput(input);
}
// ...
좋습니다. 이제 하나의 메소드를 구현하는 것만 남아 있습니다.
이 메소드가 Bolt 중에서도 가장 중요한 것으로 신뢰성 있는 움직임과 제어에 관해 마법이 일어나는 곳입니다.
ExecuteCommand 와 만나서 엔티티의 controller와 owner 둘 모두 실행합니다.
이 함수의 첫 번째 파라미터는 항상 커맨드로써 SimulateController로 부터 QueueInput으로 전송된 입력이 포함되어 있습니다.
두 번째 파라미터는 resetState이며, 컨트롤러(일반적으로 클라이어언트)에게 소유자(일반적으로 서버)가 보정을 했고 모터의 상태를 재설정해야 한다는 것을 알려줍니다.
controller 에서만 true라는 것이 중요합니다.
함수의 내부에서 resetState 이 true 인지를 체크하여 true이면 명령을 실행하지 않고 모터의 로컬 상태를 단순히 재설정만 해줍니다.
그렇지 않으면 Move 를 호출하여 모터에게 명령의 입력을 적용시키는데 전달된 명령에서 Result 속성을 복제하여 새로운 상태를 리턴합니다.
전달된 명령으로 모터의 상태를 지정하는 것은 매우 중요하며 Bolt가 소유자로부터 컨트롤러에게 명령의 결과 보정을 적용할 수 있도록 해 줍니다.
C#
// ...
public override void ExecuteCommand(Command command, bool resetState)
{
    TutorialPlayerCommand cmd = (TutorialPlayerCommand)command;

    if (resetState)
    {
      // we got a correction from the server, reset (this only runs on the client)
        _motor.SetState(cmd.Result.Position, cmd.Result.Velocity, cmd.Result.IsGrounded, cmd.Result.JumpFrames);
    }
    else
    {
        // apply movement (this runs on both server and client)
        PlayerMotor.State motorState = _motor.Move(cmd.Input.Forward, cmd.Input.Backward, cmd.Input.Left, cmd.Input.Right, cmd.Input.Jump, cmd.Input.Yaw);

        // copy the motor state to the commands result (this gets sent back to the client)
        cmd.Result.Position = motorState.position;
        cmd.Result.Velocity = motorState.velocity;
        cmd.Result.IsGrounded = motorState.isGrounded;
        cmd.Result.JumpFrames = motorState.jumpFrames;
    }
}
// ...
TutorialPlayerController 사본을 TutorialPlayer에 붙이고 지금 Play As Server를 눌렀다면 세계(현재는 애니메이션 없는)를 돌아다닐 수 있으며 캐릭터를 움직일 수 있어야 합니다.
TutorialPlayerController에 전체 코드를 참고하시기 바랍니다.
C#
using Bolt;
using Bolt.AdvancedTutorial;
using UnityEngine;

public class TutorialPlayerController : Bolt.EntityBehaviour<ITutorialPlayerState>
{
    const float MOUSE_SENSITIVITY = 2f;

    bool _forward;
    bool _backward;
    bool _left;
    bool _right;
    bool _jump;

    float _yaw;
    float _pitch;

    PlayerMotor _motor;

    void Awake()
    {
        _motor = GetComponent<PlayerMotor>();
    }

    public override void Attached()
    {
        // This couples the Transform property of the State with the GameObject Transform
        state.SetTransforms(state.Transform, transform);
    }

    void PollKeys(bool mouse)
    {
        _forward = Input.GetKey(KeyCode.W);
        _backward = Input.GetKey(KeyCode.S);
        _left = Input.GetKey(KeyCode.A);
        _right = Input.GetKey(KeyCode.D);
        _jump = Input.GetKeyDown(KeyCode.Space);

        if (mouse)
        {
            _yaw += (Input.GetAxisRaw("Mouse X") * MOUSE_SENSITIVITY);
            _yaw %= 360f;

            _pitch += (-Input.GetAxisRaw("Mouse Y") * MOUSE_SENSITIVITY);
            _pitch = Mathf.Clamp(_pitch, -85f, +85f);
        }
    }

    void Update()
    {
        PollKeys(true);
    }

    public override void SimulateController()
    {
        PollKeys(false);

        ITutorialPlayerCommandInput input = TutorialPlayerCommand.Create();

        input.Forward = _forward;
        input.Backward = _backward;
        input.Left = _left;
        input.Right = _right;
        input.Jump = _jump;
        input.Yaw = _yaw;
        input.Pitch = _pitch;

        entity.QueueInput(input);
    }

    public override void ExecuteCommand(Command command, bool resetState)
    {
        TutorialPlayerCommand cmd = (TutorialPlayerCommand) command;

        if (resetState)
        {
            // we got a correction from the server, reset (this only runs on the client)
            _motor.SetState(cmd.Result.Position, cmd.Result.Velocity, cmd.Result.IsGrounded, cmd.Result.JumpFrames);
        }
        else
        {
            // apply movement (this runs on both server and client)
            PlayerMotor.State motorState = _motor.Move(cmd.Input.Forward, cmd.Input.Backward, cmd.Input.Left, cmd.Input.Right, cmd.Input.Jump, cmd.Input.Yaw);

            // copy the motor state to the commands result (this gets sent back to the client)
            cmd.Result.Position = motorState.position;
            cmd.Result.Velocity = motorState.velocity;
            cmd.Result.IsGrounded = motorState.isGrounded;
            cmd.Result.JumpFrames = motorState.jumpFrames;
        }
    }
}
제3장을 완료했고, 아래와 같이 동작하는 유사한 게임이 있어야 합니다: