Protocol Tokens
Photon Bolt supports a feature called Protocol Tokens, they are used to attach arbitrary data (C# objects) to specific actions that can be taken in Bolt, a few examples:
- Instantiating an entity;
- Connecting to a server;
- Loading a scene.
The reason for Protocol Tokens existing is that in a lot of cases you want some small piece of data available when a specific action happens.
Due to the unreliable nature of networking for the data to be guaranteed to be there it has to be sent with the action itself.
Protocol Tokens allows you to accomplish this.
A few examples of data you might want to be available when a specific action happens are:
- When instantiating a players character you may want to send the customization options for that the player has selected.
- You want players to send a username and password when connecting to a server.
- When loading a new scene you want the season (fall, winter, etc.) to be available when the scene starts loading so you can load the correct textures, etc.
Protocol Tokens are created by simply defining a normal C# class and inherit from the Bolt.IProtocolToken interface.
This interface defines two methods: Write and Read.
They also need to be implemented in your class, as shown below:
C#
public class CharacterCustomization : Bolt.IProtocolToken
{
    public int SkinId;
    public int HatId;

    public void Write(UdpKit.UdpPacket packet) {
        packet.WriteInt(SkinId);
        packet.WriteInt(HatId);
    }

    public void Read(UdpKit.UdpPacket packet) {
        SkinId = packet.ReadInt();
        HatId = packet.ReadInt();
    }
}
Here we define a Protocol Token which will contain some character customization data for when we instantiate an entity.
It contains two simple integer fields which represent id numbers of the skin and hat of our pretend character.
In the Write method we write the data into the packet by calling the appropriate WriteXXX() method on the packet object passed in.
We do the reverse in Read and call the proper ReadXXX() method on the packet passed in.
Important: You have to call the same corresponding WriteXXX and ReadXXX methods on the packet in the same order in the Write and Read methods.
Now, if your Token is designed to be used frequently, we suggest that you implement a PooledProtocolToken (starting on Bolt v1.2.14).
This type extends the normal Protocol Token but makes use of an internal pooling system in order to reuse the memory allocated when dealing if the Tokens.
As you can see below, the only difference to define the pooled version is to extend your class from Bolt.PooledProtocolToken instead of Bolt.IProtocolToken and implement the new Reset method.
C#
public class PooledCharacterCustomization : PooledProtocolToken
{
    public int SkinId;
    public int HatId;

    public override void Read(UdpPacket packet)
    {
        // Deserialize Token data
        SkinId = packet.ReadInt();
        HatId = packet.ReadInt();
    }

    public override void Write(UdpPacket packet)
    {
        // Serialize Token Data
        packet.WriteInt(SkinId);
        packet.WriteInt(HatId);
    }

    public override void Reset()
    {
        // Reset Token Data
        SkinId = default(int);
        HatId = default(int);
    }
}
Examples of Usage
Basic Usage
In order to use our Protocol Token class we have to register it with Bolt, this should be done in the BoltStartBegin callback which you can implement by creating a Unity behaviour which inherits from Bolt.GlobalEventListener.
More details about how Bolt.GlobalEventListener works can be found in the Global Callbacks section.
Registering a token class is done by calling BoltNetwork.RegisterTokenClass<T>() and passing in the class as the generic parameter T, see below for an example.
C#
[BoltGlobalBehaviour]
public class NetworkCallbacks : Bolt.GlobalEventListener {
    public override void BoltStartBegin() {
        BoltNetwork.RegisterTokenClass<CharacterCustomization>();
    }
}
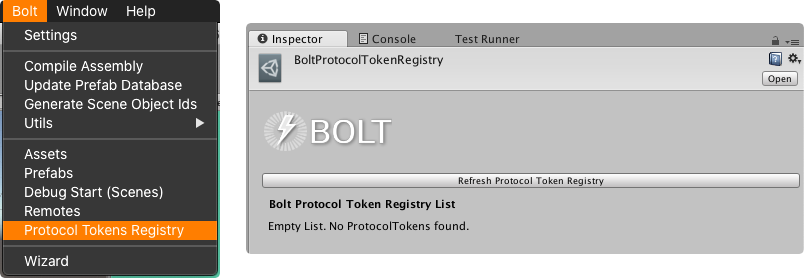
Another option is to register your tokens using the Protocol Token Registry.
Starting on Bolt v1.2.14, you are able to open the Token registry on Bolt/Protocol Token Registry Menu, if you don't have a registry already, you will be asked to create a new one.
With the registry asset created, just click on the Refresh Protocol Token Registry button, Bolt will scan the project and list all IProtocolToken found.
That is it, you can new remove all your manual registration code and let Bolt do it for you.
Based on the registry list, Bolt will automatically register your Token at runtime, always at the same order on all peers.
After the registration, you can create instances of your Tokens in two ways:
Bolt.IProtocolToken: the usual instantiation using thenewkeyword;Bolt.PooledProtocolToken: to get an instance from the internal pool, just invokeProtocolTokenUtils.GetToken<T>(), whereTis the type of your Pooled Protocol Token.
Entity Instantiation Example
When we call BoltNetwork.Instantiate method to create a new Entity we can pass in an instance of our CharacterCustomization class:
C#
// ...
public void SpawnCharacter()
{
    var token = new CharacterCustomization();
    token.SkinId = 5;
    token.HatId = 12;

    BoltNetwork.Instantiate(BoltPrefabs.CharacterPrefab, token);
}
// ...
We can then access this token in the Attached callback on our C# scripts that inherit from Bolt.EntityBehaviour and Bolt.EntityBehaviour<T> like this:
C#
public class MyEntityBehaviour : Bolt.EntityBehaviour<ICharacterState> {
    public override void Attached() {
        var customization = (CharacterCustomization)entity.attachToken;
        // ... use the customization data here
    }
}
Authentication Example
In this example, we will use a Protocol Token to authenticate our client with the server by sending a pair of user/password and also to receive the response of the server about the authentication result, so the player can handle it accordingly.
For this example to work properly, you will need to change the Accept Mode from Auto to Manual in the Bolt Settings window.
This way, the server can treat the token sent by the client, and decide if it is valid or not.
First, we will define two new Protocol Tokens:
UserToken: Sent by the client with its authentication info.AuthResultToken: Sent by the server with the result of the operation.
C#
using UdpKit;

namespace ProtocolTokenExample
{
    public class UserToken : Bolt.IProtocolToken
    {
        public string Username { get; set; }
        public string Password { get; set; }

        public void Read(UdpPacket packet)
        {
            this.Username = packet.ReadString();
            this.Password = packet.ReadString();
        }

        public void Write(UdpPacket packet)
        {
            packet.WriteString(this.Username);
            packet.WriteString(this.Password);
        }
    }
}
C#
using System;
using UdpKit;

namespace ProtocolTokenExample
{
    public class AuthResultToken : Bolt.IProtocolToken
    {
        public static AuthResultToken Invalid = new AuthResultToken();

        public int Ticket { get; private set; }
        public string Id { get; private set; }

        private static int CurrentTicket = 0;

        public AuthResultToken()
        {
            this.Ticket = CurrentTicket++;
            this.Id = "";
        }

        public AuthResultToken(string id) : this()
        {
            this.Id = id;
        }

        public void Read(UdpPacket packet)
        {
            this.Ticket = packet.ReadInt();
            this.Id = packet.ReadString();
        }

        public void Write(UdpPacket packet)
        {
            packet.WriteInt(this.Ticket);
            packet.WriteString(this.Id);
        }
    }
}
We continue to build our Authentication system by implementing the Server and Client Event Listeners.
This way, we can treat the request from the client on the host.
First, we will modify the original BoltInit.cs file, that comes with the samples.
We will update the code to send our UserToken when trying to connect to the server. See below:
C#
// BoltInit.cs

public override void BoltStartBegin()
{
    // In order to use the Tokens, we need to register them
    BoltNetwork.RegisterTokenClass<UserToken>();
    BoltNetwork.RegisterTokenClass<AuthResultToken>();
}

// ...

void State_SelectRoom()
{
    GUI.Label(labelRoom, "Looking for rooms:", labelRoomStyle);

    if (BoltNetwork.SessionList.Count > 0)
    {
        GUILayout.BeginVertical();
        GUILayout.Space(30);

        foreach (var session in BoltNetwork.SessionList)
        {
            var photonSession = session.Value as PhotonSession;

            if (photonSession.Source == UdpSessionSource.Photon)
            {
                var matchName = photonSession.HostName;
                var label = string.Format("Join: {0} | {1}/{2}", matchName, photonSession.ConnectionsCurrent, photonSession.ConnectionsMax);

                if (ExpandButton(label))
                {
                    // Using the UserToken to send our credential information
                    UserToken credentials = new UserToken();
                    credentials.Username = "Bob";
                    credentials.Password = "654321";

                    BoltNetwork.Connect(photonSession, credentials);
                    state = State.Started;
                }
            }
        }

        GUILayout.EndVertical();
    }
}
// ...
With the updated code in place, when the client tries to connect to the game host, it will send a Token passing the username and password information.
Great, now we need a way to receive this Token on the Server side, to do this, you need to implement the ConnectRequest callback on any Bolt.GlobalEventListener that runs only on the host player (by using the [BoltGlobalBehaviour(BoltNetworkModes.Server)] for example), take a look:
C#
using System;
using Bolt;
using UdpKit;

namespace ProtocolTokenExample
{
    [BoltGlobalBehaviour(BoltNetworkModes.Server)]
    public class NetworkServerCallbacks : Bolt.GlobalEventListener
    {
        public override void BoltStartBegin()
        {
            BoltNetwork.RegisterTokenClass<UserToken>();
            BoltNetwork.RegisterTokenClass<AuthResultToken>();
        }

        private bool AuthUser(string user, string pass)
        {
            // Authenticate your client...
            return false;
        }

        public override void ConnectRequest(UdpEndPoint endpoint, IProtocolToken token)
        {
            BoltLog.Warn("Connect Request");

            var userToken = token as UserToken;

            if (userToken != null)
            {
                if (AuthUser(userToken.Username, userToken.Password))
                {
                    AuthResultToken resultToken = new AuthResultToken(Guid.NewGuid().ToString());
                    BoltNetwork.Accept(endpoint, resultToken);
                    return;
                }
            }

            BoltNetwork.Refuse(endpoint, AuthResultToken.Invalid);
        }
    }
}
And finally, on the client side, we can retrieve this information sent by the server on the ConnectRefused or Connected callbacks in order to show a proper response to our player.
This can be done on another Bolt.GlobalEventListener, but this time, that only runs on our client.
C#
using Bolt;
using UdpKit;

namespace ProtocolTokenExample
{
    [BoltGlobalBehaviour(BoltNetworkModes.Client)]
    public class NetworkClientCallbacks : Bolt.GlobalEventListener
    {
        public override void BoltStartBegin()
        {
            BoltNetwork.RegisterTokenClass<UserToken>();
            BoltNetwork.RegisterTokenClass<AuthResultToken>();
        }

        public override void Connected(BoltConnection connection)
        {
            BoltLog.Warn("Connection accepted!");

            AuthResultToken acceptToken = connection.AcceptToken as AuthResultToken;

            if (acceptToken != null)
            {
                BoltLog.Info("AcceptToken: " + acceptToken.GetType());
                BoltLog.Info("Token: {0}-{1}", acceptToken.Ticket, acceptToken.Id);
            }
            else
            {
                BoltLog.Warn("AcceptToken is NULL");
            }
        }

        public override void ConnectRefused(UdpEndPoint endpoint, IProtocolToken token)
        {
            BoltLog.Warn("Connection refused!");

            var authToken = token as AuthResultToken;
            if (authToken != null)
            {
                BoltLog.Warn("Token: {0}-{1}", authToken.Ticket, authToken.Id);
            }
        }
    }
}