3 - Game Scenes
This section covers the creation of the various scenes where players will be playing.
Each scene will be dedicated for a specific number of players, getting bigger and bigger to fit all players and give them enough space to move around.
Further down this tutorial, we'll implement the logic to load the right level based on the number of players and for this will use a convention that reaches level will be named with the following format: "Room for X" where X will represent the number of players.
First Room Creation
- Create a new scene, save it and name it exactly
"Room for 1". - Create a Cube and name it
floor. - Position it at 0,0,0. it's important as our logic system will spawn players above the center (0,x,0).
- Scale the
floorto 20,1,20.
That would be sufficient here for a playable level, but some wall will keep the player within the floor area.
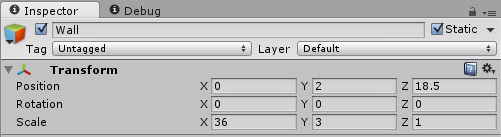
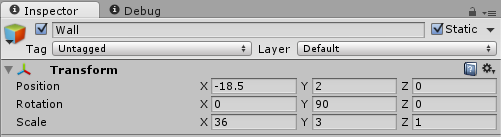
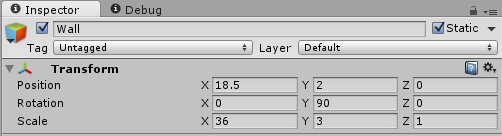
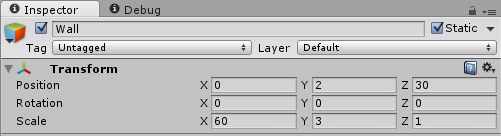
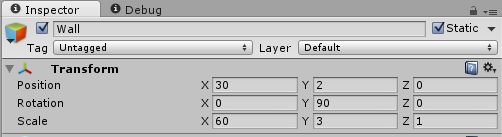
Simply create more cubes and position, rotate and scale them to act as walls.
Here are the position and scale of all four walls to match the floor GameObject


Don't forget the save Room For 1 Scene at this point.
Game Manager Prefab
In all cases, the minimum requirement for a User Interface is to be able to quit the room.
For this, we'll need a UI Button, but we'll also need a script that will call Photon to make the local player leave the room, so let's start by creating what we'll call the Game Manager prefab and the first task it will handle quitting the room the local Player is currently in.
Create a new C# script
GameManagerCreate an empty GameObject in the Scene, name it
Game ManagerDrop the
GameManagerscript onto the GameObjectGame ManagerTurn
Game Managerinto a prefab by dragging it from the scene hierarchy to the Assets Browser, it will turn blue in the hierarchy.Edit
GameManagerscriptReplace with the following
C#
using System;
using System.Collections;

using UnityEngine;
using UnityEngine.SceneManagement;

namespace Com.MyCompany.MyGame
{
    public class GameManager: MonoBehaviour {

        #region Photon Messages

        /// <summary>
        /// Called when the local player left the room. We need to load the launcher scene.
        /// </summary>
        public void OnLeftRoom()
        {
            SceneManager.LoadScene(0);
        }

        #endregion

        #region Public Methods

        public void LeaveRoom()
        {
            PhotonNetwork.LeaveRoom();
        }

        #endregion
    }
}
Save
GameManagerScript
So, we've created a public method LeaveRoom().
What it does is explicitly making the local player leave the Photon Network room.
We wrapped it around our own Public Method for abstraction.
We may want at a later stage implement more features, such as saving data, or insert a confirmation step that the user will be leaving the game, etc.
Based on our game requirements, if we are not in a room we need to show the Launcher scene, so we are going to listen to OnLeftRoom() Photon callback and load the lobby scene Launcher, which is indexed 0 in the Build settings Scene's list, that we'll set up in the Build Settings Scene List section of this section
But why make a prefab out of this?
It is because our Game requirement implies several Scenes for the same game and so we'll need to reuse this Game Manager.
In Unity, the best way to reuse GameObjects is to turn them into Prefabs.
Next, let's create the UI Button that will call our GameManager's LeaveRoom() method.
Quit Room Button Prefab
Again, like the Game Manager, in the perspective that we'll have many different scenes in need of this feature.
It makes sense to plan ahead and make the button a Prefab so that we can reuse it and modify it in one place only if we need to in the future.
- Make sure you are in the Scene
Room for 1 - Create a UI Panel using the Unity menu 'GameObject/UI/Panel', name that panel
Top Panel. - Remove the
ImageandCanvas RendererComponents to clear this panel. Keep it if you find it nicer, this is aesthetic. - Set the "Anchor Presets" to
topand anchor preset tostretchwhile holdingShiftandAlt.
RectTransform Anchors take some experience to get used to it, but it's worth it :)
- Set the
RectTransformheight to 50. - Right click on the Panel GameObject
Top Paneland add a UI/Button, name itLeave button - Select the Text Child of the
Leave buttonand set it's text toLeave Game. - Connect the OnClick button's event to the
Game Managerinstance in the hierarchy to callLeaveRoom().

- Turn
Leave buttoninto a prefab by dragging it from the scene hierarchy to the Assets Browser, it will turn blue in the Hierarchy. - Save the scene and save the Project
Other Rooms Creation
Now that we have one room done properly, let's duplicate it 3 times and name them appropriately (they should already have been by Unity when you duplicated them):
Find below the changes for the position, rotation and scale to speed up this repetitive process.
Room for 2
Floor Scale: 36,1,36

Room for 3
Floor Scale: 50,1,50


Room for 4
Floor Scale: 60,1,60


Build Settings Scenes List
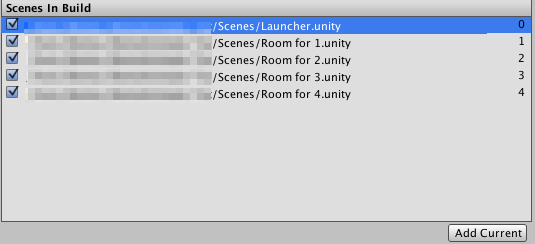
Critical to the good operation of the Project while editing and when published, we need to add all these scenes in the Build Settings so that Unity include them when building the application.
- Open the Build Settings via the menu "File/Build Settings"
- Drag and drop all the Scenes, The launcher Scene must remain the first, as by default Unity will load and show to the player the first scene on that list
Now that we have your basic scenes set up, we can finally start hooking everything up.
Let's do this in the next section.