Initial Setup
Photon Unity Networking (PUN) is really easy to setup.
Import PUN into a new project and the PUN Wizard will pop up.
Register for a new (free) Photon Cloud account by entering an email or paste an existing AppId into the field.
Done.
If you want to host a Photon Server yourself, click "skip" and edit the PhotonServerSettings, as described below.
To connect, you only have to call PhotonNetwork.ConnectUsingSettings() in your code.
If you need more control, see "Connect Manually" below.

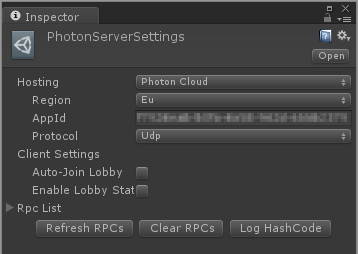
PhotonServerSettings
The Wizard adds a PhotonServerSettings file to your project to store the configuration.
This is also the go to place to edit the server settings.

You can set the AppId, Photon Cloud Region and more.
Your client's Game Version is set in code.
The most important option to select is the "Hosting".
Hosting Type
With the "Hosting" option you select which server will handle your game and which other settings you configure.
"Photon Cloud" and "Best Region" both relate to our managed cloud service.
You either select a specific region or you let the clients select the region with best ping.
Select "Self Hosted", if you run a Photon Server somewhere.
Alternatively, your client could stay in "Offline Mode" altogether.
Best Region
The "Best Region" mode will ping all known regions when the app starts the first time.
As this takes a moment, the result is being stored in the PlayerPrefs.
This speeds up connection times.
You can setup which regions to ignore.
Distributing clients on fewer regions results in more players for the remaining ones.
This can be a benefit before a game is popular.
Use PhotonNetwork.OverrideBestCloudServer() to define another region to use.
"Best Region" option is not deterministic.
Sometimes it may be "random" due to little variations or exact same ping calculations.
Theoretically, you could:
- have the same ping to multiple regions from the same device. Even clients connected to the same network can end up on different regions.
- have different ping values for the same region on different devices (or different retries on the same device) connected to the same network.
For instance, in the case of "us" and "usw", you could either use the Regions Allowlist to select the ones you want or make clients connect to a specific region.
To debug, set the logging level to "Info" and clear the "current best region" (in PUN: PhotonNetwork.BestRegionSummaryInPreferences = null). Have a look at the details or send us the log via mail.
Self Hosting
This option is relevant for customers who host Photon Server on their own using our On-Premises SDKs available to download here.
If it's the case for you, setup your server Address and Port in the PhotonServerSettings.
Make sure your clients can reach the entered Address.
It can be a public, static IP, hostname or any address in the network that your clients use.
If you develop games for iOS you may consider reading about "PUN and IPv6" and "how to setup Photon Server for IPv6".
When things are setup correctly, you can call PhotonNetwork.ConnectUsingSettings() in your code.
Protocol
The port depends in the selected Protocol, so make sure those two fields match.
Clear the field to reset it to the default port.
The default here is (reliable) UDP but Photon also supports TCP as well.
We suggest you stick to UDP.
PUN+ for Unity 4.7 does not offer TCP.
WebGL exports work with WebSockets Secure only.
Client Settings
The Client Settings section contains a few options which should be set per project.
Auto-Join Lobby
When you check "Auto-Join Lobby", PUN will automatically join the default lobby when it connects (or leaves a room).
Photon's lobby provides lists of current rooms, so players can select one to join.
This is off by default, as the better option is to use Random Matchmaking, as used in all demos.
If "Auto-Join Lobby" is unchecked, OnConnectedToMaster callback will be called.
Otherwise, OnConnectedToMaster will be skipped and only OnJoinedLobby will be called.
Enable Lobby Stats
To get Lobby Statistics from the server this should be checked.
See "App And Lobby Stats" page for more information.
Run in Background
This sets the Unity setting with the same name.
More information here.
The RPC List
"Remote Procedure Calls" enable you to call a method on all clients in a room.
PUN keeps a list of those methods in the PhotonServerSettings.
For the initial setup, this is not relevant however.
See Remote Procedure Calls.
Connect Manually
As alternative to PhotonNetwork.ConnectUsingSettings() you can connect to your own Photon Servers by using PhotonNetwork.ConnectToMaster().
This is useful when you host Photon On-Premises.
For ConnectToMaster(), you need to provide a masterServerAddress and a port.
The address is either your On-Premises DNS name or an IP.
It can include the port after a colon (then pass 0 as port) or you can pass the port separately.
ConnectToMaster() has two more parameters: "appID" and "gameVersion".
Both are only relevant for the Photon Cloud and can be set to any value when you host Photon yourself.
For the Photon Cloud, use ConnectUsingSettings().
It involves our Name Server to find the Master Server of a region automatically.