Feature Overview
PhotonNetwork Plugin for Unity3D
When you import PUN, the "Wizard" window will popup.
Either enter your email address to register for the cloud, skip this step to enter the AppId of an existing account or switch to "self hosted" Photon to enter your server's address.
This creates a configuration for either the cloud service or your own Photon server in the project: PhotonServerSettings.
PUN consists of quite a few files, however there’s only one that truly matters: PhotonNetwork.
This class contains all functions and variables needed.
If you ever have custom requirements, you can always modify the source files.
To use PUN from UnityScript, move both folders "PhotonNetwork" and "UtilityScripts" to the "Assets\Plugins" folder.
To show you how this API works, here are a few examples right away.
Connecting and the Master Server
PhotonNetwork always uses a master server and one or more game servers.
The master server manages the currently available games and does matchmaking.
Once a room is found or created, the actual gameplay is done on a game server.
All servers run on dedicated machines - there is no such thing as player-hosted servers.
You don’t have to bother remembering the server organization, PUN will handle it for you.
C#
PhotonNetwork.ConnectUsingSettings("v1.0");
The code above is all you need to connect and make use of the Photon's features.
It sets your client’s game version and uses the PhotonServerSettings (written by the PUN Wizard) to connect.
You can modify the PhotonServerSettings to connect to your own servers, too.
Alternatively, use Connect() to ignore the PhotonServerSettings file.
PhotonNetwork provides an Offline mode which allows developer to implement easily single player gamePlay and features without having to rewrite everything. See PhotonNetwork Offline Mode for more info on matchmaking.
Versioning by GameVersion
The LoadBalancing logic for Photon uses your AppId to separate your game from anyone else's.
Players also get separated by game version, the parameter of ConnectUsingSettings (see above).
This way, you can release clients with new features without breaking older versions of your game.
As we can't guarantee that different Photon Unity Networking versions are compatible with each other, PUN appends its own version number to that of your game.
Updating PUN might separate new clients from older ones but won't break the older clients.
If you use PUN and non-PUN clients at the same time or if you have clients with different PUN versions,
you need to take into consideration PUN's specific AppVersion format: {gameVersion}_{PUN_version}.
So if you set the gameVersion to "1.0" in PUN and use PUN version "1.80" then the resulting AppVersion is "1.0_1.80".
If you mix PUN and non-PUN clients, be aware that PUN registers a few Unity related classes as Custom Types.
That allows serialization of Unity's Vector3 but you need to check the "CustomTypes.cs" of PUN to support this in other client SDKs.
Creating and Joining Games
Next, you'll want to join or create a room.
The following code snippets showcase some required functions:
C#
//Join a room
PhotonNetwork.JoinRoom(roomName);
C#
//Create this room.
PhotonNetwork.CreateRoom(roomName);
// Fails if it already exists and calls: OnPhotonCreateGameFailed
C#
//Tries to join any random game:
PhotonNetwork.JoinRandomRoom();
//Fails if there are no matching games: OnPhotonRandomJoinFailed
In best case, your game uses random matchmaking.
JoinRandomRoom() will try to join any room.
If that fails (no room accepts another player), just create a new room and wait until other players join it randomly.
Alternatively, your clients can obtain a list of currently available rooms.
This is done by joining a Lobby.
Lobbies automatically send their room list to clients and update it in intervals (to minimize traffic).
Players won't see each other and can't communicate (to prevent issues when your game is busy).
The PhotonNetwork plugin can automatically join the default lobby when it connects.
Turn this on with the "Auto-Join Lobby" checkbox in the PhotonServerSettings file.
If Auto-Join Lobby is unchecked, OnConnectedToMaster callback will be called.
Otherwise, OnConnectedToMaster will be skipped and only OnJoinedLobby will be called.
While your client is in a lobby, it gets updates for the room list, which it caches.
You can access a list via GetRoomList in every frame, if needed.
C#
foreach (RoomInfo room in PhotonNetwork.GetRoomList())
{
    GUILayout.Label(string.Format("{0} {1}/{2}", room.name, room.playerCount, room.maxPlayers));
}
See Matchmaking And Room Properties for more info on matchmaking.
MonoBehaviour Callbacks
PhotonNetwork uses several callbacks to let your game know about state changes, like "connected" or "joined a game".
As usual for Unity, the callbacks can be implemented in any script.
If your script extends Photon.PunBehaviour, you can override each of the callbacks individually.
You don't have to call the base implementation in that case.
C#
public override void OnJoinedRoom()
{
    Debug.Log(string.Format("OnJoinedRoom() called by PUN: {0}", PhotonNetwork.room.name));
}
You don't have to extend PunBehaviour. All callbacks also work if you implement it on its own.
They are also listed and described in the enum PhotonNetworkingMessage.
This covers the basics of setting up game rooms.
Next up is actual communication in games.
Sending Messages In Game Rooms
Inside a room you are able to send network messages to other connected players.
Furthermore, you are able to send buffered messages that will also be sent to players that connect in the future (for spawning your player for instance).
Sending messages can be done using two methods.
Either with RPCs or by implementing OnSerializePhotonView in a script that is observed by a PhotonView.
There is more network interaction though.
You can listen for callbacks for certain network events like OnPhotonInstantiate or OnPhotonPlayerConnected and you can trigger some of these events, e.g. PhotonNetwork.Instantiate.
Don't worry if you're confused by the last paragraph, next up we'll explain for each of these subjects.
PhotonView
PhotonView is a script component that is used to send messages (RPCs and OnSerializePhotonView).
You need to attach the PhotonView to gameobjects or prefabs.
Note that the PhotonView is very similar to Unity's NetworkView.
At all times, you need at least one PhotonView in your game in order to send messages and optionally instantiate/allocate other PhotonViews.
To add a PhotonView to a gameobject, simply select a gameobject and use:
"Components/Miscellaneous/Photon View".
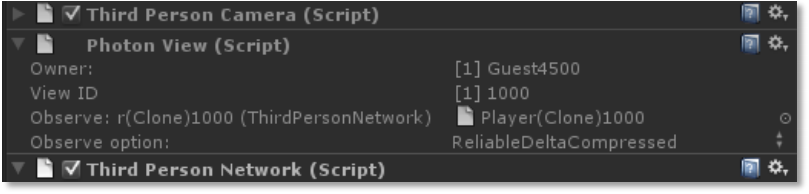
Observe Transform
If you attach a Transform to a PhotonView's Observe property, you can
choose to sync Position, Rotation and Scale or a combination of those
across the players. This can be a great help for prototyping or smaller
games. Note: A change to any observed value will send out all observed
values - not just the single value that changed. Also, updates are not
smoothed or interpolated.
Observe MonoBehaviour
A PhotonView can be set to observe a MonoBehaviour.
In this case, the script's OnPhotonSerializeView method will be called.
This method is called for writing an object's state and for reading it, depending on whether the script is controlled by the local player.
The simple code below shows how to add character state synchronization with just a few lines of code more:
C#
void OnPhotonSerializeView(PhotonStream stream, PhotonMessageInfo info)
{
   if (stream.isWriting)
   {
       //We own this player: send the others our data
       stream.SendNext((int)controllerScript._characterState);
       stream.SendNext(transform.position);
       stream.SendNext(transform.rotation);
   }
   else
   {
       //Network player, receive data
       controllerScript._characterState = (CharacterState)(int)stream.ReceiveNext();
       correctPlayerPos = (Vector3)stream.ReceiveNext();
       correctPlayerRot = (Quaternion)stream.ReceiveNext();
   }
}
Observe Options
The field Observe Option lets you select how and when updates are sent.
It also affects how often OnPhotonSerializeView gets called.
Off explains itself. Can be useful if a PhotonView is reserved for RPCs only.
Unreliable updates are sent "as is" but could become lost.
The idea is that the next update arrives soon and provides the correct/absolute values needed.
This is good for position and other absolute data but not good for triggers like switching weapons.
When used to sync a GameObject's position, it will always send updates, even if the GameObject stops moving (which is bad).
Unreliable on Change will check each update for changes.
If all values stay the same as previously sent, one update will be sent as reliable and then the owner stops sending updates unless things change again.
This is good for GameObjects that might stop moving and that don't create further updates for a while.
Like Boxes that are no longer moved after finding their place.
Reliable Delta Compressed will compare each value of an update to its predecessor.
Values that did not change are skipped to keep traffic low. The receiving side simply fills-in the values of previous updates.
Anything you write via OnPhotonSerializeView atomatically gets checked and compressed this way.
If nothing changed, OnPhotonSerializeView doesn't get called on the receiving clients.
The "reliable" part here takes some toll, so for small updates, the overhead should be considered.
Now on, to yet another way to communicate: RPCs.
Remote Procedure Calls
Remote Procedure Calls (RPC) enable you to call methods on "networked GameObjects" which is useful for infrequent actions triggered by user-input, etc.
An RPC gets executed on the same GameObject by each player in the same room, so you can as easily trigger effects for the whole scene as you can modify some GameObject.
Methods that should be called as RPC must be on a GameObject with a PhotonView component.
The method itself must be marked by the attribute: [PunRPC].
C#
[PunRPC]
void ChatMessage(string a, string b)
{
    Debug.Log(string.Format("ChatMessage {0} {1}", a, b));
}
To call the method, access to the target object's PhotonView.
Instead of directly calling the target method, call PhotonView.RPC() and provide the name of the method to call:
C#
PhotonView photonView = PhotonView.Get(this);
photonView.RPC("ChatMessage", PhotonTargets.All, "jup", "and jup!");
You can send a list of parameters but it must match the definition of the RPC method.
Those are the basics. Read more about Remote Procedure Calls.
Back to top