Fusion Sticky Notes Cross-Platform Remote Relocation
Overview
Fusion Sticky Notes Cross-Platform Remote Relocation shows how users can collaborate in mixed reality, even if they are not in the same place and using different headsets.

To achieve this, each user first selects a wall in their physical environment by clicking on a button when the application is launched.
This wall (anchor) will serve as their reference for collaboration.
When another user joins the session and also selects their own reference wall, the system teleports him into the Unity scene, aligning its position relative to the first remote user's wall.
After this relocation, both users will be in front of the same reference point in the Unity scene, while still facing their respective physical walls.
In addition to this relocation feature, which works regardless of the headset being used, users can spawn sticky notes and draw on them.
This sample offers three interaction methods for drawing:
- Using their finger, thanks to hand or controller tracking,
- Using a virtual pen,
- Using a Logitech MX Ink (only for Meta Quest).
Additionally, it is possible to create 3D drawings with the pens and change the colors of both the drawings and the sticky notes.

If you don't need cross-platform compatibility, a simpler version of this sample exists : Fusion Sticky Notes Meta SSA Colocation with a colocation system based on the Meta Shared Spatial Anchors (SSA) feature.
Technical Info
The project has been developed with Unity 2022.3.47, Fusion 2.0.2, Photon Voice 2.53, and tested with the following packages :
- Meta XR Core SDK 68.0.3 : com.meta.xr.sdk.core
- Meta XR Platform 68.0.0 : com.meta.xr.sdk.platform
- Meta MR Utility Kit 68.0.2 : com.meta.xr.mrutilitykit
- VisionOS XR Plugin 1.3.9 : com.unity.xr.visionos
- Unity PolySpatial 1.3.9 : com.unity.polyspatial
- Unity PolySpatial visionOS 1.3.9 : com.unity.polyspatial.visionos
- Unity PolySpatial XR 1.3.9 : com.unity.polyspatial.xr
- Logitech MX Ink Unity Integration package (08/28/2024)
Headset firmware version:
- Apple VisionOS 2.0
- Meta Quest v69
Before You start
- To run the sample, first create a Fusion AppId in the PhotonEngine Dashboard and paste it into the
App Id Fusionfield in Real Time Settings (reachable from the Fusion menu). Then load theLaunchscene and pressPlay.
Download
| Version | Release Date | Download |
|---|---|---|
| 2.0.6 | 10月 08, 2025 | Fusion Sticky Notes Crossplateform Relocation 2.0.6 |
Handling Input
Meta Quest
- Teleport : press A, B, X, Y, or any stick to display a pointer. You will teleport on any accepted target on release.
- Touch : simply put your hand over a button to toggle it.
- Grab : first put your hand over the object and grab it using controller grab button.
- Virtual Pen :
- move the joystick up or down to change the pen color.
- Press the trigger button to start a 3D drawing. The draw is finished when user ungrab the pen. A cube is then spawned in order to grab the 3D drawing.
- Touch a sticky note with the tip of the pen to draw on the surface.
- Sticky notes : move the joystick up or down to change the background color
Logitech MX Ink (Meta plaftorm only)
- Use the front button to change the pen color.
- Use the middle button to start a 3D drawing.
- Use the back button to end the current 3D drawing. A cube is then spawned in order to grab the 3D drawing.
- Touch a sticky note with the tip of the pen to draw on the surface.
- Touch a real surface with the tip to start a 3D drawing.
Apple Vision Pro
- Look at an object and pinch to grab it.
- Look at a button and pinch to press it.
Folder Structure
The /Photon folder contains the Fusion and Photon Voice SDK.
The /Photon/FusionAddons folder contains the XR Addons used in this sample.
The /XR folder contains configuration files for virtual reality.
The /Scripts contains all elements specific to this sample.
Architecture overview
This sample rely on the same code base than the one described in the VR Shared page, notably for the rig synchronization.
Aside from this base, the sample uses the Fusion Industries Addons to handle some reusable features.
Mixed reality
This sample is focused on mixed reality, with passthrough and plane detection.
The user's local vertical surfaces are detected and a wall prefab is spawned to interact with them.
Note that detected surfaces are not synchronized; they are only visible to the user who detected them.
Note for Meta Quest:
Currently, the user must first do a room setup in the Quest system parameters, for real life surfaces to be detected.
Cross-platform
This sample is compatible with both Apple Vision Pro and Meta Quest headset devices.
To achieve this cross-platform compatibility, and avoid error messages appearing in the editor, it is necessary to adapt the scene at runtime to the platform used.
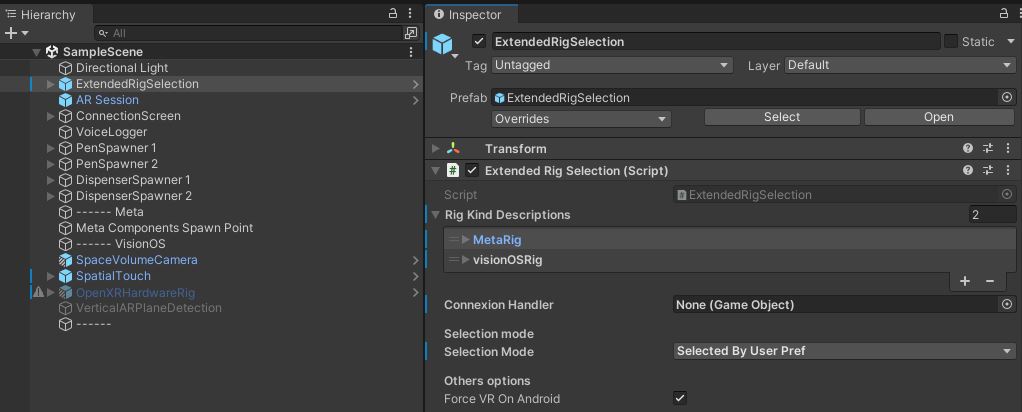
As the Meta package might cause problems during visionOs builds, and should be uninstall on this platform (see visionOS builds), to be able to keep the same scene for each platform, we used the ExtendedRigSelection capabilities to customize the created object to the detected platform.
So, the ExtendedRigSelection game objet manages two profiles : MetaRig & VisionOSRig.
For each profile, it can enable some scene game objects and spawn platform-specific prefab.
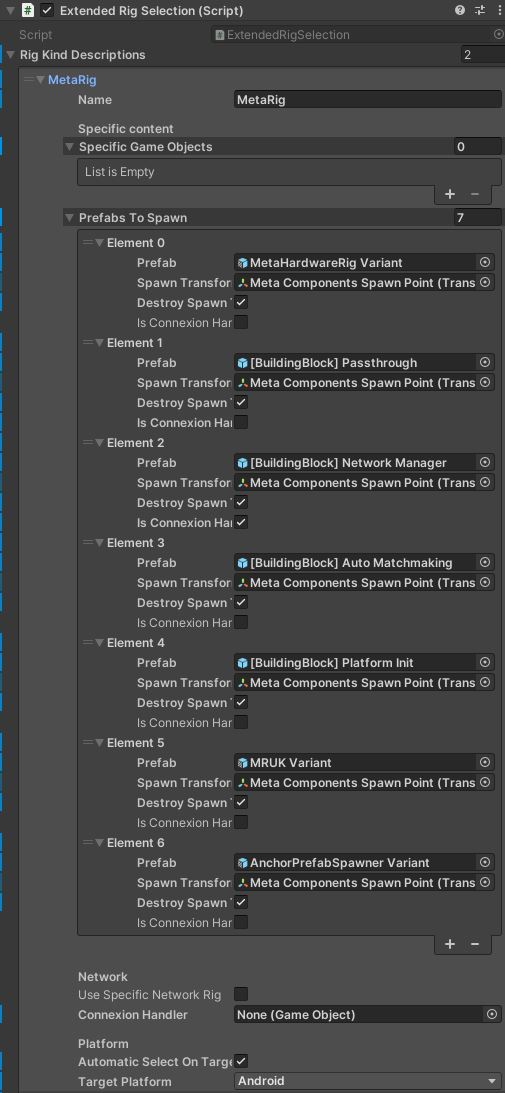
Meta platform
Seven prefabs are spawned by the ExtendedRigSelection:
- Meta hardware rig (custom version of the Meta building block OVR rig),
- Passtrough building block,
- Network Manager building block which contains the Runner and references the players' network rig prefab in the UserSpawner component,
- Auto Matchmaking building block (with the Fusion Bootstrap component to set the room name),
- Platform Init building block,
- MRUK building block variant to analyse the physical environment,
- AnchorPrefabSpawner variant to spawn a wall prefab when a vertical surface is detected in the physical environment,
Apple platform
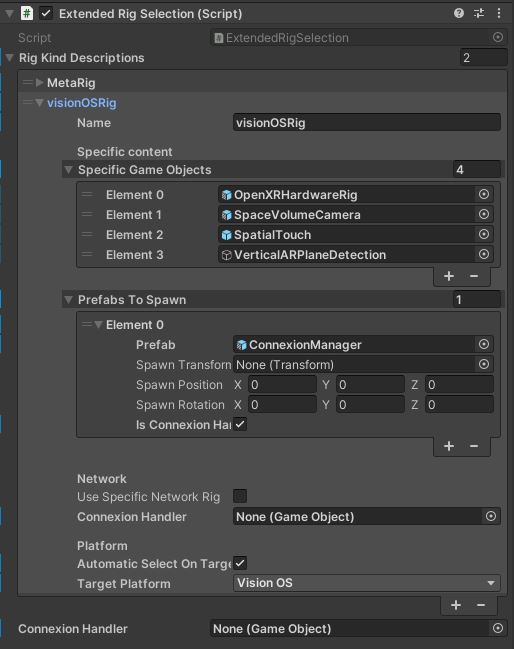
Four scene game objects are enabled at runtime by the ExtendedRigSelection:
- OpenXR hardware rig. This object could have been spawned at runtime like for Meta platform,
- Space Volume Camera to specify the part of the Unity scene that will be visible by the user,
- Spatial Touch to detect user's interaction,
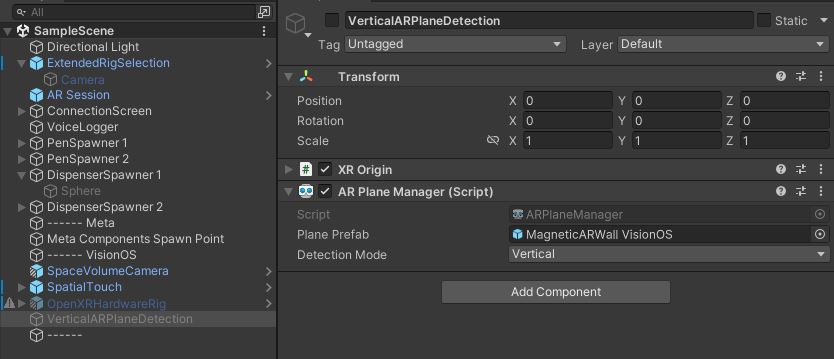
- Vertical AR Plane Detection to spawn a wall prefab when a vertical surface is detected in the physical environment,
In addition to this, a ConnexionManager is spawned. It contains the network Runner and spawns the players' network rig prefab.
The visionOS helpers tools provided in the sample ensure that the proper adaptations are done on visionOS, such as support for indirect pinch.
visionOS builds
The Meta package present in the project will prevent visionOs to build. You have to remove them when building for vision OS. The ExtendedRig selection logic allows to keep the same scene without having build errors, even with the package uninstalled.
Walls
Walls detection
When the application is launched, the physical vertical surfaces of the environment are highlighted.
Meta Quest
To do this, on Meta Quest devices, a room scan must first be performed in the system parameters.
The Meta MRUK (Mixed Reality Utility Kit) prefab is used to manage the scene data, typically checking whether the environment corresponds to a known room and loading the corresponding scene data.
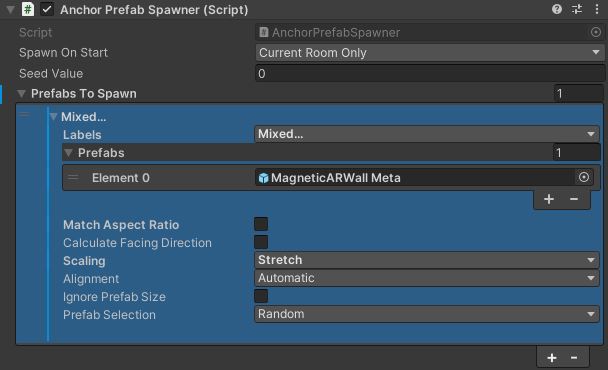
Once the scene data is loaded, the walls can be displayed using the AnchorPrefabSpawner prefab.
To this end, the prefab is configured to spawn a wall prefab MagneticARWall Meta when a vertical surfaces is detected (ie objects with label WALL_FACE, DOOR_FRAME, WINDOW_FRAME, STORAGE, WALL_ART).

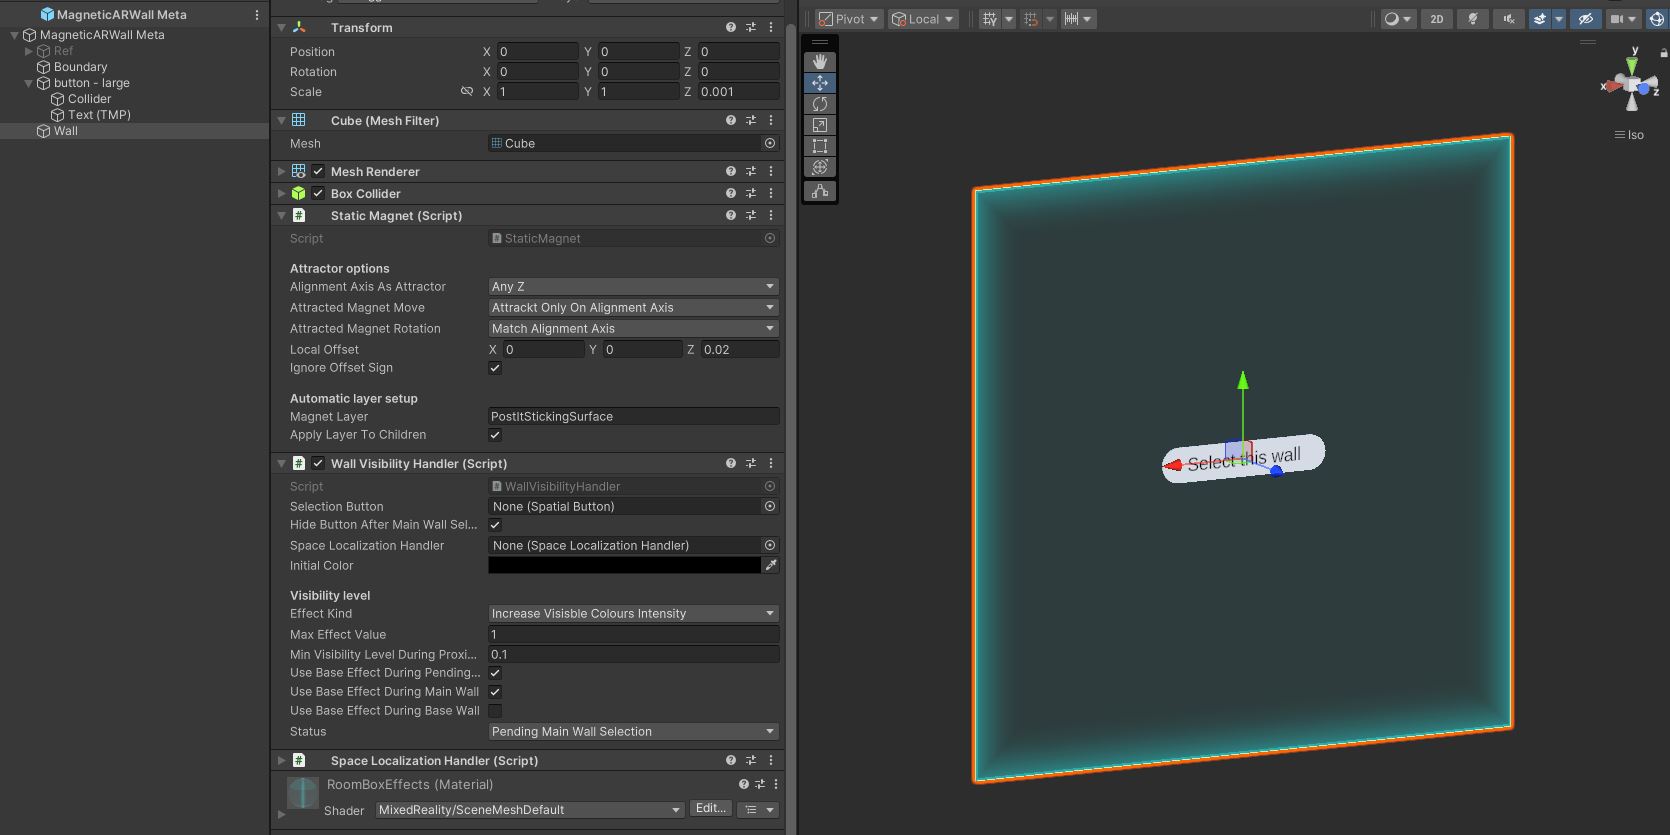
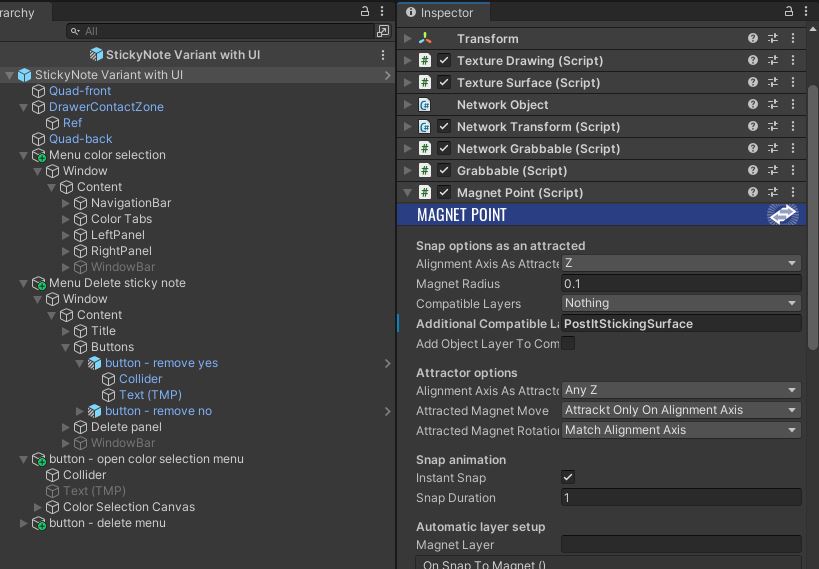
The MagnetPoint component on the sticky notes will be attracted by all objects that implement the IMagnets interface with the appropriate layers: it is the case of the walls here, with the StaticMagnet component implementing this interface.
Apple Vision Pro
On Apple Vision Pro, wall detection is performed in real time by the AR Foundation ARPlaneManager.
It is configured to spawn a MagneticARWall VisionOS wall prefab when a vertical surface is detected.
This wall is similar to the one for Meta, except for the material handling and the AR Foundation specific logic.
Wall visibilty
The WallVisibiltyHandler class on the wall prefabs manages the wall visibility according to the current status:
- no wall has yet been selected,
- this wall has been selected as the main wall,
- this wall is a basic wall.
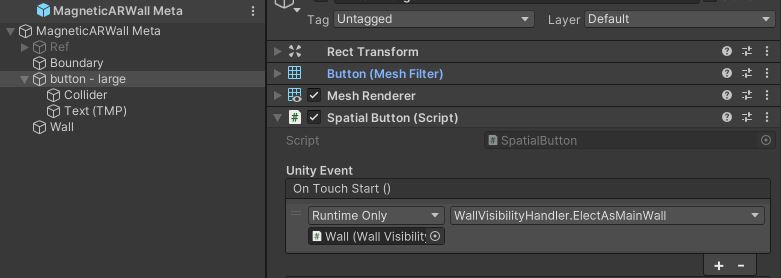
Walls status changes when the player touches a wall button. The selected wall then becomes the only visible wall.
In addition to the wall visibility based on the wall status, the IProximityTarget interface is used the create a visual effect when a sticky note is in proximity.
The ProximityHighlighter component on the sticky note uses the MagnetPoint events to inform the objects implementing the IProximityTarget interface about the distance modification.
This interface is implemented by the WallVisibilityHandler.
Please note that because the shader used on Meta platform is not compatible with Apple platform, two effects are available: a first one change the color alpha while the second effect change the color intensity.
Wall selection & Relocation
The general idea for relocating players is :
- The first player to select a wall will create a reference anchor at the main wall's position. This anchor is synchronized on the network so all late joinners will find it.
- So when a second player selects his main wall, we search the scene to see if a networked reference anchor already exists.
- With the player's relative position to his selected wall and the position of the reference anchor in the scene, we are able to teleport the second user in front of the wall selected by the first player in the Unity scene by moving the harware rig.
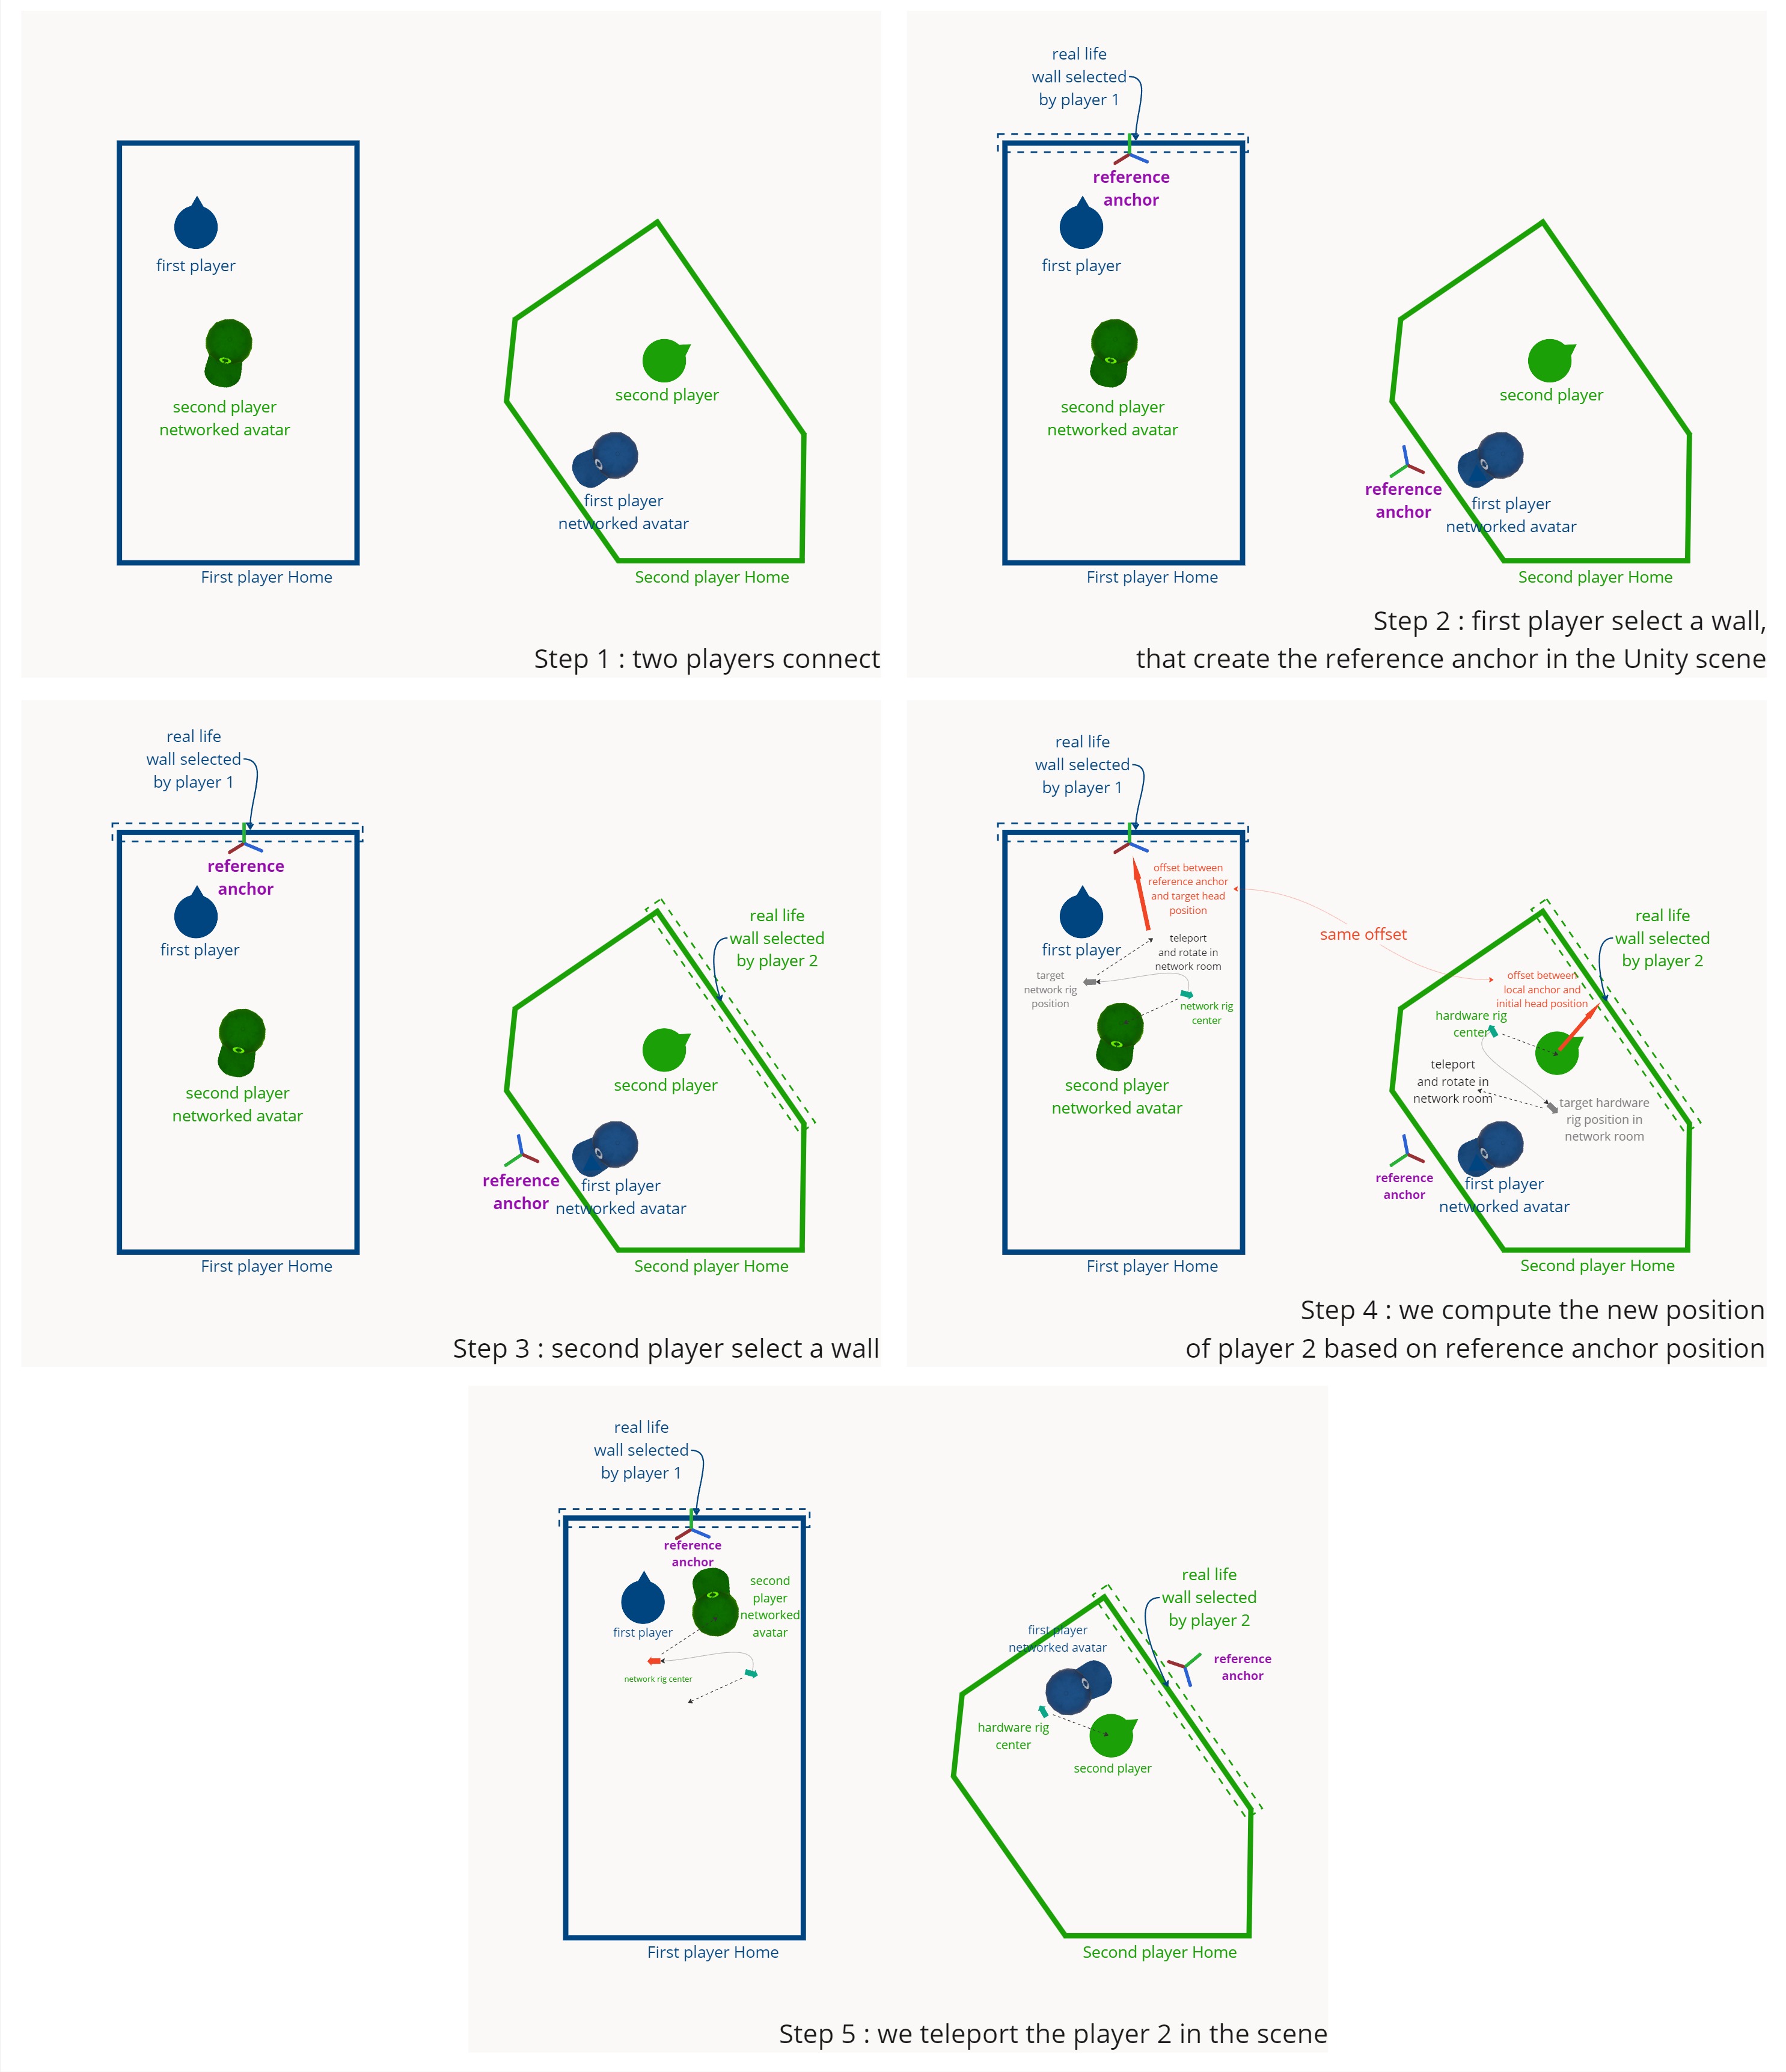
In detail, when the user selects a wall with the button, the ElecAsMainWall() method changes the walls visibilty, as explain above, but also calls the ReferenceWallSelection() function of the SpaceLocalizationHandler component located on the wall game object.
The ReferenceWallSelection() function searches for the reference anchor, then teleports the user if the anchor has been found, or creates the anchor if it doesn't yet exist.
C#
    public void ElectAsMainWall()
    {
        ChangeStatus(Status.MainWall);
        foreach (var otherWall in SceneWalls)
        {
            if (otherWall == this) continue;
            otherWall.ChangeStatus(Status.BaseWall);
        }

        if (spaceLocalizationHandler != null)
            spaceLocalizationHandler.ReferenceWallSelection();
    }
C#
 public void ReferenceWallSelection()
    {
        ...

        // Check if a reference wall has been spawned by a previous player
        DetectReferenceWall();

        if (referenceWall)
        {
            // Teleport the user
            TeleportUserToPlaceReferenceAnchoreAtSelectedRealLifeposition();
        }
        else
        {
            // Compute the reference anchor and spawn it
            ...
            }
            runner.Spawn(referenceWallPrefab, transform.position, referenceWallRotation);
        }
    }
Pens
Users can create 3D drawing or interact with a sticky note using a virtual pen or a Logitech MX Ink.
Virtual pen
Two virtual pens are spawned in the scene when the first user connects to the network thanks to the SpawnOnConnect class.
With a virtual pen, users can start a new 3D drawing by pressing the controller's trigger button.
The color of the drawing can be changed by moving the joystick up or down.
The drawing is finished when user ungrab the pen. A cube is then spawned in order to grab the 3D drawing.
Also, the virtual pen draws on the sticky notes when the tip touches the surface.
Logitech MX Ink
With a Logitech MX Ink, users can start a new 3D drawing with the middle button.
The drawing color can be change using the front button.
The drawing is completed when the back button is pressed.
Also, a 3D drawing is created if the pen tip touches a real surface.
In addition, the pen draws on the sticky notes when the tip touches the surface. Its virtual visualization is "blocked" by the post-it, as for the fully virtual pens.
The player's NetworkRig contains the NetworkMXInkPen prefab. The ColoredNetworkMXPen is derived from the NetworkMXPen class.
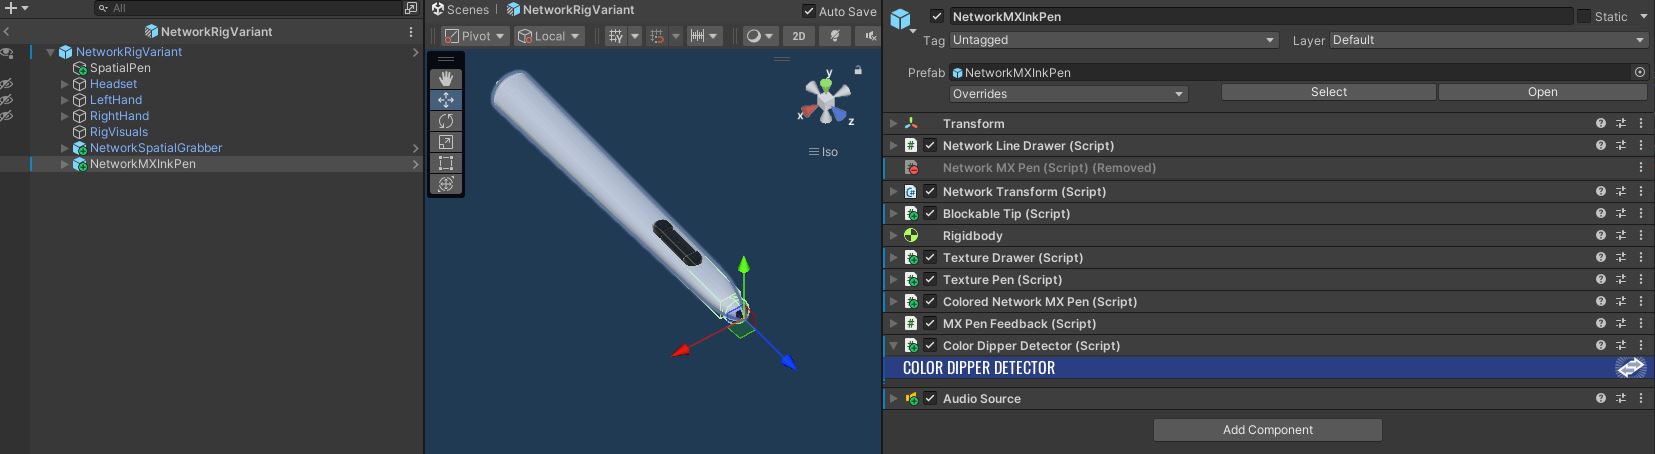
The MX Ink pen is only displayed if the stylus is enabled via the IsStylusActive network variable.
Each time the MX Ink's status is changed, the OnChangeIsStylusActive() method is called.
C#
    [Networked, OnChangedRender(nameof(OnChangeIsStylusActive))]
    public NetworkBool IsStylusActive { get; set; }

    protected virtual void OnChangeIsStylusActive()
    {
        UpdateDisplayedGameObjects();
    }
The NetworkMXPen class is also in charge to synchronize the MX Ink 3D model with the real MX Ink pen position.
C#
        public override void Spawned()
        {
            base.Spawned();
#if OCULUS_SDK_AVAILABLE
            if (Object.HasStateAuthority)
            {
                localHardwareStylus = FindObjectOfType<VrStylusHandler>();
            }
#endif
            UpdateDisplayedGameObjects();
        }

        public override void FixedUpdateNetwork()
        {
            base.FixedUpdateNetwork();

            if (localHardwareStylus)
            {
                transform.position = localHardwareStylus.transform.position;
                transform.rotation = localHardwareStylus.transform.rotation;
                IsStylusActive = localHardwareStylus.CurrentState.isActive;
                IsReplacingRightHand = localHardwareStylus.CurrentState.isOnRightHand;
            }
        }
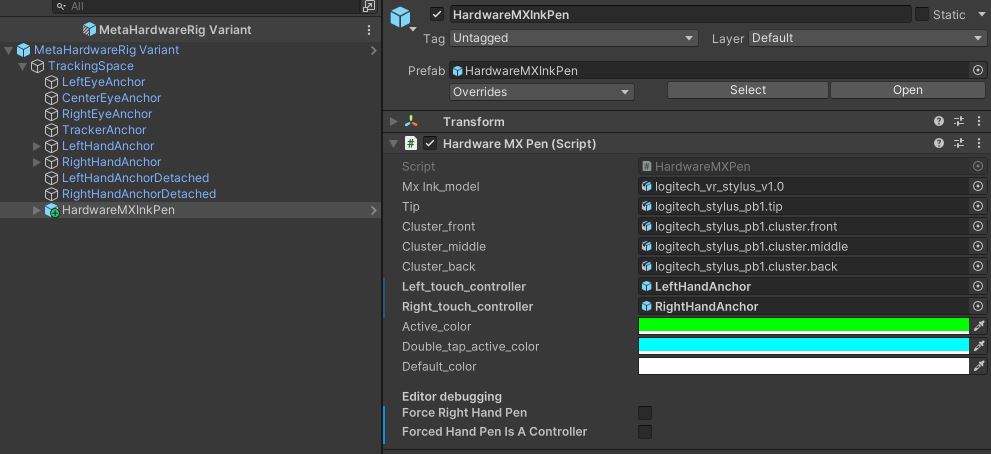
The hardware rig for Meta devices contains the HardwareMXInkPen class, derived from the Logitech VrStylusHandler class.
Drawings synchronization
For the virtual pen, the creation and synchronization of 3D lines is managed by the NetworkGrabbableLineDrawer class from the Line Drawing addon.
For the Logitech MX Ink pen, 3D drawings are handled by the NetworkMXPen class of the Logitech MX Ink Integration addon
Feedback
For both pens, audio and haptic feedback is generated when the user uses them. To do this, the classes that need to generate a feedback look for an IFeedbackHandler interface.
This interface is implemented by the BasicFeedback class provided by the XRShared addon.
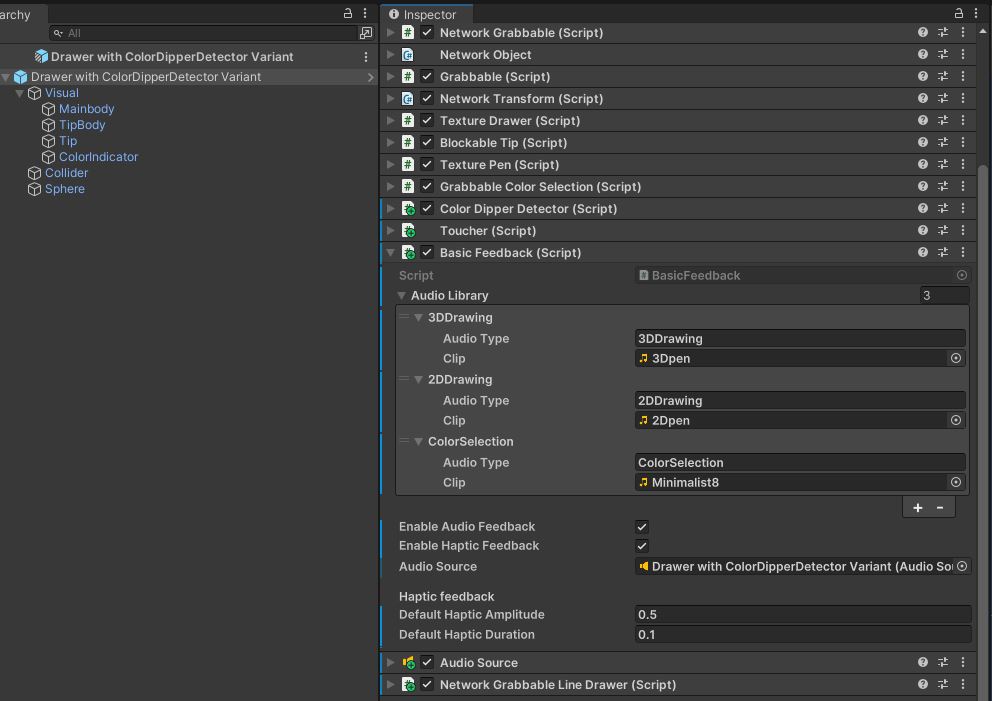
In this example, the GrabbableColorSelection class generates an haptic and audio feedback when the user changes the pen color.
C#
        [Header("Feedback")]
        IFeedbackHandler feedback;
        [SerializeField] string audioType;
        [SerializeField] FeedbackMode feedbackMode = FeedbackMode.AudioAndHaptic;

        protected virtual void Awake()
        {
        ...
            feedback = GetComponent<IFeedbackHandler>();
        ...
        }

        private void CheckColorModification()
        {
            ...
            // Audio & Haptic feedback
            if (feedback != null)
                feedback.PlayAudioAndHapticFeeback(audioType: audioType, audioOverwrite: true, feedbackMode: feedbackMode);
            ...
        }
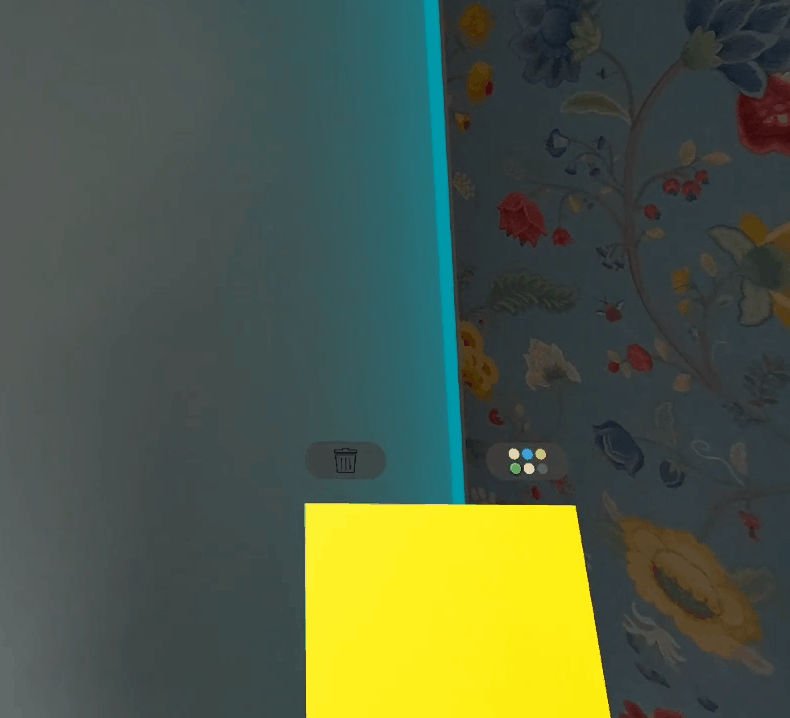
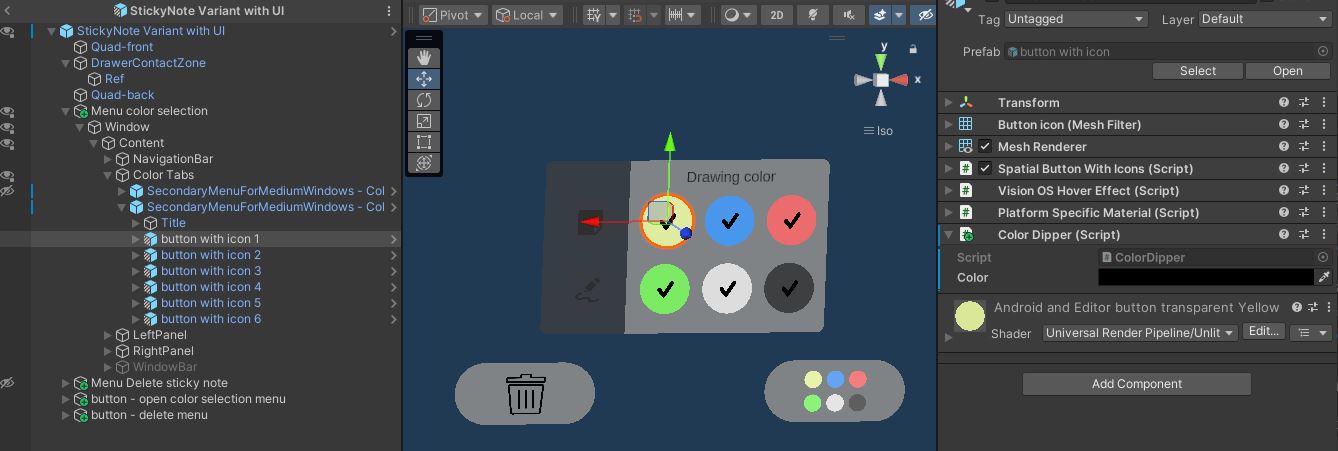
Sticky Notes
The sticky note is built using the Sticky Notes addon.
Drawing synchronization on sticky notes surface
Users can draw on the surface of sticky notes with their finger, a virtual pen or a Logitech MX Ink.
The sticky note texture synchronization is handled by the TextureDrawer and TextureDrawing classes from the Texture Drawings addon.
Finger drawing
When using a regular pen, the TexturePen class from the add-on is used.
However, to draw with fingers, the sample provides a dedicated class, TouchDrawing: it interfaces with TextureDrawer components available in the users' network rig, one for each hand.
TouchDrawing implements the ITouchable interface, and as such, is warned when the Toucher component present on the index (in fact, its Pincher subclass, here) touches the post-it.
Then, to limit erroneous lines to be drawn on the post-it when the user tries to grab it, DetectGrabbingOrDrawingStart checks the finger orientation to be sure that an actual drawing is expected to start.
While the finger stays in contact with the surface, in the Draw method, SmoothPosition is called to determine an average contact point and replace the contact position by this average: in finger tracking, the detection inaccuracies might lead to trembling drawing line, hence the use of this system. This can be customized with numberOfToucherPositionsToSmoothOn (and disabled by setting this to 0).
Finally, the TextureDrawer's AddDrawingPoint method is called, like with regular pens.
vision OS spatial drawing
The project contains an optional subclass of TouchDrawing, dedicated to using vision OS spatial touches to draw: SpatialTouchDrawing. It relies on the ISpatialTouchListener callbacks triggered by the SpatialTouchHandler component in the scene.
In vision OS 1, this was particularly required as the refresh rate of the hand skeleton was low, while the spatial touch position was much more frequently updated. In vision OS 2, it is less required, and the TouchDrawing is used by default in the project even for visionOS.
While the SpatialTouchDrawing is a bit more rapid and accurate (no need to smooth position), the current spatial touches have an issue that made us choose not to rely on it by default: currently, in Polyspatial, if you pinch directly on an object (not from remote), then you cannot touch again this object unless you have interacted with something else, or moved the hand pretty far away. This lead to the current issue here: while there is no issue if you pinch-grab the post-it remotly, if you grab it "locally", then you cannot draw on it easily without moving your hand far from it, which is a bit unexpected.
UI & Interaction
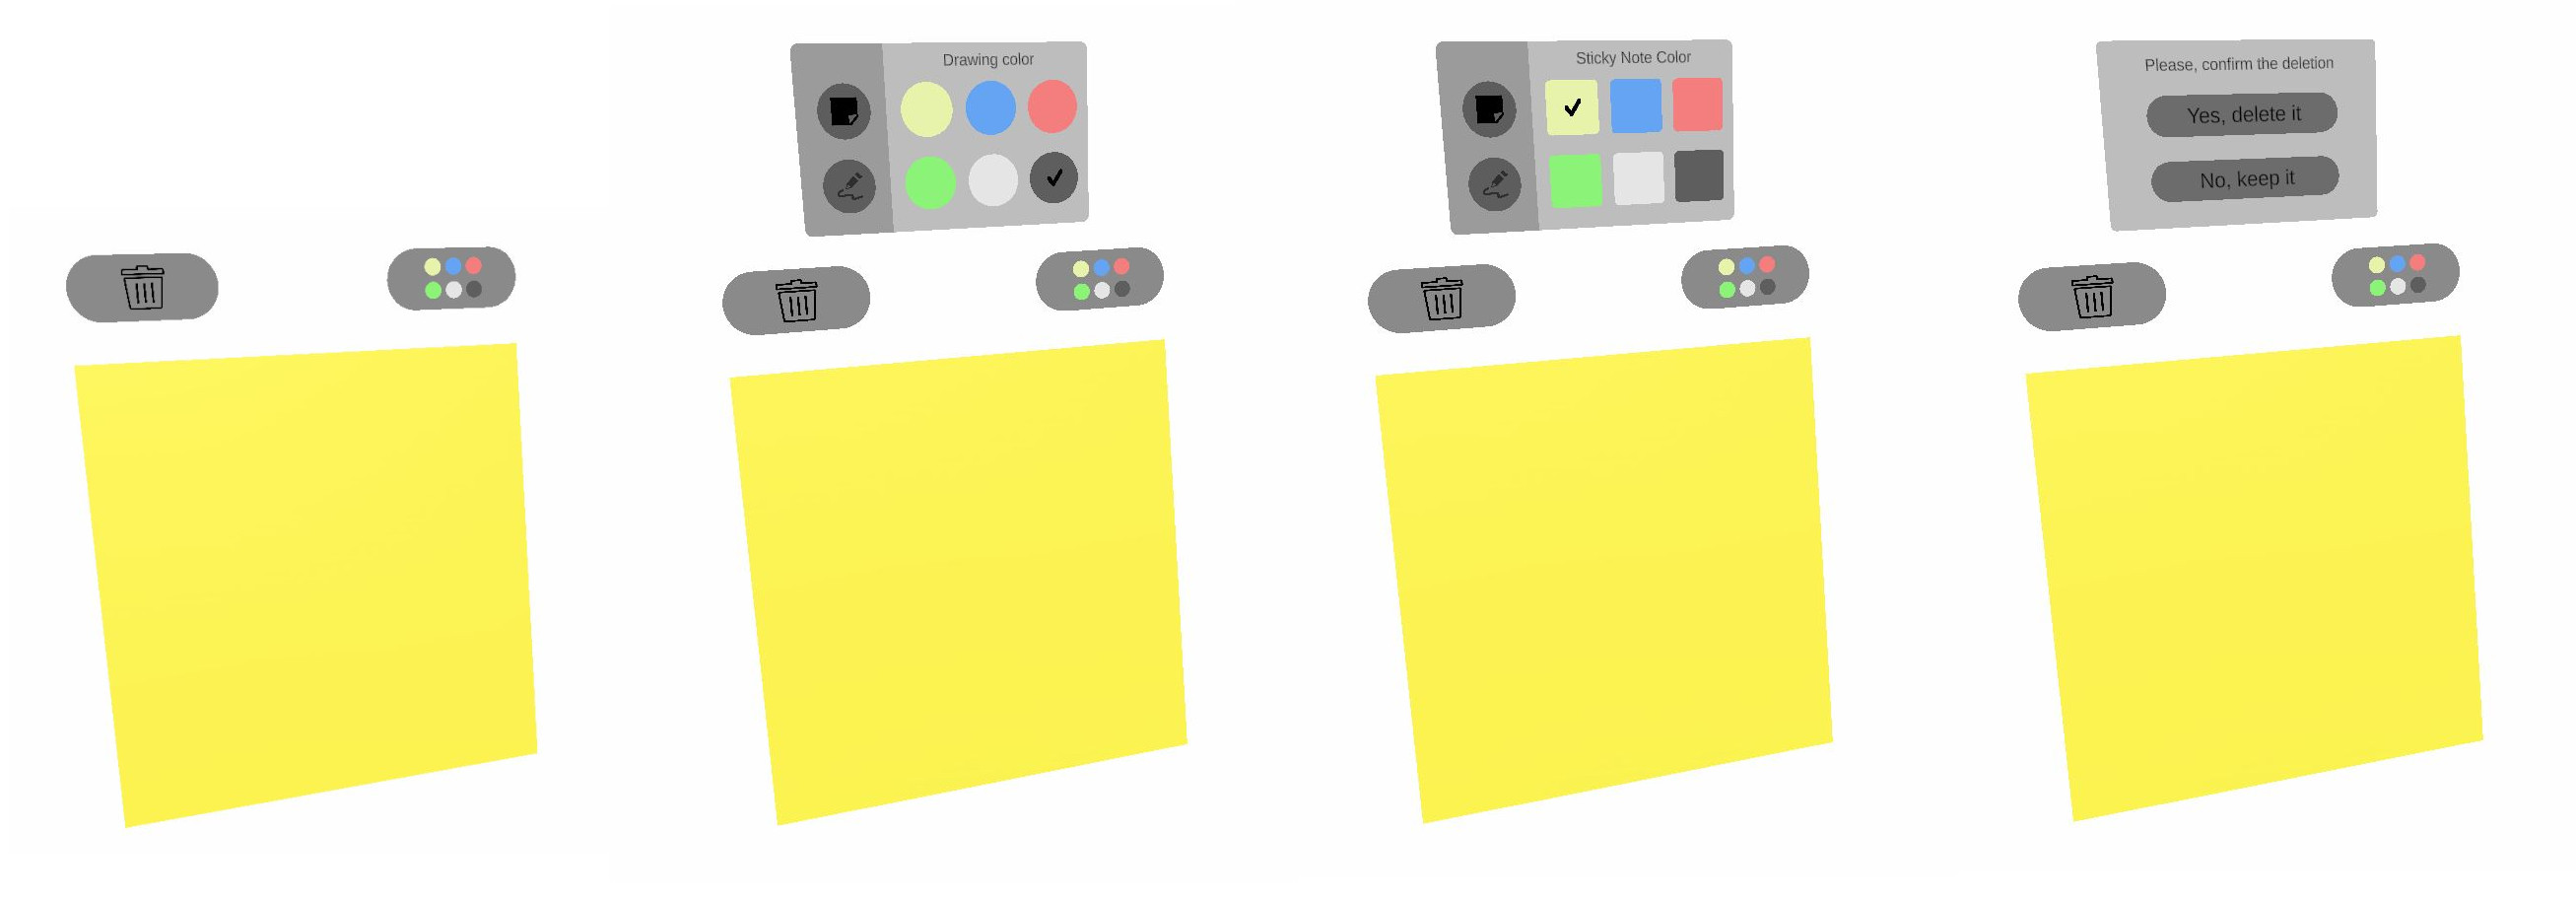
Compared to the sticky note addon prefab, a UI has been added to the notes to:
- change the background color,
- change the drawing color,
- delete the drawings,
- delete the sticky note,
Pen interaction
Sticky note buttons (SpatialButton & SpatialButtonWithIcons) implement the ITouchable interface in the SpatialTouchable class.
Pens can interact with the sticky notes UI thanks to the Toucher component, which will detect collisions with objects with an ITouchable interface.
Hand interactions
To interact with the finger, the Pincher component, which derived from the Toucher, is located to the hardware rig index.
Users can therefore interact with objects with the IPinchable interface, but also touch objects with the Touchable component.
This is the case for the UI buttons (SpatialButton & SpatialButtonWithIcons) which implement the ITouchable interface in the SpatialTouchable class.
The HandRepresentationManager component handles which mesh is displayed for an hand, depending on the hand tracking mode currently used (controller tracking or finger tracking).
Please note that, in this sample, it has been choosen to display the hardware rig hands when the finger tracking mode is enabled.
The local hand representation:
- is the XR Hands package hand representation on visionOs
- is the Meta OVR hand representation on Meta Quest
The remote user hands use the XR Hands package hand representation, no matter the origin platform.
See XR Hands Synchronization addon for more details on hand state synchronization.
The grabbing system used here is the "local rig grabbing" implementation described in the VR Shared - Local rig grabbing page.
Drawing color modification with sticky notes UI
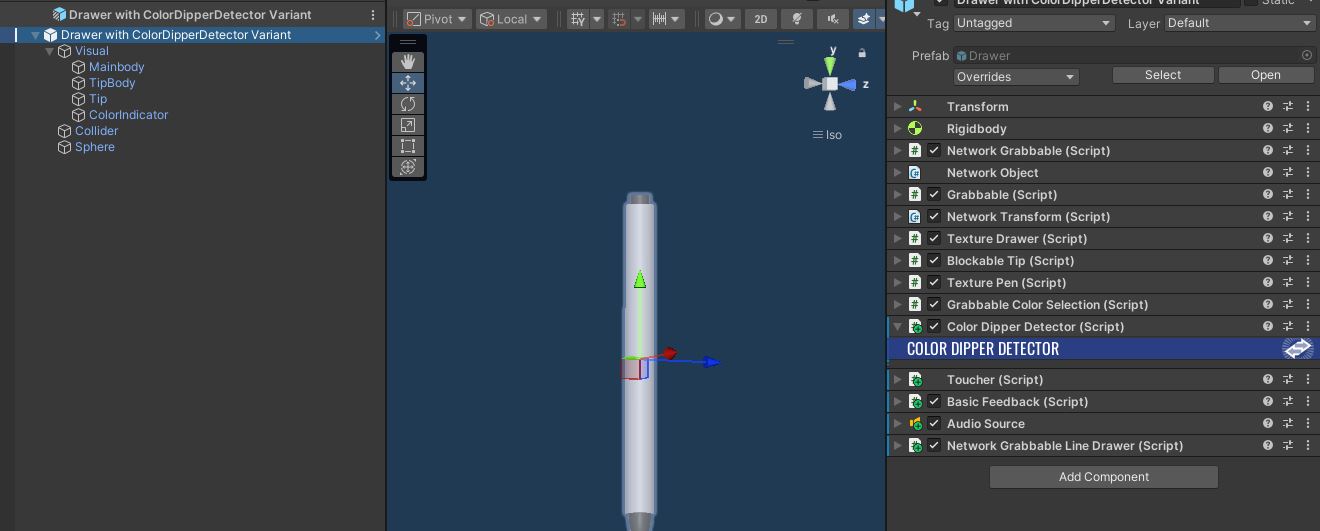
In addition to the Toucher, the sticky notes color buttons have the ColorDipper component.
On the pen side, the ColorDipperDetector checks if a collision occurs with a ColorDipper.
If a collision with a ColorDipper is triggered, ColorDipperDetector forwards the new color during the FixedUpdateNetwork() to the IColorProvider (ie the GrabbableColorSelection) by changing the colorProvider.CurrentColor.
C#
    private void OnTriggerEnter(Collider other)
    {
        if (Object && Object.HasStateAuthority)
        {
            ColorDipper colorDipper = other.GetComponentInParent<ColorDipper>();
            if (colorDipper != null)
            {
                colorChangeRequest = true;
                requestedColor = colorDipper.color;
            }
        }
    }

    public override void FixedUpdateNetwork()
    {
        base.FixedUpdateNetwork();
        if(colorChangeRequest)
        {
            colorProvider.CurrentColor = requestedColor;
            colorChangeRequest = false;
        }
    }
Then, GrabbableColorSelection synchronizes the color modification on the network (OnColorChanged()).
Note that GrabbableColorSelection is also responsible for synchronizing the color if the player changes it using the controller's joystick.
In the case of Logitech MX Ink, the ColoredNetworkMXPen class implements the IColorProvider interface, and is therefore responsible for changing the drawing color when the user uses the Logitech MX Ink hardware button or interacts with a color button.
Please note that the UI is also synchronized on the network.
When a new color is selected, the SpatialButton class calls the ChangeDrawingColor() method of the StickyNoteColorSelectionWithMenu class.
First, it checks if the user has the StateAuthority on the object, then it changes the color index variable.
This variable will be checked in the FixedUpdateNetwork() and the networked variable DrawingColorMenuIndex will be updated if required to inform remote users.
Finally, the OnDrawingColorMenuIndexChanged() function is called on all players.
C#
    [Networked, OnChangedRender(nameof(OnDrawingColorMenuIndexChanged))]
    [SerializeField] private int DrawingColorMenuIndex { get; set; }

    // ChangeDrawingColor is called by menu buttons (SpatialButtonWithIcons) in the scene
    public void ChangeDrawingColor(int index)
    {
        if (Object == null) return;
        await Object.WaitForStateAuthority();
        drawingColorRequestedWithMenu = index;
    }


    public override void FixedUpdateNetwork()
    {
        base.FixedUpdateNetwork();

        if (Object == null || Object.HasStateAuthority == false) return;
        CheckBackgroundColorSelectionWithStickyNoteMenu();
        CheckDrawingColorSelectionWithStickyNoteMenu();
    }

    private void CheckDrawingColorSelectionWithStickyNoteMenu()
    {
        if (DrawingColorMenuIndex != drawingColorRequestedWithMenu)
        {
            if (Object.HasStateAuthority)
            {
                // change the DrawingColorMenuIndex networked var so remote player's UI will be updated
                DrawingColorMenuIndex = drawingColorRequestedWithMenu;
            }
        }
    }

    // Update the menu selected color when the network var DrawingColorMenuIndex has been changed
    protected virtual void OnDrawingColorMenuIndexChanged()
    {
        // change drawing color
        ApplySpatialTouchDrawingColorChange(DrawingColorMenuIndex);

        if (DrawingColorMenuIndex == previousDrawingColorMenuIndex) return;
        // Update the color index
        previousDrawingColorMenuIndex = DrawingColorMenuIndex;

        // update buttons
        ActivateRadioButton(drawingColorRadioGroupButtons, DrawingColorMenuIndex);
    }
Background color
The background color of sticky notes can be changed when the user selects a new color in the user interface.
The process of updating the UI is very similar to the drawing color selection described above.
Regarding the texture color modification process, when a new background color is selected, the SpatialButton class calls the ChangeStickyNoteColor() method of the StickyNoteColorSelectionWithMenu class.
It first checks whether the user has the State Authority on the object, then change the backgroundColorRequestedWithMenu variable.
This variable will be check in the FixedUpdateNetwork() with the CheckBackgroundColorSelectionWithStickyNoteMenu() method.
C#
    // ChangeStickyNoteColor is called by menu buttons (SpatialButtonWithIcons) in the scene
    public async void ChangeStickyNoteColor(int index)
    {
        if (Object == null) return;
        await Object.WaitForStateAuthority();
        backgroundColorRequestedWithMenu = index;
    }

    private void CheckBackgroundColorSelectionWithStickyNoteMenu()
    {
        if (backgroundColorRequestedWithMenu != -1 && colorIndex != backgroundColorRequestedWithMenu)
        {
            ChangeColor(backgroundColorRequestedWithMenu);
            backgroundColorRequestedWithMenu = -1;
        }
    }
The ChangeColor() function of the GrabbableColorSelection class updates the CurrentColor networked variable.
So, the OnCurrentColorChange(), OnColorChanged() and the ApplyColorChange() methods are called.
C#
    public class GrabbableColorSelection : NetworkBehaviour, IColorProvider
    {
        [Networked, OnChangedRender(nameof(OnCurrentColorChange))]
        public Color CurrentColor { get; set; }

        ...
        void OnCurrentColorChange()
        {
            OnColorChanged();
        }

        // Update the color when the network var has been changed
        protected virtual void OnColorChanged(bool forceChange = false)
        {
            if (CurrentColor == previousColor) return;
            // Update the color
            previousColor = CurrentColor;
            ...
            ApplyColorChange(CurrentColor);
        }
        ...
The new background color is applied to the TextureSurface by the override ApplyColorChange() function of the StickyNoteColorSelection derived class.
C#
public class StickyNoteColorSelection : GrabbableColorSelection
{
    TextureSurface texture;

    protected override void Awake()
    {
        base.Awake();
        texture = GetComponent<TextureSurface>();
        if (texture == null)
            Debug.LogError("TextureSurface not found");
    }

    protected override void ApplyColorChange(Color color)
    {
        texture.ChangeBackgroundColor(color);
    }
}
Deletion
When the user confirms the deletion of a sticky note, the DeleteObject() method of the DespawnObject is called.
A delay in deleting the object is necessary to allow audio feedback to be played.
C#
    public void DeleteObject()
    {
        await Object.WaitForStateAuthority();
        if (Object.HasStateAuthority)
        {
            StartCoroutine(DeleteObjectAfterDelay(delayBeforeDespawn));
        }
    }

    IEnumerator DeleteObjectAfterDelay(float delay)
    {
        if (feedback != null)
        {
            feedback.PlayAudioFeeback(audioType);
        }

        yield return new WaitForSeconds(delay);
        Object.Runner.Despawn(this.Object);
    }
Snapping
A specific PostItStickingSurface magnet layer is set on the Static Magnet component of the walls prefab .
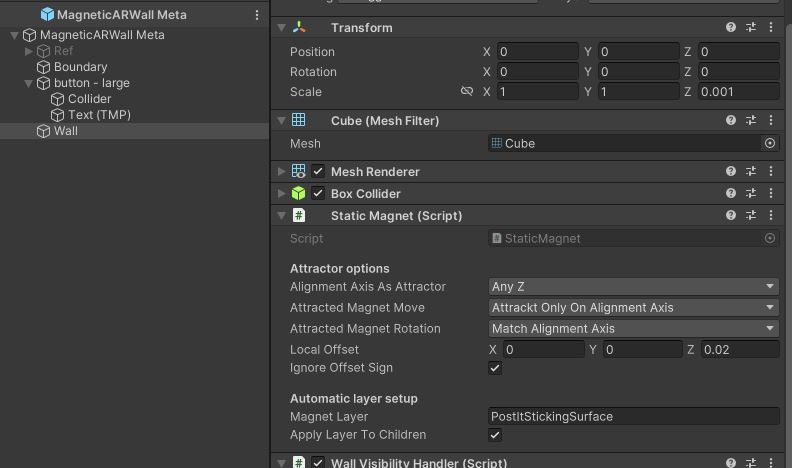
So, the sitcky notes Magnet Point component of the sticky notes prefab has to be set with the same layer.
See the Magnets addon for more details.
Used XR Addons & Industries Addons
To make it easy for everyone to get started with their 3D/XR project prototyping, we provide a comprehensive list of reusable addons.
See Industries Addons for more details.
XRShared
The XR shared offers the core of the rig parts sycnhronization logic, as well as basic interaction capabilities such as grabbing.
Meta Core Integration
The Meta Core Integration addon has been developed to facilitate Meta building blocks support.
VisionOS helpers
The visionOS helpers addon addresses some specificities of the visionOS platform.
It makes the indirect pinch compatible with XRShare grabbing, provides tools to synchronize the bounded/unbounded Polyspatial's state, and also offers some cross-platform tools, like a LineRenderer replacement, or helpers to mimic the visionOS windows behavior in Unity.
MXInkIntegration
The Logitech MX Ink Integration addon has been developed to facilitate the Logitech MX Ink stylus support.
Voice helpers
The Voice Helpers addon provides some components to help set up Photon Voice for a Fusion XR project.
ConnectionManager
The ConnectionManager addon manages the connection launch and spawns the user representation for the Apple profile.
For the Meta profile, it is handle by the Network Manager building block which contains the Runner and references the players' network rig prefab in the UserSpawner component.
See ConnectionManager addon for more details.
ExtendedRigSelection
This addon allows to switch between the various rigs required in this sample.
There is one profile for the Apple Vision Pro and one profile for Meta Quest devices.
See Extended Rig Selection addon for more details.
Line Drawing
This addons is used to create drawings with pens.
See Line Drawing addon for more details.
Texture Drawing
This addon is used to synchronized the texture edition on sticky notes.
Note that this sample includes a button to clear the drawing, that use the clearing method provided by the add-on.
See Texture Drawings addon for more details.
Data Sync Helpers
This addon is used here to synchronize the 3D/2D drawing points & sticky note drawing points.
See Data Sync Helpers addon for more details.
Blocking contact
We use this addon to block the pens on sticky notes surfaces.
See Blocking contact addon for more details.
Magnets
This addon is used to snap the sticky notes on the wall.
The Magnets addon for more details.
Sticky notes
This addon allows users to spawn sticky notes in the scene.
See Sticky Notes addon for more details.
XRHands synchronization
The XR Hands Synchronization addon shows how to synchronize the hand state of XR Hands's hands (including finger tracking), with high data compression.
It also provides some helpers classes to detect gestures (pinching, grabbing, ...)
Third party components
Oculus Sample Framework hands
Sounds
- Overview
- Architecture overview
- Mixed reality
- Cross-platform
- Walls
- Pens
- Sticky Notes
- Used XR Addons & Industries Addons
- XRShared
- Meta Core Integration
- VisionOS helpers
- MXInkIntegration
- Voice helpers
- ConnectionManager
- ExtendedRigSelection
- Line Drawing
- Texture Drawing
- Data Sync Helpers
- Blocking contact
- Magnets
- Sticky notes
- XRHands synchronization
- Third party components