Culling Demo
This is a tutorial about how to add Network Culling to the RPGMovement demo from the PUN package.
First of all let's talk about what Network Culling is and why you should make use of it.
Imagine: you have two active players in your scene: one player is in the upper left corner of the map, the other player is in the bottom right corner of the map.
So the distance between both players nearly reaches a maximum value.
Additionally they can’t see each other because there are some obstacles placed in the middle of the map.
Because of that the first player doesn’t need to know exactly what the second player is doing right now and the other way around.
This leads us to Network Culling.
Network Culling reduces the amount of messages being sent over the network by using Interest Groups.
When using this solution the player subscribes to a few groups he is currently interest in and only sends messages to or receives messages from those.
Getting started
After launching Unity the first thing you want to do is to download the latest PUN package from the Unity Asset Store and import the files.
You can safely uncheck all demos except the RPGMovement demo since we want to add Network Culling abilities to it.
When the import process is done navigate to Photon Unity Networking > Demos > DemoRPGMovement and open the scene inside this folder.
Take a look at the hierarchy and search for a blueish written Robot Kyle RPG.
If it exists, you need to remove it, otherwise this may lead to a lot of exceptions later.
Now let’s set up the grid used for Network Culling.
Therefore take a look at the hierarchy again and search for the game object Terrain.
Right click on it and select create empty.
This creates a new, empty game object as a child of Terrain.
Rename it to whatever you want, for this tutorial let’s call it CullArea.
When having the CullArea game object selected, click on the Add Component button in the inspector, look for Cull Area and add it to the game object.
The script can also be dragged and dropped onto the game object’s inspector.
It is located in Photon Unity Networking > UtilityScripts.
Let’s take a closer look at the options provided by the component.
Setting up the world
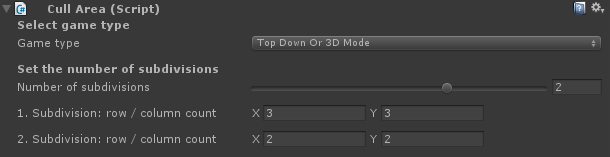
First of all the component lets you choose the game type of your project.
In more detail this sets the up-axis of the culling area.
When having a side-scrolling game select Side Scroller Mode, otherwise if you are working on a top-down or fully 3D perspective (First-Person, Third-Person…) game select Top Down Or 3D Mode.
Since we are working on the RPGMovement demo we select the Top Down Or 3D Mode option.
Next step is to set up the dimension of the cull area.
Therefore we simply change the Transform component by increasing the scaling of the game object. For the RPGMovement demo the scaling must be set to 100 on the x- and the z-axis.
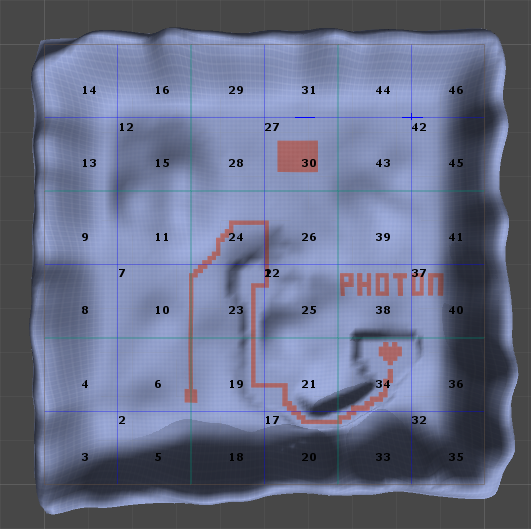
When taking a look at the scene window you notice, that there is a red square appeared which is the border of the cull area.
You also notice that the square is displaced so we need to adjust the position, by changing the x- and z-coordinates of the Transform component.
Set both values to 50.
The border should match with the map of the demo now.

Note: When using Unity 4 the grid possibly might be displaced when taking a look at the game view when having Gizmos activated.
You can - more or less - fix that by using ‘Free Aspect’ instead of any other fixed aspect ratio in the game view.
Let’s take a look at the other options the CullArea component provides.
Until now you only have a single, large area which doesn’t offer any Network Culling possibilities at all.
So the next step is to define how many subdivisions we want to have on the map.
For the RPGMovement demo it’s fine to set the number of subdivisions to 2.
You notice that changing this value made some more options appear - or disappear.
This new option lets you define how many rows and columns you want to have on each subdivision.
For this tutorial we set the row and column count of the first subdivision both to 3.
When taking a look at the scene view now, the red square is subdivided into nine smaller green squares.
Let’s also set the row and column count of the second subdivision.
This time we set both values to 2.
When taking a look at the scene view again the green squares now are also subdivided, each into four even smaller blue squares.
Note: The maximum number of subdivisions is limited to three.
The amount of the created cells by setting the above values is limited to 249 using default values.
Any attempt to create more cells will result in an exception displayed in the editor’s console.
The last two options are for adjusting the scene and the game view.
When checking the toggle to automatically align the editor view with the grid the scene view is changed every time you update the size or position of the cull area.
This might be helpful when trying to match the border of the cull area with the created level.
Align main camera with grid is mostly for testing in side-scrolling or top-down games and aligns the main camera with the grid.
This might ease your work because you don’t have to manually adjust the main camera for testing.
Adjusting the main camera can be undone.
Setting up the player
We just finished configuring the world and need to set up the player in the next step.
Therefore navigate to Photon Unity Networking > Demos > DemoRPGMovement > Resources and select the prefab Robot Kyle RPG.
Take a look at the inspector, click on Add Component and select Network Culling Handler from the list.
This component automatically looks for a reference to the Cull Area we adjusted before and regularly checks, which interest group the client has to subscribe or unsubscribe.
Since we don’t need to configure anything over here, we’re done with the player and the overall setup.
Testing
We are done with configuring the Network Culling and can do some tests now.
Testing requires at least two clients connected to the same room.
In Unity navigate to File > Build & Run.
Unity now creates a standalone client which is automatically started when the process is done.
For testing you can launch the created executable multiple times or hit the play button in the editor.
When at least two clients are loaded, connected to the same room and their player characters are created and controllable, take one of them and start moving around, while taking a look at one of the other client’s window to follow the movement.
You will notice that the larger the distance between both players is, the more laggy the movement will be.
This is because the number of updates sent over the network is massively reduced.
In contrast when lowering the distance between both players, the movement will be more precisely and less laggy because there are more updates sent.
Keep in mind that this is just for demonstrating the possibilities of Network Culling.
When you want to use Network Culling in production you need to improve and extend the given basics.