Goal Oriented Action Planning
Creating a new GOAP
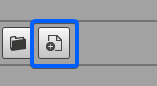
Using the top menu, you can create a new GOAP.
Creating a new Task
When right clicking any empty space, you can create a new Task.
A Task has a set of Conditions and Effects.
Those are directly related to the World State of the game.
You can have your own set of World State flags defined on your quantum_code solution.
- The Conditions specify that the Task should be performed if those Conditions matches the current World State.
- The Effects specify what will change in the World State after the task finishes.
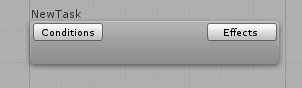
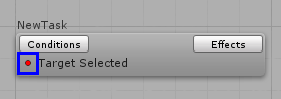
This is the simpler Task that you can create, with no Condition/Effect defined:
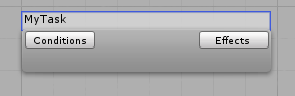
You can change a Task's name by right clicking it and selecting Edit Task Settings.
Press Enter to apply the changes or press Esc to discard those changes.
Specifying the Conditions/Effects
To specify a Condition/Effect on any Task, just click the left/right buttons and select what is the World State flag that you want to add.
The ones that are not selected will just be ignored.
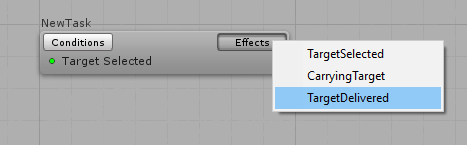
When you add a new World State flag to any task, it will be treated as True.
So for Conditions, it will see if that flag is set as True on the World State.
On Effects, it will set the flag to true on the World State.
To toggle those values, you can Left Click the little green circle at the side of the flag, then it will turn to red.
You can add multiple Conditions and Effects and toggle their values the way you want:
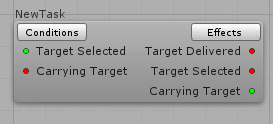
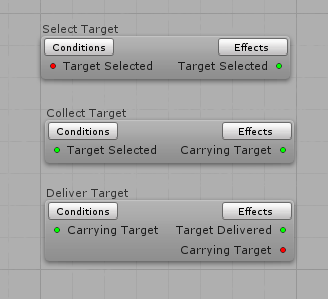
So it is very common that your GOAP have many Tasks defined, with diversified sets of Conditions and Effects:
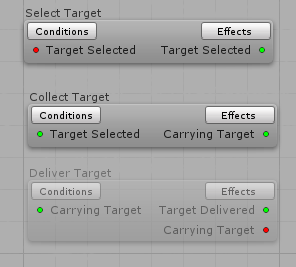
You can also disable a Task so it will be ignored during the planning process.
To do it, right click any Task and select Disable Task:
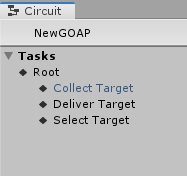
You can also navigate through your Tasks using the left side menu:
GOAP Actions
Defining Actions is shared topic on Bot SDK. Find here more information on how to use Actions on the visual editor: Defining Actions
Muting
When testing your AI, it might be useful to mute some nodes in order to temporarily disable some logic. Find here more information on how to Mute nodes: Muting
Compiling your GOAP
In order to actually use the GOAP that you created, you have to compile what you have done.
To compile, you have two options:

- The left button is used to compile only the currently opened document
- The right button is used to compile every AI document that you have on your project
Your GOAP files will be located at: "Assets/Resources/DB/CircuitExport/GOAP_Assets".

Choosing the AI to be used by your Bots
To finally use the AI created, you just need to reference the compiled assets.
You can do it by loading the asset based on the GUID, or you can just create an Asset Link to point to the desired AI asset:

GOAP Coding
Declaring the World State
When using the GOAP, you will have to define your own World States to be used as your Task's Conditions and Effects.
The framework already comes with a set of pre-defined World States so you have to replace them by your own.
To find it, you have to search on your project for the GOAP.qtn file.
It should be located at the quantum.state project on the "BotSDK/AI/GOAP" folder.
When opening the file, you will see that there is a definition for the World States.
This is where you replace those by your own flags.
C#
enum GOAPWorldState : Int64 {
    Root = 1, TargetSelected = 2, CarryingTarget = 4, TargetDelivered = 8
}
When changing this enum and compiling the quantum.state project, the values will already be available on the GOAP Editor for Conditions and Effects.
Using the Goap Agent
This is how to declare a GOAP Agent within an entity:
C#
entity MyEntity[6] {
    use Transform2D;
    use DynamicBody;
    use Prefab;
    fields {
        player_ref Player;
        GOAPAgent GOAPAgent;
    }
}
But, as the Agent is a struct, you are not limited to use it inside of entities.
The GOAP Updater
As we already seen, on the GOAP Visual Editor, we defined a set of Tasks.
Those are the tasks that a GOAP Agent will try to use in order to achieve its goal state.
In order to update a GOAP Agent's state, we need to use the GOAPUpdater.
But before actually using the Updater, it needs to know what are the tasks that can be used.
This is done first on the initialization process.
You can manage this as you prefer but, just to exemplify, let's analyse a simple case.
The first thing to do is to instantiate a GOAPUpdater.
It can be done this way in any quantum code:
C#
private GOAPUpdater goapUpdater = new GOAPUpdater();
Now we have to initialize it using the Agent's GOAP information:
C#
goapUpdater.InitGOAPUpdater(runtimePlayerData.GOAPRoot);
By accessing the GOAPRoot (which is the file generated after the compilation process), the Updater knows the Tasks that the GOAP has in hands, so it is ready to be used to actually plan and act.
An important concept here is that once an Updater is initialized to use a specific set of Tasks, you cannot use the same Updater to update GOAP Agents that has a different set of tasks.
So you might need to either:
- Re-initialize your GOAPUpdater using the different GOAPRoot
- Create new GOAPUpdaters for those other types of agent, initializing the Updaters with the specific GOAPRoots
Setting a GOAP Agent's Goal
Now that we have a initialized Updater, we also need to initialize the GOAP Agent.
It is done in two simple steps:
Create a new goal using the
GOAPWorldState.The goal supports both Positive and Negative values.
C#
GOAPState goal = new GOAPState();
goal.Positive = (Int64)GOAPWorldState.TargetDelivered;
goal.Negative = (Int64)GOAPWorldState.CarryingTarget;
Set it as the agent's goal
C#
myEntity->Fields.GOAPAgent.SetGoal(goal);
Updating the GOAP Agent
Now that we already have:
- An initialized
GOAPUpdater - An initialized
GOAPAgent
We can finally move to using both of them to drive our Bot.
What we have to do is update the agent's current state based on our game specific logic.
To do that, whenever you need, you can update it like this:
C#
myEntity->Fields.GOAPAgent.CurrentState = (Int64)state;
Besides, you also need to use the Updater to update the agent so it makes a new plan and execute a set of actions based on its current state and on its goal:
C#
goapUpdater.UpdateGOAPAgent(f, &myEntity->Fields.GOAPAgent, (Entity*)myEntity);
Coding Actions
To create your own Actions, follow these instructions: Coding Actions
Defining fields values
Find here more information on the alternatives that you have when settings values to Actions/Decisions fields: Defining fields values.
AIParam
Find here more information on using the AIParam, which is useful if you want to have more flexible fields that can be defined in different ways: settings by hand or from Blackboard/Constant/Config Nodes: AIParam.
Visual Editor Comments
Find here more information on how to create comments on the Visual Editor: Visual Editor Comments.
Changing the compilation export folder
By default, assets generated by Bot SDK's compilation will be placed into the folder Assets/Resources/DB/CircuitExport. See here how you can change the export folder: Changing the export folder.
Choosing the saved History Size
It is possible to change the amount of history entries saved on Bot SDK files. Find here more information on this matter: Changing History Save Count.
Back to top- Creating a new GOAP
- Creating a new Task
- Specifying the Conditions/Effects
- GOAP Actions
- Muting
- Compiling your GOAP
- Choosing the AI to be used by your Bots
- GOAP Coding
- Declaring the World State
- Using the Goap Agent
- The GOAP Updater
- Setting a GOAP Agent's Goal
- Updating the GOAP Agent
- Coding Actions
- Defining fields values
- AIParam
- Visual Editor Comments
- Changing the compilation export folder
- Choosing the saved History Size