Manual Installation
Summary
On this tutorial you will learn how to install and uninstall the Thunder library manually on your Unity installation. In an usual case, Thunder can be installed using the simple Wizard inside the package, that verifies the presence of the library and install or update if necessary. This installation script runs once every time you start the Unity Editor.
Unet Code
The core code of Unet can be found on <unity folder>/UnityExtensions/Unity/Networking under 3 DLLs:
Editor/UnityEditor.Networking.dllStandalone/UnityEngine.Networking.dllUnityEngine.Networking.dll
These files represents an extension plugin to Unity and add all networking capabilities
used to build multiplayer games. The source code of this library can be found here.
Thunder Package
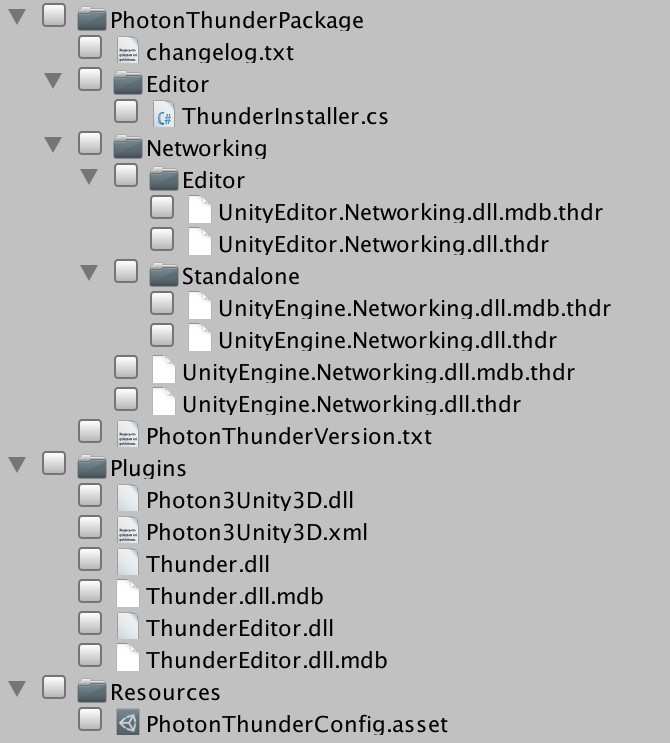
After you download the Thunder from Asset store, it will be added several files to your current project. In order to make the library work property, it was necessary to update/modify some parts of the original Unet code to acomodate the bindinds with Photon network.
You can found our versions of the Networking library inside your project by looking at Assets/PhotonThunderPackage/Networking. As you may know, all DLL files on the project folder are automatically loaded by the Unity Editor as it treat these files as plugins, that is why our files has a .thdr extension, to not be loaded and cause conflicts with the already installed Networking code.
Manual Installation Process
The installation process can be summarized as backing up the original files and replace with the modified ones. To do so, follow the next steps:
- Find your Unity installation folder and the Networking plugin DLLs. Find for
<unity folder>/UnityExtensions/Unity/Networking; - Backup all Networking files and save on folder outside the Unity installation:
UnityEngine.Networking.dllUnityEngine.Networking.dll.mdbEditor/UnityEditor.Networking.dllEditor/UnityEditor.Networking.dll.mdbStandalone/UnityEngine.Networking.dllStandalone/UnityEngine.Networking.dll.mdb
- Close your Unity Editor, this is necessary, because Unity only load DLL files on the startup;
- Copy the Thunder Networking DLLs from your project to your Unity Networking folder following the same tree relations, files must be inside the respective
<root>,EditorandStandalonefolders; - Rename the files to remove the
.thdrextension:
.dll.thdr → .dll.dll.mdb.thdr → .dll.mdb
- Copy the file
PhotonThunderVersion.txtto the same Networking folder inside your Unity installation. This is necessary to mark that Thunder is already installed with a specific version.
Without this file, when you reopen the Unity Editor, the installation script will try to reinstall Thunder.
- File source:
<project>/Assets/PhotonThunderPackage/PhotonThunderVersion.txt - File destination:
<unity folder>/UnityExtensions/Unity/Networking/PhotonThunderVersion.txt
- Reopen Unity Editor, and you should have Thunder working properly.
Manual Uninstall Process
In order to remove Thunder from you Unity Editor follow the next steps:
- If you want a complete removal of Thunder, remove all related files from your project:
- Folders:
<project>/Assets/PhotonThunderPackage
-<project>/Assets/Demo
- Files:
<project>/Assets/Plugins/Photon3Unity3D.dll
-<project>/Assets/Plugins/Photon3Unity3D.xml
-<project>/Assets/Plugins/Thunder.dll
-<project>/Assets/Plugins/Thunder.dll.mdb
-<project>/Assets/Plugins/ThunderEditor.dll
-<project>/Assets/Plugins/ThunderEditor.dll.mdb
-<project>/Assets/Resources/PhotonThunderConfig.asset
- Close your Unity Editor;
- Navigate to:
<unity folder>/UnityExtensions/Unity/Networking; - Remove all the following files:
PhotonThunderVersion.txtUnityEngine.Networking.dllUnityEngine.Networking.dll.mdbEditor/UnityEditor.Networking.dllEditor/UnityEditor.Networking.dll.mdbStandalone/UnityEngine.Networking.dllStandalone/UnityEngine.Networking.dll.mdb
- Put back all previously saved files to the correct locations. Take extra care with the file
UnityEngine.Networking.dll[.mdb]files, as they have the same name, but have differences on compile time. - Reopen your Unity Editor. If you open a project with the Thunder code, it will detect that the library is not installed and will try to reinstall it.