カスタム認証
Photonのカスタム認証は、既存の認証プロバイダーのいずれも需要に適合しない場合、ほかのサービスを統合してユーザー(独自のユーザーバックエンドを含む)を特定したい場合に使用します。
つまり、カスタム認証プロバイダーは、自分で構築して管理するWebサービスであるということです。Photonサーバーがセットアップされ、構成したURLに認証値を受け渡し少しの間応答を待ちます。結果に応じて、クライアントがPhotonへの接続が許可されたり拒否されたりします。もっとも良いケースでは、バックエンドによってユーザーIDが定義されオプションで追加情報が安全な方法で受け渡されてサーバープラグインで使用されるようになります。
サンプル実装
Gitリポジトリで認証プロバイダーのサンプル実装を提供しています。リポジトリのフォークしおよびリクエストのプルはお気軽にお願いします。
ソースはGitHubでご確認いただけます。
認証フロー
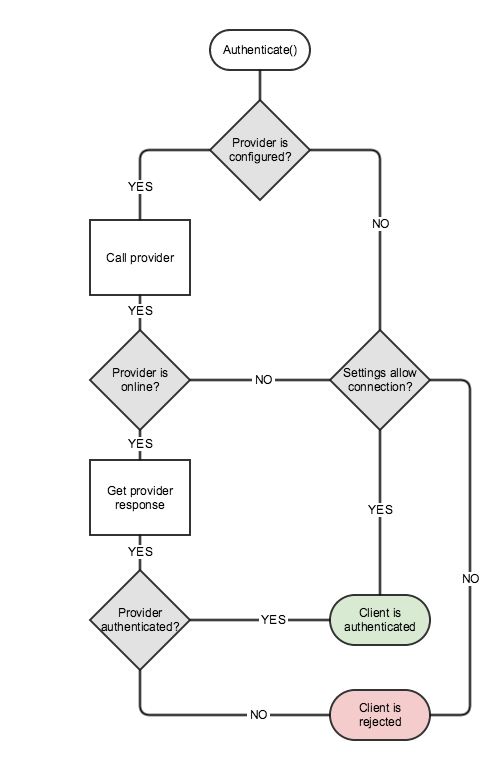
以下のステップは、認証プロセスの一般的なフローです。

- クライアントの接続時に、クライアントがどの認証プロバイダーを使用するかに関する情報および必要な認証データをPhotonサーバーに受け渡します。
- Photonサーバーはご自身のアプリケーションに望ましい認証プロバイダーを取り、以下のいずれかのステップを行います。
- 認証プロバイダー設定が見つかった場合 -> 認証のステップ3へ進みます。
- 認証プロバイダー設定が見つからなかった場合 -> アプリケーションの設定によって、クライアントの接続が許可または拒否されます。
- Photonサーバーが、
Connect()で受け渡された認証情報を使用して認証プロバイダーを呼び出します。- 認証プロバイダーがオンラインの場合 -> 認証のステップ4へ進みます。
- 認証プロバイダーがオフラインの場合 -> 対応するプロバイダーの設定によって、クライアントの接続が許可または拒否されます。
- 認証プロバイダーが認証情報を処理し、結果をPhtonServerへ返します。
- 認証結果によって、クライアン都が無事に認証されるか、拒否されます。
Photon Cloudのセットアップ
全ての認証プロバイダーはPhoton アプリケーションのダッシュボードからセットアップできます。
アプリケーションの詳細ページへ移動し、カスタム認証セクションを開いてください。
認証プロバイダーの追加
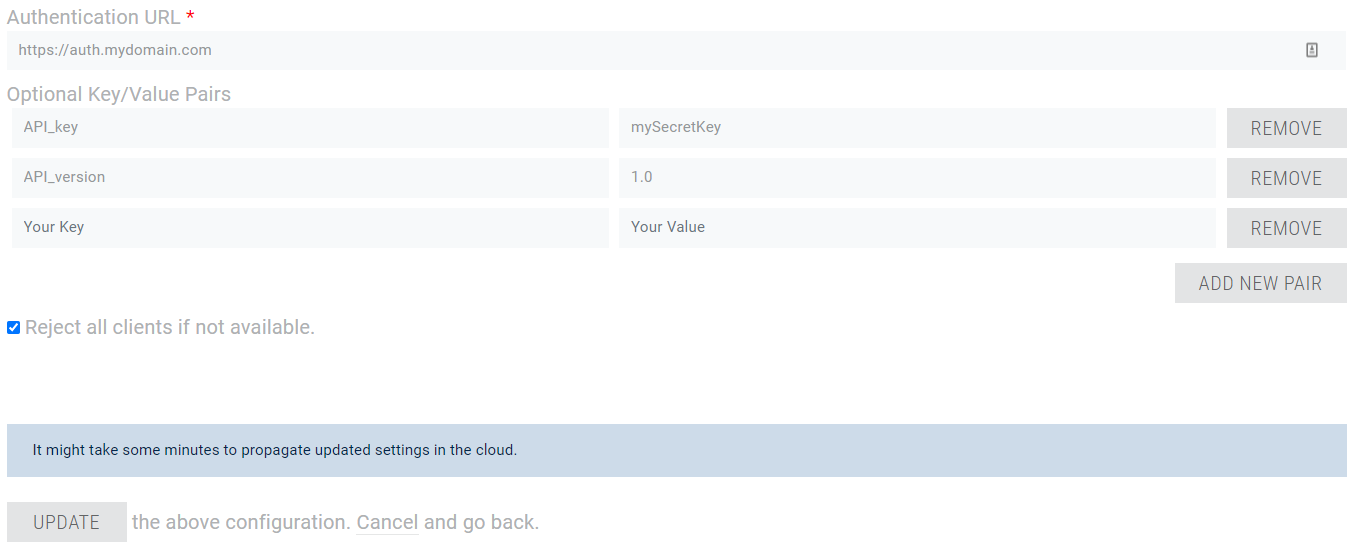
カスタム認証プロバイダーの設定は簡単です。 Photonアプリケーションのダッシュボードから、数秒で設定可能です。

スクリーンショットからわかるように、認証サービスがオンラインではないなど様々な理由から動いていない場合に、認証URLを入力してクライアントを拒否するか決定できます。
さらに、オプションで各リクエストと共にクエリ文字列パラメータとして認証サービスに送られるキー・値ペアを追加できます。
- リクエストが間違いなくPhotonサーバーから来ているものかを確認するためのAPIパブリックキー。
- 今後の変化に鵜なく対応するためのカスタム認証のAPIバージョン。
また、匿名のクライアントがアプリケーションへの接続を試みてきた場合、設定した認証プロバイダーの種類にかかわらずその許可・拒否を行うこともできます。この機能はデフォルトで有効にされています。つまり、認証されていてもされていなくても、すべてのクライアントがまずはアプリケーションに接続できるということです。
Photonアプリケーションのダッシュボードからアプリケーションの詳細ページに移動し、認証セクションでこちらを確認できます。
このオプションは、認証プロバイダーを少なくとも1つ追加して初めて表示されます。
認証プロバイダーが1つも設定されていない場合、デフォルト値で非表示となっています(有効にはなっています)。

認証プロバイダーを更新または削除する
アプリケーションの詳細ページから、既存の認証プロバイダーを選択し、編集することもできます。
編集フォームでは、すべての設定を更新したり、認証プロバイダーをすべて削除したりできます。

実装
クライアントサイド
クライアントサイドでは、APIがカスタム認証に対応します。関連するパラメータと目的となるカスタム認証サービスを1度設定するだけです。
ひとたびセットアップしたら、接続して最終的に起こるエラーに対応します。
事例:
C#
AuthenticationValues authValues = new AuthenticationValues();
authValues.AuthType = CustomAuthenticationType.Custom;
authValues.AddAuthParameter("user", userId);
authValues.AddAuthParameter("pass", pass);
authValues.UserId = userId; // this is required when you set UserId directly from client and not from web service
loadBalancingClient.AuthValues = authValues;
// connect
C++
ExitGames::Common::JString params = "user=" + userId + "&pass=" + pass;
ExitGames::LoadBalancing::AuthenticationValues authenticationValues;
authenticationValues.setType(ExitGames::LoadBalancing::CustomAuthenticationType::CUSTOM);
authenticationValues.setParameters(params);
authenticationValues.setUserId(userId); // this is required when you set UserId directly from client and not from web service
// pass authenticationValues as parameter on connect
JavaScript
var queryString = "user=" + userId + "&pass=" + pass;
var type = Photon.LoadBalancing.Constants.CustomAuthenticationType.Custom;
loadBalancingClient.setCustomAuthentication(queryString, type);
// connect
コードサンプルを簡単にするため、非常に基本的なパスワードベースの認証情報を選択しました。結果として、 クエリ文字列は?user={user}&pass={pass}となります(Photon Cloudから認証サービスへ)。
一般的に、これらの認証情報は値のペアで、1つ目の値が一意の識別子(ユーザーID、ユーザー名、Eメールアドレスなど)となり、もう1つは「認証の証拠」(ハッシュされたパスワード、キー、シークレット、トークンなど)となります。
セキュリティの観点から、テキストでパスワードを送信することは推奨されていません。
認証オペレーション
認証オペレーションで、実際に認証値がサーバーに送信されます。
これを使用するのはAPIであって直接クライアントコードではありません。
ここで重要なのが、サーバーへの接続では必ず認証ステップが含まれるということです。
1回目では、オペレーションが実際の認証値を暗号化されたオペレーションとして送信します。
その後のサーバー切り替えでは、Photonが独自の暗号化されたトークンを提供し、自動的にそれが使用されるようになります。
サーバー側
Webサーバーに認証リクエストが到達するとクエリパラメータの確認および検証が行われます。
その一例が、認証情報とデータベースに保管された既存の認証情報との照合です。
受け取ったパラメータに不足があったり、向こうで合ったりする場合、 { "ResultCode": 3, "Message": "Invalid parameters." }という結果が返されます。
検証が終わると、以下の結果が返されます。
- 成功時:
{ "ResultCode": 1, "UserId": <userId> } - 失敗時:
{ "ResultCode": 2, "Message": "Authentication failed. Wrong credentials." }
高度な機能
ユーザーの認証以外にも、認証プロバイダーから追加情報を受け取ることができます。
追加情報を受け取るには、クライアントとWebサービス(「認証者の役割を担う」)間でプロトコルのようなものを確立されてる必要があります。
サーバーへデータを送る
最も簡単かつシンプルなのは、「全部か0か」戦略をとることです。
つまり、クライアントへ静的変数を返すか否かを選択するということです。
中には、より複雑なアプローチを必要とするケースもあります。Webサービスからクライアントがリクエストしたものに応じて、臨機応変にデータを返してくる場合などです。
本サブセクションでは、クライアントがWebサービスへデータを送る方法について説明しています。
データとは、認証に必要な認証情報と、さらにその他のパラメータです。
その他のパラメータは、とりわけ、認証応答内でサーバー側から取得できるデータのリクエストに使用するものを指します。
余計なAPI呼び出しの必要がなく、ログインワークフローを簡潔にすることができるため、便利なものです。
大量のデータが必要になる珍しいケースもあります。
その一方で、多くのWebサーバーではクエリの字列の文字数やURLの長さに制限があります。
これをカバーするため、PhotonではC# SDKでHTTPメソッドをクライアントからのPOSTに変更することができます。
この変更は、値に AuthenticationValues.AuthPostData フィールドを明示的に設定することで行えます。
後半部分をstring または byte[] または Dictionary<string, object>のタイプにすることもできます。
Dictionary<string, object>の場合は、ペイロードがJSON文字列に変換され、HTTPリクエストのコンテンツタイプが「applicaton/json」に設定されます。
C# SDKでは、AuthenticationValuesクラスが対応している各タイプに合わせてセッターメソッドを提供しています。
これは要件や制約になりかねないため、Webサービスからの認証リクエスト受信をPOSTメソッドとして選択する場合でも使えるように、POSTメソッドオプションが用意されています。
つまり、認証パラメータの送信に関して、クエリ文字列を選んでもPOSTデータを選んでも、その両方を選んでもいいということです。
以下の表で可能な組み合わせをご紹介します。
| AuthPostData | AuthGetParameters | HTTP メソッド |
|---|---|---|
| null | * | GET |
| 空白の文字列 | * | GET |
| 文字列 (nullも空白も×) | * | POST |
| byte[] (nullは×、空白は〇) | * | POST |
| ディクショナリ<文字列、オブジェクト> (nullは×、空白は〇) | * | POST (コンテンツタイプ="application/json") |
クライアントへデータを返す
PhotonサーバーはクライアントとWebサービス間のプロキシですので、Photonサーバーで処理できる変数について知っておく必要があります。
Photonサーバーが受信するすべてのHTTP受信応答で同じですが、Webサーバーが返すのはResultCode やオプションの Messageを含むJSONオブジェクトである必要があります。
以下は、認証中にPhotonサーバーがWebサービスから受け取れるものの一覧です。
UserId:
認証そのもののパラメータとして使用したり、またはクライアント側からリクエストされることが可能。Photonサーバーに到達すると、必ずクライアントへ転送される。AuthenticationValues.UserIdが初めに設定されていないと、ランダムで生成されるUerIDがクライアントへ返送される。クライアントのUserIdがランダムなものに上書きされ、以降変更することは不可能。ResultCodeの値が1のときのみ返送すること。
例:{ "ResultCode": 1, "UserId": "SomeUniqueStringId" }Nickname:
認証そのもののパラメータとして使用したり、またはクライアント側からリクエストされることが可能。
Webサービスから返されると、クライアントのNicknameが上書きされる。
Nicknameは、クライアント側で後から変更可能。
ResultCodeの値が1のときのみ返送すること。
例:{ "ResultCode": 1, "UserId": "SomeUniqueStringId", "Nickname": "SomeNiceDisplayName" }AuthCookie:
セキュアなデータとも呼ばれ、Webサービスから返されるが受信する暗号化トークンに埋め込まれているため、クライアント側からはアクセス不可能。
後からWebhookまたはWebRPC HTTPリクエストで送信可能。
ResultCodeの値が1のときのみ返送すること。
例:{ "ResultCode": 1, "UserId": "SomeUniqueStringId", "AuthCookie": { "SecretKey": "SecretValue", "Check": true, "AnotherKey": 1000 } }Data: クライアントに返されるべきあらゆる値を含むJSONオブジェクト。
ネストされた配列やオブジェクトは対応していないため注意してください。ResultCodeの値が0または1のときのみ返送すること。
例:{ "ResultCode": 0, "Data": { "S": "Vpqmazljnbr=", "A": [ 1, -5, 9 ] } }
ResultCode は唯一必須の返送変数ですが、その他はオプションです。
以下の表でWebサーバーから返せるものをまとめています。
| ResultCode | 説明 | UserId | Nickname | AuthCookie | Data |
|---|---|---|---|---|---|
| 0 | 認証が未完了。データのみが返送された。* | ||||
| 1 | 認証成功。 | (オプション) | (オプション) | (オプション) | (オプション) |
| 2 | 認証失敗。認証情報が誤っている。 | ||||
| 3 | パラメータが無効。 |
*: OAuth 2.0または2段階検証などの実装の際に便利です。
クライアントからのデータを読み取る
応答から、返された値を取得するコードスニペットを以下に記載します。
C#
// 適切なインターフェースからコールバックを実装するか、実装するクラスから上書きする
void OnCustomAuthenticationResponse(Dictionary<string, object> data)
{
    // 返されたデータにここでアクセス可能
}
C++
// マルチレッグ認証の場合、以下を実装するだけ:
Listener::onCustomAuthenticationIntermediateStep();
// ResultCode:0 LoadBalancingの場合::クライアントがこの関数を呼び出し、中間データをパラメータとして受け渡す
データ型の変換
ここでは、Photon ServerとWebサービス間で通信するデータ型のみを説明します。
クライアントとPhoton Server間で通信するデータ型の詳細は、Photonのシリアライゼーションをご覧ください。
Photon Server -> Webサービス
| C# / .NET (Photon supported types) | JavaScript / JSON |
|---|---|
byte
|
number |
short
|
|
int
|
|
long
|
|
| double | |
bool
|
bool |
string
|
string |
byte[] (byte array length < short.MaxValue)
|
string (Base64 encoded) |
T[] (array of supported type T, length < short.MaxValue)
|
array |
Hashtable (of supported types, count < short.MaxValue, preferably Photon implementation)
|
object
|
Dictionary (keys and values of supported types, count < short.MaxValue)
|
object
|
null
|
null
|
リクエストデータ(型を連結済み)のサンプル
Photon Serverからの送信
JSON
{
    "(Dictionary<String,Object>)Dictionary":{
        "(Int32)dk_int":"1",
        "(String)dk_str":"dv2",
        "(Boolean)dk_bool":"True"
    },
    "(Hashtable)Hashtable":{
        "(Byte)hk_byte":"255",
        "(Object[])hk_array":[
            "(Int32)0",
            "(String)xy",
            "(Boolean)False"
        ],
        "hk_null":"null"
    },
    "null":"null",
    "(String[])string[]":[
        "PUN",
        "TB",
        "RT",
        "Bolt",
        "Chat"
    ],
    "(Byte[])byte[]":[
        "255",
        "0"
    ],
    "(Int16[])short[]":[
        "-32768",
        "32767"
    ],
    "(Int32[])int[]":[
        "-2147483648",
        "2147483647"
    ],
    "(Int64[])long[]":[
        "-9223372036854775808",
        "9223372036854775807"
    ],
    "(Single[])float[]":[
        "-3.402823E+38",
        "3.402823E+38"
    ],
    "(Double[])double[]":[
        "-1.79769313486232E+308",
        "1.79769313486232E+308"
    ],
    "(Boolean[])bool[]":[
        "True",
        "False"
    ]
}
Webサービスでの読み込み
JSON
{
    "(object)Dictionary":{
        "dk_int":"(number)1",
        "dk_str":"(string)dv2",
        "dk_bool":"(boolean)true"
    },
    "(object)Hashtable":{
        "(number)hk_byte":"255",
        "(array)hk_array":[
            "(number)0",
            "(string)xy",
            "(boolean)false"
        ],
        "hk_null":null
    },
    "null":null,
    "(array)string[]":[
        "(string)PUN",
        "(string)TB",
        "(string)RT",
        "(string)Bolt",
        "(string)Chat"
    ],
    "byte[]":"(string)/wA=",
    "(array)short[]":[
        "(number)-32768",
        "(number)32767"
    ],
    "(array)int[]":[
        "(number)-2147483648",
        "(number)2147483647"
    ],
    "(array)long[]":[
        "(number)-9223372036854776000",
        "(number)9223372036854776000"
    ],
    "(array)float[]":[
        "(number)-3.40282347e+38",
        "(number)3.40282347e+38"
    ],
    "(array)double[]":[
        "(number)-1.7976931348623157e+308",
        "(number)1.7976931348623157e+308"
    ],
    "(array)bool[]":[
        "(boolean)true",
        "(boolean)false"
    ]
}
Webサービス -> Photon Server
JavaScript/JSONの型と、C#/.Netの型との対応表は、以下の通りです。
| JavaScript / JSON | C# / .Net |
|---|---|
| object |
Dictionary
|
| array |
object[] (array of objects)
|
| number (integral) |
long
|
| number (floating) |
double
|
| string |
string
|
| boolean |
bool
|
null (not a type)
|
null
|
undefined (when sent)
|
null
|
レスポンスデータ(型を連結済み)のサンプル
Webサービスからの送信
JSON
{
    "(object)number": {
        "(number)MAX_VALUE": "1.7976931348623157e+308",
        "(number)MIN_VALUE": "5e-324"
    },
    "(object)object": {
        "(string)string": "xyz",
        "null": null,
        "(boolean)bool": "false",
        "(undefined)undefined": "undefined",
        "(number)float": "-3.14",
        "(number)integer": "123456"
    },
    "(array)array": [
        "(string)xyz",
        "(number)0",
        "(boolean)true",
        null,
        "(undefined)undefined"
    ]
}
Photon Serverでの読み込み
JSON
{
    "(Dictionary<String,Object>)number":{
        "(Double)MAX_VALUE":"1.79769313486232E+308",
        "(Double)MIN_VALUE":"4.94065645841247E-324"
    },
    "(Dictionary<String,Object>)object":{
        "(String)string":"xyz",
        "null":"null",
        "(Boolean)bool":"False",
        "(Double)float":"-3.14",
        "(Int64)integer":"123456"
    },
    "(Object[])array":[
        "(String)xyz",
        "(Int64)0",
        "(Boolean)True",
        "null",
        "null"
    ]
}
トラブルシューティング
カスタム認証が失敗すると、以下のコールバックが呼び出されます。
C#
void OnCustomAuthenticationFailed(string debugMessage)
{
   // 認証プロバイダーからの返送が`debugMessage`であることがある。
}
ダッシュボードで設定した認証URLがHTTPエラーを返す場合、Photonサーバーが認証呼び出しを短時間の間保留し、オーバーヘッドを回避します。
URLを設定したりテストする際は、この「バックオフ」時間があることを頭に入れておいてください。
ベストプラクティス
- 認証プロバイダーから返される結果で、特に失敗した時に大事なのは、読める
Messageが含まれていることです。これがあれば、デバッグの苦しみからだいぶ解放されます。 - ダッシュボードからクライアント側から設定されるべきでない静的キー/値のペアを設定してください。結果となるクエリ文字列でキーがダブらないようにするためです。
- セキュリティの観点から、認証パラメータとしてパスワードをプレーンテキストで送らないようにしてください。
- クエリ文字列パラメータは、Photonダッシュボードで設定することを推奨します。リクエストの送信元を確認することができます。
AuthenticationValuesメソッドを使用して パラメータを設定し、AuthGetParametersに直接値が影響しないようにしてください。クエリ文字列が崩れr内容にするためです。
ユースケースの例: 古いクライアントのバージョンをブロックする
カスタム認証を使用して、古いバージョン(または予期せぬバージョン)を使っているクライアントからの接続を拒否し、特定のエラーを返すことでユーザーにアップデートを促すことができます。
これを実現す津には、カスタム認証リクエストにバージョンを送信してください。クエリ文字列パラメータとして行うか、POSTデータ引数として行うかは自由に決められます。
以下の例では、クエリ文字列パラメータを使用しています。
C#
string version = lbClient.AppVersion;
lbClient.AuthValues = new AuthenticationValues();
lbClient.AuthValues.AuthType = CustomAuthenticationType.Custom;
lbClient.AuthValues.AddAuthParameter("version", version);
カスタム認証URLが https://example.comの場合、リクエストはhttps://example.com?version={version}として送信されます。
認証プロバイダの実装から、受信したバージョンを取得して比較してください。
バージョンが許可されていれば、{ "ResultCode": 1 }を返し、許可されていない場合は、カスタム値(1以外)でResultCodeを返します。メッセージをつけることが望ましいです。
例: { "ResultCode": 5, "Message": "バージョンが許可されていません。" }.