Hierarchical Finite State Machine
Creating a new HFSM
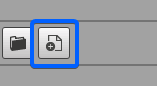
On the editor's top bar, click on the (+) button, then select the option State Machine.
You will then be prompted to save the HFSM file.
Save it wherever you prefer.
This will create a data asset used to persist the work that you have done on the visual editor.

Note: The name that you choose now will be the name of another data asset generated further when you compile what you have done on the visual editor.
That will be the data asset used to actually drive your Bots, so you can already choose a suggestive name.
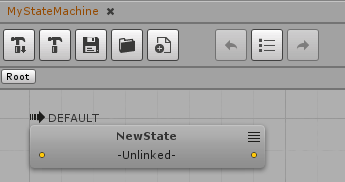
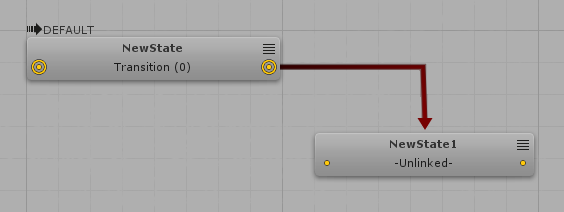
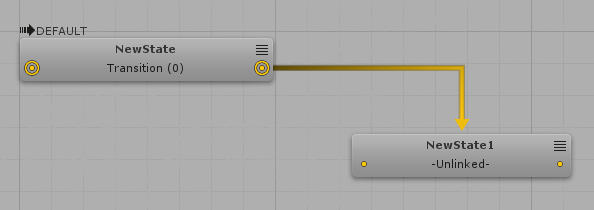
When you save the file, the main Bot SDK window will be populated with a single NewState for you to begin with.
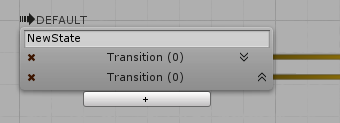
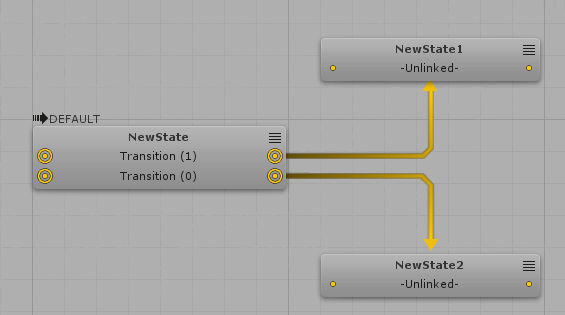
Now, let's take a closer look on this initial state:
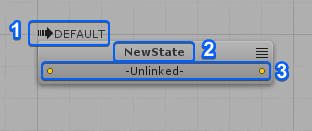
- Indicates that this is the HFSM's Initial State;
- State's name;
- The Transitions list that comes out from this state.
Creating a new State
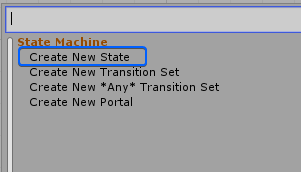
To create a new State, right click on any empty space on the Editor window and select Create New State

Editing a State
To edit a State, right click the target state and select Edit This State.
Here, you can define the State's name and delete/reorder transitions.
PS: reordering transitions will not change their priority. It is used just for visual adjusting. The priority topic is explained further on this tutorial.
It is used just for visual adjusting.
Press Enter to apply the changes or press Esc to discard those changes.
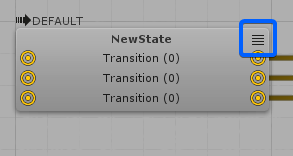
Minimizing the State view
It is common to see HFSMs increasing a lot in terms of the amount of States and Transitions, which can make it difficult to actually understand the flow of some HFSMs.
On any State node, you can click on the Minimize button to hide the transitions slots and change the way that the lines are drawn from/to it, thus enabling a simplified view.
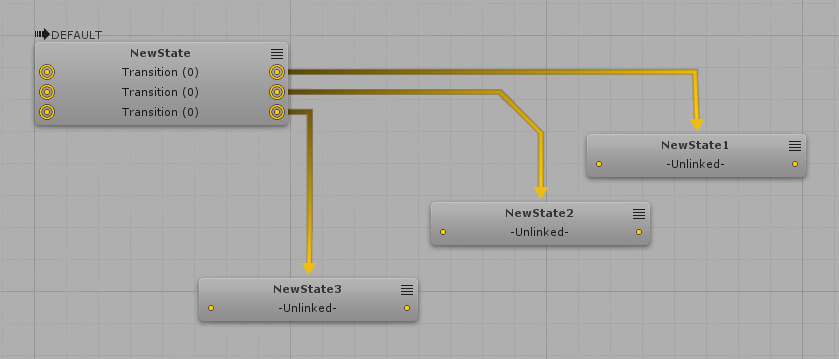
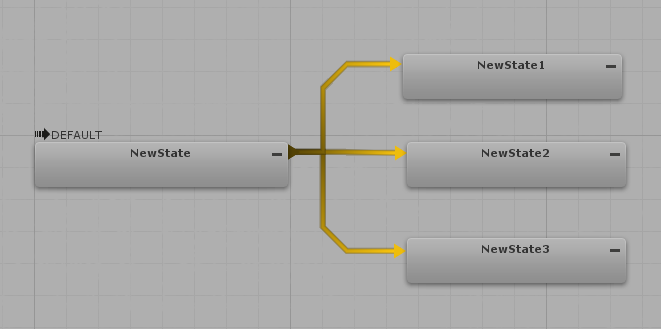
Let's analyse the before and the after.
Creating a Transition between two States
To begin creating a Transition between two states, first click on one of the little circles on the left/right edges of any State.
Then, if you click on another state, a new transition will be created linking these two states.
If, instead of clicking on another state, you click on any blank empty space, the editor will pop the creation panel if you want to create the target state right away.
Whenever you create a new transition, it will have a dark color, indicating that the transition is not defined yet.
There are some ways of interacting with a transition:
- When your mouse is over a transition, it will be highlighted;
- When you left click a transition, little circles will walk through it to indicate what is the transition's direction;
- When you double click a transition, you will enter on its sub-graph;
- From the right-click menu, you can: enter on the transition sub-graph, mute the transition or delete it.
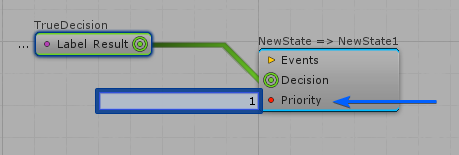
Lets analyze the node that is already created on the decision sub-graph:
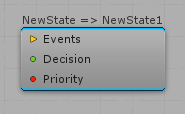
This is the node used to actually define the transition.
There are four important concepts here:
- This node's name indicates the origin state and the target state. It can be changed using the right-click menu, so you can choose meaningful name, and it will appear on the upper level, making it easier to understand what is the condition;
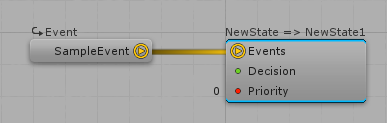
- The first slot is used to define an Event to be taken in consideration when evaluating this transition;
- The second slot is used to define the Decisions that compose the transition;
- The third slot is used to define an order of execution between all transitions that comes from that same node.
Let's begin by defining a simple decision for this transition.
To do that, right click any blank space and a panel will show the possible decisions that you can create.
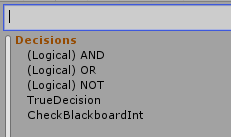
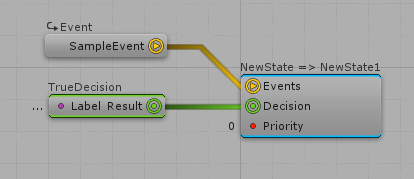
For simplicity, let's select the TrueDecision.
Of course, this decision's result is always True.
There is an outbound slot which defines where the result of this decision will be driven to.
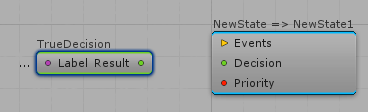
So, left click the circle on the side of the Result slot and connect it to the Decision slot:
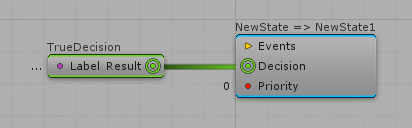
That's it.
You just defined the simplest transition.
With this, whenever your Bot is on NewState and the HFSM is updated, the Bot will transit to NewState1.
It is possible to edit a Decision field value by clicking on the field.
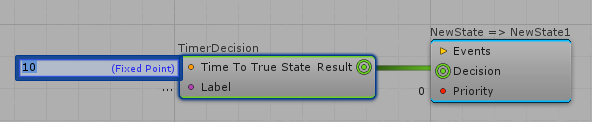
Press Enter to apply the changes or press Esc to discard those changes.
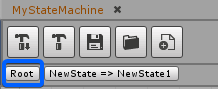
Now that we have a very simple transition defined, let's go back to the top view and see how it looks like.
You can navigate back to the states view by clicking on the Root button on the breadcrumb at the top bar:
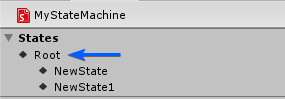
Alternatively, you can navigate through the states by using the left side panel:
Now you can see that the transition is no longer red.
It indicates that this is a valid transition.
Defining the transitions Priorities
For states which has more than one transition, it is possible to define which one will be evaluated first.
To define this order, use the Priority slot. Click on it to set its value.
It is possible to see the transition's priorities on the State node.
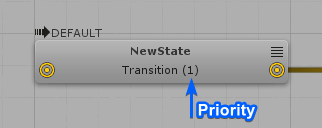
The order in which the transitions will be evaluated is: from higher priority to lower priority.
With this, you already can define what transition needs to be checked first.
Note: The priorities defined for a state's transitions will make no difference for another state's transitions.
Creating new Transitions
We currently have only one transition between our two states.
With this, the Priority field is useless as no state has multiple transitions.
In order to create a new Transition, put the mouse on the bottom part of your state and click on the (+) button that appears.
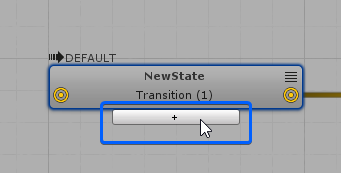
Then you can define that new transition just like you did for the first one.
Special Transition Types
Transition Sets
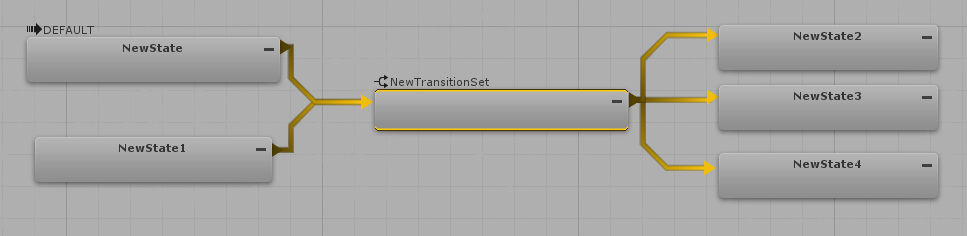
These types of nodes can be used to group up many transitions.
It is especially useful to reuse a set of transitions, as many States can point to a single Transition Set.
To create a new Transition Set, right click in any empty space and select Create New Transition Set.
This will create a node very similar to the State node: it begins with a single undefined transition and you can create many new transitions by hovering the mouse on its bottom part:
Then, just create the links.
Here is an example:

It is also possible to minimize Transition Sets using its top right corner button:
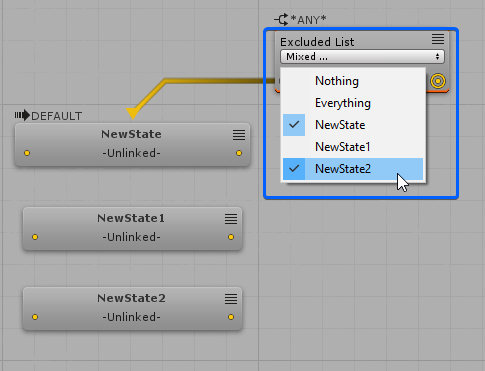
Any Transitions
These transitions are very useful when you want to define some transition which should be taken from any state on that same hierarchy level.
PS: Hierarchy will be explained further in this document.
Create new ANY Transitions from the right click menu.
Now, define the target state(s) of the ANY Transition.
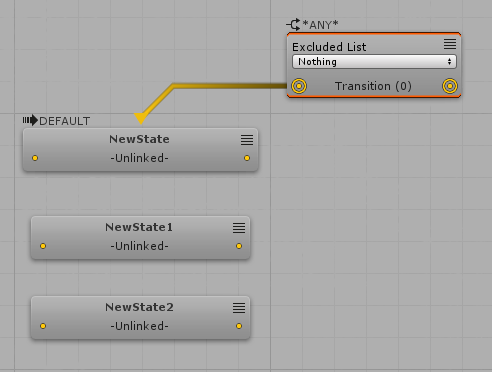
On the sample image above, every State on that level of the hierarchy will consider the transition from the ANY node.
It is possible though to define a list of States to ignore the ANY Transition. Select these from the Excluded List menu.
Portal Transitions
This type of transition is meant to force the HFSM to go from a State to any other state in any level of your hierarchy.
Create new Portal Transitions from the right click menu.
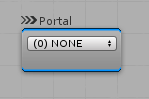
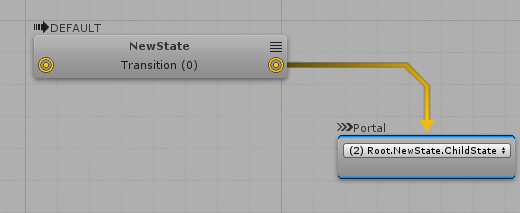
Now you have to define to which State this Portal will take the HFSM to.
Click on the dropdown menu to choose it.
Note that the name of the target States will be based on the hierarchy that you have:
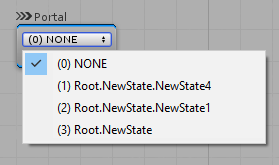
After you define the Portal's target, you just have to define which States will consider that portal.
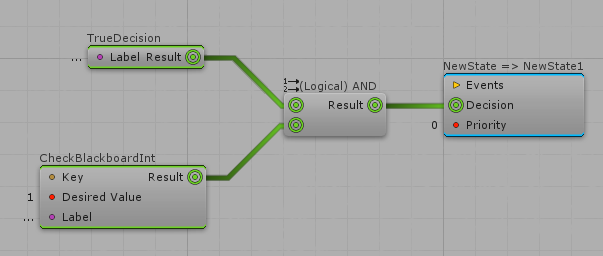
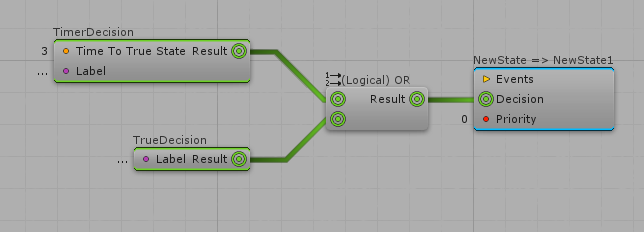
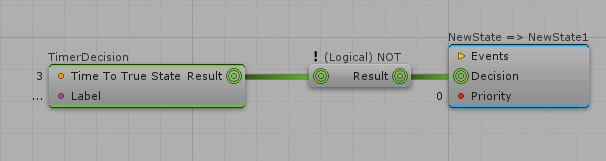
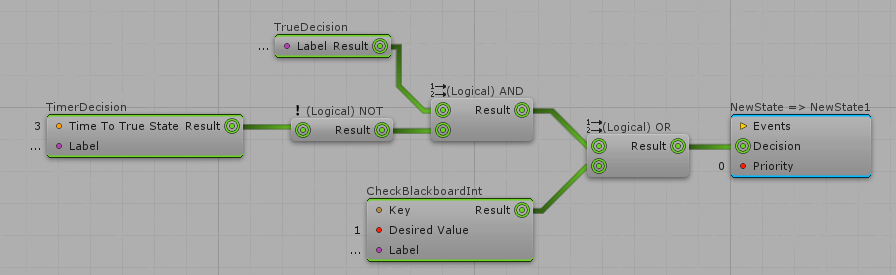
Composed Decisions
Besides of using single decisions to define the transitions, it is also possible to create some composed decisions.
Bot SDK already comes with 3 logical decisions ready to use.
Here are some samples of composed decisions based on the AND, OR and NOT decisions:
Events
If you want to evaluate a transition without creating a new Decision on your quantum_code project, compiling, setting it up, etc, you can make use of the Events.
Events work in a very simple way: whenever an event is triggered, the current state's transitions will check if that event is being listened to.
If any transition listens to that event, it will be taken.
In terms of code, this is what is needed to trigger an event:
In any quantum_code script, execute:
C#
HFSMManager.TriggerEvent(f, &guy->Fields.HFSMAgent.Data, (Entity*)guy, "SomeEventName");
This method call can be added to your actions/decisions or to any other logic that you have, such as in your systems.
To create a new event, click on the (+) button on the left side panel, on the events' session:

When you do that, you will be prompted to create your new event.
You can also double click on an event to open the menu to edit or delete the event.
In order to place an event on the transition sub-graph you have to drag and drop it.
Then, similarly of what you did for the Decision, you can link the event's outbound slot to the transition's event inbound slot:
Note: Differently from the decisions, there is no composite events definition and a transition does not accept more than one event connected.
Transitions with the decision defined by just one event are considered as valid transitions.
It is also possible to define a transition by setting both an Event and a Decision.
In this case, that Transition will only happen if both the Event is triggered and the Decision conditions result is True, on the same frame.
Defining Actions
Now that we discussed how to create the flow of State Machines (with States and Transitions), let's take a look on how to define Actions for a State.
Find more information on this topic here: Defining Actions
Muting
When testing your AI, it might be useful to mute some nodes in order to temporarily disable some logic. Find here more information on how to Mute nodes: Muting
Hierarchy
On any State's sub-graph, you can create new sets of states and transitions.
Let's say you are on the NewState sub-graph and you create a new state called AnotherState.
When you do this, a relationship will be created between those two actions: NewState is the parent and AnotherState is the child.
Both the parent and the child State's Actions and Transitions will be executed.
This way, it is possible to encapsulate a State Machine inside of another State Machine.
This can be very useful if you have, let's say, a boss with 3 levels of behavior: it begins in an easy mode, then gets a little harder when it gets to half of its HP, and then gets even harder when it has only 10% of its total health.
You can create 3 main states on the top graph and each of those states will have its own state machine to define the boss' difficulty.
It is very useful to improve how the HFSMs are organized.
To create a child State, just go to any State's sub-graph, right click on the empty space and select the Create New State option.
With this, you can have a complex level of hierarchy, which you can visualize on the left side menu:
Note: You can navigate on the hierarchy by clicking on these buttons.
It is also possible to right click on any of these states to create a new Portal to it on your current graph view.
Important: it is also possible to define, for every level of the hierarchy on the HFSM, which are the Default States. This is what defines what are the children states entered when transiting between parent states. To define which is the Default State, right-click any State Node and select "Make Default State".
Compiling your HFSM
In order to actually use the HFSM that you created, you have to compile what you have done.
To compile, you have two options:

- The left button is used to compile only the currently opened document;
- The right button is used to compile every AI document that you have on your project.
Your HFSM files will be located at: "Assets/Resources/DB/CircuitExport/HFSM_Assets".

Setting the AI to be used by your Bots
To finally use the AI created, you just need to reference the compiled assets.
You can do it by loading the asset based on the GUID, or you can just create an Asset Link to point to the desired AI asset:
HFSM Coding
Now, speaking in terms of the DSL, there are two main options in terms of creating new HFSMAgents:
- You can have the HFSMAgent component added to your entities;
- You can have it declared on your Structs or on the global space, with no need of having entities.
This is important to know because it is possible to have HFSMs to perform actions which are out of the scope of entities, such as creating the game flow, defining which actions are performed when the game begins, define when the game will change its current state and so on.
Initializing the Agent
Now first, to exemplify, this is how you create a new HFSMAgent and add it to your entity, if you are not using an EntityPrototype:
C#
var hfsmAgent = new HFSMAgent();
f.Set(myEntity, hfsmAgent);
Then, at any point that better fits your application, you must call the HFSMManager.Init method for that entity, based on the HFSMRoot asset that you compiled from the Visual Editor.
The initialization step below needs to be done whether you are using EntityPrototypes or not:
C#
var hfsmRootAsset = f.FindAsset<HFSMRoot>(referenceToRoot.Id);
HFSMManager.Init(frame, myEntity, hfsmRootAsset);

// Only do this if you are not using Entity Prototypes
f.Set(myEntity, hfsmAgent);
If any information that you HFSM initialization process needs is contained on the HFSMAgent itself, you can just get the component from the entity to get whatever data is necessary:
var hfsmAgent = f.Get<HFSMAgent>(myEntity);
Initializing using the "OnComponentAdded" callback
It is also possible to setup the reference to the HFSMRoot asset directly on the EntityPrototype, and use the OnComponentAdded signal to initialize the agent with that information:
C#
// At any system...
  public unsafe class AISystem : SystemMainThread, ISignalOnComponentAdded<HFSMAgent>
  {
    public void OnAdded(Frame f, EntityRef entity, HFSMAgent* component)
    {
      // This is how you get the HFSMRoot from the component set on the Entity Prototype
      HFSMRoot hfsmRoot = f.FindAsset<HFSMRoot>(component->Data.Root.Id);

      // Then we just do the initialization step
      HFSMManager.Init(f, entity, hfsmRoot);
    }

  // ...
  }
Updating the Agent
Now that the Entity's HFSMAgent is initialized, you just need to call the Update method whenever you need:
C#
HFSMManager.Update(f, f.DeltaTime, myEntity);
This will make the HFSM execute its Initial State's data and perform actions and transitions to other states.
With this, the AI should already execute the flow that you created on the Visual Editor.
A sample system which initializes and updates the Agents
C#
namespace Quantum
{
  public unsafe class AISystem : SystemMainThread, ISignalOnComponentAdded<HFSMAgent>
  {
    public void OnAdded(Frame f, EntityRef entity, HFSMAgent* component)
    {
      HFSMRoot hfsmRoot = f.FindAsset<HFSMRoot>(component->Data.Root.Id);
      HFSMManager.Init(f, entity, hfsmRoot);
    }

    public override void Update(Frame f)
    {
      var allAgents = f.Filter<HFSMAgent>();
      while(allAgents.NextUnsafe(out var entity, out var agent))
      {
        HFSMManager.Update(f, f.DeltaTime, entity);
      }
    }
  }
}
Coding Actions and Decisions
To create your own Actions, follow these instructions: Coding Actions
To create your own Decisions, it is very similar.
But, instead of creating a new class that inherits from the AIAction, make it inherit from the HFSMDecision abstract class.
Also, instead of having to implement the Update method, you need to implement the Decide method.
Use it to return true/false depending on your own needs.
Important: you need to mark your new class as [Serializable] and partial.
C#
namespace Quantum
{
  [Serializable]
  public partial class TrueDecision : HFSMDecision
  {
    public override unsafe bool Decide(Frame frame, EntityRef entity)
    {
      return true;
    }
  }
}
Defining fields values
Find here more information on the alternatives that you have when settings values to Actions/Decisions fields: Defining fields values.
AIParam
Find here more information on using the AIParam, which is useful if you want to have more flexible fields that can be defined in different ways: settings by hand or from Blackboard/Constant/Config Nodes: AIParam.
AIContext
Find here more information on how to pass agent-contextual information as parameter: AIContext.
BotSDKSystem
There is a class which is used to automate some processes such as deallocating Blackboard memory. Find here more information about it: BotSDKSystem.
The Debugger
Bot SDK comes with its own debugging tool. It makes it possible for the developer to select any HFSMAgent during runtime and see the most recent agent's flow highlighted on the Visual Editor. Here is a sample of the debugging tool working on the Bot SDK Sample project:
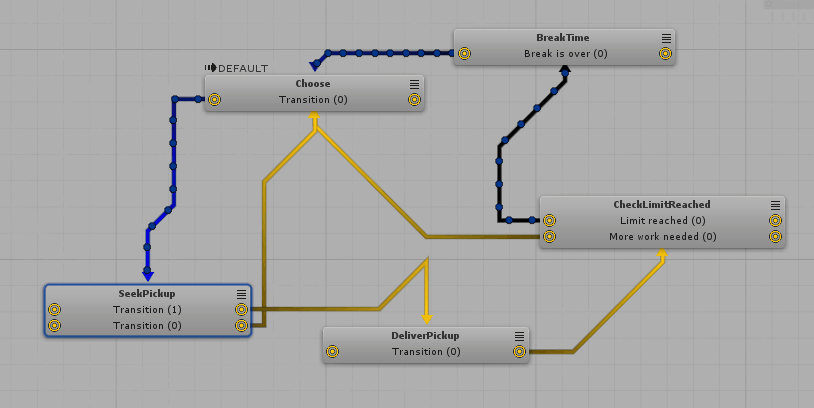
As shown on the gif above, it is possible to see what is the current state in which the agent is, and which were the most recent three transitions taken which led to that state. The blue transitions is the most recent one. It also has more circles going through the line than the previous transitions, that are colored black.
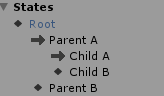
In addition, it is also possible to inspect the current states on the hierarchy view. The states with an arrow represents that the HFSM is currently on that state. It is helpful as you don't need to dive on the visual graph in order to see how deep on the hierarchy the agent currently is.
Using the Debugger
This is the step-by-step in order to use the debugger on your project:
- Enable the
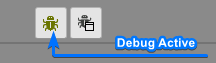
BotSDKDebuggerSystemon yourSystemSetup.csfile. Using this specific system is optional as, if it is your preference to have the debugging logic somewhere else, you can just callBotSDKDebuggerSystem.OnVerifiedFrame?.Invoke(f);within your own custom systems, at verified frames; - On the visual editor, click on the bug icon on the top panel. The debugging it active when the icon is colored as green;
Now, there are two ways of choosing which entity will be debugged. It can be related to a selected Game Object, or it can be selected on a inspector window. You can choose one of the above. Or both:
Debugging from a Game Object:
Select your prefab/entity prototype which represents a Quantum entity which has the
HFSMAgentas a component;Add the
BotSDKDebuggerto it;During runtime, with the Bot SDK window opened, select the game objects which has the
BotSDKDebuggeradded. There you go! The debugging shall already be working;
Debugging from a debugger inspector window:
On the simulation side, you need to register the Agent entity to the Debugger Window. It can be done by calling:
BotSDKDebuggerSystem.AddToDebugger(entitiRef, (optional) customLabel)The default name that is shown for the debugged entities follow this pattern:
Entity XX | AIAssetName. But if you want to give a custom name to the debug entry, you can use thecustomLabelparameter. It can be anything that you want.It is also possible to create hierarchies. Just use the separator
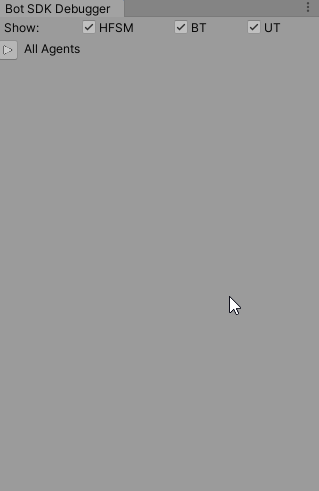
/on the custom label and it will create the hierarchies on the Debugger Window, which can be collapsed, expanded, etc;On Unity, click on the button which is on the right side of the debugger activation button. It opens a new window which shows all registered entities. Select the one that you want to debug and that's it.

Just to exemplify, some custom labels used on the sample gif above were: Monster 1, Monster 2, Blue Team/Commander, Blue Team/Warriors/Foo, Blue Team/Warriors/Fuz and Blue Team/Wizards/Bar
Important: when the Debugger is activated, it will allocate memory to store the data needed for the debugging, which might slow down the game if you are playing from the editor. So, if you are profiling the application from within Unity, parts of the profiling might be related to the debugger, so consider deactivating it during profiling.
PS: the debugger window will also show entities which doesn't have an entity view, so this is how you can find it to debug their HFSM;
PS2: currently, it isn't possible to debug agents which are not linked to an entity, such as agents which lies on the DSL global. This will be added only on further versions.
Visual Editor Comments
Find here more information on how to create comments on the Visual Editor: Visual Editor Comments.
Changing the compilation export folder
By default, assets generated by Bot SDK's compilation will be placed into the folder Assets/Resources/DB/CircuitExport. See here how you can change the export folder: Changing the export folder.
Choosing the saved History Size
It is possible to change the amount of history entries saved on Bot SDK files. Find here more information on this matter: Changing History Save Count.
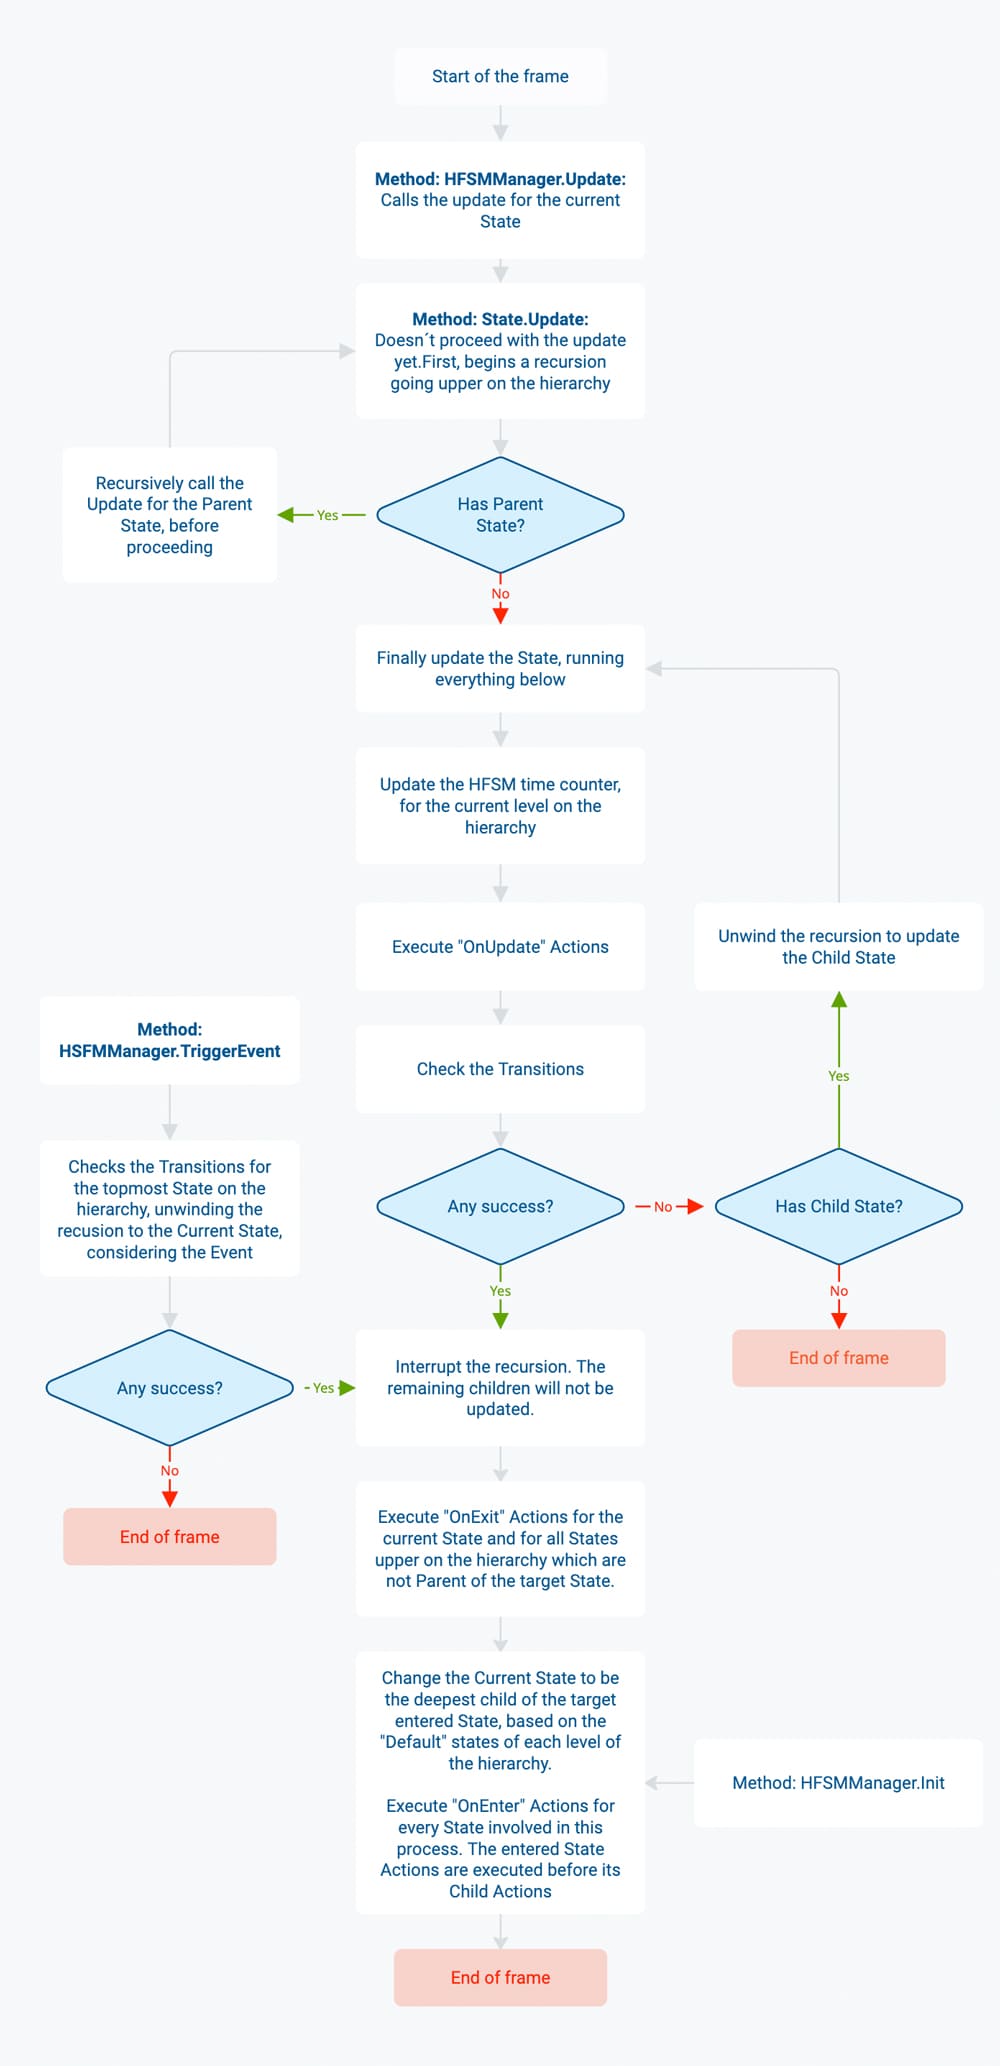
What Happens in a Frame
On Bot SDK, the main entry points are:
HFSMManager.Update, which is constantly called to update your Agents;HFSMManager.Init, which is used to Initialize the Agent;HFSMManager.TriggerEvent, which forces transition checks, considering a triggered event.
In order to help visualize better what happens during a frame when these methods are called, here is a flow graph:
- Creating a new HFSM
- Creating a new State
- Editing a State
- Creating a Transition between two States
- Defining the transitions Priorities
- Creating new Transitions
- Special Transition Types
- Composed Decisions
- Events
- Defining Actions
- Muting
- Hierarchy
- Compiling your HFSM
- Setting the AI to be used by your Bots
- HFSM Coding
- Coding Actions and Decisions
- Defining fields values
- AIParam
- AIContext
- BotSDKSystem
- The Debugger
- Visual Editor Comments
- Changing the compilation export folder
- Choosing the saved History Size
- What Happens in a Frame