Custom Animator
Introduction
Quantum’s deterministic animator works by baking information from Unity’s Mecanim Controller. It imports many configurations such as the States, the Transitions, the Motion clips and so on.
The main advantage of using it is that it can control animations to be 100% in sync across machines. Animations will snap to the correct state and clip time accordingly to the predict-rollback. So it provides very accurate tick based animations, which is something that is usually needed on Fighting and some Sports games because the animations should be perfectly in sync between all client simulations.
Due to this addon's dependencies on Unity's Mecanim and the lack of a new animation tool on Unity, we decided to stop improving the addon. Be aware that if using this tool might require the team to change the code based on your game's animation needs.
Because of that, we decided to have the Animator as open source code that you can import into your quantum.code project and change it.
This document explains how the Custom Animator should be imported and used into your own projects.
This package was lastly tested with Quantum SDK 2.1.0 A1 Nightly Build 659
Known issues/Limitations
The CustomAnimator, as it comes by default, has these known limitations:
- No support for hierarchical states;
- No support for Unity’s animation events;
- No support for states with no motion (no animation clip set);
- No support for the Layers menu, which means that it's not possible to mix animations between more than one layer, such as using Avatar Masks, Blending and so on;
- When using Blend Trees, it is mandatory to have the blending value between [-1, 1], on both 1D and 2D Blend Trees;
- No support for Root Motion on 3D Transforms/PhysicsBody.
Importing the Custom Animator package
| Version | Release Date | Download |
|---|---|---|
| 2.0 | Jul 05, 2023 | Quantum Custom Animator |
- Download the Custom Animator
- Unzip it and put the content of the folders
QuantumCustomAnimator_stateandQuantumCustomAnimator_systemswherever your prefer on yourquantum.codeproject; - The package comes with a partial implementation of the
Frame.InitUsermethod, which is responsible for initializing theCustomAnimatorUpdater. If your project already have a partial implementation of the same method, please just make sure to include a call to theInitializeAnimatorUpdatermethod inside your ownInitUser, and do not import theFrame.User.csfile from this package; - With everything included in your solution, build your
quantum.codeproject; - On Unity, import the file
QuantumCustomAnimator.unitypackageto the project;
This completes the initial steps to have it all building and running. Now, in order to actually use the component, assets and baking tools, here are the instructions:
Using the custom Animator
- To use the component, add it directly to an Entity Prototype on Unity. Otherwise, it is possible to create a new instance of the
CustomAnimatorcomponent and add it to the entity directly via code:
C#
var customAnimator = new CustomAnimator();
f.Set(fighter, customAnimator);
- On Unity, create a new data asset of type
CustomAnimatorGraph. This is the asset responsible for storing information related to Unity's Mecanim controller. When using Entity Prototypes to setup your custom animator, it is possible to reference the Animator Ggraph asset in the Inspector, on theAnimatorGraphfield. An alternative is to load the graph asset via code:
var animatorGraphAsset = f.FindAsset<CustomAnimatorGraph>(assetGuid);
- Initializing the CustomAnimator component: when using Entity Prototypes and defining the CustomAnimatorGraph as described above, it is not needed to initialize the component as it is already done using a Reactive Callback, on the
CustomAnimatorSystemclass. It can though alternatively be initialised via code:
C#
CustomAnimator.SetCustomAnimatorGraph(&knight->CustomAnimator, animatorGraphAsset);
f.Set(fighter, customAnimator);
- Similarly to how it is done on Unity, use Getters and Setters in order to read/write to the Animator:
C#
// Getters
CustomAnimator.GetBoolean(frame, &fighter->Animator, "Defending");
CustomAnimator.GetFixedPoint(frame, &fighter->Animator, "Direction");
CustomAnimator.GetInteger(frame, &fighter->Animator, "State");

// Setters
CustomAnimator.SetBoolean(frame, &fighter->Animator, "Defending", true);
CustomAnimator.SetInteger(frame, &fighter->Animator, "Direction", 25);
CustomAnimator.SetFixedPoint(frame, &fighter->Animator, "Speed", FP._1);
CustomAnimator.SetTrigger(frame, &fighter->Animator, "Shoot");
It is important to notice that Unity’s Trigger parameters works like Booleans here. So, in order to trigger some param, you need to use the
SetBoolean(&fighter→Animator, "MyTrigger", true)to set it to true, and aSetBoolean(&fighter→Animator, "MyTrigger", false)on the next tick so the trigger isn’t activated again. The package already includes a system to be run before the animation system, which sets every trigger parameter to false every tick. Just insert this codenew CustomAnimatorResetTriggersSystem(),into your SystemSetup.cs file;Every
AnimatorStatehas anAssetRefthat you can use in order to make references to custom assets. You can extend the baking process on Unity, grabbing even more information from the Unity's animator, save these information on you custom asset and reference it on the state, so you can read it on the simulation. You can, for example, create assets which has hitbox/hurtbox information baked in the form ofFPAnimationCurves. You can save Unity events names/time into the asset so on the simulation you know when some animation event happens, etc;On your SystemSetup.cs file, insert this line of code after your own systems:
C#
new CustomAnimatorSystem(),
- On Unity, create the Custom Animator Graph asset, from the context menu:
Create/Quantum/CustomAnimatorGraph;
This is how it looks like on its default state:
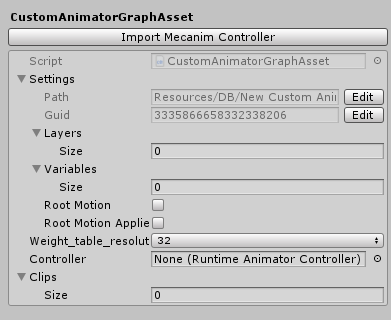
- Reference an Unity’s Animator Controller asset using the
Controllerfield and hit theImport Mecanim Controllerbutton. You should then see the animations information filled, such as the states, transitions, parameters and so on:

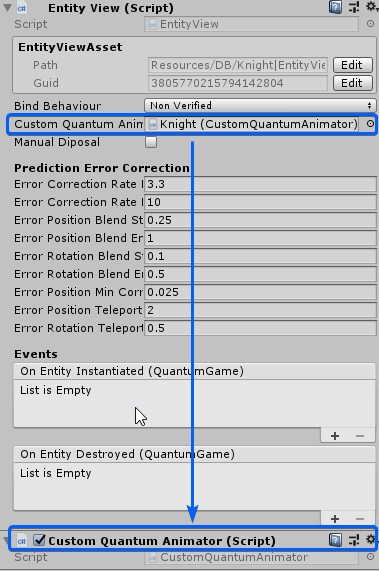
Open your
EntityViewclass, and add this field:C#
public CustomQuantumAnimator CustomQuantumAnimator;Add the component
CustomQuantumAnimatorto the GameObjects that will be animated. Of course, it needs to have anEntityPrefabRooton it, so make the reference to the component that you just added, using the field that you created on the instruction above;
- Open your EntitiyViewUpdater class and, on its OnUpdateView method, it has a foreach loop iterating over the active views. It should now include the custom animator updating, so this is how your
foreachshould look like:
C#
// Iterate over all view instances and update components using only entities from current frame.
foreach (var kvp in _activeViews) {
    // ... updates 2D and 3D transforms

    // At the end of the foreach, add this.
    // This is responsible for actually animating the entity views
    if (instance.CustomQuantumAnimator)
    {
        if (game.Frames.Predicted.Unsafe.TryGetPointer<CustomAnimator>(instance.EntityRef, out var animator))
        {
            instance.CustomQuantumAnimator.Animate(game.Frames.Current, animator);
        }
    }
}
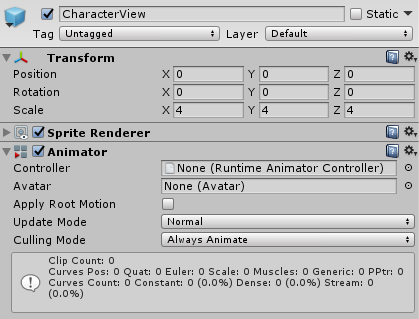
- The last step is to add a Unity's Animator component to your object. It can be placed on the same object which has the
EntityPrefabRootor it can be placed on a child object:
Now that you have done the replacements on your quantum code, the replacements needed on the Unity side, and you have your CustomAnimatorGraph with information baked directly from a Unity's Mecanim controller, you are ready to go.
Parts of the code already comes with simple comments. On the Quantum side you’ll find everything related to the internal state machine itself, such as the AnimatorConditions, which are used on the AnimatorTransitions, the AnimatorVariables (parameters), Layers, Motions and so on.
On the Unity side, you will find the code related to drawing the custom editor for the Custom Animator Graph asset, and all of the code responsible for the baking process, which you can surely extend in order to bake more data into your animator asset, such as FPAnimationCurves for collision information, animation events from Unity and so on.