Navigation System
Introduction
The Quantum navigation system provides a deterministic navigation mesh and agents to navigate and steer in a 2D game world. The system consists of the following parts:
The Navigation Mesh is the data structure made up of triangles that agents can walk on.
- The can be converted from the Unity NavMesh mesh or it can be drawn and edited by hand.
- Although it already exports 3D data it does not understand the concept of height, yet.
- Multiple navigation meshes can be used per map.
- The NavMesh comes with a standard A* pathfinding algorithm.
- The mesh can have regions that are dynamically toggleable (much like Unity navmesh obstacles that cannot move).
The Navigation Mesh Agent is a Quantum component that will make an entity navigate and steer through the Navigation Mesh.
- After receiving a target the agent will move autonomously through the map.
- Agents use an avoidance system with priorities to steer around other agents.
- Agents can be marked to be dynamic bodies and therefor never penetrate walls for example.
Hint
The Quantum navigation system is used in the ActionRPG sample which is downloadable here: ActionRPG sample documentation.
Workflow
Add the MapNavMeshDefinition script to your map data or create a GameObject underneath it and attack the NavMeshDefinition script there.
This is where the intermediate Quantum navmesh data will reside which is later baked into the NavMesh Quantum asset.
From here you can either import the Unity NavMesh (A) or create and edit the Quantum navigation mesh by hand (B).
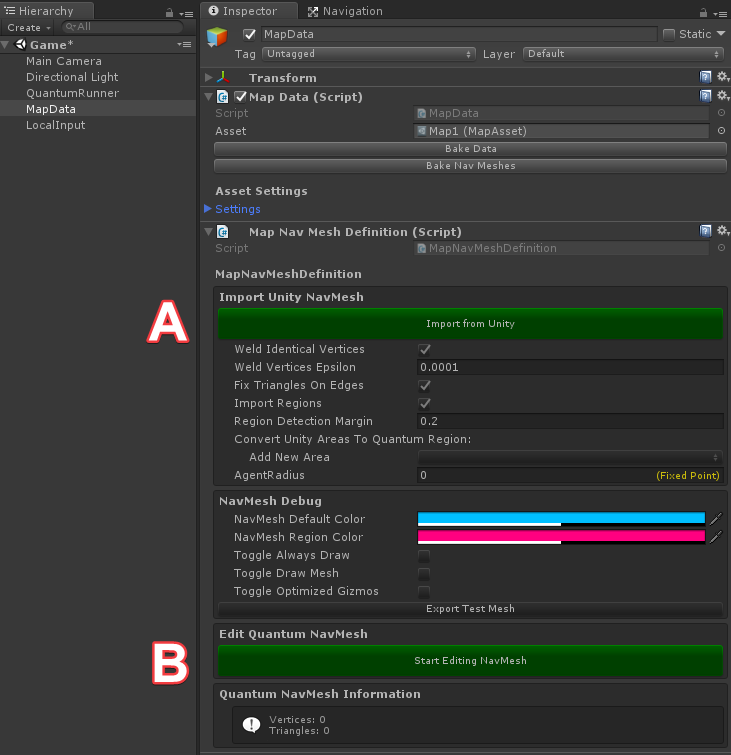
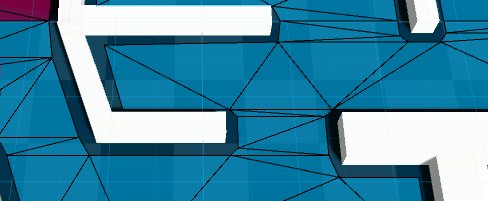
When the MapNavMeshDefinition GameObject is selected the Quantum navmesh is drawn into the scene.
Toggle Always Drawwill draw the navmesh even when GameObject has not been selected.Toggle Draw Meshwill draw the triangle as as it's outline.Toggle Optimized Gizmoswill optimize the debug rendering but is not compatible with the manually edit mode.Export Test Meshwill export the navmesh to a file.
Creating A Quantum Navmesh
A) Importing Unity NavMesh
Create and bake a Unity NavMesh according to the Unity documentation (Off mesh links, height mesh and weights are not supported, yet).
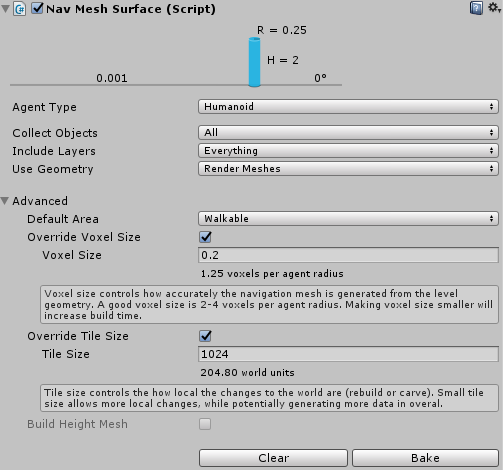
Alternatively use the NavMeshComponents addon (downloadable via Unity Github page). Link the component then to the
NavMeshSurfaceslist.Press Import from Unity on the inspector.
Weld Indentical Verticescombines identical vertices. Always keep this enabled.Weld Vertices Epslionfine-tune the epsilon to weld vertices.Fix Triangles On Edgesfixes triangles that have vertices lying on other triangle edges, which would lead to false border detection.Import Regionsenabled the import of Quantum navmesh regions. Toggle this off, if you don't have any regions.Region Detection Marginis necessary because the Unity NavMesh does not fit the source mesh size very well. The value is added to the navmesh area and checked against all Quantum Region scripts to select the correct region id. If regions are not detected enlarge this value.Convert Unity Areas To Quantum Regionsee region workflow.Agent Radiusis overwritten during import by extracting the smallest agent radius used to generate the Unity navmesh. It's used to calculate more precise waypoints for the agents.
Known Issues before 1.2.4
- Fold out the Advanced Options to run Validate Navmesh and tweak the Combine Vertices Distance. When importing the NavMesh from Unity vertices that are located very close to each other are combined. In rare cases you need to enlarge the delta to get correct results. Running Validate Navmesh will tell you.
- The Unity NavMesh format is different than ours. For example it divides the mesh into chunks and it creates much more triangles than we actually need and additionally the triangles are not sharing vertices. We need to convert it into a proper mesh so we can safely detect the borders. Exactly these two facts in conjunction can make the Quantum NavMesh baking fail sometimes by finding the correct borders. You can notice it by agents making odd choices for clearly vacant paths. This can be mitigated by using the Unity NavMeshComponents (downloadable via their Github page) and applying different tile settings in the NavMeshSurface inspector (see below).
B) Manually Editing The Navigation Mesh
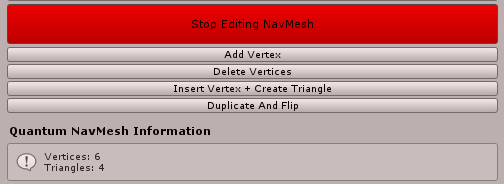
- Pressing Start Editing NavMesh will try to restrict your mouse clicks to the editing of the NavMesh. Click Stop Editing NavMesh to be able to select other game objects again.
- Start creating a new mesh by Add Vertex three times. New vertices are created in (0,0,0).
- Select one vertex in the scene and translate it using the Unity move tool.
- After moving all three of them apart, select all three of them by pressing shift while clicking on them and then Create Triangle or pressing the T key. Only triangles will later be used for path-finding.
- Btw: all edit steps are undo-able.
- Now, we can select two vertices and extrude the mesh by using Insert Vertex + Create Triangle or pressing the shortcut T.
- Select multiple vertices and you are able to move them as a group.
- Press the X key to grow your vertex selection.
- Select vertices and press Delete Vertices or hit the shortcut Backspace to remove them.
- Select any number of vertices and use Duplicate And Flip to mirror them across (0, 0, 0).
Known Issues
- Sometimes the gizmos for the vertex handles are not drawn in the scene. Reset the Unity Layout (under the Layout button in the upper right corner of the UnityEditor).
C) Using Any Mesh As MapNavMeshDefinition
Look into the MapNavMeshDefinition class or into MapNavMeshDefinitionEditor.ImportFromUnity() to see how the data is filled. It is fairly easy to fill that information from a MeshFilter for example.
C#
public class MapNavMeshDefinition : MonoBehaviour {
  public MapNavMeshVertex[] Vertices;
  public MapNavMeshTriangle[] Triangles;
}
Baking The Quantum NavMesh
After importing the Unity navmesh or manually editing the Quantum navmesh definition the navmesh needs to be baked into a Quantum asset.
- Make sure your grid covers the complete NavMesh.
- Press Bake Nav Meshes. This step will convert the raw navigation mesh data into the Quantum NavMesh format. Borders edges are generated, triangles and borders are inserted in a grid structure for fast access and a lookup table for closest triangle per grid cell is created.
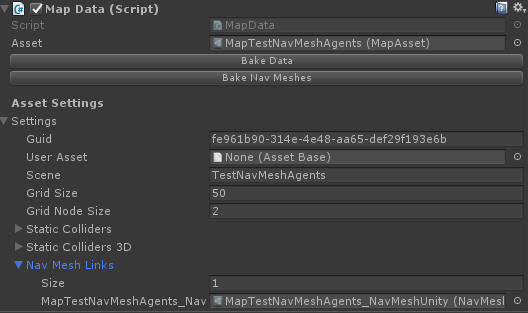
- Additional files are created and are attached to the MapData (
NavMeshLinks). If you select the file you will notice that it is the final NavMesh.AssetObject but without the bulk of the binary data, which is stored in a binary file named in theData Filepathfield. The reason for this is the size limitation on ScriptableObjects. The extra file is loaded duringUnityDB.Init()on theLoaded-callback of the NavMesh.AssetObject.
Hint
It is easy to inject custom scripts into the Quantum map baking process. You can run all steps above automatically by chaining them to the OnBeforeBake-callback. Check out the Auto Baking Map Data page in the community website.
Setting Up Quantum NavMesh Agents
Activate the NavMeshAgentSystem in your SystemSetup:
C#
  public static class SystemSetup {
    public static SystemBase[] CreateSystems(RuntimeConfig gameConfig, SimulationConfig simulationConfig) {
      return new SystemBase[] {
        // pre-defined core systems
        new Core.PhysicsSystemPre(),
        new Core.NavMeshAgentSystem(),
        // ..
      };
    }
  }
Add the NavMeshAgent component to your entities in the Quantum DSL. For example to your main character. Transform2D is required, DynamicBody is optional.
entity Character[PLAYER_COUNT] {
  use Transform2D;
  use DynamicBody;
  use Prefab;
  use NavMeshAgent;

  fields {
    player_ref Player;
  }
}
When creating the entity set the desired AgentConfig:
C#
c->NavMeshAgent.AgentConfig = DB.FindAsset<NavMeshAgentConfig>("MyAgentConfig");
Set the desired target on the component and will move towards it using the passed in NavMesh:
C#
var nm = f.Map.NavMeshes["NavMesh"];
var i = f.GetPlayerInput(c->Player);
c->NavMeshAgent.SetTarget(i->Data.Target, nm, false);
Hint
When the agent is set up to "UsePhysics" make sure to set FreezeRotation to true on the agent physics material. This prevents oversteering and other rotation issues with the agent steering.
To set the animation on your agent game object attach a script to the prefab that does something similar to the following. Be sure to create animation controller that uses the Speed variable.
C#
public class CharacterAnimation : MonoBehaviour {
  public float AnimSpeedFactor = 0.5f;
  private Animator anim;
  private EntityPrefabRoot root;

  void Start() {
    anim = GetComponentInChildren<Animator>();
    root = GetComponent<EntityPrefabRoot>();
  }

  unsafe void Update() {
    if (QuantumRunner.Default != null) {
      var entity = QuantumRunner.Default.Game.Frames.Current.GetEntity(root.EntityRef);
      var body = Quantum.Entity.GetDynamicBody(entity);
      float speed = body->Velocity.Magnitude.AsFloat;
      anim.SetFloat("Speed", speed);

      if (speed > 0.1f)
        anim.speed = speed * AnimSpeedFactor;
      else
        anim.speed = 1;
    }
  }
}
Setting Up Navmesh Regions
Since Quantum 1.2.4
Navmesh Regions are predefined parts of a navmesh that can be activated and deactivated deterministically during run-time. Compared to dynamic carving technique the regions have only little performance overhead.
Unity NavMesh Areas are utilized to generate triangles where the Quantum Regions are supposed to be. Extra game objects (with a MeshRender) have to be places at the position where Regions should be generated.
The same applies when NavMeshSurfaces are used. Additionally add the NavmeshModifier script to the extra game objects.
The maximum number of different regions is 64. The same regions ids can be used on different places. Try to resuse them when hitting the limitation.
The default Quantum navmesh is not a region and can not be toggled.
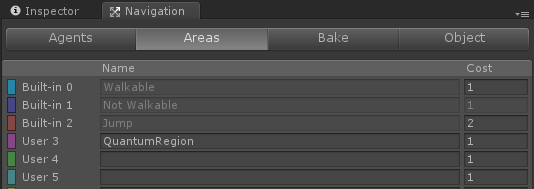
- Reserve and name one Unity NavMesh Area as a "QuantumRegion". Generally you only need one. If you have regions lying exacly next to each other (sharing an edge) they need to be set up with different Area ids.
- Add the Unity NavMesh Areas created in step 1) to
Convert Unity Areas To Quantum Regionson the Quantum NavMesh inspector:
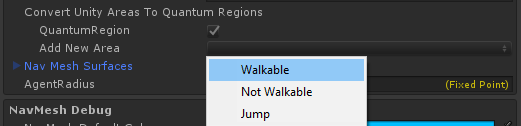
- Add the
MapNavMeshRegionscript to GameObjects in the scene that have a MeshRenderer and should project the Quantum Region to the NavMesh. Select the Unity NavMesh Area from step 1), make sure Navigation Static is toggled on and give the Region anId(as what the Region can be referred to in the simulation).

- Bake the Unity NavMesh
The triangles generated do not match the source mesh renderer completely. Region Detection Margin is used to add a margin when checking the resulting triangles against the mesh renderers bounding box to identify Regions. Toggle QuantumEditorSettings.DrawNavMeshRegionIds to debug.
Import Quantum NavMesh from Unity
Bake NavMesh (on Map inspector)
Toggle Quantum Regions In Code
C#
var nm = f.Map.NavMeshes["NavMeshUnity"];

var isActive = nm.IsRegionActive(f, "Door_002");

// Toggle by name
nm.SetRegionActive(f, "Door_002", !isActive);

// Get region index from region name
byte GetNavMeshIndex(Frame f, NavMesh navMesh, string name)
{
    NavMeshRegion navMeshRegion;
    if (navMesh.RegionMap.TryGetValue(name, out navMeshRegion))
    {
        return navMeshRegion.Index;
    }

    return byte.MaxValue;
}

// Toggle region on off by its index (starting by 0)
nm.SetRegionActive(f, regionIndex, !nm.IsRegionActive(f, flags));
Know Issues
- When loading a new map
Frame.ClearAllNavMeshRegions()must be called. - When activating or deactivating regions all agents must re-path:
NavMeshAgent.ForceRepath(). - (Since 1.2.4 B3) The Quantum navmesh internally uses the XZ plane representation also When QUANTUM_XY is active. An Unity navmesh generated by NavMeshSurface in the XY plane is slipped during baking. The debug gizmos draw it in the visually correct space though.
- (Fixed in 1.2.4 B3 by using PathQuality Best)** The introduction of extra triangles (near active regions) make the heuristic sometimes chose a visually incorrect initial waypoint and creates paths that are slightly bend towards active regions.
- (Fixed in 1.2.4 B3) The regions do not generate normals, yet. Be sure to make the regions big enough that the biggest unit does visually comfortably walk around the edges.
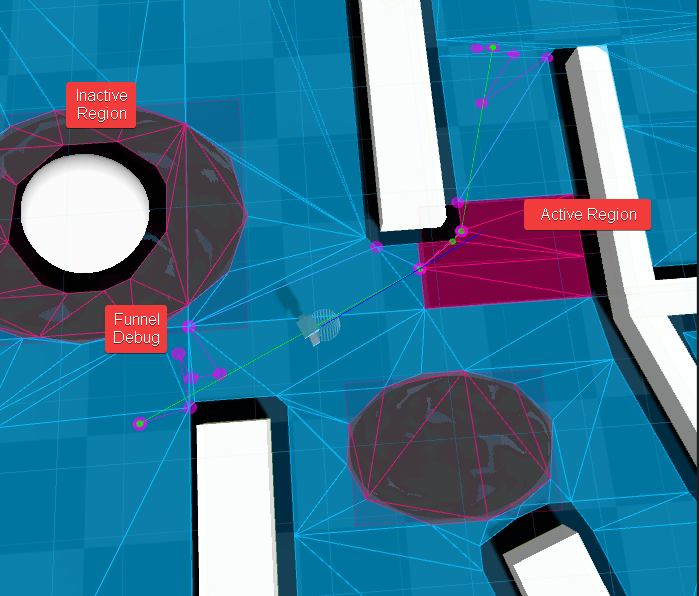
Debugging During Runtime
Goto the EditorConfigSettings and you have more options to draw the NavMesh and additional information during runtime in the Unity Editor.
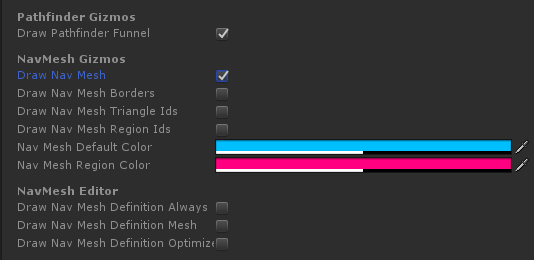
Draw Nav Meshwill render the NavMesh Unity-like and additionally the regions. Inactive regions are greyed-out.Draw Nav Mesh Bordersfinally let's you visualize the borders used for NavMesh line casts. Region borders (colored red) are active when the region is toggled off.Draw Pathfinder Funnelonly works with the latest information, so only really use-able when having only one agent. But the code is in Unity and can be easily extended.
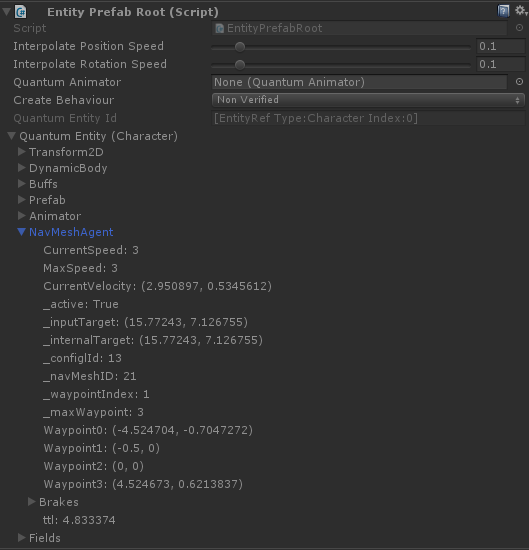
You can debug the state of agents through the Quantum entity state inspector as well.
API
NavMeshAgentConfig
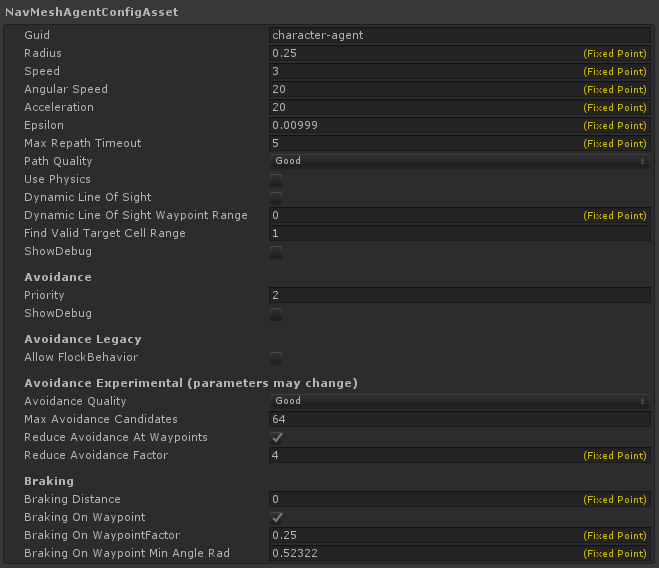
RadiusThe radius of the agent.SpeedThe speed of the agent in units per second.Angular SpeedWill affect the rotation speed of the agent. When set to 0 the agent will never rotate. Set to a high value to make it's rotation instant-like.AccelerationWill affect the agent speed when accelerating. When set to 0 no acceleration is used.EpsilonIs the distance threshold to arrive at the target. Is clamped toNavMeshAgentConfig.MinEpsilonwhen Loaded().Max Repath TimeoutIn seconds. A re-pathing is forced in this interval.Path QualitySelect the quality of the pathfinding heuristics.FastUses Manhatten distance for A* heuristics, uses triangle center for A* node candidates.GoodTakes triangle corners into account when creating A* node candidates.BestUses Euclidean distance for A* heuristics and (since 1.2.4 B3) uses the triangle vs. scan line intersection if possible for A* node positions. This option is recommened when Regions are used!
Use PhysicsToggle this to make the agent set velocity on the dynamic body (requires theDynamicBodycomponent) instead setting the translation directly. Make sure to set FreezeRotation to true on the agent physics material.Dynamic Line Of SightToggle this to make the agent try to skip waypoints if he can see them using aNavMesh.LineOfSight()check.Dynamic Line Of Sight Waypoint RangeSame as the above but it only is active when in range to a waypoint. Set to 0 to deactivate.FindValidTargetCellRangeWhen the SetTarget() position is off the navmesh it will be corrected and moved to a valid position on the navmesh. By default this may be visually inaccurate and the result quality can be increased by activating this search (value>0). The cell of the position and X-1 neighboring cells in each direction are searched for the closest position on the navmesh. The search can be quite elaborate so don't set this value too high.- Known Issue When the agent target position is located on a non-reachable part of the navmesh using this option may still result in a non-reachable target.
Show DebugDraw agent behavior and pathfinding gizmos: Pink small dot indicated the target, yellow large dots are current waypoints.- Avoidance Legacy
Allow Flock BehaviorThe move direction of agents is influenced by other agents in close proximity.PriorityAgents with higher priority (higher value) will not be affected by other agents when performing avoidance.
- Avoidance Experimental (since Quantum 1.2.4)
PriorityAgents with higher priority (higher value) will split the avoidance 25% to 75% with agents with lower priority.Avoidance QualityNone: avoidance is off, Low: legacy avoidance, Medium: minimum candidates, Good: best cost-benefit, High = experimentalMax Avoidance CandidatesDepending on the quality and number of agents that are influencing each other this value needs to be increased to maintain smooth avoidance.Clamp Agent To Navmeshcan be used to make sure that agents stay inside the navmesh with active avoidance.Clamp Agent Radius Thresholdis the minimum radius of agents (subtract NavMesh.MinAgentRadius) to use optimized clamp computations. If small agents go outside the navmesh try increasing this to include them.Clamp Agent Correctionis the percent of correction applied each tick. Increase this to allow even less penetration.Reduce Avoidance At WaypointsActivate this to reduce the agent avoidance when getting close to waypoints. Use this only if you have kinematic agents to mitigate agents going off the navmesh. An alternative to this is still under development. Try settingDynamic Line Of Sight Waypoint Rangewhen using physic bodies to mitigate stuck agents on waypoints.Reduce Avoidance FactorThis is multiplied with the agent radius and represents the distance in what the avoidance influence is reduced quadratically.
- Breaking
BreakingDistanceIf set to 0 (default and recommended) the agent will use current velocity as reference to start breaking. Set this value to > 0 to override the distance.BreakingOnWaypointIf enabled the agent will also apply breaking when getting in range of the waypoints.BreakingOnWaypointFactorReduce the amount of breaking applied on waypoints.BreakingOnWaypointMinAngleRadSet the minimum angle when breaking on waypoint should be applied.
SimluationConfig.NavMeshAgent

Proximity Factor(until Quantum 1.2.3) Distance between agents to be regarded as proximity. Multiplied with the combined radius of two agents. It is used as Max-Distance to query for neighbor agents while computing the collision avoidance vector. The larger it is, more accurate avoidance is, but uses more CPU.Avoidance Range(since Quantum 1.2.4) The distance between two agents minus their radius when they start influencing each other.Update IntervalRefers to update ticks (1 = every tick, 2 = every other tick)Default Nav Mesh AgentThis config will be used for all agents that were not assigned a specific config.Use Legacy Avoidance(since Quantum 1.2.4) Disable this to activate the new avoidance systems.
NavMeshAgent
C#
public struct NavMeshAgent {

    // Agent linear velocity
    FPVector2 CurrentVelocity;

    // Target position that has be set
    FPVector2 Target { get; }

    // Target position that may have been corrected
    FPVector2 InternalTarget { get; }

    // Is the agent working
    bool IsActive { get; set; }

    // Set the config also when it is running
    NavMeshAgentConfig AgentConfig { get; set; }

    // Access how many waypoints the agent currently uses (max 4)
    int MaxWaypoints { get; }

    // Access what waypoint the agents currently steers towards (-1 is inactive)
    int CurrentWaypoint { get; }

    // Use this to initilizes the agent and set the config
    void Init(NavMeshAgentConfig agentConfig = null);

    // See below
    void SetTarget(FPVector2 target, NavMesh navMesh, bool resetSpeed);

    // Triggers a repath next tick (internally sets CurrentWaypoint to -1)
    void ForceRepath();

    // Access agent waypoint positions (throws when index > MaxWaypoints)
    FPVector2 GetWaypoint(int index)
}
SetTarget(target, navMesh, resetSpeed)
Set the desired target of the navigation agent.
targetThe target of the agent in 2D.navMeshThe NavMesh used for navigation.resetSpeedWhen re-targeting should the current agent speed be reset.
NavMesh
NavMeshes are stored in a dictionary (using NavMeshAsset.Name as key) on the Maps. Access them by:
C#
Frame.Map.NavMeshes["NavMeshName"];
C#
public class NavMesh : AssetObject {

    // The path finder object
    NavMeshPathFinder PathFinder;

    // Makes sure that the position is on the map grid.
    void ClampToGrid(ref FPVector2 position);

    // Will return true is the a triangle can be found in the NavMesh at this position (uses FindTriangle internally).
    // If inclusive is false, positions what lie exactly on the triangle edge will return false.
    bool Contains(FPVector2 position, INavMeshRegionMask areaMask, Boolean inclusive = false);

    // Same as the above. The y-component of the 3D position is set to zero.
    bool Contains(FPVector3 position, INavMeshRegionMask areaMask, Boolean inclusive = false);


    // Will return true if the position is inside the map grid. Sets the out parameters to the closest triangle vertices.
    bool FindClosestTriangle(FPVector2 position, out FPVector2 v0, out FPVector2 v1, out FPVector2 v2, INavMeshRegionMask regionMask)

    // Will return a triangle index >= 0 when the position could be moved to inside the navmesh (closestPosition).
    // The position is tried to be moved minDistanceToBorder units into the navmesh.
    // Cell arround the position are checked when maxCellsChecked < 0.
    Int32 FindClosestTriangle(FPVector2 position, FP minDistanceToBorder, Int32 maxCellsChecked, INavMeshRegionMask regionMask, out FPVector2 closestPosition)

    // Returns true is the two positions are in line of sight of each other on the NavMesh.
    bool LineOfSight(FPVector2 p0, FPVector2 p1, INavMeshRegionMask regionMask);
    bool LineOfSight(FPVector2 p0, FPVector2 p1, INavMeshRegionMask regionMask, ref FPVector2 hit);

    // Same as the above. The y-component of the 3D position is set to zero.
    bool LineOfSight(FPVector3 p0, FPVector3 p1, INavMeshRegionMask regionMask);
    bool LineOfSight(FPVector3 p0, FPVector3 p1, INavMeshRegionMask regionMask, ref FPVector3 hit);

    // Use this to convert region ids to cache its index
    Dictionary<string, NavMeshRegion> RegionMap { get; }

    // Check is region is active
    bool IsRegionActive(INavMeshRegionMask f, byte index);
    bool IsRegionActive(INavMeshRegionMask f, string id);
    bool IsRegionActive(INavMeshRegionMask f, ulong flags);

    // Toggle a region
    void SetRegionActive(INavMeshRegionMask f, ulong flags, bool isActive);
    void SetRegionActive(INavMeshRegionMask f, byte index, bool isActive);
    void SetRegionActive(INavMeshRegionMask f, string id, bool isActive);
}
LineOfSight(p0, p1, regionMask, ref hit)
regionMaskTheFrameclass implements theINavMeshRegionMaskinterface. This is required to check for active regions.hitOptionally generate the closest hit position towards p0.
NavMeshPathFinder
There is a path finder instantiated for every navigation mesh. It's accessible via NavMesh.PathFinder.
C#
public class NavMeshPathFinder : IDisposable {

    // Funneled path
    int PathSize { get; }
    NavMeshPathVertex[] Path { get; }

    // Pathfinder raw path
    int RawPathSize { get; }
    NavMeshPathVertex[] RawPath { get; }

    // Find a path from start to end (check PathSize > 1 for progress)
    FPVector2 FindPath(FPVector2 start, FPVector2 end, FP epsilon, Int32 findValidTargetCellRange, INavMeshRegionMask regionMask, PathQuality quality = PathQuality.Good, NavMesh navmesh = null);

    // Same as the above. The y-component of the 3D position is set to zero.
    FPVector3 FindPath(FPVector3 start, FPVector3 end, FP epsilon, Int32 findValidTargetCellRange, INavMeshRegionMask regionMask, PathQuality quality = PathQuality.Good, NavMesh navmesh = null);

    // Sets the navmesh the path finder operates on.
    void SetNavMesh(NavMesh navmesh);
}
FindPath(start, end, epsilon, findValidTargetCellRange, regionMask, quality, navmesh)
Returns the corrected end position when oustide of the navmesh.
epsilonOffset to move target inside the navmesh from its border. Should be > 0. Agents use their radius minus Navmesh.MinAgentRadius.findValidTargetCellRangeIf greater 0: surrounding cells are checked for border intersection when the position is offmesh.regionMaskTheFrameclass implements theINavMeshRegionMaskinterface. This is required to check for active regions.qualityThePathQualitydefines how extensive the pathfinder heuristics are.navmeshOptionally pass the navmesh. Internally SetNavMesh() is called.
NavMesh Callbacks
ISignalOnNavMeshTargetReached is called when agent reached a target destination using the Epsilon Parameter on the NavMeshAgentConfigAsset.
ISignalOnNavMeshUpdateSteering (since Quantum 1.2.3) can be used to overwrite the internal steering system. See the example below.
It is called for all agents once. You can create seperatate logic for different agents by branching here. If you set NavMeshAgent-UpdateInterval in the SimulationConfig this callback, as well as the internal version, is called in a lower frequency for each agent.
You can reset the pathfinder from here by calling NavMeshAgent.SetTarget(). You can force a repathing by calling NavMeshAgent.ForceRepath().
The steering and avoidance in the example below works well with the following setup:
- Agents have a dynamic or kinematic collider
- AgentConfig.UsePhysics = True
- SimulationConfig.ProximityFactor = 2 and UpdateInterval = 1
- PhysicsMaterial.Drag = 4
C#
  public struct NavMeshAgentSteeringData {
    FPVector3 Waypoint;          // Current waypoint
    Boolean IsTarget;            // Is the waypoint the final target
    FP BreakingFactor;           // Internally calculated breaking factor
    FPVector3 AvoidanceVector;   // Accumulated avoidance forces
    bool IgnoreInternalSteering; // Set this to true to deactivate the internal steering
  }
C#
public unsafe class MyNavSystem : SystemBase, ISignalOnNavMeshUpdateSteering {

    public void OnNavMeshUpdateSteering(Frame f, NavMeshAgent* agent, Entity* entity, NavMeshAgentSteeringData* data) {

      // This is important as it will disable the internal steering. Otherwise your changes will be overwritten.
      data->IgnoreInternalSteering = true;

      var transform = Entity.GetTransform2D(entity);
      var direction = (data->Waypoint.XZ - transform->Position).Normalized;

      // Add the avoidance vector into our desired moving direction
      // Use the dot product with the agents right vector to only take lateral avoidance into account.
      var avoidance = data->AvoidanceVector.XZ;
      var localRight = FPVector2.Rotate(FPVector2.Right, transform->Rotation);
      var dot = FPVector2.Dot(localRight, avoidance);
      direction += localRight * dot;

      // agent->CurrentVelocity is used to apply velocity to the agent.
      // You can also set the velocity on the dynamic body directly, but then you have to disable UsePhysics on the NavMeshAgentConfigAsset.
      agent->CurrentVelocity = direction.Normalized * agent->AgentConfig.Speed;

      // Set the direction that the actor is facing or set it on the dynamic body directly
      // The dynamic body might still be rotating by itself after steering because it received angular rotation velocity due to physics contacts.
      // Reset it manually or switch rotations off completely.
      transform->Rotation = FPMath.Lerp(transform->Rotation, FPVector2.RadiansSigned(FPVector2.Up, direction), f.DeltaTime * agent->AgentConfig.AngularSpeed);
    }
}
OnNavMeshUpdateAvoidance (since Quantum 1.2.3) Overwrites the internal avoidance vector calculation. See the example below.
This gets called for every agent pair once that are in inside the same cells defined by the SimulationConfig.ProximityFactor range.
C#
  public struct NavMeshAgentAvoidanceData
  {
    FPVector3 AvoidanceVectorA;
    FPVector3 AvoidanceVectorB;
    Boolean IgnoreInternalAvoidance;
  }
C#
public unsafe class MyNavSystem : SystemBase, ISignalOnNavMeshTargetReached, ISignalOnNavMeshUpdateAvoidance {

    public void OnNavMeshUpdateAvoidance(Frame f, NavMeshAgent* agentA, Entity* entityA, NavMeshAgent* agentB, Entity* entityB, NavMeshAgentAvoidanceData* data) {

      // This will deactivate the internal avoidance calculation that would happen afterwards.
      // You can still add avoidance here and let the internal avoidance add even more.
      data->IgnoreInternalAvoidance = true;

      // This is a very simliplied approach to calculate an avoidance vector for this particular pair.
      // AvoidanceVectorA set here for example will be added to the the accumulated NavMeshAgentSteeringData.AvoidanceVector in the steering callback.
      // Additional features could be taking the agents looking direction or agent->CurrentVelocity into account.
      // Or using a cross vector to improve the evasion actors facing each other.
      // Or adding agent priority, ...
      var posA = Entity.GetTransform2D(entityA)->Position;
      var posB = Entity.GetTransform2D(entityB)->Position;
      var direction = posB - posA;
      var dist = direction.Magnitude;
      direction = direction.Normalized / dist;
      data->AvoidanceVectorA = -direction.XOY;
      data->AvoidanceVectorB = direction.XOY;
    }
}