Utility Theory (Beta)
Introduction
Utility Theory AI works by providing an architecture for decision making which is strongly based on mathematical modelling. When creating Utility Theory Agents (UTAgent), the designer's work is commonly to create and adjust Response Curves, which defines the utility of performing a set of actions, in order to generate the desired bot behaviour.
Bot SDK implementation is split in the following core concepts:
- Consideration: this is the main type of node used, defining what are the things an agent should consider doing. It encapsulates most of the relevant data for generating a score (i.e the utility value), the Actions to be performed if the Consideraiton is chosen as the most useful, and many other extra aspects such as Ranking, Momentum and Cooldown;
Examples: "Consider Fighting" evaluates how useful it currently is for the agent to start fighting other entities. "Consider Running Away" evalutes how useful it is to run from the fight, due to danger (low health, skills in cooldown, etc).
- Response Curve: models one instance of a Response Curve (or Utility Curve) which outputs a score value. It receives an input as parameter which is used for evaluating a specific point of the curve. It uses Unity's AnimationCurve editor for users to express how the score behaves based on the input value. It can be used to express that the utility score increases linearly, exponentially, or maybe it decreases over time, stays constant in a given interval, etc. A Consiration can contain multiple instances of Response Curves which are then combined to generate the final score result;
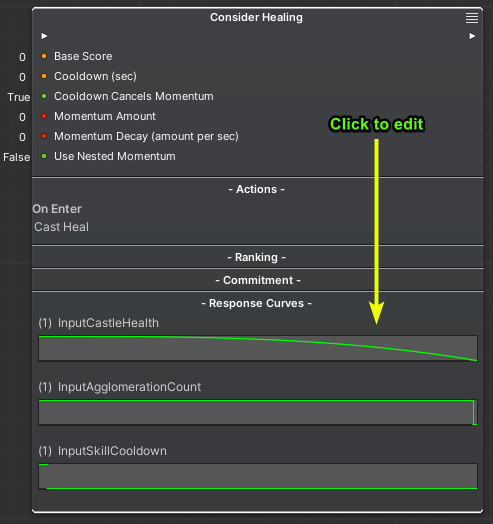
Example: "Consider Healing" has a Response Curve which has linearly decreasing score value and receives the current entity normalized Health as input, meaning that the Consideration is less relevant when the entity health is closer to 1.
- Actions: defines sets of sequential actions to be performed when a Consideration is chosen/updated/not chosen. These are responsible for actually changing the game state as part of an agent's actions.
Example: "Consider Casting Fireball" was the chosen Consideration, then actions are performed to cast a Fireball spell which might involve an initial setup, sequential updates and clearing up data.
There are other implementation details which adds up to all of this: Ranking, Commitment and Nested Considerations. These will be explained over the next sections.
Pros and Cons
Here is a list of pros and cons to consider when using Bot SDK UT:
- Pros:
- Immersive behaviour: Considerations are evaluated and freely chosen. Differently from State Machines and Behaviour Trees, the Utility Theory document does not requires the users to tightgly define every single possibility of agent execution. Considerations are loose and the UTAgent can execute them in any order it finds the most useful. This makes the agent more "creative" in the sense of executing things in ways that the user did not have to pre-define it;
- Smoothed decision making space: due to the use of Response Curves in order to define utility scores, the decision making becomes smoother when compared to true/false branching such as the ones present in State Machines Transitions and Behaviour Tree branches. The semantics of the decision making changes.
- Cons:
- Harder to define sequences: when using UT, defining sequences of logic to be performed is not so easy. While in a State Machine it is very easy to define a sequence of States that should happen with tight control on its logic and timing, the UT editor does not easily allow that, even though it is possible to define sequences of Actions and Nested Considerations, so it can be harder to express certain types of game actions, though such sequences can be delegated to some other system;
- Less predictability: as the UTAgent can execute Considerations in any order that is the most useful, it can perform actions that the user did not expect or want them to and it may not be straightforward to figure it out;
- Multiple variables to balance: the Considerations are big containers of lots of info. The amount of things they express, in order to increase the usage freedom and optimizations makes them a little bit packed with multiple values the user might have to take in account. It is not about just modeling the Response Curves, but other concepts such as Rank, Momentum and Cooldown can really help with optimizing the agent execution, which means that some of the maintenance efforts are direct to fine tuning these variables.
Find in the videos below an overview of the UT editor and an example of its usage on a simple game example:

Creating a Utility Theory document
In the Bot SDK window, click on the New Document button and choose Utility Theory (UT):

Choose a name for the AI document. This document is a Scriptable Object which has the XML that is needed on the editor side only, which is not revelant to the Quantum simulation. It does not need to be shipped in builds.
The name chosen for this AI document will also be the name of the Quantum asset created, that is used on the simulation to actually update entities AI, so it is nice to already pick a suggestive name.

Creating a new UT document already populates it with a very basic Consideration node:
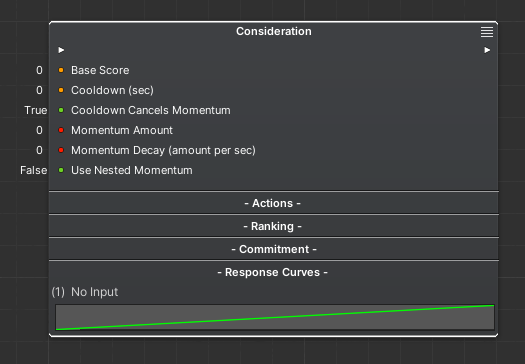
The Consideration Node
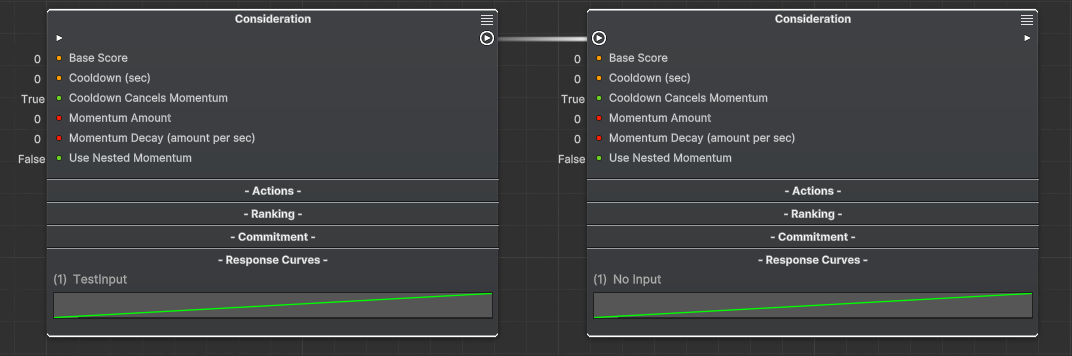
This is the main node type on this editor. It has all relevant entry points for defining utility scores, the actions to be performed and if there are other Considerations nested to it.
Within Considerations it is possible to define the Response Curves that the specific Consideration evaluates. Such curves evaluation then results on values on the range [0..n]. If there are multiple response curves in place, they are multiplied and the result is the utility of executing the Consideration.
By default, all the Considerations are evaluated, meaning that the Response Curves output values based on the define Inputs. The Consideration with the greatest Score is chosen as the one to be executed at that particular frame.
The chosen Consideration might already be different on the next UTAgent update if the scores are different, but there are extra mechanisms which helps reducing how "jittery" the decision making is, when it is necessary for the UTAgent to execute the same Consideration for many frames.
Let's analyze the anatomy of a Consideration:
Base Values
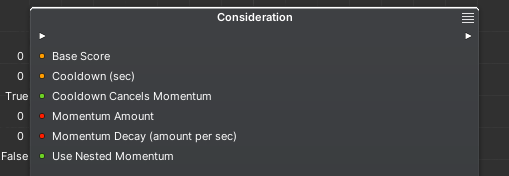
Base Score: FP base value that is always added to the result of the response curves. Use this to give a fixed utility value to a Consideration;
Cooldown: when the Consideration is chosen and its execution starts, the Cooldown defines an amount of seconds in which it will be skipped/ignored;
Cooldown Cancels Momentum: if
true, the Cooldown forces the Consideration to be skipped no matter if the Consideration had Momentum being applied. Iffalse, the Cooldown is only applied after the Momentum is over;Momentum Amount: if the Consideration is chosen, its Rank value is inscreased to the value defined on this field. Use it to define which Considerations should probably keep being executed for more frames, as this will increase their absolute utility value. Read the Ranking topic further for more information;
Momentum Decay: if the Consideration is in Momentum (i.e it had it's Rank increased due to Momentum Amount), its Rank value is decreased at every second by the amount defined on this field. Use it to express how fast the Momentum to be reduced;
Use Nested Momentum: forces the Consideration to mirror the Momentum value applied to any of its Nested Considerations as a way to stay executing a set of Considerations while the nested context is still relevant, even if the parent Consideration does not have any Momentum value.
The base values are not mandatory to be used, but they do provide some extra functionality can be very useful.
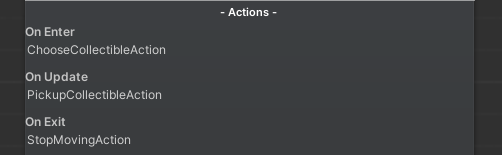
Actions
Actions are the main ways of changing the game state from the context of the agents. Moving an actor from point A to point B, using skills, scanning, etc, can all be done within Actions.
Utility Theory's Actions are the same used on the HFSM and there is a shared documentation which can be accessed by clicking here.
Double click on the Actions area in order to edit the sets of actions. The avaiable sequences are:
- On Enter: executed when the Consideration is chosen as the most useful and started being executed;
- On Update: executed every frame while the Consideration is still chosen as the most useful;
- On Exit: executed when the Consideration was chosen on the previous frame, but it was not chosen again on the current frame;
Ranking

When choosing a Consideration, there are two main scores that are compared, which are:
- Absolute Utility: the Considerations with the highest Rank value have absolute preference over ones with lower Rank values, which are completely ignored when calculating the scores;
- Relative Utility: this is the score that was already explained, the one evaluated from the Response Curves.
This absolute utility from the Rank helps "muting" other Considerations, which can be benefic for the UT document organization and can also greatly improve the agent performance as it avoids evaluating unnecessary curves.
The Rank value is calculated as an integer. As an example: consider 4 Considerations (A, B, C and D). Lets suppose Rank values for them:
- A = 0;
- B = 1;
- C = 2;
- D = 2;
When the agent is updated, Consideration C and D have absolute preference and will have their response curves evaluated and compared. Considerations A, B are ignored.
The Rank is always defined in runtime and can change at every frame and can be defined in two ways: either in the Rank container or in the Commitment container (more on the next topic).
The Rank container node accepts input of any node that inherits from the AIFunctionInt class. Implement a function which returns the desired rank value based on the game state. Here is an example:
C#
namespace Quantum
{
  [System.Serializable]
  public unsafe class AgentPriority : AIFunction<int>
  {
    public EAgentPriority DesiredPriority;

    public override int Execute(Frame frame, EntityRef entity, ref AIContext aiContext)
    {
      // Get an agent-specific component
      var agentData = frame.Unsafe.GetPointer<AgentData>(entity);

      // Compare the agent current priority with the priority this AIFunction checks
      // If the agent is currently prioritizing it, then increase the Rank of the Consideration to 10
      // If the priority is something else, set it to 0 instead
      if(agentData->Priority == DesiredPriority)
      {
        return 10;
      }
      else
      {
        return 0;
      }
    }
  }
}
Another example is implementing a IsInDanger function which reads the game state/blackboard values in order to identify if the Agent is currently in danger, meaning that there are enemies close to it, or which has LoS to it. If danger is detected, return a Rank value of 10, meaning that the Considerations with such Rank will have now a very high absolute priority. If there is no danger, just return 0.
In order to access the Rank container, double click in the Rank area.
Momentum
The Momentum value is used to set the Rank of a Consideration when it is chosen (similar to an On Enter logic).
Its main purpose is to allow for increasing the importance of a Consideration only if it is chosen as the most useful amongst others, and keep it relevant for more time, reducing the chances the UTAgent will be "jittery", changing the chosen Consideration in situations where the agent should try to commit more time into doing only one thing.
It is useful, for example, to keep an agent chasing a target for many frames rather than risking it frequently stopping do to something else.
PS: the Rank value generated by Momentum has higher priority than the one calculated dynamically.
Now that the Consideration is in Momentum, when does it get back to normal again? There are two main ways into decreasing it:
- By setting a
Momentum Decayvalue, it is possible to specify a value which will be used to decrease the Momentum's Rank every second; - It is also possible to cancel the Momentum's Rank with the Commitment nodes, which return Booleans that can be used to specify when the Momentum should be canceled. This is specially useful when the Momentum should not decay by time, but rather via some specific game logic, such as "the target is not reacheable anymore". To create a Commitment function, inherit from
AIFunction<bool>and implement it'sExecutemethod. When returning the valuetrue, it means that the Momentum should be canceled.
C#
namespace Quantum
{
  [System.Serializable]
  public unsafe class SampleCommitment : AIFunction<bool>
  {
    public override int Execute(Frame frame, EntityRef entity, ref AIContext aiContext)
    {
      return false;
    }
  }
}
In order to access the Commitment nodes, double click the Commitment area.
The idea is that you might want to sustain a high Rank value, until some condition is complete. For example, when an agent follows another character due to a Consideration, it might be desirable to increase its Rank to a high value during the chasing, set zero into Momentum Decay and add a Commitment node which checks if the agent can still reach it's target (it could be a simple distance check). If the target is too far away, then returning true will take the Rank of the Consideration back to zero again, increasing the chances that something else will be more useful to the agent.
That said, it is not mandatory to use neither of those techniques, or to use them in exclusivity. It is possible to add Momentum to a Consideration and have both a natural Momentum Decay and a Commitment function.
Response Curves
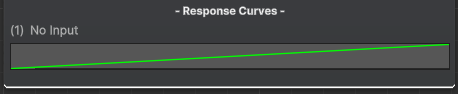
This is the core of this AI technique. The decision making is all based on defining curves, scoring, multiplying and combining the results to decide what is more useful to do at a given frame.
We are re-using Unity's AnimationCurve system in order to define the curves, which are then compiled into its deterministic version which are called FPAnimationCurve.
When creating curves, what is mostly important is to use curves that correctly express what is the desired evaluation. Is it some behaviour that is only useful when it is very close to a specific value? Does the utility grows linearly? Exponentially? Should it be zero within a specific range, and then start to increase linearly after some point? Etc.
Create your own curves, select the ones from the presets and create new presets.
A very important concept to have in mind is that the Y Axis of the curves (which is the resulting score) should be normalized (i.e between 0..1). This is critical because the curves' results are multiplied, so the proportion needs to be maintained, otherwise the results of the curves will not be really comparable with each other, which would break the principles of the UT technique.
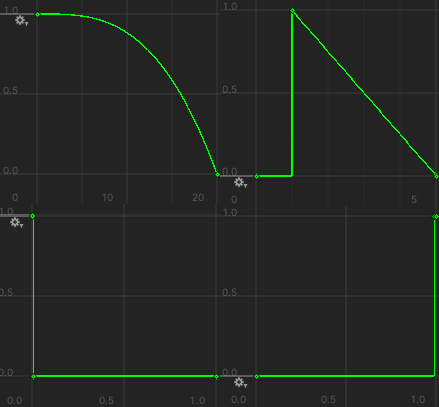
Here are a few sample images of the response curves saved as presets and used on the Bot SDK Sample:
In order to define more Response Curves for a Consideration, double click in the curves area to go to the curves graph.
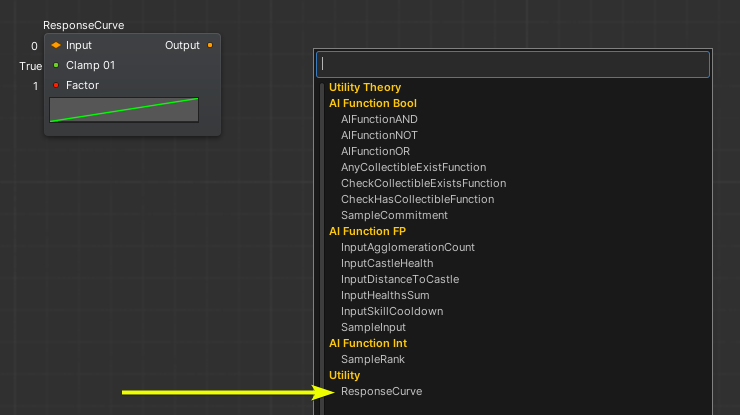
Use the right mouse button to create a new Response Curve, on the Utility section.
Click on the curve to open it's editor window.
The decision of which curve to use completely depends on the agent specific needs. It depends on which Input will be inserted on that curve, and how that should be reflected on a "utility" value.
To exemplify:
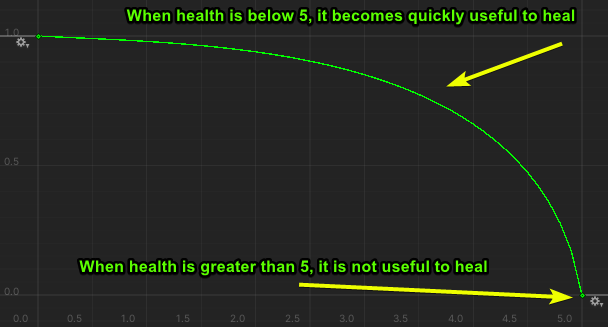
Consider Healing: suppose an Agent which has 10 of Max Health, and starts to desire healing only when it's health value goes below 5. To values which are greater than 5, the result of the utility curve should be zero so it focus on executing other Considerations. Then, for values below zero, the utility of healing should increase very fast. This could be expressed by this curve, for example:
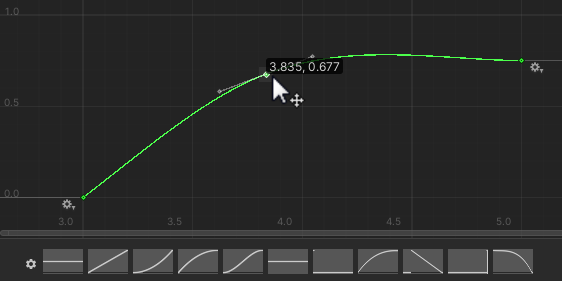
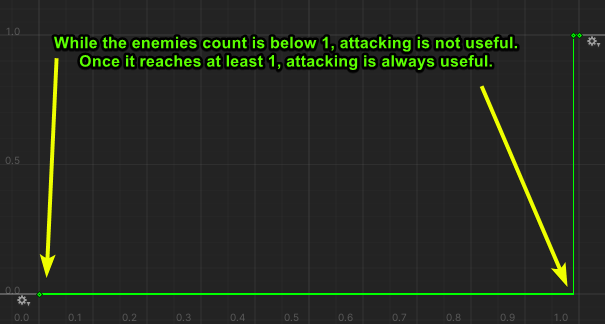
Consider Attacking: suppose an Agent which only desires to Attack if there is at least one enemy on the scenario. It does not matter if it is one, two or ten enemies. This is a "binary threshold" curve, where it goes from zero to one immediately. Even though it removes some of the expressivity that we have with curves, it can still be useful. The curve could look like this:
It is common (but not mandatory) that a Consideration needs more than one Response Curve. Continue adding new curves as needed. Be aware that adding more curves might need more input to be processed, which adds an overhead, but there are strategies that can be used to minimize the amount of polling necessary.
It is possible to see and edit the response curves from the root view:
Input for Response Curves
Input values are defined by custom user logic, as this is very game specific. It could be the Health value that comes from an entity's component, it can be data stored on the blackboard, it can be something gathered from sensors systems, etc.
In order to create custom Input types, create a new class which inherits from AIFunction<FP> and implement its Execute method.
C#
namespace Quantum
{
  using Photon.Deterministic;

  [System.Serializable]
  public unsafe partial class InputEntityHealth : AIFunction<FP>
  {
    public override FP Execute(Frame frame, EntityRef entity, ref AIContext aiContext)
    {
      // Read the current health from a component from the agent entity
      var health = frame.Unsafe.GetPointer<Health>(entity);
      return health->Current;
    }
  }
}
Save the code and, after a successful compilation, the input node will be available for use on the visual editor.
To access the Response Curve nodes, double click in the Response Curves area on the Consideration node.
Linked Considerations
It is possible to link one consideration to others, creating a parent-children relationship.
In this case, the children Considerations are evaluated only if, at a specific frame, the parent Consideration was chosen as the most useful. When it happens, the Children Considerations will only compete with the sibling Considerations.
This can be useful mainly for a few reasons:
- It can help with performance optimizations. Imagine a parent Consideration which analyzes if "fighting is useful", and the children Considerations are the ones which actually evaluate which battle choices to make. These are not computed until it is useful to fight;
- Still for performance matters, the curves contained on the parent Consideration are implicitly calculated for all of its children, so it removes the need of re-computing those curves repeated times;
- It helps organizing the Considerations in a "contextual" matter;
To link a Consideration, click on its output slot at the right top corner and link it to the input slot of another Consideration:
Compiling a Utility Theory document
In order to actually use the UT in the simulation, it is necessary to compile everything done on the AI document every time a meaningful change is done.
To compile, there are two options:

- The left button is used to compile only the currently opened document;
- The right button is used to compile every AI document on the project.
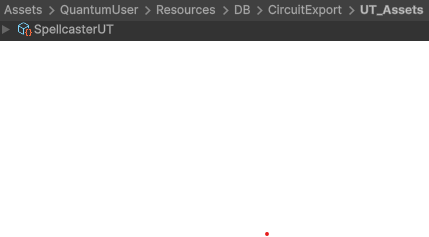
By default, the UT files will be located at: Assets/QuantumUser/Resources/DB/CircuitExport/UT_Assets.
The type of the main asset created by this process is UTRoot.
Using the UTRoot asset
To use the created UT root asset, make a reference to it using a field of type AssetRef<UTRoot> and load it via frame.FindAsset().
UT Coding
The UT has a main component named UTAgent, which can be used basically in two different ways:
- Add the component into entities, either via code or directly in an Entity Prototype on Unity;
- Or, declare instances of the
UTAgentin the frame's Globals;
The UTAgent component has a struct named UtilityReasoner which is the main hub of data and logic used by the agent. It stores all the relevant data that is necessary for scoring Considerations and choosing one of them to execute.
Initializing and Updating
Here is a snippet for initializing and updating a UT agent:
C#
UTManager.Init(f, &utAgent->UtilityReasoner, utAgent->UtilityReasoner.UTRoot, entity);
UTManager.Update(f, &utAgent->UtilityReasoner, entity);
Defining fields values
Find here more information on the alternatives that you have when settings values to fields on Considerations, Inputs, Ranks and Commitments: Defining fields values.
AIParam
Find here more information on how to use the AIParam type, which is useful if you want to have more flexible fields that can be defined in different ways: settings by hand or from Blackboard/Constant/Config Nodes: AIParam.
AIContext
Find here more information on how to pass agent-contextual information as parameter: AIContext.
BotSDKSystem
There is a class which is used to automate some processes such as deallocating Blackboard memory. Find here more information about it: BotSDKSystem.
Visual Editor Comments
Find here more information on how to create comments on the Visual Editor: Visual Editor Comments.
Changing the compilation export folder
By default, assets generated by Bot SDK's compilation will be placed into the folder Assets/Resources/DB/CircuitExport. See here how you can change the export folder: Changing the export folder.
- Introduction
- Pros and Cons
- Creating a Utility Theory document
- The Consideration Node
- Base Values
- Actions
- Ranking
- Momentum
- Response Curves
- Input for Response Curves
- Linked Considerations
- Compiling a Utility Theory document
- Using the UTRoot asset
- UT Coding
- Initializing and Updating
- Defining fields values
- AIParam
- AIContext
- BotSDKSystem
- Visual Editor Comments
- Changing the compilation export folder