Shared Concepts
Find here some concepts are the same for more than one Bot SDK AI model.
Defining Actions
On the HFSM editor, every State has a sub-graph inside of it. On the UT editor, every Consideration also has a sub-graph. Those can be accessed by double clicking on the respective nodes.
On those sub-graphs, it is possible to create Action nodes.
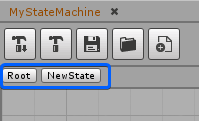
When accessing a sub-graph, you will see at the top bar that there is a breadcrumb which indicates how deep in the hierarchy you currently are.
You can use these buttons in order to navigate to previous levels of the hierarchy.
There is already an important node defined on sub-graphs: the Actions Root node.
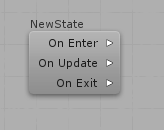
In the Bot SDK editor
There are three lists of actions to be performed:
- The On Enter list defines the actions to be executed when the HFSM enters on this state;
- The On Update list defines the actions to be executed every time that the HFSM is updated (normally, every frame);
- The On Exit list defines the actions to be executed when the HFSM leaves this state.
In the UT editor
There are three lists of actions to be performed:
- The On Enter list defines the actions to be executed when the UT starts executing the Consideration;
- The On Update list defines the actions to be executed every time that the UT is updated (normally, every frame);
- The On Exit list defines the actions to be executed when the UT stops executing a Consideration as another one was chosen instead.
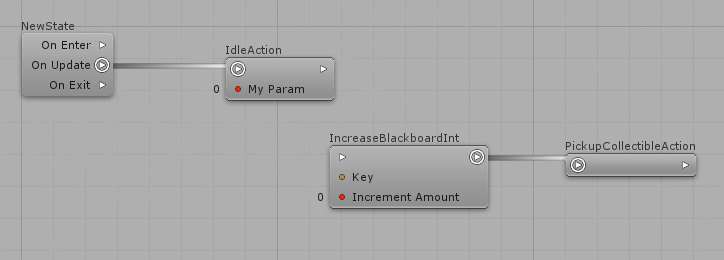
In order to define these actions lists, click on the arrow on the right side of the Actions Root node, then click on any Action's inbound slot, or click on any empty space to create a new Action right away:

An important thing here is that you can define as many linked actions as you need and they will be executed sequentially on the same frame.
Just keep linking them using the arrow buttons:

You can re-order the actions as you want.
You can also have detached sets of actions to use later if you don't want to delete them, and you don't want them to be executed:
Note that you can define Actions fields values by clicking on the inbound slots.
Press Enter to apply the changes or press Esc to discard those changes.
As we already saw, the Editor already comes with some pre-defined Actions and Decisions.
Those were created for the developer to have something to begin with.
On your project, you will have to implement your specific Actions and Decisions.
Let's take a look on how to do that.
Coding Actions
To create an AI Action, to perform game-specific logic, create a new any class that inherits from the AIAction abstract class.
Then, implement the Execute method, which is triggered according to how it is used on the different kind of AI documents.
Important: mark the new AIAction class as [Serializable].
C#
namespace Quantum
{
    [Serializable]
    public partial class IdleAction : AIAction
    {
        public override void Execute(Frame frame, EntityRef entity, ref AIContext aiContext)
        {
            // Insert action code here
        }
    }
}
Defining fields values
On Bot SDK, it is possible to declare public fields on code so those fields appear on the Visual Editor. In the HFSM, for example, it is possible to do this for Actions and Decisions codes. In the editor, the user can define what is the value of that field.
The simpler way to setup these values is to click on the field and assign the value right away. But there are other options:
- Using Blackboard nodes;
- Using Constant nodes;
- Using Config nodes;
- Using AIFunction nodes.
As the Blackboard nodes is already explained on the Blackboard documentation, let's dive into the Constant/Config/AIFunction nodes.
The Constants Panel
It is possible to define and use Constants from the left side panel.
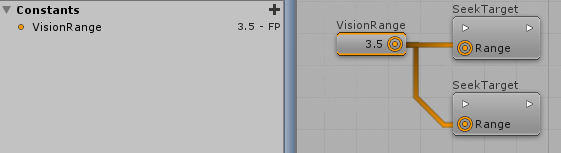
After defining Constants, it is possible to grab Constant Nodes and link them to inbound slots of Actions and Decisions (on the HFSM). A single Constant Node can be used as input many times, making it easier to define many fields with the same value.
Another important aspect about the Constants is that whenever its value is changed on the setup menu, all of the nodes that were originated from that Constant will be updated accordingly, which makes it easier to define values in many different parts of the HFSM and change these values later on.
Use the left side menu in order to define a new Constant, clicking on the (+) symbol on the Constants tab.

Then choose its Name, Type, Default Value and save it. Now, with the Constant defined, you can drag and drop it to the graph view and already link it to inbound slots.
The Config panel
It is possible to have different constant values for many agents which uses the same HFSM/BT/UT, which can be useful, for example, if you want Bots for different difficulties, but that has the same behavior logic. A Shooter Bot on the Easy Mode can have a value of "2 seconds" as its Reaction Time, whilst on the Hard Mode it can have a value of "0.5 seconds". This can easily be done using the Config panel.
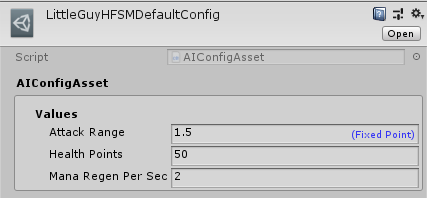
Use the panel on the left side in order to create Config values, which are then compiled into a new data asset of type AIConfigAsset. After compilation, you can find the asset with the name <DocumentName>DefaultConfig, on the folder AIConfig_Assets folders.
These assets can then be used on the simulation in order to retrieve constant values.
Lets create a very simple Config layout:

Besides of creating new config fields from scratch, it is also possible to convert a Constant to a Config, and vice versa.
Then, after compiling the document, this is the resulting asset:
Finally, in order to have variations from this asset, so you can define different constant values, use the right click menu on Unity’s Project tab and go under Create/Quantum/Assets/AIConfig.
This will create a very simple config asset which looks for another config asset for it to be based on. Fill the Default Config field and click in Update Config in order to mirror the default config asset. You can then change the values as you wish. Also, click on the Reset to Default if you want to revert the values back to the original config asset values.
Now, in order to use these configs, there are some alternatives:
Read it directly from the config asset, informing the config Key and retrieving the value accordingly with the config type:
var myBoolean = myConfig.Get("Key").Value.Boolean;The type can be: Integer, Boolean, Byte, FP, FPVector2, FPVector3 and String
Or use it alongside with the AIParam type.
To exemplify:
First, create, on any Action/Decision, an AIParamFP field. Compile it so it shows up on the Visual Editor;
Then, Drag and drop some Config value from the left side panel and link it to the AIParam field;
Then compile the document. On code, retrieve the value using the AIParam API. This will already retrieve the value for the config accordingly with the Config asset passed as parameter:
// Considering that the variable "AttackRange" is of type AIParamFP
FP rangeValue = AttackRange.Resolve(f, blackboard, myConfig);
So, basically, the trick here is to create the default Config asset based on what you have on the Visual Editor, using the configs panel, and then to create variations of it, and link them accordingly to your needs using AssetRefs.
The HFSMAgent, BTAgent and UTAgent already comes with a field to reference the Config asset for that specific agent/entity, just for convenience. So you can use it to make your own references:
// The config to be set can come from any source that you prefer. Some custom asset, RuntimeConfig, RuntimePlayer...it's up to you. Just set it to the component:
hfsmAgent->Config = config;
btAgent->Config = config;
utAgent->Config = config;

// Then, when you need to GET the Config:
hfsmAgent.GetConfig(frame);
btAgent.GetConfig(frame);
utAgent.GetConfig(frame);
AIParam
There are different ways of defining the source of the values on fields. It can currently be done by using Blackboard, Constants and Config. Because of this, there are also different ways of reading these values on code. Because of that, if the developer needs to change the source type from one to another (i.e change from Blackboard Node to Constant Node), a change on the source code would also be needed.
But why changing the source type can be useful?
- For simplicity, it is possible to just define the value manually;
- If the value can change during runtime, it can be stored on the Blackboard, so define it using a Blackboard Node;
- If the value doesn't change but you want it to come from Nodes, for the graph to be more flexible, then define it using a Constant Node;
- If the above applies, but you need it to vary from agent to agent, use a Config Node.
The AIParam is a type created to help with this kind of situation where the source can be suddenly changed. But, before learning about its usage, let's quickly analyze the differences between the code for reading the values.
If some field's value was manually defined on the Visual Editor, or if it was defined by using a Constant Node, then the code to read it is plain and simple:
C#
// In this case, the value is directly stored on the field itself, with no need for any extra code
public Int32 MyInteger;
Now, if the value comes from a Blackboard node:
C#
// Read the value from the blackboard asset
var value = blackboardComponent->Board.GetValue("someKey");
As for a Config node:
C#
// Read the value from the config asset
var myBoolean = myConfig.Get("Key").Value.Boolean;
So, in order to not need to change the code when the value source changes on the Visual Editor, use the AIParam type for your fields. Its main characteristics are:
- It has the
Resolvemethod, which receives the blackboard and config assets. By knowing what is the source of the field's value, this method already returns the correct value, either by returning the value directly (when the field was manually defined), or returning the value from Blackboard/Configs. So you can change the value source type as many time as needed, and this will be the code for reading it:
C#
public AIParamInt MyAIParam;
var value = MyAIParam.ResolveResolve(frame, blackboard, aiConfig);
- It currently has 8 possible types:
C#
AIParamInt, AIParamBool, AIParamByte, AIParamFP, AIParamFPVector2, AIParamFPVector3, AIParamString, AIParamEntityRef
- Internally, it already checks how the AIParam was defined on the Visual Editor? If it was hand defined, or from any of the specialized nodes.
AIFunction Nodes
With AIFunction Nodes, it is possible to pre-define "Getter" nodes of a variety of types. The main purpose of this is to make it possible to create specific nodes which will return values accordingly to your game specific needs.
The base AIFunction class is generic and supports mainly the types: byte, bool, int, FP, FPVector2, FPVector3, EntityRef and AssetRef.
To create your own AIFunction nodes, create a new class that implements the desired abstract type and implement the desired Exectue() method (there is a Frame and a FrameThreadSafe version). Here is a sample AIFunction node that returns the position of an Entity referenced in a custom component:
C#
namespace Quantum
{
  [System.Serializable]
  public unsafe class GetEntityPosition : AIFunction<FPVector3>
  {
    public override FPVector3 Execute(Frame frame, EntityRef entity, ref AIContext aiContext)
    {
      MyComponent myComponent = frame.Unsafe.GetPointer<MyComponent>(entity);
      Transform3D* targetTransform = frame.Unsafe.GetPointer<Transform3D>(myComponent->TargetEntity);
      return targetTransform->Position;
    }
  }
}
When you compile the quantum solution, the AIFunction will now be available from the context menu. It is also possible to declare public fields on AIFunction classes, which you can then fill directly in the visual editor.
As for linking AIFunction Nodes, it has to be done with the AIParam type which was explained above. So, if I have an HFSM Action which needs to get the position of an entity based on the AIFunction class above, an AIParamFP field is needed:
C#
namespace Quantum
{
  [System.Serializable]
  public unsafe partial class SampleAction : AIAction
  {
    public AIParamFP TargetPosition;

    public override void Update(Frame frame, EntityRef e)
    {
      // If you are not sure if your AIParam's source is a Blackboard/Config/AIFunction node, then use the general Resolve method
      var position = TargetPosition.Resolve(/*args*/);

      // If you are sure that the source is an AIFunction node, then you can use the specific Resolve method
      var position = TargetPosition.ResolveFunction(frame, entity);

      // Now, do something with the position
    }
  }
}
As shown on the example above, it is possible to either use the general Resolve method, which returns a value depending on the Source that was defined on the visual editor (blackboard, config, AIFunction nodes). But if it is known that the AIParam is defined by a AIFunction node, then using the specific Resolve method can be a better choice as it does not requires many parameters and is a little bit faster.
An AIFunction Node can also have AIParam fields, allowing the creation of nested AIFunctions.
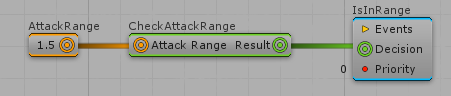
On the Visual Editor
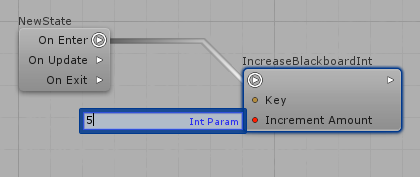
When a public AIParam is declared on Actions and Decisions, it will appear on the Visual Editor and you will be able to define its value either manually or from specialized nodes. For example, considering a public AIParamInt IncreaseAmount:
Creating AIParam for custom Enums
It can be useful to also create AIParams for Enums, besides of the types mentioned before. In order to do that, you need to create your own AIParam type for the specific Enum that you need. Here are the code snippets for it:
C#
// Considering this enum:
public enum BotType { None, HFSM, BT, UT };

// Create a new AIParam class based on that enum:
[System.Serializable]
  public unsafe sealed class AIParamBotType : AIParam<BotType>
  {
    public static implicit operator AIParamBotType(BotType value) { return new AIParamBotType() { DefaultValue = value }; }

    protected override BotType GetBlackboardValue(BlackboardValue value)
    {
      int enumValue = *value.IntegerValue;
      return (BotType)enumValue;
    }

    protected override BotType GetConfigValue(AIConfig.KeyValuePair config)
    {
      return (BotType)config.Value.Integer;
    }
  }
AIContext
Bot SDK comes with an implementation of a data container which can be helpful in order to pass, on the agents update routines, their context-specific data.
The usage of such contextual container is not mandatory, but can be used in order to facilitate getting data from the user end points, such as an HFSM's AIAction.Update(), a BT's Leaf.OnUpdate(), etc.
The main reason to use it is to provide extra data to user code other than the Frame and the EntityRef. This way, it is possible to avoid a lot of boilerplate code such as frame.Get<MyComponent>(entityRef), which sometimes needs to be done many times for a single Update of an Agent.
With the AI Context, it is possible to put data into it at the very beginning of the update routine (e.g before calling HFSMManager.Update, same goes for BT and UT).
So, to exemplify, the purpose of the context here is to fill it with data which is relevant to a specific agent's context. Maybe save it's AIBlackboard component. Maybe some other custom component. Or maybe some integer which represents something to the agent update logic.
That all said, here are a few code snippets needed in order to get it running. These are examples with the HFSM, but the same applies to BT, and UT:
Extending the AIContextUser struct
- Create a new file, with name and location of your preference, e.g
AIContextUser.cs; - Declare a
partialdefinition of theAIContextUserstruct with the desired specific fields. The code below is just an example:
C#
namespace Quantum
{
  public unsafe partial struct AIContextUser
  {
    public readonly AIBlackboardComponent* Blackboard;
    public readonly HFSMAgent* HFSMAgent;

    public AIContextUser(AIBlackboardComponent* blackboard, HFSMAgent* hfsmAgent)
    {
      Blackboard = blackboard;
      HFSMAgent = hfsmAgent;
    }
  }
}
- When updating the AI agent, create a new
AIContextinstance and fill it with the specificSetUserData, then pass it to the Update method:
C#
AIContext aiContext = new AIContext();
AIContextUser userData = new AIContextUser(blackboard, hfsmAgent);
aiContext.SetUserData(&userData);

HFSMManager.Update(frame, frame.DeltaTime, hfsmData, entityRef, ref aiContext);
- From the user end points, access the user-specific context using the extension method for easy conversion:
C#
namespace Quantum
{
    [System.Serializable]
    public unsafe class SampleAction : AIAction
    {
        public override void Update(Frame frame, EntityRef entity, ref AIContext aiContext)
        {
            var userContext = aiContext.UserData();
            // either cash the data in local variables
            var agent = userContext.HfsmAgent;
            var blackboard = userContext.Blackboard;

            // or use it right away where needed
        }
    }
}
Important considerations
Be very careful with how you manages the AIContext. Creating it from scratch every frame and filling it's data is the safest way to use it, even though there are other possibilities;
Also, the main purpose of the context is to provide a nice way to read data regarding a context in order to help with the decision making. It is not built to support storing data in the context and changing it on the fly, even though it is possible. Use it as prefered, just make sure to do it carefuly as to avoid hard to track issues.
Muting
For each AI model, there are some specific Nodes which can be muted. This essentially disables that part of logic from the compilation process without the need of deleting/unlinking anything. Lets analyze what can be muted on the different AI models:
Specific to the HFSM
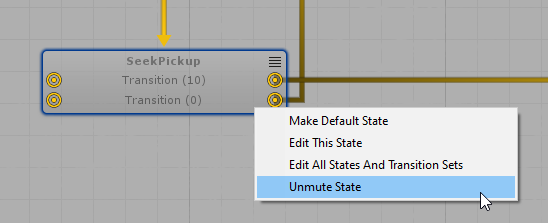
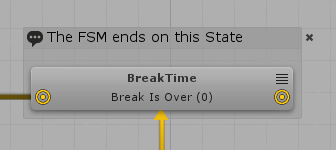
Muting States
Transitions to muted states are ignored. Also, any Action inside that state will not be executed.
PS.: You will get an error if you compile a HFSM with a muted Default state.
To mute a State Node, right-click the State and then select "Mute/Unmute State".
It will be rendered transparent while it is muted.
Muting Transitions
You can mute a Transition by right clicking on the transition's line and selecting "Mute/Unmute Transition".
Muted Transitions will be ignored during compilation.
It is possible to mute any type of transition: the common transitions, the Any transition, the Transition Set and transitions to Portals.

For both HFSM and UT
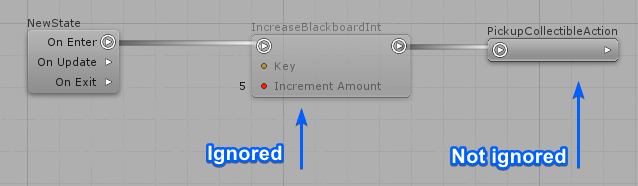
Muting Actions
It is possible to mute any Action, no matter its position on the actions list.
Muted actions are ignored during compilation and only the next actions in the chain will be executed, if the muted action contains any next action.
It is also accessible by right-clicking any Action Node.
Bot SDK Systems
There are two classes that comes by default with Bot SDK's package:
BotSDKSystem: used to automate some processes such as deallocating Blackboard memory, initializing HFSM/BT agents with data contained on the Entity Prototypes and so on;BotSDKDebuggerSystem: used to gather important information for the debugger on the Unity side;
To use them, just add new BotSDKSystem(), and/or new BotSDKDebuggerSystem() on your SystemSetup class.
PS: it is not mandatory to use these systems. Everything done there can be done in your own classes;
PS2: be aware that some things done there might be already done in other part of your own code, so take care to introduce issues by adding this system. Before adding the system, take a look at what it does and either use it right away, or take some logic of it into your own code.
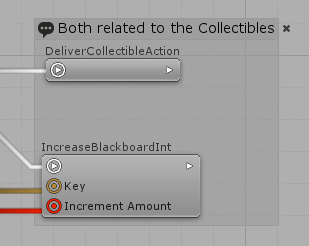
Visual Editor Comments
It can be handy to add comments to the Visual Editor. To do that, select any Node (States/Tasks/Actions/Decisions/Constants, etc...) and press "G" in order to add a comment area. Then, click on the "Comment" header text and change it as you prefer. It is also possible to add comments to more than one Node. To select more than one node, hold the "Ctrl" button on Windows OS, or the "Command" button on Mac OS.
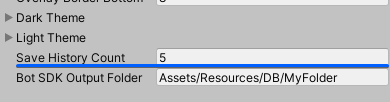
By default, assets generated by Bot SDK's compilation will be placed into the folder Assets/Resources/DB/CircuitExport. This can be changed by selecting the asset named SettingsDatabase located on the folder Assets/Photon/BotSDK/VisualEditor/CircuitScriptables. Then, find the field named Bot SDK OutputFolder and change it as you wish. Just make sure that the target folder is already created.
Also, a parent folder named CircuitExport is always created, and all the sub-folders are created inside it.
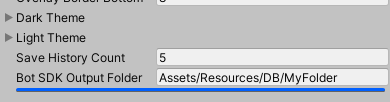
Choosing the saved History Size
Bot SDK by default saves 5 entries of history into the visual editor files. This is useful if you want to maintain the history between sessions when you close/open your AI document. But the AI file size will increase as the AI circuit gets bigger, depending on you much history entries you save.
So you can choose how many history entries you want saved, which you can even set to zero if you don't need history to be saved, as the History is only re-loaded when you re-open your AI file, which also happens you close/open Unity.
To change the history entries amount, select the asset named SettingsDatabase located on the folder Assets/Photon/BotSDK/VisualEditor/CircuitScriptables. Then, find the field named Save History Count.