Behaviour Tree
Introduction
Behaviour Tree(BT) algorithms are popular in the games development field for building AI agents.
Bot SDK's version of it is composed of:
- Child/Parent nodes: any node might have from zero to multiple child nodes depending on its type. Nodes can only have one parent node though;
- Root Node: the first, base node at the top of the tree which is used as the starting point. It can only have one child node;
- Composite Node: used mostly for branching, composite nodes can have any amount of child nodes and they define which of those will be executed;
- Leaf Node: used at the bottom part of the tree, used for actually performing game actions. Cannot have any child node;
- Decorator Node: used as an "attachment" to other nodes, having a condition that is checked in order to decide if the node it is attached to will or not be executed. Can only have one child node;
- Services: used to be perform game actions in a pre-determined frequency defined by the user. This is not a node.
Behaivour Trees execution starts at the Root Node, which then leads the execution to its child node and so on, until Leaf nodes are reached, game actions are performed and so on.
Similar to State Machines, Behaviour Trees also requires the developer to take care of every detail, every possibility through it's symbolic AI definition.
This means it does not creates new, unpredictable plans in runtime, but rather always follows the same structure. Lets call it an AI model with fixed structure.
It is also important to notice that this is a stateful BT implementation, meaning that it makes more use of the frame memory in order to cache and track everything that is needed for being able to only run the minimum amount of nodes logic per frame.
For example, the state of every BT node and the current BT Leaf being executed are cached into the BT agent component, so execution can be resumed from where it stopped, every frame, rather than having to re-evaluate the entire tree from scratch all over again.
This implementation is also events driven as it is possible for some BT nodes to "watch" changes into Blackboard variables and react when they are changed, making it more responsive.
Pros and Cons
Here is a list of pros and cons to consider when using Bot SDK BT:
- Pros:
- Performance: due to its stateful, events driven approach, the internal mechanisms of the BT are very fast as, again, it's execution always continue from where it stopped on the last frame without the need to go through the whole tree;
- Ease of expression: the concept of Composite, Leaf, Decorators and Service nodes are quite simple to understand. It is also easy to visualize and understand the order in which it is executed. These are some reasons why behaviour trees are so popular in gamedev;
- Tight control: trees are always executed from top to bottom, from left to right and nodes are numbered with their execution order. This gives users tighter control of exactly how they want things to be executed.
- Cons:
- Memory Consumption: the
BTAgentcomponent needs to cache data which is relevant to the execution of the BT. Nodes Status, Current Leaf, Services being executed are examples of what is cached. This increases the memory footprint of BT agents, which makes it not ideal for huge hordes of agents; - Tight control: yes, this is both positive and negative. Needing to define every possibility creates a specific type maintenance necessity when as adding more nodes;
- Lower flexibility: some times it might be an interesting approach to let the AI itself try and make plans instead of hand-defining everything, which is something more possible with Bot SDK's Utility Theory;
- Memory Consumption: the
When using Bot SDK, the BT is usually an interesting approach, specially if it fits the team's personal preferences on AI design.
It is a great approach for low or moderate amount of agents, but for big hordes of agents, it is expected that the HFSM will perform better.
Find in the video below an explanation of Behaviour Tree basic mechanisms and some implementation details which are specific to Bot SDK:

Video content:
From 00:00 to 1:15: Introduction;
From 1:15 to 21:40: Behaviour Tree basic concepts;
From 21:40 to 45:53: Exploring the sample Decorator/Leaf/Service nodes code.
Creating a Behaviour Tree document
In the Bot SDK window, click on the New Document button and choose Behaviour Tree (BT):

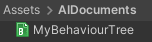
Choose a name for the AI document. This document is a Scriptable Object which has the XML that is needed on the editor side only, which is not revelant to the Quantum simulation. It does not need to be shipped in builds.
The name chosen for this AI document will also be the name of the Quantum asset created, that is used on the simulation to actually update entities AI, so it is nice to already pick a suggestive name.
Creating a new BT document already populates it with the Root node: which doesn perform any action, nor has any transition:
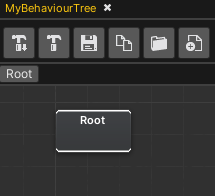
The Root Node
This is the starting point of the behaviour tree. It is used to create the the main Quantum asset that shall be referenced on the BTAgent component.
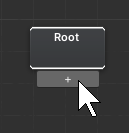
Root nodes can only have one child node, which has to be either a Composite or a Leaf node.
In order to link the Root node to another node, hover the mouse cursor on the bottom part of the Root node and click the "+" button that appears.
When the node linking is active, it is possible to click in empty space and a node creation panel shows up.
Nodes Status
Every BTNode has its own Status. This is very important because that's how most of the flow of the Behaviour Tree execution is defined.
Status can be:
- Success: when the Node successfully completes its task. The result goes upwards to the parent node, which has the logic to decide what should be executed next;
- Failure: when the Node failed to execute its task. The result also goes upwards just like the Success result;
- Running: if, on that specific frame, the Node neither failed nor succeeded on executing its task, then the node needs to run for more frames before returning the execution to its parent node. There can be only one Running node at a time. This node is cached in the
BTAgentcomponent and is executed every tick while running; - Inactive: informs whether the node was already visited in the current tree execution or not. This is meant to be used internally only, there is no need to use it in game specific Node.
When coding game specific nodes, use the different Status types to define the tree execution. See more details on custom nodes on the next topics.
Creating new nodes
There are two main ways of adding new nodes to the BT editor:
- From the context menu when clicking with the Right Mouse Button on any empty space in the Editor window;
- By initializing a new link from a node, and then clicking on any empty space.
Lets take a look at which types of nodes can be created.
Composite nodes
These are the main source of flow control on the Behaviour Tree. They define what are the possible next nodes to be executed and, depending on the child nodes Status, they choose which node is executed next.
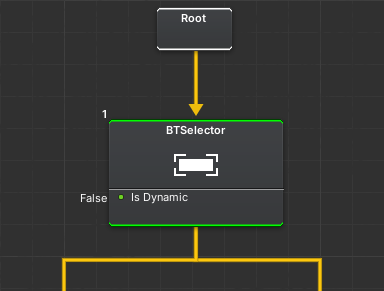
Composite nodes try to execute child nodes from left to right, which means that this is how priority is defined. A small number on the node informs the execution order.
A Composite node can be linked to many other nodes, which can be either Composite or Leaf nodes.
After polling a result from its child nodes, the Composite also reports its own result to its parent node and so on.
PS: it is possible to convert from one type of Composite node to another using the context menu and selecting Convert to .... This is useful when needing to change the Composite type when it is already linked to other nodes so it doesn't need to be re-linked again.
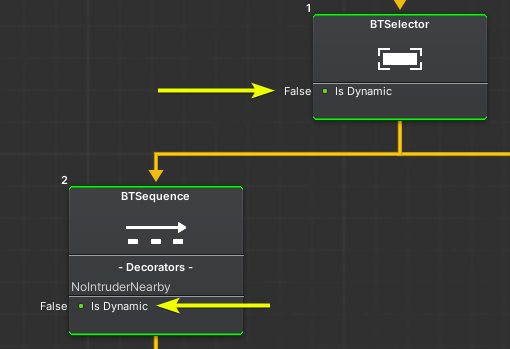
Selector nodes
Equivalent to an OR operator.
- It results in Success as soon as any of its child nodes execution results in Success. Child nodes which were not executed at that point are skipped;
- It results in Failure only if all of its child nodes execution results in Failure.
Sequence Nodes
Equivalent to an AND operator*.
- It results in Failure as soon as any of its child nodes execution results in Failure. Child nodes which were not executed at that point are skipped;
- It results in Success only if all of its child nodes execution results in Success.
Decorator Nodes
Decorator nodes allows the user to define a condition which helps with the definition of which branch should be executed.
When the considiton evaluates to true, the Decorator results in Success. When is evaluates to False, the Decorator results in `Failure.
This result either blocks or allows the execution of the subtree to which the Decorator is attached. To attach a Decorator node, go to either a Composite of a Leaf node sub-graph by double-clicking on it and add the Decorator to the list.
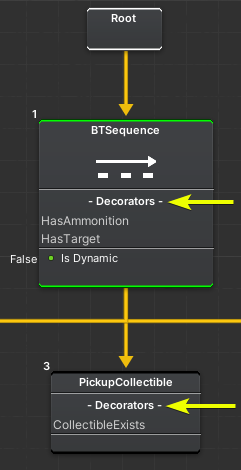
Examples of Decorator Nodes are:
HasAmmonition: returnstrueif the BTAgent has more than zero ammonition available;HasTarget: returnstrueif the BTAgent has a EntityRef stored in some of its components;Cooldown: returnstrueonly if that specific subtree was not executed on the lastTseconds.
To illustrate it a bit more, the HasAmmonition Decorator can block the execution of a "Shoot" sub-branch and lead it to a "Reload" sub-branch instead, when the character runs out of ammo.
Create new Decorators with the Right Mouse button and link them with the Decorators root node:

The Decorators defined on a node's subgraph can be seen on its top-level view in the Decorators list:
Interrupting with Decorators
As explained on the Nodes Status topic, when a Leaf node's Status is RUNNING, it gets cached and will be directly executed on the next frames. While this is an optimization, it should still be possible to interrupt the execution of a running Leaf node before it completes its task.
For example, consider a character which is attacking a target and, suddenly, it recognizes a bomb is about to explode near to it. It is useful then for the agent to stop shooting and take cover in order to avoid the explosion.
When a Leaf node is reached, it means that the Decorators on its execution free were already tested and won't be re-tested every frame, for optimization reasons.
But there are ways to still execute Decorators logic while a Leaf is running, in order to make the use case above possible.
Interruption checks can be done in two ways:
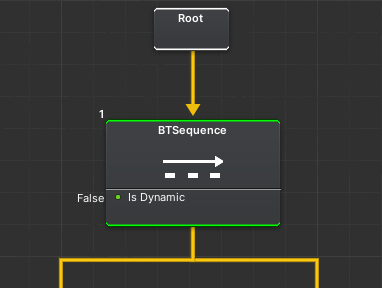
Dynamic Composite Nodes
Every Composite node has a IsDynamic field, which is a Boolean that can be toggled:
If a Composite node is dynamic is means that, while that specific Composite is part of the current subtree being executed, all of its Decorators will be re-checked every frame. If the any of the Decorators fail, then the current Leaf node execution will be interrupted and the Composite node will result in Failure.
This gives the developer the control of which set of Decorator nodes, from a Composite, should be re-executed every tick, allowing for possibilities of how to optimize the behaviour tree.
Reactive Decorators
It is possible for Decorator nodes to "watch" changes into specific Blackboard entries and react to it.
The advantage is, again, not performing Decorator checks every tick and instead only do it if a new value is set into a Blackboard entry.
For example: consider a CompareIntegers Decorator node which checks if the integer A is greater than integer B, from the Blackboard. With Reactive Decorators, the test is only executed the the node is visited for the first time, or when the current RUNNING brunch gets an execution of blackboardEntry->TriggerDecorators().
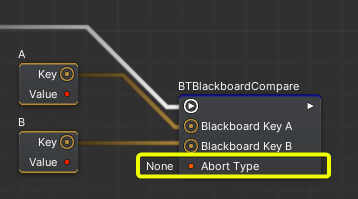
When an interruption happens through this mechanism, it is possible to define in the Decorator node the Abort mechanism to be used, which can be of three types:
Self: stop the current node execution and resumes it from the node that caused the interruption;Lower Priority: keep executing the current node, but don't execute the right-side sibling nodes;Both: applies both logics;
It is possible to define the Abort Type on the Decorator node itself:
A Reactive Decorator is setup on the simulation code, so please take a look on the BT coding session for more details.
Leaf Nodes
These are the lowest level nodes on the Behaviour Tree.
They are responsible for performing most of the agent's game specific logic, highly relying on the Status it returns when executed.
Simple examples of Leaf nodes are:
Wait: keepsRUNNINGuntil a certain amount of time passes. ReturnsSUCCESSwhen the timer is finished. Never returnsFAILURE;ChaseEntity: whileRUNNING, keeps moving the BT Agent towards a target Entity. ReturnsSUCCESSif it the Agent manages to reach the target. ReturnsFAILUREif the Agent is somehow blocked from reaching the target (e.g if the target was destroyed, or is in a separate nav mesh region);Log: prints a message to the console and always returnsSUCCESS;
So the Status that you will need to return completely depends on your needs.
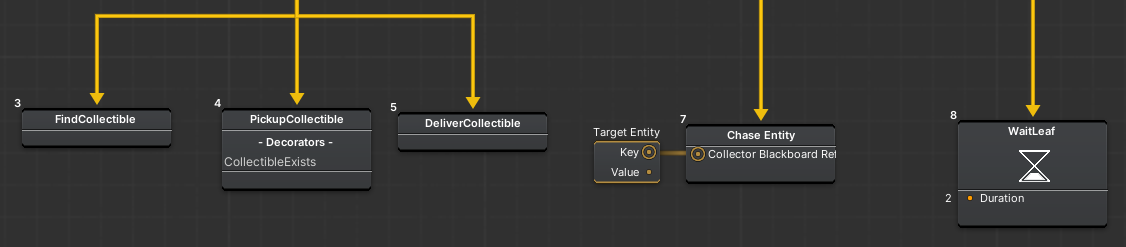
IMPORTANT: one of the Leaf nodes provided with the SDK is the WaitLeaf node. In order for this node to work properly, please enable the BotSDKTimerSystem as it is used to count the elapsed time.
Service Nodes
Used mostly as Helper nodes which doesn't directly affect the flow of the Behaviour Tree. These nodes are usually good for changing the game state without in a timed, repeated manner.
Service Nodes are the only types of nodes which doesn't return a Status.
Just like Decorator nodes, the Service nodes can be added to Composite or Leaf nodes. To do that, go to the node's subgraph and create/link it to the Service Root node.
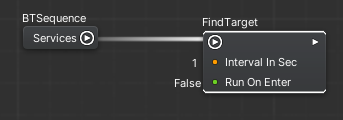
Every Service node shared two main fields/mechanisms:
Interval In Secspecifies how frequent the Service shall be executed. This aims to give the developers the control of which kinds of logic are executed more or less frequently so they can properly optimize the tree execution;Run On Enterdefines if the Service should be run once, when it enters in the current execution context, without having to wait forInterval In Secfor it's first execution.
IMPORTANT: in order to use Service Nodes, please enable the BotSDKTimerSystem as it is used to count the elapsed time.
Examples of Service Nodes are:
UpdateTargetPosition: from time to time, updates the position that the Agent shall go to. It could be related to the NavMesh (e.g setting a random target position on it), it can be related to chasing a specific entity, etc;UseSkill: from time to time, the Agent executes a specific skill;
These nodes are not meant to be used as the core of the agent's changes to the game state. They are rather meant to be helper nodes, with the purpose of assisting specific branches with their context-specific needs.
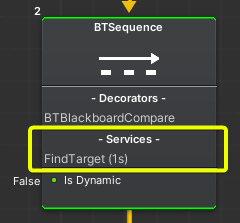
It is important to highlight that Services are stored as part of the subtree being executed, which means that the currently executing branch (e.g when there is a Leaf node which is resulting RUNNING) will execute the Services that are contained within that specific branch only.
As an example, a FindTarget service node might be placed only in branches in which the agent needs to deal with a target, so it is not executed when the agent is performing other types of actions.
Just like the Decorators, it is possible to observe the Services list on the top graph view:
Compiling a Behaviour Tree
In order to actually use the BT in the simulation, it is necessary to compile everything done on the AI document, every time a meaningful change is done.
To compile, there are two options:

- The left button is used to compile only the currently opened document;
- The right button is used to compile every AI document on the project.
By default, the BT files will be located at: Assets/QuantumUser/Resources/DB/CircuitExport/BT_Assets.
The type of the main asset created by this process is BTRoot.

Using the BTRoot asset
To use the created BT root asset, make a reference to it using a field of type AssetRef<BTRoot> and load it via frame.FindAsset()
Behaviour Tree Coding
The BT has a main component called BTAgent, which can be used basically in two different ways:
- Add the component into entities, either via code or directly in an Entity Prototype on Unity;
- Or, declare instances of the
BTAgentin the Global variables;
The most common usage is to add the component into entities. But having it decoupled from entities can also be useful to create things such as a Game Manager BT which lies in frame.Global and has the logic for the start of a game match, update of game rules, match end, etc.
Initializing a BTAgent
When not added directly into an Entity Prototype, the BTAgent component can be added to entities directly via code. It can be useful for, in runtime, turning an entity into an AI agent, such as when a player disconnects, etc.
Here is a code snippet for adding the component (only if not already added to the Entity Prototype):
C#
var btAgent = new BTAgent();
f.Set(myEntity, brAgent);
The initialization step below needs to be done *whether EntityPrototypes are used or not:
C#
var btRootAsset = f.FindAsset<BTRoot>(btReference.Id);
BTManager.Init(f, myEntity, btRoot);
Initializing using the "OnComponentAdded" callback
It is also possible to setup the reference to the BTRoot asset directly on the EntityPrototype, and use the OnComponentAdded signal to initialize the agent with that information.
It is what the BotSDKSystem showcases. Here is an example:
C#
// At any system...
  public unsafe class AISystem : SystemMainThread, ISignalOnComponentAdded<BTAgent>
  {
    public void OnAdded(Frame frame, EntityRef entity, BTAgent* component)
    {
      // Get the BTRoot from the component set on the Entity Prototype
      BTRoot btRoot = frame.FindAsset<BTRoot>(component->Tree.Id);

      // Initialize
      BTManager.Init(frame, entity, btRoot);
    }
  // ...
  }
Updating the BTAgent
After initializing the agent, update it:
C#
BTManager.Update(frame, filter.Entity);
This starts the entire BT mechanism: the root node will execute its child node and so on.
C#
namespace Quantum
{
  public unsafe class AISystem : SystemMainThread, SystemMainThreadFilter<AISystem.Filter>
  {
    public struct Filter
    {
      public EntityRef Entity;
      public BTAgent* BTAgent;
    }

    public void OnAdded(Frame frame, EntityRef entity, BTAgent* component)
    {
        var btRootAsset = frame.FindAsset<BTRoot>(btReference.Id);
        BTManager.Init(frame, myEntity, btRoot);
    }

    public override void Update(Frame frame, ref Filter filter)
    {
        BTManager.Update(frame, filter.Entity);
    }
  }
}
Coding Nodes
Overall, most of the node types inherit from the same class, so they all share very similar API which can be overridden.
Creating Decorator, Leaf Nodes and Services
- To create a new Decorator node, create a new class which inherits from
BTDecorator; - To create a new Leaf node, create a new class which inherits from
BTLeaf; - To create a new Service, create a new class which inherits from
BTService;
Important: it is required to mark any of the classes above wiht [System.Serializable].
API for Decorator and Leaf Nodes
Initis called once, whenBTManager.Initis called and the tree is initialized recursively. It shall be used to allocate space for that specific Node's data. For more information on this, please read the topic Node Data that follows;OnEnteris called multiple times, always at the moment that the specific node is visited, before the node's Update is executed. It is useful for setting up data relevant to that specific context, such as storing a timer FP. The classWaitLeafhas an example on how to store timer information on the Agent. But, again, that's better explained on the Node Data topic;OnUpdate, is called every tick while that is the Leaf being executed. ReturnsBTStatusfor the user to choose if/when to returnSuccess/Failure/Running. A very simple example, which always results inSuccesscan be seen in the classDebugLeaf. The classWaitLeafhas a slightly more complex example, which results inRunningorSuccessOnExitis called when the node is done with its job, or if its execution was interrupted and is going upper on the tree. Can be used to de-initialize any data if needed;
Observations regarding Decorator Nodes
Decorators have an extra method that can be overridden other than the methods above:
CheckConditionsis called during the Node'sOnUpdate. Returns aBooleanwhich depends on game specifics.
On Decorator nodes, it is common to only need to implement CheckConditions and alternatively OnEnter/OnExit for (de)allocating and initializing relevant data.
API for Service Nodes
OnUpdatecalled whenever the Service is executed, which depends on the interval defined on the Visual Editor.
Node Data
Sometimes it might useful to add associate more data to a BT node, such as custom integers and FP values.
The component BTAgent already has a storage for node-specific data, even though the developer is free to create their own data storages instead.
To further exemplify:
- Composite nodes needs to store the index of the current Child node that is being executed;
- The
WaitLeafnode needs to store the time value in which the waiting will be over;
Similarly, it is possible that custom nodes will also need to have some data which needs to be changed during runtime.
But remember, Nodes are data assets, so it is not possible to change its fields values in runtime. That's why an in-frame data storage is required.
For integers and FP fields, that's easily achievable by using the type BTDataIndex. This structure is pre-baked during the compilation process on the Visual Editor and guarantees that every BTDataIndex field have a unique index value.
Here is a step by step on how to add custom data into nodes:
- Create a new field of type
BTDataIndexwith a suggestive name, such as thepublic BTDataIndex EndTimeIndex;declared on theWaitLeafnode; - On the
Initmethod, allocate the data into theBTAgentby executing:btAgent->AddIntData(frame, initialValue);orbtAgent->AddFPData(frame, initialValue); - To read the data from the BTAgent, use:
p.BtAgent->GetFPData(frame, EndTimeIndex.Index), where EndTimeIndex is just the example that we have form theWaitLeafnode; - To write data on the BTAgent, execute:
p.BtAgent->SetFPData(frame, endTimeValue, EndTimeIndex.Index);
Reactive Decorators Coding
To create a Reactive Decorator node, follow the steps below:
- On the
OnEntermethod of a Decorator class, register the Decorator on the Blackboard entries which should be observed:
// --> Sample from BTBlackboardCompare

    // We let the user define, on the Visual Editor, which Blackboard entries
    // shall be observed by this Decorator
    public AIBlackboardValueKey BlackboardKeyA;
    public AIBlackboardValueKey BlackboardKeyB;

    public override void OnEnter(BTParams p)
    {
      base.OnEnter(p);

      // When entering in the Decorator, register it as a Reactive Decorator on the blackboard entry
      // so, when it is changed, the CheckConditions method is executed again, possibly interrputing the current execution
      p.Blackboard->RegisterReactiveDecorator(p.Frame, BlackboardKeyA.Key, this);
      p.Blackboard->RegisterReactiveDecorator(p.Frame, BlackboardKeyB.Key, this);
    }
- On the
OnExit, unregister the Decorator:
// --> Sample from BTBlackboardCompare

    public override void OnExit(BTParams p)
    {
      base.OnExit(p);

      // When exiting the Decorator, it means that it isn't in the current subtree anymore
      // So, unregister it from the blackboard entry so it is not being watched anymore
      p.Blackboard->UnregisterReactiveDecorator(p.Frame, BlackboardKeyA.Key, this);
      p.Blackboard->UnregisterReactiveDecorator(p.Frame, BlackboardKeyB.Key, this);
    }
- To trigger the Decorators reaction, call
TriggerDecorators()whenever it fits. It can be anytime the blackboard variable changes, or only when some specific range of values is set, or at some pre-defined interval, etc:
blackboard->Set(f, "VariableKey", value)->TriggerDecorators(p);
Defining fields values
Find here more information on the alternatives for settings values to nodes fields: Defining fields values.
AIParam
Find here more information on using the AIParam type, which is useful for having flexible fields that can be defined in different ways: setting it by hand or from Blackboard/Constant/Config Nodes: AIParam.
AIContext
Find here more information on how to pass agent-contextual information as parameter: AIContext.
BotSDKSystem
There is a class which is used to automate some processes such as initializing and freeing Bot SDK components memory upon component Added and Removed callbacks. Find here more information about it: BotSDKSystem.
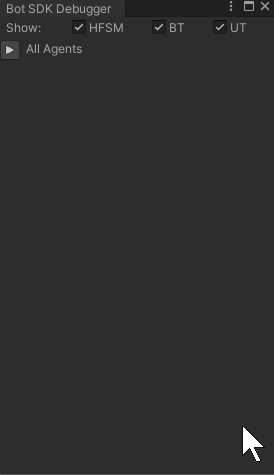
The Debugger
Bot SDK comes with its own debugging tool. It makes it possible for the developer to select any BTAgent in runtime and see the most recent agent's flow highlighted on the Visual Editor. Here is an example of the debugging tool in the Bot SDK Sample project:

- Blue = current sub-tree being executed. The blue links shows the path taken and deepest blue node is the ones that is currently running;
- Green = every successful node at that point of the application. Be aware that a Composite Node will only be painted as green if its children succeeded accordingly;
- Red = every unsuccessful node at that point of the application;
- Gray = branches that were not visited, and that might or not be visited later.
Using the Debugger
This is the step-by-step necessary in order to use the debugger:
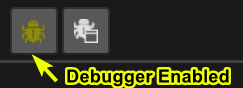
- Enable the
BotSDKDebuggerSystemin the Systems Config file. Using this specific system is optional as the same API it uses can be called from user custom logic: callBotSDKDebuggerSystemCallbacks.OnVerifiedFrame?.Invoke(frame);in verified frames; - In the visual editor, click on the little bug icon on the top panel. The debugger is active when the icon is colored as green;
There are two ways of choosing which entity will be debugged:
Debugging using a Game Object:
- Select the prefab/entity prototype which represents a Quantum entity which has the
BTAgentcomponent; - Add the
BotSDKDebuggerUnity component to it; - In runtime, with the Bot SDK window opened and the debugger enabled, select the game objects which has the
BotSDKDebugger. The debugging shall already be working;
Debugging using the Debugger Window:
On the simulation side, register the Agent entity to the Debugger Window. It can be done by calling:
BotSDKDebuggerSystem.AddToDebugger(frame, collectorEntity, btAgent, (optional) customLabel);The default name that is shown for the debugged entities follow this pattern:
Entity XX | AI Document Name. But it is possible to assign specific labels using thecustomLabelparameter.It is also possible to create naming hierarchies. Use the separator
/on the custom label and it will create the hierarchies on the Debugger Window, which can be collapsed and expanded;On Unity, click on the button next to the debugger activation one. It opens a new window which shows all registered agents. Select the one to be debugged.

Important: when the Debugger is enabled, it increases the memory and CPU usage in order to process the agents data.
This may degrade the game performance so make sure to always disable the debugger during performance tests and use it when debugging agents behaviour. Even if the debugger is not being actively used, it still processes data on the background.
PS: currently, it isn't possible to debug agents which are not linked to an entity, such as agents which lies on the DSL global.
Visual Editor Comments
Find here more information on how to create comments on the Visual Editor: Visual Editor Comments.
Changing the compilation export folder
By default, assets generated by Bot SDK's compilation process will be placed into the folder Assets/Resources/DB/CircuitExport. Check here how to change the export folder: Changing the export folder..
- Introduction
- Pros and Cons
- Creating a Behaviour Tree document
- The Root Node
- Nodes Status
- Creating new nodes
- Composite nodes
- Decorator Nodes
- Interrupting with Decorators
- Leaf Nodes
- Service Nodes
- Compiling a Behaviour Tree
- Using the BTRoot asset
- Behaviour Tree Coding
- Coding Nodes
- Creating Decorator, Leaf Nodes and Services
- API for Decorator and Leaf Nodes
- Observations regarding Decorator Nodes
- API for Service Nodes
- Node Data
- Reactive Decorators Coding
- Defining fields values
- AIParam
- AIContext
- BotSDKSystem
- The Debugger
- Visual Editor Comments
- Changing the compilation export folder