Behaviour Tree
介紹
行為樹(BT)演算法在遊戲開發領域中廣泛用於構建 AI 代理。
Bot SDK 的版本由以下部分組成:
- 子/父節點:根據節點類型,任何節點可能有零到多個子節點。節點只能有一個父節點;
- 根節點:樹頂部的第一個基礎節點,作為起始點。它只能有一個子節點;
- 複合節點:主要用於分支,複合節點可以有任意數量的子節點,並定義哪些子節點將被執行;
- 葉節點:用於樹的底部,實際執行遊戲動作。不能有任何子節點;
- 裝飾節點作為其他節點的「附件」,具有一個條件,檢查該條件以決定是否執行其附加的節點。只能有一個子節點;
- 服務:用於以用戶定義的頻率執行遊戲動作。這不是一個節點。
行為樹的執行從根節點開始,然後引導執行到其子節點,依此類推,直到到達葉節點,執行遊戲動作等。
與狀態機類似,行為樹也需要開發者以其符號 AI 定義來處理每個細節和可能性。
這意味著它不會在運行時創建新的、不可預測的計劃,而是始終遵循相同的結構。我們稱之為 固定結構 的 AI 模型。
還需要注意的是,這是一個 有狀態 的 BT 實現,這意味著它更多地使用幀記憶體來緩存和跟踪執行所需的一切,以便每幀只運行最少的節點邏輯。
例如,每個 BT 節點的狀態和當前執行的 BT 葉節點都會緩存在 BT 代理元件中,因此可以從上次停止的地方繼續執行,而不是每次都必須重新評估整個樹。
此實現也是 事件驅動 的,因為某些 BT 節點可以「監視」黑板變量的變化,並在它們更改時做出反應,使其更具響應性。
優點和缺點
以下是使用 Bot SDK BT 時需要考慮的優缺點:
- 優點:
- 性能:由於其有狀態、事件驅動的方法,BT 的內部機制非常快,因為它的執行總是從上次停止的地方繼續,而不需要重新遍歷整個樹;
- 易於表達:複合、葉、裝飾器和服務節點的概念非常容易理解。它也易於視覺化和理解執行的順序。這些是行為樹在遊戲開發中如此受歡迎的一些原因;
- 嚴格控制:樹總是從上到下、從左到右執行,節點按執行順序編號。這使用戶能夠更嚴格地控制他們希望如何執行事物。
- 缺點:
- 記憶體消耗:
BTAgent元件需要緩存與 BT 執行相關的资料。節點狀態、當前葉節點、正在執行的服務等都是緩存的例子。這增加了 BT 代理的記憶體佔用,因此不適合用於大量代理; - 嚴格控制:是的,這既是優點也是缺點。需要定義每個可能性會帶來一種特定的維護需求,尤其是在新增更多節點時;
- 靈活性較低:有時讓 AI 自己嘗試制定計劃而不是手動定義所有內容可能是一種有趣的方法,這在 Bot SDK 的效用理論中更有可能實現;
- 記憶體消耗:
使用 Bot SDK 時,BT 通常是一種有趣的方法,特別是如果它符合團隊對 AI 設計的個人偏好。
對於少量或中等數量的代理來說,這是一個很好的方法,但對於大量代理,預計 HFSM 會表現得更好。
在下面的影片中,您可以了解行為樹的基本機制以及 Bot SDK 特有的一些實現細節:

影片內容:
從 00:00 到 1:15:介紹;
從 1:15 到 21:40:行為樹基本概念;
從 21:40 到 45:53:探索示例裝飾器/葉/服務節點代碼。
創建行為樹文件
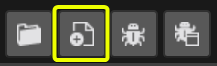
在 Bot SDK 窗口中,點擊New Document按鈕並選擇Behaviour Tree (BT):
為 AI 文件選擇一個名稱。此文件是一個可指令碼物件,擁有僅在編輯器端需要的 XML,與 Quantum 模擬無關。它不需要在構建中發佈。
為此 AI 文件選擇的名稱也將是用於模擬中實際更新實體 AI 的 Quantum 資產的名稱,因此最好選擇一個有意義的名稱。
創建新的 BT 文件時,它已經填充了根節點:該節點不執行任何操作,也沒有任何轉換:
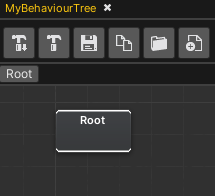
根節點
這是行為樹的起點。它用於創建應在BTAgent元件中引用的主要 Quantum 資產。
根節點 只能有一個子節點,該子節點必須是Composite或Leaf節點。
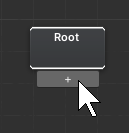
要將根節點鏈接到另一個節點,請將滑鼠懸停在根節點的底部,然後點擊出現的"+"按鈕。
當節點鏈接處於活動狀態時,可以點擊空白處,節點創建面板將顯示。
節點狀態
每個BTNode都有自己的Status。這非常重要,因為這是定義行為樹執行流程的主要方式。
狀態可以是:
- 成功:當節點成功完成其任務時。結果向上傳遞給父節點,父節點有邏輯決定下一步應該執行什麼;
- 失敗:當節點未能執行其任務時。結果也像成功結果一樣向上傳遞;
- 運行中:如果在該特定幀中,節點既沒有失敗也沒有成功執行其任務,則該節點需要運行更多幀才能將執行返回給其父節點。一次只能有一個運行中的節點。該節點緩存在
BTAgent元件中,並在運行時每幀執行; - 非活動:指示該節點是否已在當前樹執行中訪問過。這 僅供內部使用,不需要在遊戲特定節點中使用。
在編寫遊戲特定節點時,使用不同的狀態類型來定義樹的執行。有關自定義節點的更多詳細資訊,請參閱下一個主題。
創建新節點
有兩種主要方法可以向 BT 編輯器新增新節點:
- 在編輯器窗口中的任何空白處以右鍵點擊,從上下文選單中選擇;
- 從節點初始化新鏈接,然後點擊任何空白處。
讓我們看看可以創建哪些類型的節點。
複合節點
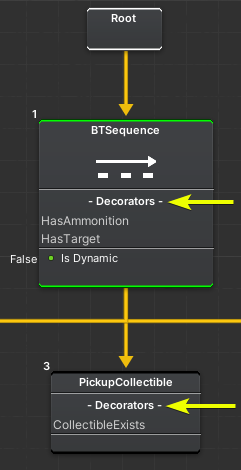
這些是行為樹中流程控制的主要來源。它們定義了可能執行的下一個節點,並根據子節點的狀態選擇下一個要執行的節點。
複合節點嘗試 從左到右執行子節點,這意味著這是 定義優先級的方式。節點上的小數字表示執行順序。
複合節點可以鏈接到許多其他節點,這些節點可以是複合節點或葉節點。
從其子節點獲取結果後,複合節點還會將其結果報告給其父節點,依此類推。
PS: 可以使用上下文選單並選擇Convert to ...,將一種類型的複合節點轉換為另一種類型。這在需要更改複合節點類型時非常有用,因為它已經鏈接到其他節點,因此不需要重新鏈接。
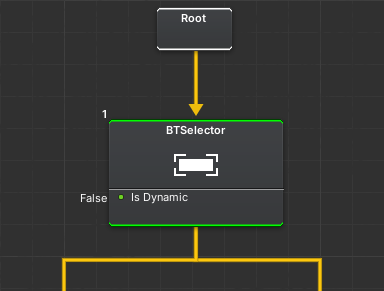
選擇器節點
相當於 OR 運算符。
- 只要其任何子節點的執行結果為成功,它就返回成功。未執行的子節點將被跳過;
- 僅當所有子節點的執行結果為失敗時,它才返回失敗。
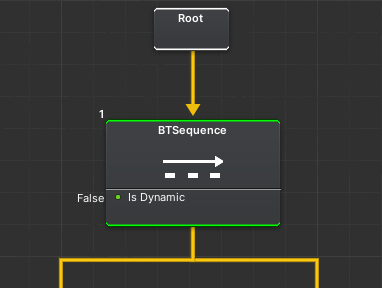
序列節點
相當於 AND 運算符*。
- 只要其任何子節點的執行結果為失敗,它就返回失敗。未執行的子節點將被跳過;
- 僅當所有子節點的執行結果為成功時,它才返回成功。
裝飾器節點
裝飾器節點允許用戶定義一個條件,該條件有助於定義應執行哪個分支。
當條件評估為true時,裝飾器返回Success。當評估為False時,裝飾器返回Failure。
此結果要嘛阻止要嘛允許執行裝飾器附加的子樹。要附加裝飾器節點,請雙擊複合節點或葉節點的子圖,然後將裝飾器新增到列表中。
裝飾器節點的示例包括:
HasAmmonition:如果 BTAgent 有超過零的彈藥可用,則返回true;HasTarget:如果 BTAgent 在其某些元件中存儲了 EntityRef,則返回true;Cooldown:僅當該特定子樹在最後T秒內未執行時,才返回true。
為了進一步說明,當角色耗盡彈藥時,HasAmmonition裝飾器可以阻止「射擊」子分支的執行,並將其引導至「重新裝彈」子分支。
使用右鍵點擊以創建新的裝飾器,並將它們與裝飾器根節點鏈接:

在節點的子圖中定義的裝飾器可以在其頂層視圖中的裝飾器列表中看到:
使用裝飾器中斷
正如在節點狀態主題中解釋的那樣,當葉節點的狀態為RUNNING時,它會被緩存並將在下一幀直接執行。雖然這是一種優化,但仍然應該可以在葉節點完成其任務之前中斷其執行。
例如,考慮一個正在攻擊目標的角色,突然它識別到附近即將發生爆炸。這時,讓代理停止射擊並尋找掩護以避免爆炸是有用的。
當到達葉節點時,意味著其執行路徑上的裝飾器 已經 被測試過,並且不會每幀重新測試,這是為了優化。
但是,仍然有方法在葉節點運行時執行裝飾器邏輯,以使上述用例成為可能。
中斷檢查可以透過兩種方式完成:
動態複合節點
每個複合節點都有一個IsDynamic欄位,這是一個可以切換的布林值:
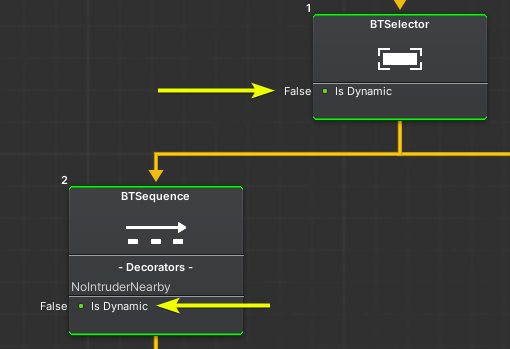
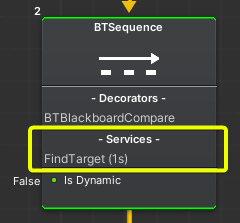
如果複合節點是動態的,則意味著當該特定複合節點是當前執行的子樹的一部分時,其所有裝飾器將每幀重新檢查。如果任何裝飾器失敗,則當前葉節點的執行將被中斷,複合節點將返回Failure。
這使開發者能夠控制複合節點中的哪些裝飾器集應每幀重新執行,從而允許優化行為樹的可能性。
反應式裝飾器
裝飾器節點可以「監視」特定黑板條目的變化並對其做出反應。
優勢再次在於不每幀執行裝飾器檢查,而是僅在黑板條目中設置新值時執行。
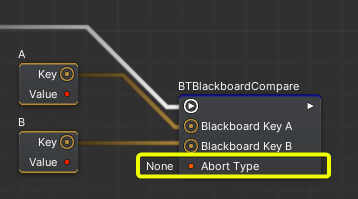
例如:考慮一個CompareIntegers裝飾器節點,它檢查黑板中的整數A是否大於整數B。使用反應式裝飾器,僅在首次存取節點時或當前RUNNING中分支執行blackboardEntry->TriggerDecorators()時執行測試。
當透過此機制發生中斷時,可以在裝飾器節點中定義 中止 機制,該機制可以是以下三種類型之一:
Self:停止當前節點的執行,並從導致中斷的節點恢復;Lower Priority:繼續執行當前節點,但不執行右側的同級節點;Both:應用兩種邏輯;
可以在裝飾器節點本身定義Abort Type:
反應式裝飾器在模擬代碼中設置,因此請查看 BT 編碼部分以獲取更多詳細資訊。
葉節點
這些是行為樹中的最低級別節點。
它們負責執行代理的大部分遊戲特定邏輯,高度依賴於執行時返回的Status。
葉節點的簡單示例包括:
Wait:保持RUNNING,直到經過一定時間。計時器結束時返回SUCCESS。永遠不會返回FAILURE;ChaseEntity:在RUNNING時,繼續將 BT 代理移動到目標實體。如果代理成功到達目標,則返回SUCCESS。如果代理因某種原因無法到達目標(例如,如果目標被摧毀或位於單獨的導航網格區域中),則返回FAILURE;Log:將消息列印到控制台並始終返回SUCCESS;
因此,您需要返回的狀態完全取決於您的需求。
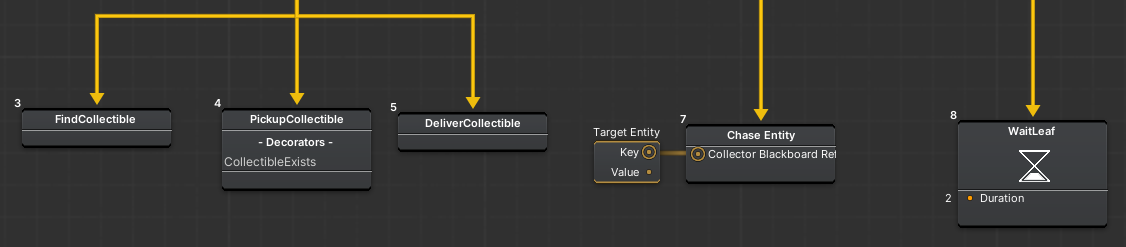
重要提示: SDK 提供的一個葉節點是WaitLeaf節點。為了使此節點正常工作,請啟用BotSDKTimerSystem,因為它用於計算經過的時間。
服務節點
主要用作不直接影響行為樹流程的輔助節點。這些節點通常用於以定時、重複的方式更改遊戲狀態。
服務節點是 唯一不返回狀態的節點類型。
與裝飾器節點一樣,服務節點 可以新增到複合節點或葉節點。為此,請轉到節點的子圖並創建/將其鏈接到服務根節點。
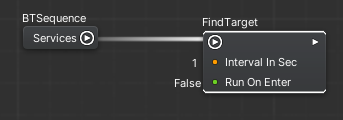
每個服務節點共享兩個主要欄位/機制:
Interval In Sec指定服務執行的頻率。這旨在讓開發者控制哪些邏輯更頻繁或更不頻繁地執行,以便他們可以正確優化樹的執行;Run On Enter定義服務是否應在進入當前執行上下文時運行一次,而不必等待Interval In Sec進行第一次執行。
重要提示: 為了使用服務節點,請啟用BotSDKTimerSystem,因為它用於計算經過的時間。
服務節點的示例包括:
UpdateTargetPosition:不時更新代理應前往的位置。它可能與導航網格相關(例如在導航網格上設置隨機目標位置),也可能與追逐特定實體相關,等等;UseSkill:不時地,代理執行特定技能;
這些節點不應用於作為代理對遊戲狀態更改的核心。它們更適合作為輔助節點,目的是幫助特定分支滿足其上下文特定需求。
重要的是要注意,服務作為正在執行的子樹的一部分而存儲,這意味著當前執行的分支(例如,當有一個葉節點返回RUNNING時)將 僅執行該特定分支內 包含的服務。
例如,FindTarget 服務節點可能僅放置在代理需要處理目標的分支中,因此當代理執行其他類型的動作時,它不會執行。
與裝飾器一樣,可以在頂層圖視圖中觀察服務列表:
編譯行為樹
為了在模擬中實際使用 BT,每次進行有意義的更改時,都需要編譯 AI 文件中的所有內容。
要編譯,有兩個選項:

- 左側按鈕用於僅編譯當前打開的文件;
- 右側按鈕用於編譯專案中的每個 AI 文件。
預設情況下,BT 文件將位於:Assets/QuantumUser/Resources/DB/CircuitExport/BT_Assets。
此過程創建的主要資產類型為 BTRoot。

使用 BTRoot 資產
要使用創建的 BT 根資產,請使用類型為 AssetRef<BTRoot> 的欄位引用它,並以frame.FindAsset()載入它
行為樹編碼
BT 有一個名為 BTAgent 的主要元件,可以以兩種不同的方式使用:
- 將元件新增到實體中,無論是以代碼還是直接在 Unity 中的實體原型中新增;
- 或者,在全局變量中聲明
BTAgent的實例;
最常見的用法是將元件新增到實體中。但將其與實體分離也可以有用,例如創建一個位於 frame.Global 中的遊戲管理器 BT,並具有遊戲比賽開始、遊戲規則更新、比賽結束等邏輯。
初始化 BTAgent
當未直接新增到實體原型時,可以以代碼直接將 BTAgent 元件新增到實體中。這在運行時將實體轉換為 AI 代理時非常有用,例如當玩家斷開連接時等。
以下是新增元件的代碼片段(僅當未新增到實體原型時):
C#
var btAgent = new BTAgent();
f.Set(myEntity, brAgent);
無論*是否使用 EntityPrototypes,都需要執行以下初始化步驟:
C#
var btRootAsset = f.FindAsset<BTRoot>(btReference.Id);
BTManager.Init(f, myEntity, btRoot);
使用「OnComponentAdded」回調初始化
也可以直接在 EntityPrototype 中設置對 BTRoot 資產的引用,並以此資訊使用 OnComponentAdded 信號來初始化代理。
BotSDKSystem 展示了這一點。以下是一個示例:
C#
// At any system...
  public unsafe class AISystem : SystemMainThread, ISignalOnComponentAdded<BTAgent>
  {
    public void OnAdded(Frame frame, EntityRef entity, BTAgent* component)
    {
      // Get the BTRoot from the component set on the Entity Prototype
      BTRoot btRoot = frame.FindAsset<BTRoot>(component->Tree.Id);

      // Initialize
      BTManager.Init(frame, entity, btRoot);
    }
  // ...
  }
更新 BTAgent
初始化代理後,更新它:
C#
BTManager.Update(frame, filter.Entity);
這將啟動整個 BT 機制:根節點將執行其子節點,依此類推。
C#
namespace Quantum
{
  public unsafe class AISystem : SystemMainThread, SystemMainThreadFilter<AISystem.Filter>
  {
    public struct Filter
    {
      public EntityRef Entity;
      public BTAgent* BTAgent;
    }

    public void OnAdded(Frame f, EntityRef entity, BTAgent* component)
    {
        var btRootAsset = f.FindAsset<BTRoot>(btReference.Id);
        BTManager.Init(f, myEntity, btRoot);
    }

    public override void Update(Frame frame, ref Filter filter)
    {
        BTManager.Update(frame, filter.Entity);
    }
  }
}
編碼節點
總體來說,大多數節點類型繼承自同一類,因此它們都共享非常相似的 API,其可以覆寫。
創建裝飾器、葉節點和服務
- 要創建新的裝飾器節點,請創建一個繼承自
BTDecorator的新類; - 要創建新的葉節點,請創建一個繼承自
BTLeaf的新類; - 要創建新的服務,請創建一個繼承自
BTService的新類;
重要提示: 必須使用[System.Serializable]標記上述任何類。
裝飾器和葉節點的 API
- 在調用
BTManager.Init並遞歸初始化樹時調用 一次Init。它應該用於分配該特定節點資料的空間。有關此內容的更多資訊,請閱讀後續的 節點資料 主題; - 多次調用
OnEnter,總是在訪問特定節點時調用,且在節點的更新執行之前。它用於設置與該特定上下文相關的資料,例如存儲計時器 FP。WaitLeaf類有一個示例,說明如何在代理上存儲計時器資訊。但這在 節點資料 主題中有更好的解釋; - 在該葉節點執行時每幀調用
OnUpdate。返回BTStatus以供用戶選擇是否/何時返回Success/Failure/Running。一個非常簡單的示例,其始終返回Success,可以在DebugLeaf類中看到它。WaitLeaf類有一個稍微複雜的示例,返回Running或Success - 在節點完成其工作時調用
OnExit,或者如果其執行被中斷並向上返回樹時調用。可用於取消初始化任何資料(如果需要);
關於裝飾器節點的觀察
裝飾器除了上述方法外,還有一個可以覆寫的額外方法:
- 在節點的
OnUpdate期間調用CheckConditions。返回一個Boolean,該值取決於遊戲特定條件。
在裝飾器節點上,通常只需要實現 CheckConditions,並可選地實現 OnEnter/OnExit 以(取消)分配和初始化相關資料。
服務節點的 API
- 在服務執行時調用
OnUpdate,這取決於視覺編輯器中定義的間隔。
節點資料
有時可能需要向 BT 節點新增更多資料,例如自定義整數和 FP 值。
BTAgent 元件已經有一個用於節點特定資料的存儲,儘管開發者可以創建自己的資料存儲。
為了進一步說明:
- 複合節點需要存儲當前正在執行的子節點的索引;
WaitLeaf節點需要存儲等待期結束的時間值;
同樣,自定義節點也可能需要一些在運行時需要更改的資料。
但請記住,節點是 資料資產,因此 無法在運行時更改其欄位值。這就是為什麼需要幀內資料存儲。
對於整數和 FP 欄位,這很容易使用 BTDataIndex 類型來實現。此結構在視覺編輯器的編譯過程中預先內嵌,並確保每個 BTDataIndex 欄位都具有唯一的索引值。
以下是向節點新增自定義資料的步驟:
- 創建一個類型為
BTDataIndex的新欄位,並使用一個有意義的名稱,例如在WaitLeaf節點上聲明的public BTDataIndex EndTimeIndex;; - 在
Init方法中,執行btAgent->AddIntData(frame, initialValue);或btAgent->AddFPData(frame, initialValue),將資料分配到BTAgent中; - 要從 BTAgent 讀取資料,請使用
p.BtAgent->GetFPData(frame, EndTimeIndex.Index),其中 EndTimeIndex 只是我們從WaitLeaf節點中獲取的示例; - 要在 BTAgent 上寫入資料,請執行:
p.BtAgent->SetFPData(frame, endTimeValue, EndTimeIndex.Index);
反應式裝飾器編碼
要創建反應式裝飾器節點,請按照以下步驟操作:
- 在裝飾器類的
OnEnter方法中,在應觀察的黑板條目上註冊裝飾器:
// --> Sample from BTBlackboardCompare

    // We let the user define, on the Visual Editor, which Blackboard entries
    // shall be observed by this Decorator
    public AIBlackboardValueKey BlackboardKeyA;
    public AIBlackboardValueKey BlackboardKeyB;

    public override void OnEnter(BTParams p)
    {
      base.OnEnter(p);

      // When entering in the Decorator, register it as a Reactive Decorator on the blackboard entry
      // so, when it is changed, the CheckConditions method is executed again, possibly interrputing the current execution
      p.Blackboard->RegisterReactiveDecorator(p.Frame, BlackboardKeyA.Key, this);
      p.Blackboard->RegisterReactiveDecorator(p.Frame, BlackboardKeyB.Key, this);
    }
- 在
OnExit中,取消註冊裝飾器:
// --> Sample from BTBlackboardCompare

    public override void OnExit(BTParams p)
    {
      base.OnExit(p);

      // When exiting the Decorator, it means that it isn't in the current subtree anymore
      // So, unregister it from the blackboard entry so it is not being watched anymore
      p.Blackboard->UnregisterReactiveDecorator(p.Frame, BlackboardKeyA.Key, this);
      p.Blackboard->UnregisterReactiveDecorator(p.Frame, BlackboardKeyB.Key, this);
    }
- 要觸發裝飾器的反應,請在適當的時候調用
TriggerDecorators()。它可以在黑板變量更改時、僅在設置某些特定值範圍時、或在某些預定義間隔時調用,等等:
blackboard->Set(f, "VariableKey", value)->TriggerDecorators(p);
定義欄位值
在此處查找有關設置節點欄位值的替代方案的更多資訊:定義欄位值.
AIParam
在此處查找有關使用 AIParam 類型的更多資訊,該類型對於具有可以以不同方式定義的靈
活欄位非常有用:手動設置或從黑板/常數/配置節點設置:AIParam。
AIContext
在此處查找有關如何將代理上下文資訊作為參數傳遞的更多資訊:AIContext。
BotSDKSystem
有一個類用於自動化某些過程,例如在元件新增和刪除回調時初始化和釋放 Bot SDK 元件記憶體。在此處查找有關它的更多資訊:BotSDKSystem。
調試器
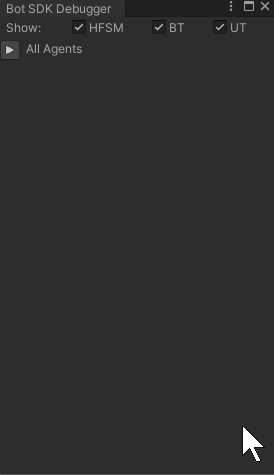
Bot SDK 附帶自己的調試工具。它使開發者能夠在運行時選擇任何 BTAgent,並在視覺編輯器中查看最近代理的流程。以下是 Bot SDK 示例專案中調試工具的示例:

- 藍色 = 當前正在執行的子樹。藍色鏈接顯示所採取的路徑,最深的藍色節點是當前正在運行的節點;
- 綠色 = 在應用程式的該點成功的每個節點。請注意,僅當其子節點相應地成功時,複合節點才會被繪製為綠色;
- 紅色 = 在應用程式的該點失敗的每個節點;
- 灰色 = 未訪問的分支,這些分支可能會或不會在以後訪問。
使用調試器
這是使用調試器所需的步驟:
- 在系統配置文件中啟用
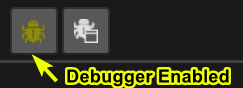
BotSDKDebuggerSystem。使用此特定系統是可選的,因為可以從用戶自定義邏輯調用相同的API:在驗證幀中調用BotSDKDebuggerSystemCallbacks.OnVerifiedFrame?.Invoke(frame);; - 在視覺編輯器中,點擊頂部面板中的小蟲圖標。當圖標為綠色時,調試器處於 活動狀態;
有兩種方法可以選擇要調試的實體:
使用遊戲物件調試:
- 選擇表示具有
BTAgent元件的 Quantum 實體的預製件/實體原型; - 向其新增
BotSDKDebuggerUnity 元件; - 在運行時,打開 Bot SDK 窗口並啟用調試器,選擇具有
BotSDKDebugger的遊戲物件。調試應該已經開始工作;
使用調試器窗口調試:
在模擬端,將代理實體註冊到調試器窗口。可以調用以下完成:
BotSDKDebuggerSystem.AddToDebugger(frame, collectorEntity, btAgent, (optional) customLabel);顯示的調試實體的預設名稱遵循以下模式:
Entity XX | AI Document Name。但可以使用customLabel參數分配特定標籤。還可以創建命名層次結構。在自定義標籤上使用分隔符
/,它將在調試器窗口中創建層次結構,可以折疊和展開;在 Unity 中,點擊調試器啟用按鈕旁邊的按鈕。它將打開一個新窗口,顯示所有註冊的代理。選擇要調試的代理。

重要提示: 啟用調試器時,它會增加記憶體和 CPU 使用率以處理代理資料。
這可能會降低遊戲性能,因此請確保在性能測試期間始終 禁用調試器,並在調試代理行為時使用它。即使調試器未主動使用,它仍然在後台處理資料。
PS:目前,無法調試未鏈接到實體的代理,例如位於 DSL 全局中的代理。
視覺編輯器註釋
在此處查找有關如何在視覺編輯器中創建註釋的更多資訊:視覺編輯器註釋。
更改編譯匯出文件夾
預設情況下,Bot SDK 編譯過程生成的資產將放置在文件夾 Assets/Resources/DB/CircuitExport 中。在此處查看如何更改匯出文件夾:更改匯出文件夾。。