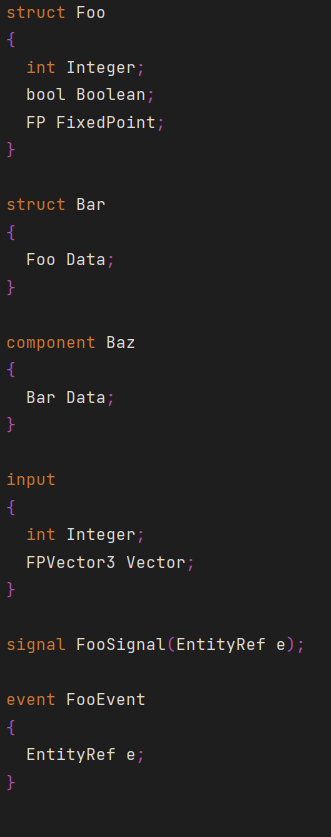
Quantum Project
Unitypackage內容
Quantum 3 SDK以unitypackage檔案形式發布。它大致分為兩個部分:Assets/Photon和Assets/QuantumUser。前者代表 Quantum SDK,後者是可修改的使用者程式碼。
安裝 Quantum 後,使用者會看到以下資料夾結構:
Assets
├───Photon
│   ├───PhotonLibs
│   ├───PhotonRealtime
│   ├───Quantum
│   ├───QuantumAsteroids
│   └───QuantumMenu
└───QuantumUser
    ├───Editor
    │   ├───CodeGen
    |   └───Generated
    ├───Resources
    ├───Scenes
    ├───Simulation
    │   └───Generated
    └───View
        └───Generated
升級時會替換 Photon 子資料夾中的所有檔案,但不會替換 QuantumUser 中的檔案。
所有決定性模擬程式碼必須放在QuantumUser/Simulation中,或包含在 Quantum.Simulation 組件參考中。
擴展 Quantum 視圖腳本的程式碼可以放在Quantum.Unity或Quantum.Unity.Editor中(例如部分方法),並使用它們各自的組件參考。
可以選擇不使用 Quantum 組件定義,例如對於從 Quantum 2.1 專案中的此類設置遷移的使用者。
Assets/Photon
Assets/Photon:此資料夾包含 Photon Quantum 和其他套件。升級時此處的檔案修改會被覆蓋。Assets/Photon/PhotonLibs (and PhotonRealtime):包含 Quantum 用於連接和與 Quantum 雲端通信的 Photon 依賴項。Assets/Photon/Quantum/Assemblies:包含用於 Unity 的 Quantum 庫及其偵錯版本。Assets/Photon/Quantum/Editor:Quantum Unity 編輯器腳本。編譯為Quantum.Unity.Editor.dll。Assets/Photon/Quantum/Editor/Assemblies:包含 Quantum CodeGen 庫。Assets/Photon/Quantum/Editor/CodeGen:包含 Quantum CodeGen 腳本。編譯為Quantum.CodeGen.Qtn.dll。Assets/Photon/Quantum/Runtime:Quantum Unity 執行時腳本。編譯為Quantum.Unity.dll。Assets/Photon/Quantum/Simulation:Quantum 模擬核心腳本。編譯為Quantum.Simulation.dll。Assets/Photon/Quantum/Samples:包含示範選單場景,目前還有 GraphProfiler。
Assets/QuantumUser
Assets/QuantumUser:此資料夾中的檔案永遠不會被升級覆蓋,由開發人員控制。它使用組件定義參考向 Quantum 和模擬庫添加程式碼。Assets/QuantumUser/Editor/CodeGen:擴展 Qtn CodeGen 的檔案。Assets/QuantumUser/Editor/Generated:生成的 Unity 編輯器腳本。Assets/QuantumUser/Simulation:實際的模擬程式碼。Assets/QuantumUser/Simulation/Generated:生成的 Quantum C# 程式碼。Assets/QuantumUser/Resources:執行時配置檔案。Assets/QuantumUser/Scenes:新 Quantum 場景的預設資料夾。Assets/QuantumUser/View:視圖腳本的預設位置。Assets/QuantumUser/View/Generated:生成的 Quantum 原型腳本,此資料夾中的腳本擴展 Quantum.Unity.dll。
Quantum 分為四個組件:
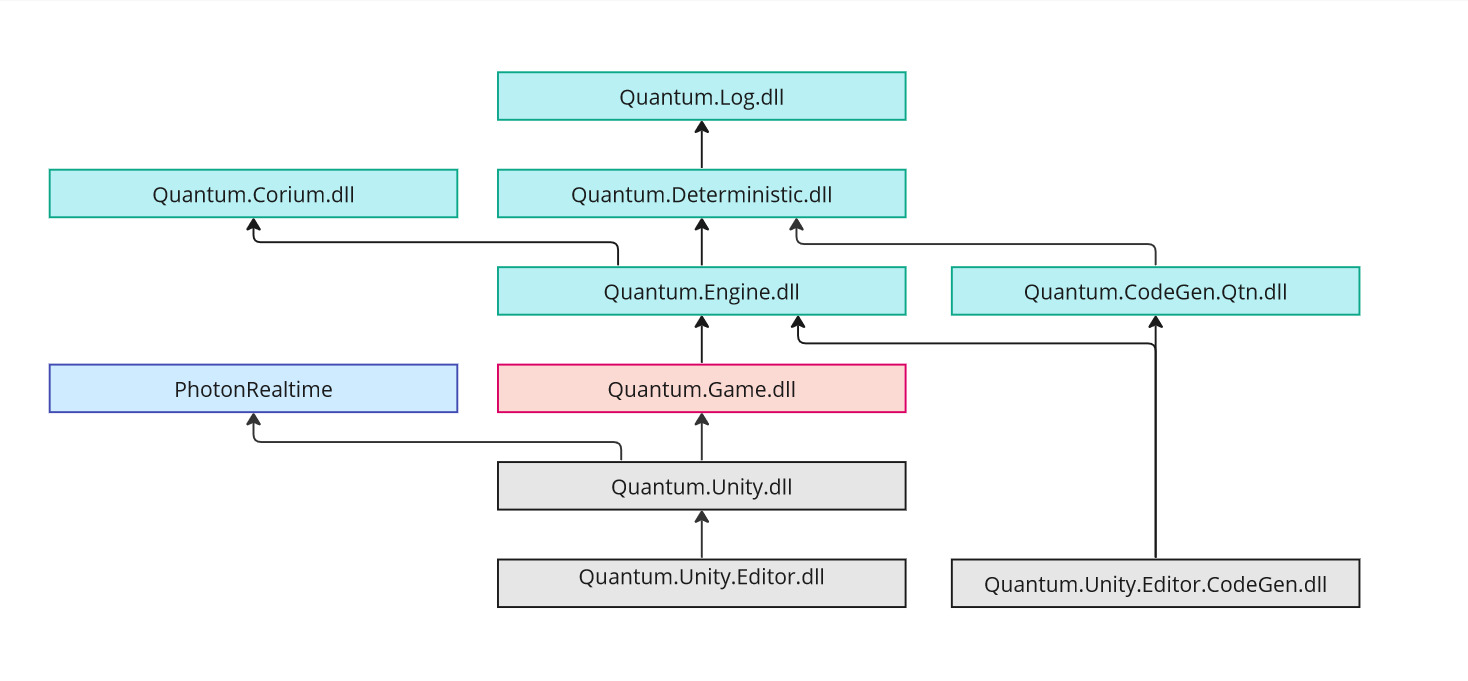
Quantum.Simulation:包含模擬程式碼。任何使用者模擬程式碼都應通過AssemblyDefinitionReferences添加到此組件。可以隨意使用 Unity/Odin 屬性特性,但強烈不建議使用非決定性的 Unity API。此組件的程式碼可以輕鬆作為獨立的.csproj進行處理,類似於 Quantum 2 中的quantum.code.csproj。Quantum.Unity:包含特定於 Quantum 與 Unity 集成的程式碼。此外,CodeGen 會發出包裝組件原型的MonoBehaviours。Quantum.Unity.Editor:包含Quantum.Simulation和Quantum.Unity的編輯器程式碼。Quantum.Unity.Editor.CodeGen:包含 CodeGen 集成程式碼。它完全獨立於其他 Quantum 組件,因此即使存在編譯錯誤也可以運行 —— 這可能需要退出安全模式。
Quantum依賴項
Quantum中心
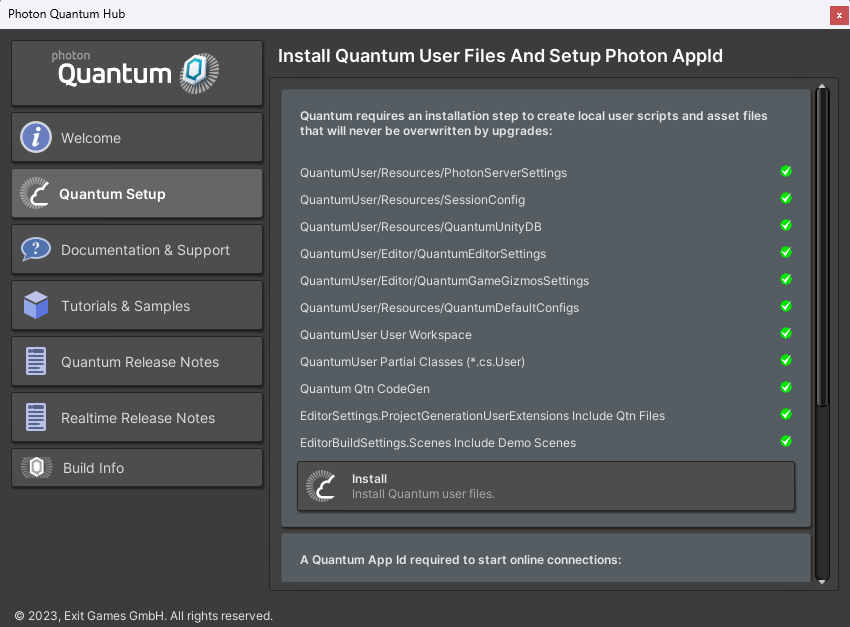
按Ctrl+H或通過 Quantum 選單打開。
當缺少重要的 Quantum 配置檔案(例如 PhotonServerSettings)時,中心窗口也會彈出,並建議按安裝按鈕。
安裝過程負責在本地安裝無法來自 unitypackage 的檔案,因為它們會被下一個 Quantum 版本升級覆蓋。
安裝 Quantum 選單
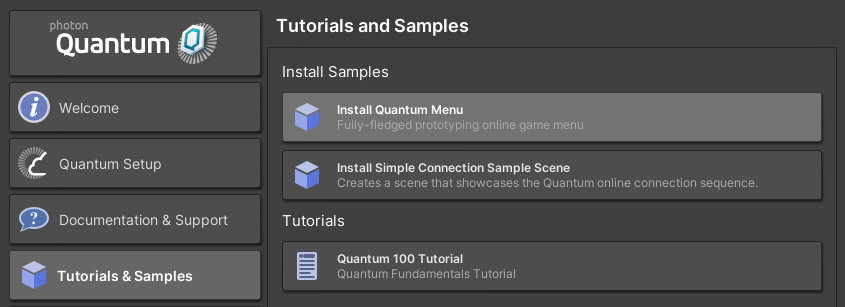
Quantum 選單是一個附加組件,可以使用中心與 SDK 一起安裝。unitypackage 可以在Asset/Photon/QuantumMenu/Quantum-Menu.unitypackage下找到。
該選單是一個功能齊全的圖形化遊戲內選單,用於啟動隨機線上比賽或創建隊伍。
有關自定義可能性的更多信息,請參閱:樣式選單自定義.
發布和偵錯構建
Quantum 庫(Quantum.Deterministic.dll、Quantum.Engine.dll 和 Quantum.Corium.dll)有發布和偵錯兩種配置。為了讓 Unity 識別正確的庫,使用了QUANTUM_DEBUG全局腳本定義。
使用以下選單切換偵錯和發布:

注意:由於需要為每個平台設置定義,因此在製作發布構建時,可能存在某些平台的偵錯版本未禁用的風險。
與發布構建相比,偵錯構建有 顯著的性能損失。對於性能測試,始終使用 Quantum 發布構建(和 Unity IL2CPP)。有關這方面的更多信息,請參閱分析 (Profiling)部分。
開發構建包含斷言、異常、檢查和偵錯輸出,這些在開發過程中很有幫助,而在 發布配置 中則被禁用。例如:
- 從Quantum程式碼專案調用的
Log.Debug()和Log.Trace()將不再輸出日誌。 - 以及所有
Draw.Shape()方法。 NavMeshAgentConfig.ShowDebugAvoidance和ShowDebugSteering將不再繪製 gizmos。- 低級系統(如物理)內部的斷言和異常被禁用。
日誌記錄
Quantum提供靜態Quantum.Log類,用於從模擬程式碼記錄日誌,也用於生成其自身的所有日誌輸出。
C#
namespace Quantum {
  public unsafe class MyQuantumSystem : SystemMainThread
    public override void Update(Frame frame) {
      Log.Debug($"Updating MyQuantumSystem tick {frame.Number}");
    }
  }
}
Unity SDK 有一個名為QuantumUnityLogger的包裝器。它會在RuntimeInitializeOnLoadMethod和 / 或 InitializeOnLoadMethod期間靜態初始化自身(見QuantumUnityLogger.Initialize())。
可以使用部分方法InitializePartial()來自定義初始化。
QuantumUnityLogger 類提供了各種自定義欄位,例如定義配色方案。
日誌級別
全局日誌級別由Quantum.Log.LogLevel控制。要設置 初始日誌級別,使用以下腳本定義:
QUANTUM_LOGLEVEL_TRACEQUANTUM_LOGLEVEL_DEBUGQUANTUM_LOGLEVEL_INFOQUANTUM_LOGLEVEL_WARNQUANTUM_LOGLEVEL_ERROR
它們可通過QuantumEditorSettings檢視器切換。
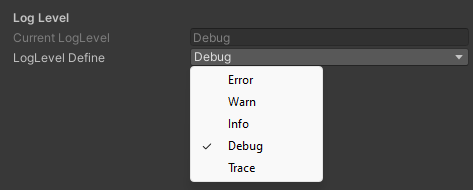
如最後一節有關偵錯構建的內容所述,Log.Trace()和Log.Debug()消息僅會分別在有TRACE和DEBUG定義時記錄。請注意,運行 UnityEditor 時總是定義DEBUG。
Photon Realtime日誌
Quantum 使用的 Photon Realtime 庫有自己的日誌級別,可以通過PhotonServerSettings ScriptableObject 上的Photon.Realtime.AppSettings控制。
AppSettings.NetworkLogging:PhotonPeer 和連接的日誌級別。可用於偵錯連接相關問題。AppSettings.ClientLogging:RealtimeClient 和回調的日誌級別。可用於獲取有關用戶端狀態、使用的伺服器和調用的操作的信息。
在非開發構建中,除非定義LOG_WARNING, LOG_INFO和LOG_DEBUG,否則嚴重性低於ERROR的 Realtime 日誌不會記錄。
匯出模擬
Quantum 模擬程式碼可以匯出到獨立的 C# 專案,該專案沒有用 Unity 依賴項。該專案生成到 Unity 專案資料夾中,它會鏈接到所有找到的模擬原始檔,並使用從Assets/Photon/Quantum/Editor/Dotnet/Quantum.Dotnet.Debug.zip等提取的非 Unity Quantum 依賴項。
在 Unity 專案中選擇
QuantumDotnetProjectSettings資產,定義要搜索的模擬原始檔。- 手動添加額外的
IncludePaths,或用QuantumDotNetIncludeUnity 資產標籤標記資料夾。
- 手動添加額外的
在 Unity 專案中選擇
QuantumDotnetBuildSettings資產,控制如何生成和構建 DotNet 專案。
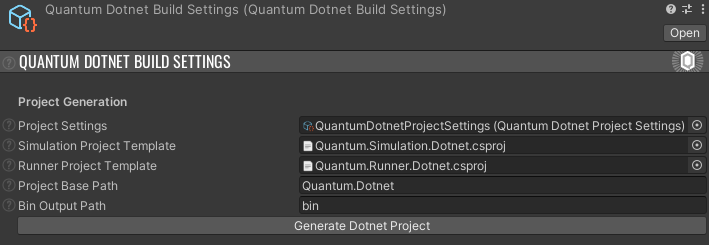
- 啟用
Show Folder After Generation並按Generate Dotnet Project- 專案將生成在
Project Base Path,相對於 Unity 專案資料夾。
- 專案將生成在
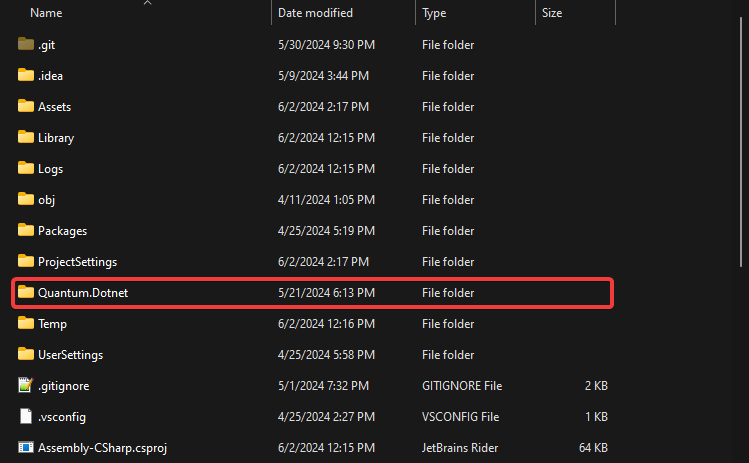
匯出的解決方案結構
生成的解決方案包含兩個專案:
Lib- 偵錯和發布配置中解壓縮的非 Unity Quantum 依賴項Quantum.Runner.Dotnet- 包含可以運行 Quantum 重播的輕量級控制台運行器Quantum.Simulation.Dotnet- 包含非 Unity Quantum 模擬專案和程式碼
使用控制台運行器
在 IDE 中構建解決方案。
打開終端並導航到構建的 exe(
Quantum.Runner.exe)所在的資料夾。使用以下參數運行 exe:
bash
Quantum.Runner.exe --replay-path path/to/replay --lut-path path/to/lut --db-path path/to/db --checksum-path path/to/checksum
--replay-path和--lut-path參數是必需的。
如果重播包含 db,則--db-path參數是可選的。
--checksum-path參數完全可選。
要獲取獨立的資產檔案,可以按Tools/Quantum/Export/AssetDatabase選單下的Asset Database選單按鈕。
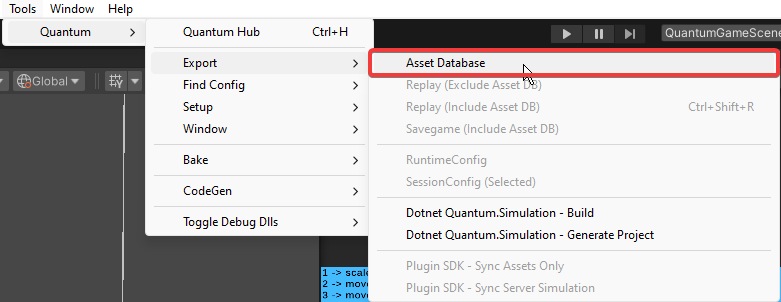
要獲取 LUT 檔案,可以在 Unity 專案的Assets/Photon/Quantum/Resources/LUT資料夾中訪問它們。
.qtn 檔案中的語法高亮
要在 DSL(具有.qtn副檔名的檔案)中啟用語法高亮,請按照以下特定於 IDE 的指南操作。
Visual Studio
在 Visual Studio 中,可以通過將 QTN 檔案與另一種類型(例如 C# 或 Microsoft Visual C++)關聯來為其添加語法高亮。為此,請前往Tools -> Options -> Text Editor -> File Extension。
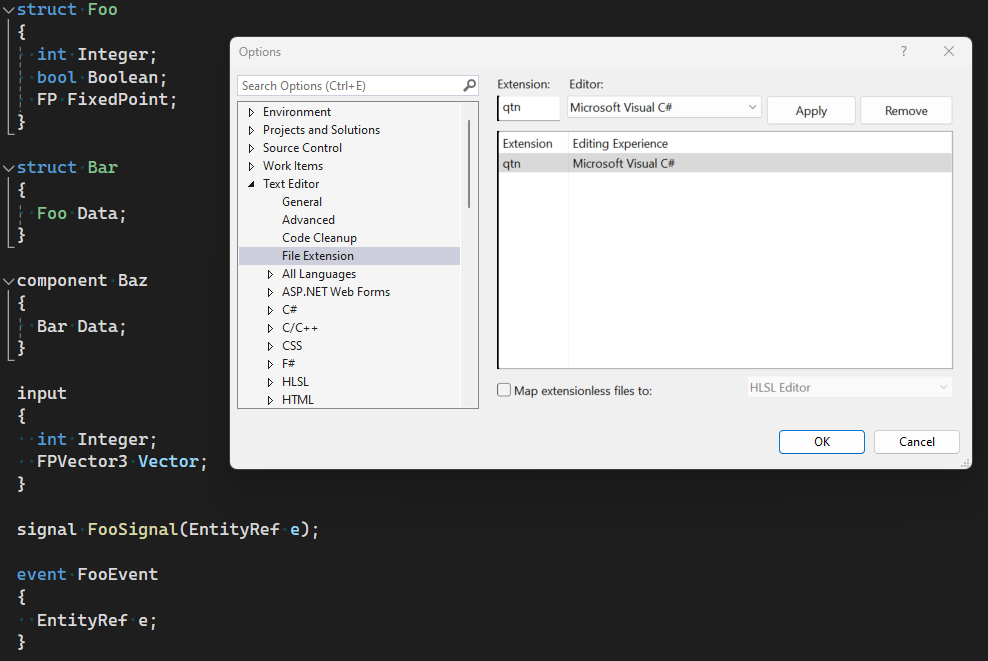
Visual Studio Code
在 Visual Studio 中,可以通過將 QTN 檔案與另一種類型(例如 C#)關聯來為其添加語法高亮。
- 打開設置(Ctrl +,或 macOS 上的 Cmd +)。
- 搜索 "Files: Associations"。
- 添加 "*.qtn" 到 "csharp" 的新檔案關聯。

JetBrains Rider
在 JetBrains Rider 中,可以通過定義新的檔案類型為 DSL 檔案(具有.qtn副檔名的檔案)添加語法高亮。
- 步驟 1: 導航到
File -> Settings -> Editor -> File Types。
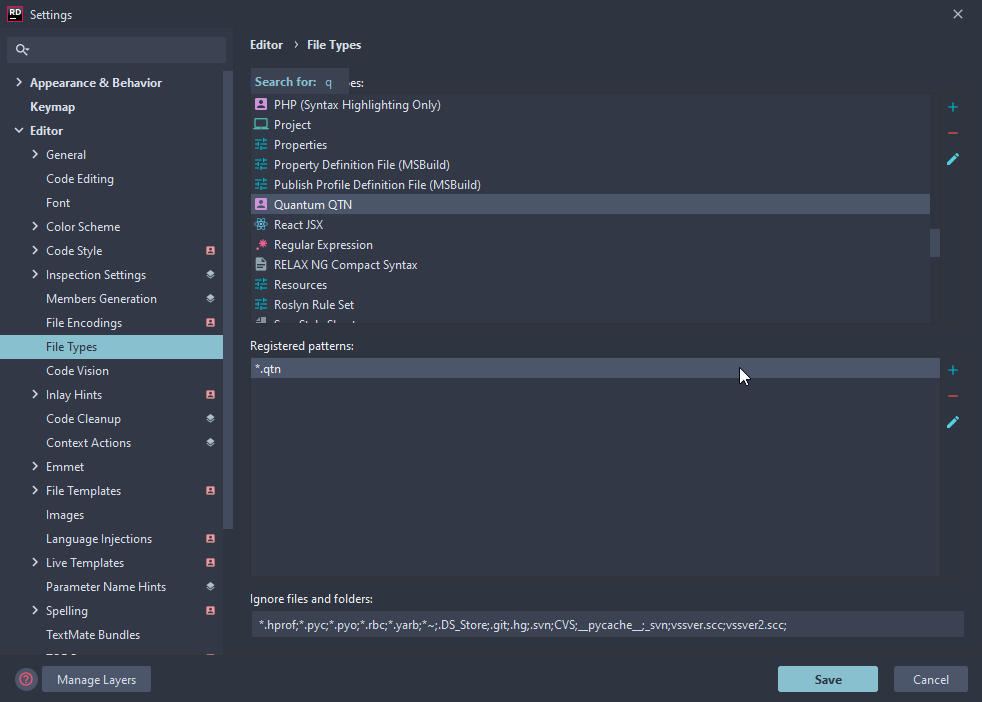
- 步驟 2: 在
Recognized File Types類別中,按右側的+號添加新的檔案類型。
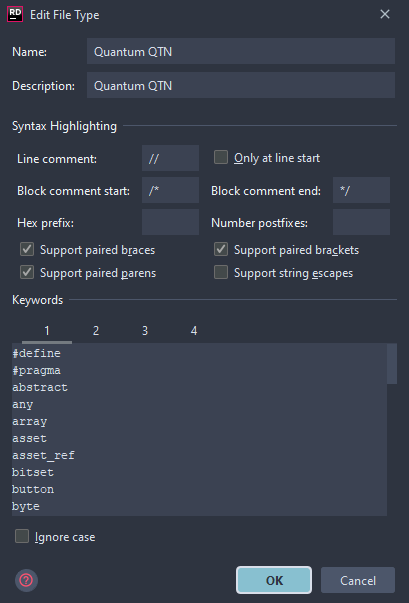
- 步驟 3: 檢查行註釋、塊註釋等的設置。
- 步驟 4: 將下面的列表粘貼到關鍵字級別 1 中。
C#
#define
#pragma
abstract
any
array
asset
asset_ref
bitset
button
byte
component
dictionary
entity_ref
enum
event
fields
filter
flags
global
has
import
input
int
list
local
long
not
player_ref
remote
sbyte
set
short
signal
struct
synced
uint
ulong
union
use
ushort
using
- 步驟 5: 將下面的列表粘貼到關鍵字級別 2 中,然後按
Ok。
C#
(
)
*
:
;
<
=
>
?
[
]
{
}
- 步驟 6: 在
File Name Patterns類別中,按右側的+號。 - 步驟 7: 輸入
*.qtn作為該類型的萬用字元。
