ビヘイビアツリー
はじめに
ビヘイビアツリー(BT:Behaviour Tree)は、ゲーム開発分野のAIエージェント構築に広く用いられています。
Bot SDKのビヘイビアツリーは、以下の要素で構成されています。
- Child/Parent Nodes(子/親ノード):ノードの種類によって0~複数の子ノードを持つ可能性があります。ただし、ノードが持てる親ノードは1つだけです。
- Root Node(ルートノード):始点として使用されるツリー最上位の基本ノードで、子ノードを1つだけ持ちます。
- Composite Node(コンポジットノード):主に分岐に使用され、複数の子ノードの中から、どのノードを実行するかを定義します。
- Leaf Node(リーフノード):ツリーの最下層で使用され、実際のゲームアクションを実行します。子ノードを持つことはできません。
- Decorator Node(デコレーターノード):他のノードへ「付加」して使用します。自身が持つ条件をチェックして、付加先のノードを実行するかどうかを決定します。子ノードを1つだけ持ちます。
- Services(サービス):事前に定義された頻度でゲームアクションを実行します。これはノードではありません。
ビヘイビアツリーの実行は、ルートノードから開始し、そこから子ノード~孫ノードが実行され、リーフノードに到達するまで伝搬します。そして、リーフノードではゲームアクションが実行されます。
ステートマシンと同様に、ビヘイビアツリーはあらゆる詳細や可能性についてのAI定義を管理する必要があります。
これは、実行時に予測不可能なプランを新しく計画することなく、常に同じ構造に従うことを意味します。これを固定構造のAIモデルと呼びましょう。
また、これはステートフルなビヘイビアツリー実装である点も重要です。つまり、フレームごとに最小限のノードロジックのみを実行するために必要な要素すべてをキャッシュ/追跡するため、フレームのメモリ消費量が増加します。
例えば、各ノードの状態や現在実行中のリーフノードは、エージェントコンポーネントにキャッシュされるため、フレームごとにツリー全体を再評価することなく、停止した所から実行を再開できます。
さらに、この実装はイベント駆動型です。一部のノードがブラックボード変数の変更を「監視」して、高い応答性で変更に反応できます。
利点と欠点
Bot SDK BTを使用する際の利点と欠点は次の通りです。
- 利点:
- パフォーマンス:ステートフルかつイベント駆動型アプローチにより、BTの内部メカニズムは非常に高速です。前フレームで停止した所から実行が再開されるため、ツリー全体を再走査する必要がありません。
- 表現しやすさ:コンポジットノード・リーフノード・デコレーターノード・サービスの概念は非常にわかりやすく、実行順序の可視化と理解も容易です。これらが、ビヘイビアツリーがゲーム開発で広く使われる理由です。
- 厳密な制御:ツリーは常に上から下、左から右へ実行され、ノードは実行順に番号が割り振られます。そのため、実行したいことを明確に制御することができます。
- 欠点:
- メモリ使用量:
BTAgentコンポーネントは、実行に関するデータ(ノードのステータス・現在のリーフノード・実行中のサービスなど)をキャッシュする必要があります。これによって、エージェントのメモリ使用量が増加するため、大量のエージェントには不向きです。 - 厳密な制御:これは長所でもあり短所でもあります。すべての可能性を定義する必要があるため、後からノードを追加できるようにするには、保守が必須になります。
- 柔軟性の欠如:すべての要素を手動で定義するより、AI自身に計画を立てさせるアプローチの方が有益な場合もあります。これは、Bot SDKの効用理論で実現可能です。
- メモリ使用量:
Bot SDK使用時、HFSMは一般的に採用しやすいアプローチで、特にAI設計についてチームメンバーの個人的な好みに合う場合に有効です。
エージェント数が小~中規模の場合には優れたアプローチですが、エージェント数が大規模になるなら、HFSMの方が良いパフォーマンスが期待できます。
以下の動画(英語)では、ビヘイビアツリーの基本的なメカニズムと、Bot SDK固有の実装詳細について説明しています。
動画内容:
00:00 から 1:15:導入
1:15 から 21:40:ビヘイビアツリーの基本コンセプト
21:40 から 45:53:デコレーターノード/リーフノード/サービスのコードサンプル詳説
ドキュメントの作成
Bot SDKウィンドウでNew Documentボタンをクリックして、Behaviour Tree (BT)を選択してください。

まず、AIドキュメントの名前を設定してください。このドキュメントはScriptableObjectで、エディター側でのみで使用されるXMLを保持し、Quantumシミュレーションには関連しません。そのため、ビルドに含める必要はありません。
このAIドキュメントに設定した名前は、生成されるQuantumアセット名にもなります。アセットは、シミュレーション内でエンティティのAIを更新するために使用されるので、意味のある適切な名前を選ぶと良いでしょう。

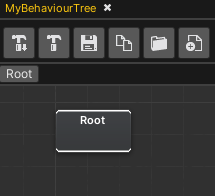
新しく作成したBTドキュメントには、ルートノード(何のアクションも実行せず、遷移を持たない)が置かれています。
Root Node(ルートノード)
ルートノードはビヘイビアツリーの始点です。BTAgentコンポーネントで参照されるメインのQuantumアセットを作成するために使用されます。
ルートノードは子ノードを1つだけ持ち、子ノードはCompositeまたはLeafである必要があります。
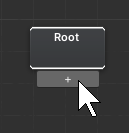
ルートノードを別ノードにリンクするには、ルートノード下部にマウスカーソルを合わせると表示される「+」ボタンをクリックします。
ノードのリンクが有効な場合、何もない場所をクリックするとノード作成パネルが表示されます。
Nodes Status(ノードステータス)
各BTNodeにはStatusがあります。これは、ビヘイビアツリーのフローの大部分を定義するものになるため、非常に重要です。
ステータス値は次の通りです。
Success(成功):ノードがタスクを正常に完了した場合です。その結果は、次に実行すべきタスクを決定するロジックを持つ親ノードへ伝搬されます。Failure(失敗):ノードがタスクの実行に失敗した場合です。その結果はSuccessと同様に親ノードへ伝搬されます。Running(実行中):そのフレームにおいて、ノードがタスクの実行の成功も失敗もしておらず、親ノードに実行結果を返す前に次以降のフレームを実行する必要がある場合です。同時に実行できるノードは1つのみで、そのノードはBTAgentコンポーネントにキャッシュされ、毎ティック実行されます。Inactive(非活性):現在実行中のツリーにおいて、ノードが訪問済みであるかどうかを示します。これは内部でのみ使用されるため、ゲーム固有ノードに使用する必要はありません。
ゲーム固有ノードを作成する際は、ツリー実行を定義するために異なるステータスの種類を使用します。カスタムノードの詳細は、次のトピックをご覧ください。
新しいノードの作成
BTエディターに新しいノードを追加する方法は主に2つあります。
- エディターウィンドウの何もない場所をマウス右クリックで表示されるコンテキストメニューから作成する
- ノードから新しいリンクを作成して、何もない場所をクリックして作成する
作成可能なノードの種類を見てみましょう。
Composite Nodes(コンポジットノード)
これらはビヘイビアツリーにおけるフロー制御のメインソースになります。次に実行可能なノードを定義し、子ノードステータスに応じて、次に実行するノードを選択します。
コンポジットノードは子ノードを左から右へ実行を試みるため、これが優先度の定義方法になります。ノード上の小さい数字が実行順序を示します。
コンポジットノードは、他の多くのノード(コンポジットノードやリーフノード)にリンクできます。
子ノードから結果を取得した後、コンポジットノードも自身の結果を親ノードへ順次伝搬させます。
補足:コンテキストメニューからConvert to ...を選択することで、コンポジットノードの種類を変換できます。これは、他のノードと既にリンク済みのコンポジットノードの種類を変更する際に便利で、再リンクし直す手間が不要になります。
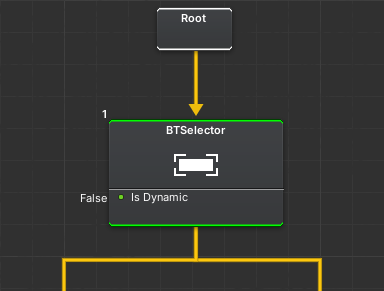
Selector Nodes(セレクターノード)
OR演算子に相当します。
- いずれかの子ノードの実行結果が成功すると、ただちに成功を返します。そこで実行されなかった子ノードはスキップされます。
- すべての子ノードの実行結果が失敗した場合のみ、失敗を返します。
Sequence Nodes(シーケンスノード)
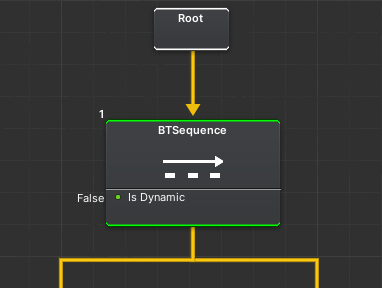
AND演算子に相当します。
- いずれかの子ノードの実行結果が失敗すると、ただちに失敗を返します。そこで実行されなかった子ノードはスキップされます。
- すべての子ノードの実行結果が成功した場合のみ、成功を返します。
Decorator Nodes(デコレーターノード)
デコレーターノードによって、どの分岐を実行するかの条件を定義することができます。
条件がtrueと評価された場合はSuccessを返し、falseと評価された場合はFailureを返します。
この結果は、デコレーターノードがアタッチされているサブツリーの実行を許可/ブロックします。デコレーターノードをアタッチするには、コンポジットノードかリーフノードのサブグラフをダブルクリックし、デコレーターノードをリストに追加してください。
以下はデコレーターノードの例です。
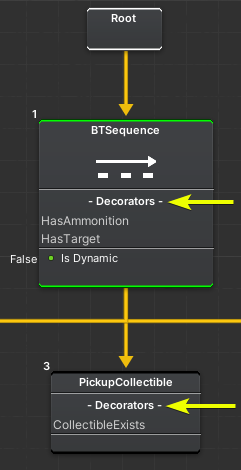
HasAmmonition:BTAgentが利用可能な弾薬を所持している場合にtrueを返すHasTarget:BTAgentのコンポーネントにEntityRefが格納されている場合にtrueを返すCooldown:特定のサブツリーが直近T秒間実行されていない場合にtrueを返す
より具体例で説明すると、HasAmmonitionデコレーターにより、キャラクターの弾薬が尽きた場合に、「射撃」サブブランチの実行をブロックして、「リロード」サブブランチに移行させるようなことができます。
右クリックで新しいデコレーターを作成し、デコレーターのルートノードに接続します。

ノードのサブグラフで定義されたデコレーターは、上位ビューのデコレーターリストから確認できます。
デコレーターによる中断
ノードステータスで説明したように、リーフノードのステータスがRUNNINGの場合、そのノードはキャッシュされ、次のフレームで直接実行されます。ここで、実行中のリーフノードがタスクを完了する前に、実行を中断することが可能です。
例えば、ターゲットを攻撃しているキャラクターが、突然近くに爆発寸前の爆弾があることを認識したとします。その際に、エージェントは射撃を中止し、爆発を避けるために身を隠すことができます。
リーフノードに到達した時点で、実行ツリーのデコレーターはテスト済みとなり、(パフォーマンス上の理由から)毎フレームの再テストは行われません。
しかし、上記のユースケースを実現するために、リーフノード実行中にデコレーターのロジックを実行する方法は存在します。
中断チェックを行う方法は2つあります。
Dynamic Composite Nodes(動的コンポジットノード)
各コンポジットノードはIsDynamicフィールドを持ち、これは切り替え可能なブール値です。
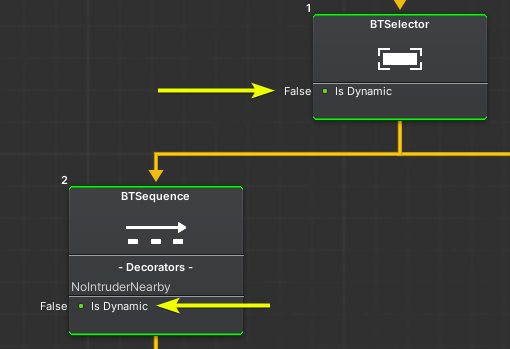
コンポジットノードが動的である場合、そのコンポジットノードが現在実行中のサブツリーの一部である間、そのすべてのデコレーターが毎フレーム再チェックされます。いずれかのデコレーターが失敗すると、現在のリーフノードの実行が中断され、コンポジットノードはFailureを返します。
これによって、どのコンポジットノードのデコレーターを毎ティック再実行するかを制御できるため、ビヘイビアツリーの最適化の可能性が広がります。
Reactive Decorators(リアクティブデコレーター)
デコレーターノードは、特定のブラックボードの変更を「監視」し、反応することが可能です。
この利点は、デコレーターを毎フレームチェックすることなく、ブラックボードに新しい値が設定された場合にのみ実行できることです。
例:ブラックボードで整数Aが整数Bより大きいかどうかを判定するCompareIntegersデコレーターノードを考えます。リアクティブデコレーターでは、ノードを最初に訪問した時、または現在実行中のツリーがblackboardEntry->TriggerDecorators()を実行した時のみ、判定が実行されます。
この方法によって中断が行われた場合、デコレーターノードで使用される中止メカニズムを定義できます。その種類は次の3つです。
Self:現在のノード実行を停止し、中断が発生したノードから再開するLower Priority:現在のノード実行を継続するが、右側の兄弟ノードは実行しないBoth:両方のロジックを適用する
Abort Typeは、デコレーターノード自体で定義可能です。
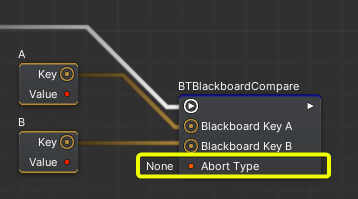
リアクティブデコレーターはシミュレーションコードでセットアップされます。詳細はビヘイビアツリーのコード実装セクションをご覧ください。
Leaf Nodes(リーフノード)
これがビヘイビアツリーの最下層ノードになります。
エージェントのゲーム固有ロジックの大半を実行する役割を持ち、実行時に返されるStatusに大きく依存します。
リーフノードの簡単な例は次の通りです。
Wait:指定時間が経過するまでRUNNINGを継続します。タイマー終了時にSUCCESSを返し、FAILUREは返しません。ChaseEntity:RUNNING中、BTAgentは対象のエンティティに向かって移動し続けます。エージェントが対象に到達した場合はSUCCESSを返し、何らかの理由で対象への到達を阻まれた(例:対象が破壊された、別のナビメッシュ領域にいる)場合はFAILUREを返します。Log:コンソールにメッセージを出力し、常にSUCCESSを返します。
上の例の通り、ステータスで何を返すかは、完全に要件次第になります。

重要:SDKに付属しているリーフノードの1つであるWaitLeafを正しく動作させるには、経過時間をカウントするBotSDKTimerSystemを有効にしてください。
Service Nodes(サービスノード)
補助的なノードとして主に使用され、ビヘイビアツリーのフローには直接影響を与えません。これらのノードは通常、タイマーや繰り返しが不要なゲームステートの変更に適しています。
サービスノードは、ステータスを返さない唯一のノードタイプです。
デコレーターノードと同様に、サービスノードはコンポジットノードやリーフノードに追加できます。ノードのサブグラフに移動し、作成したサービスをサービスのルートノードにリンクしてください。
各サービスノードは、2つの主要なフィールド/メカニズムを共有します。
Interval In Sec:サービスの実行頻度を指定します。どの種類のロジックを高頻度/低頻度で実行するかを制御することで、ツリー実行を適切に最適化できます。Run On Enter:現在の実行コンテキストを開始する際に、Interval In Secを待たずに、サービスを最初に一度だけ最初に実行するかを定義します。
重要:サービスノードを使用するには、経過時間をカウントするBotSDKTimerSystemを有効にしてください。
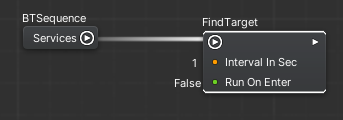
以下はサービスノードの例です。
UpdateTargetPosition:エージェントの移動先を定期的に更新します。ナビメッシュ(例:ランダムな移動先の設定)に関連付けたり、追跡中のエンティティに関連づけたりします。UseSkill:エージェントが特定のスキルを定期的に実行します。
このノードは、エージェントがゲームステートを変更するための機能として使用することを意図したものではなく、コンテキストに関連する特定のブランチを補助するためのヘルパーノードとして設計されています。
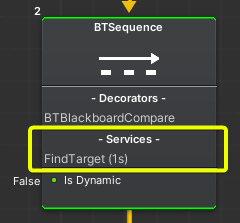
重要な点として、サービスは実行中のサブツリーの一部として保存されます。つまり、現在実行中のブランチ(例:RUNNINGを返すリーフノードが存在する場合)は、そのブランチに含まれるサービスのみを実行します。
一例として、FindTargetサービスノードは、エージェントがターゲットを扱う必要があるブランチにのみ置かれるため、それ以外の種類のアクションを実行している際には実行されません。
デコレーターと同様に、サービスリストは上位のグラフビューで確認できます。
ビヘイビアツリーのコンパイル
ビヘイビアツリーを実際にシミュレーションで使用するには、AIドキュメントをコンパイルする必要があります。これは、ドキュメントを変更するたびに行う必要があります。
コンパイルには、2つのオプションがあります。

- 左ボタン:現在開いているドキュメントのみをコンパイルする
- 右ボタン:プロジェクトのドキュメントすべてをコンパイルする
デフォルトでは、BTファイルはAssets/QuantumUser/Resources/DB/CircuitExport/BT_Assetsに置かれます。
このコンパイルプロセスで、BTRootアセットが作成されます。

BTRootアセットの使用
作成されたBTRootアセットを使用するには、AssetRef<BTRoot>型フィールドで参照を作成し、frame.FindAsset()からロードします。
ビヘイビアツリーのコード実装
BTの主要なコンポーネントはBTAgentで、基本的に2つの方法で使用できます。
- エンティティにコンポーネントを追加する(直接コードから追加する、またはUnity上のエンティティプロトタイプから追加する)
frame.GlobalにBTAgentインスタンスを宣言する
最も一般的な使用方法は、エンティティにコンポーネントを追加することですが、エンティティから分離させてframe.Globalに配置することで、BTで動作するGameManager(ゲームマッチの開始・ゲームルールの更新・ゲームマッチの終了などのロジックを持つ)のようなものを作成するのに便利です。
BTAgentの初期化
BTAgentをエンティティプロトタイプに追加していない場合は、コードからエンティティに追加することができます。これは、プレイヤーが切断した際など、実行時にエンティティをAIエージェントに切り替える場合に便利です。
以下は、コンポーネントを追加するコードスニペットです。(エンティティプロトタイプに追加していない場合のみ)
C#
var btAgent = new BTAgent();
f.Set(myEntity, brAgent);
以下の初期化ステップは、エンティティプロトタイプを使用するしないにかかわらず実行する必要があります。
C#
var btRootAsset = f.FindAsset<BTRoot>(btReference.Id);
BTManager.Init(f, myEntity, btRoot);
OnComponentAddedコールバックによる初期化
BTRootアセットの参照をエンティティプロトタイプに直接設定し、その情報でエージェントを初期化するのにOnComponentAddedシグナルを使用することも可能です。
これはBotSDKSystemでも行っている方法です。以下がその例です。
C#
// 任意のシステム
  public unsafe class AISystem : SystemMainThread, ISignalOnComponentAdded<BTAgent>
  {
    public void OnAdded(Frame frame, EntityRef entity, BTAgent* component)
    {
      // エンティティプロトタイプに設定されたコンポーネントからBTRootを取得する
      BTRoot btRoot = frame.FindAsset<BTRoot>(component->Tree.Id);

      // 初期化
      BTManager.Init(frame, entity, btRoot);
    }
  // ...
  }
BTAgentの更新
エージェント初期化後は、次のように更新できます。
C#
BTManager.Update(frame, filter.Entity);
これによって、BTメカニズム全体が開始されます。ルートノードが子ノードを実行し、子ノードが孫ノードを実行するなどが行われます。
C#
namespace Quantum
{
  public unsafe class AISystem : SystemMainThread, SystemMainThreadFilter<AISystem.Filter>
  {
    public struct Filter
    {
      public EntityRef Entity;
      public BTAgent* BTAgent;
    }

    public void OnAdded(Frame frame, EntityRef entity, BTAgent* component)
    {
        var btRootAsset = frame.FindAsset<BTRoot>(btReference.Id);
        BTManager.Init(frame, myEntity, btRoot);
    }

    public override void Update(Frame frame, ref Filter filter)
    {
        BTManager.Update(frame, filter.Entity);
    }
  }
}
ノードのコード実装
全体として、ほとんどのノード型は同じクラスを継承しているため、非常に似ているオーバーライド可能なAPIを共有しています。
デコレーター・リーフノード・サービスの作成
- 新しいデコレーターノードを作成するには、
BTDecratorを継承した新しいクラスを作成します - 新しいリーフノードを作成するには、
BTLeafを継承した新しいクラスを作成します - 新しいサービスを作成するには、
BTServiceを継承した新しいクラスを作成します
重要:上記のどのクラスも[System.Serializable]を付ける必要があります。
デコレーターとリーフノードのAPI
Init:BTManager.Initが呼び出されてツリーを再帰的に初期化する際に、一度だけ呼び出されます。これは、特定のノードデータの領域を割り当てるために使用されます。詳細な情報は後述の「ノードデータ」をご覧ください。OnEnter:特定のノードを訪問した瞬間、かつノードの更新が実行される前に、常に呼び出されます。特定のコンテキスト関連のデータ(例:FPのタイマーの保存など)を設定するのに便利で、WaitLeafクラスにはエージェントにタイマー情報を保存する方法の例があります。詳細は「ノードデータ」をご覧ください。OnUpdate:リーフノードが実行されている間、毎ティック呼び出されます。Success/Failure/Runningをいつ返すかを選択するためのBTStatusが返されます。DebugLeafは常にSuccessを返すシンプルな例で、WaitLeafはRunning/Successを返す少し複雑な例です。OnExit:ノードがジョブを完了した際、またはツリー上層で実行が中断された際に呼び出されます。必要に応じて、データの後始末に使用できます。
デコレーターノードについての補足
デコレーターは、上記のメソッド以外にもオーバーライド可能なメソッドを持ちます。
CheckConditions:ノードのOnUpdate中に呼び出され、ゲーム仕様に応じたBooleanを返します。
デコレーターノードでは、OnEnter/OnExitで関連データの割り当て/解放や初期化を行うかわりに、CheckConditionsを実装するだけで十分なことが一般的です。
サービスノードのAPI
OnUpdate:サービスが実行されるたびに呼び出されます。実行間隔は、ビジュアルエディターで定義した値に依存します。
ノードデータ
BTノードに、独自の整数値やFP値など、追加の関連データを持たせると便利なことがあります。
BTAgentコンポーネントには、ノード固有データのストレージが既に備わっていますが、独自のデータストレージを作成することも可能です。
以下に具体例を挙げます。
- コンポジットノードには、現在実行されている子ノードのインデックスを保存する必要がある
WaitLeafノードには、待機終了時刻の値を保存する必要がある
これらと同様に、カスタムノードにも実行時に変更が必要なデータを保存する必要がある可能性があります。
しかしノードはデータアセットであり、実行時にフィールドの値を変更することはできないため、フレーム内にデータストレージが必要になります。
整数型やFP型のフィールドには、BTDataIndex型が簡単に使用できます。この構造体は、ビジュアルエディター上のコンパイルプロセス中にベイクされ、各BTDataIndexフィールドは一意のインデックス値を持つことが保証されます。
ノードにカスタムデータを追加する手順は次の通りです。
BTDataIndex型の新しいフィールドを作成します。(例:WaitLeafノードで宣言されているpublic BTDataIndex EndTimeIndex;のように)Initメソッドで、btAgent->AddIntData(frame, initialValue);かbtAgent->AddFPData(frame, initialValue);を実行して、BTAgentにデータを割り当てます。BTAgentからデータを読み取るには、p.BtAgent->GetFPData(frame, EndTimeIndex.Index)を使用します。WaitLeafノードのEndTimeIndexはその例です。BTAgentにデータを書き込むには、p.BtAgent->SetFPData(frame, endTimeValue, EndTimeIndex.Index);を実行します。
リアクティブデコレーターのコード実装
リアクティブデコレーターノードを作成するには、次の手順に従います。
- デコレータークラスの
OnEnterメソッドで、デコレーターを監視するブラックボードエントリに登録します。
C#
// --> BTBlackboardCompareからのサンプル

    // ビジュアルエディター上で、
    // どのブラックボードエントリにデコレーターを監視させるかを定義する
    public AIBlackboardValueKey BlackboardKeyA;
    public AIBlackboardValueKey BlackboardKeyB;

    public override void OnEnter(BTParams p)
    {
      base.OnEnter(p);

      // デコレーターを開始したら、リアクティブデコレーターとしてブラックボードエントリに登録する
      // これによって、変更時にCheckConditionsメソッドが再実行され、現在の実行を中断できるようになる
      p.Blackboard->RegisterReactiveDecorator(p.Frame, BlackboardKeyA.Key, this);
      p.Blackboard->RegisterReactiveDecorator(p.Frame, BlackboardKeyB.Key, this);
    }
OnExitでは、デコレーターの登録を解除します。
C#
// --> BTBlackboardCompareからのサンプル

    public override void OnExit(BTParams p)
    {
      base.OnExit(p);

      // デコレーターを終了すると、現在のサブツリーからも抜けるため、
      // ブラックボードエントリの登録を解除し、監視対象から外す
      p.Blackboard->UnregisterReactiveDecorator(p.Frame, BlackboardKeyA.Key, this);
      p.Blackboard->UnregisterReactiveDecorator(p.Frame, BlackboardKeyB.Key, this);
    }
- デコレーターの反応をトリガーするには、適切なタイミングで
TriggerDecorators()を呼び出します。ブラックボード変数が変更された時、特定の範囲に値が設定された時、または一定間隔で呼び出すなど、任意のタイミングで実行できます。
C#
blackboard->Set(f, "VariableKey", value)->TriggerDecorators(p);
フィールド値の定義
ノードのフィールドに値を設定する様々な方法について、詳細な情報はフィールド値の定義をご覧ください。
AIParam
AIParam型の使用方法について、詳細な情報はAIParamをご覧ください。この型は、手動設定やBlackboard/Constant/Configノードからの設定など、柔軟に定義可能なフィールドを実現するのに便利です。
AIContext
エージェントのコンテキスト情報をパラメーターとして渡す方法について、詳細な情報はAIContextをご覧ください。
BotSDKSystem
Bot SDKコンポーネントの追加/削除コールバック時、コンポーネントのメモリ初期化/解放などのプロセスを自動化するクラスです。詳細な情報はBotSDKSystemをご覧ください。
デバッガー
Bot SDKには独自のデバッグツールが付属しています。これによって、実行時に任意のHFSMAgentを選択すると、エージェントの直近フローをビジュアルエディター上でハイライト表示できます。以下はBot SDKサンプルプロジェクトにおけるデバッグツールの例です。
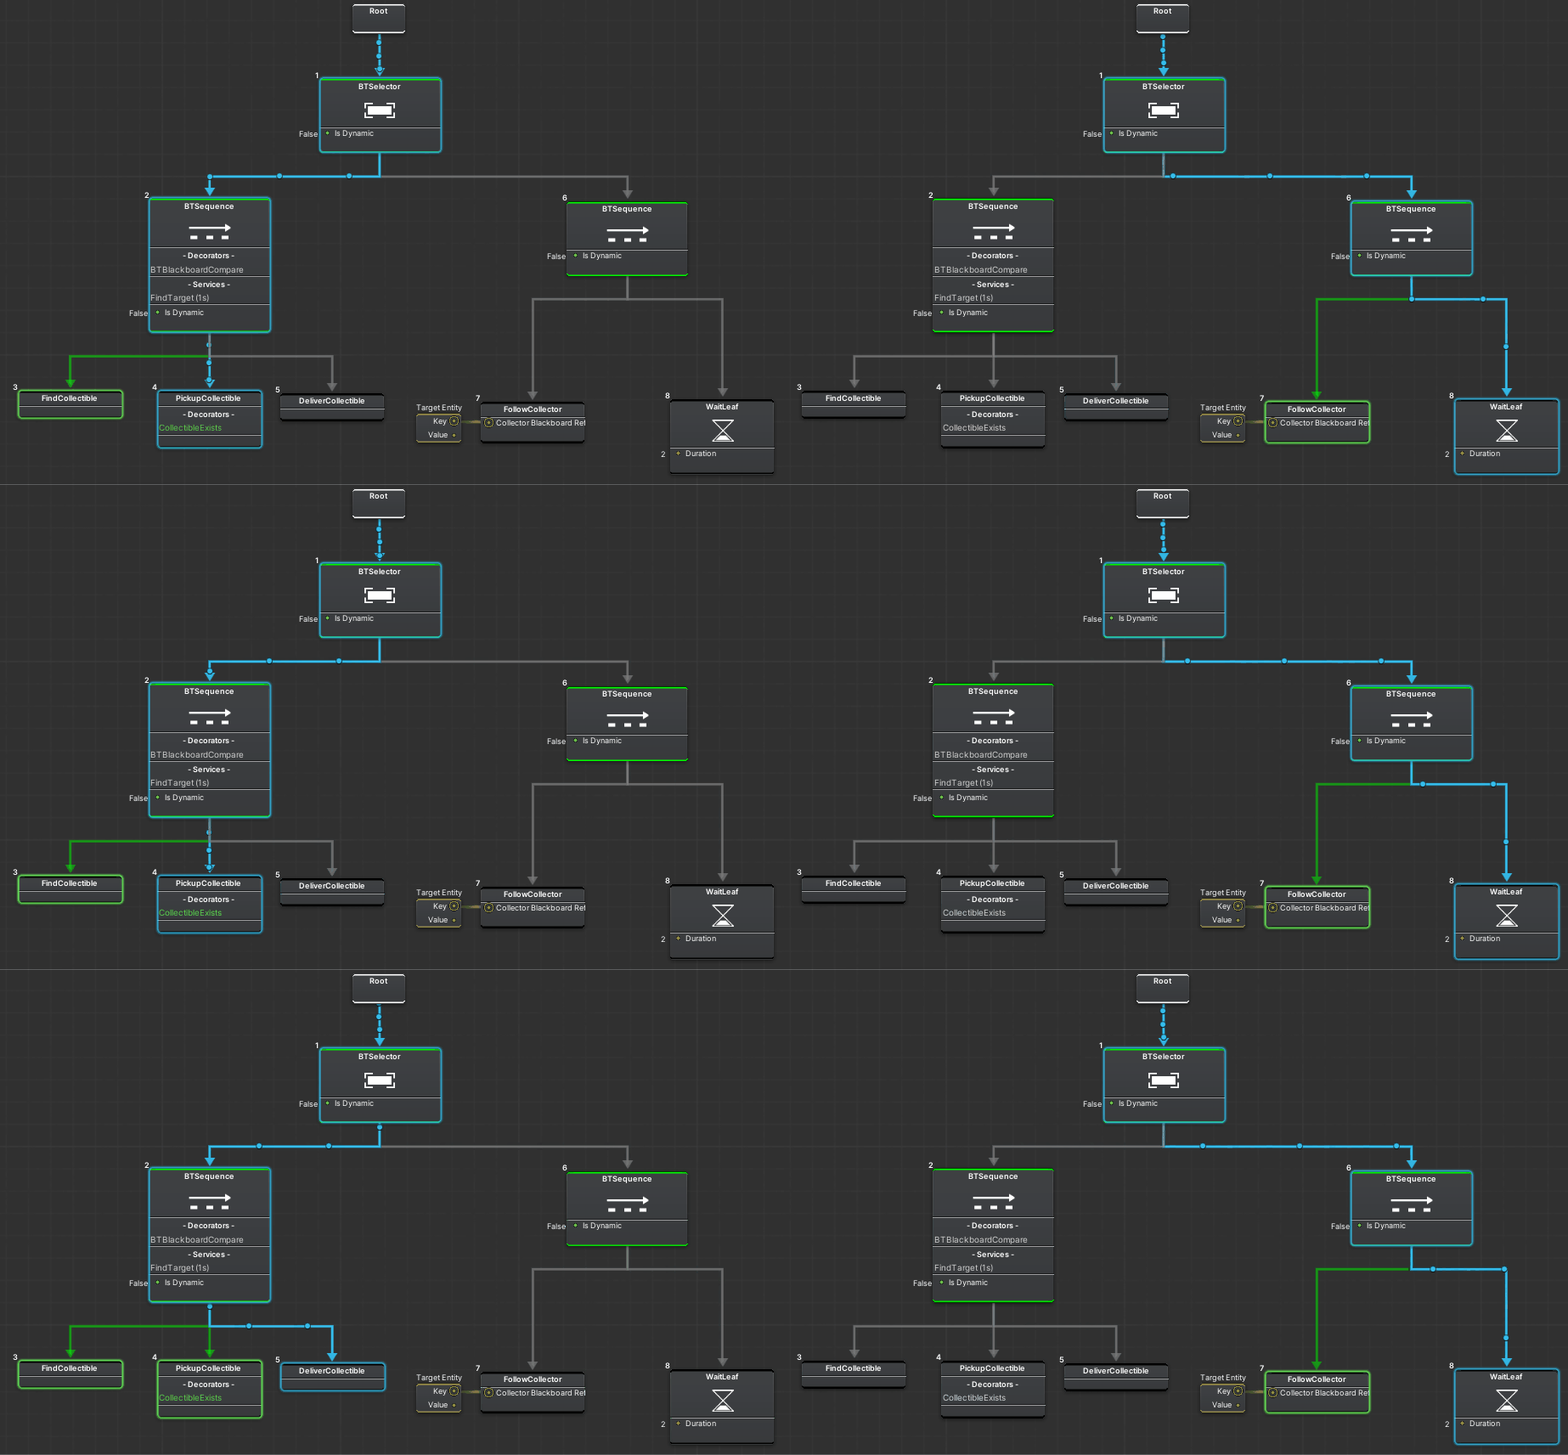
- 青:現在実行中のサブツリーです。青いリンクが辿った経路を示し、濃い青のノードが現在実行中のノードです。
- 緑:その時点で成功したすべてのノードです。コンポジットノードは、子ノードが成功した場合にのみ緑で表示されます。
- 赤:その時点で失敗したすべてのノードです。
- グレー:未訪問のブランチです。その後に訪問する可能性はあります。
デバッガーの使用方法
デバッガーを使用するために必要な手順は次の通りです。
SystemsConfigファイルでBotSDKDebuggerSystemを有効にします。システムの使用はオプションで、独自ロジックから同じAPIのBotSDKDebuggerSystemCallbacks.OnVerifiedFrame?.Invoke(frame);を確定フレームで呼び出すこともできます。- ビジュアルエディター上で、上部パネルの小さな虫アイコンをクリックします。アイコンが緑色になれば、デバッガーが有効になります。

どのエンティティをデバッグするかを選択する方法は2つあります。
ゲームオブジェクトを使用したデバッグ:
HFSMAgentコンポーネントを持つQuantumエンティティを表す、プレハブ/エンティティプロトタイプを選択する- Unityの
BotSDKDebuggerコンポーネントを追加する - 実行時にBot SDKウィンドウを開きデバッガーを有効にした上で、
BotSDKDebuggerを持つゲームオブジェクトを選択して動作を確認する
デバッガーウィンドウを使用したデバッグ:
- シミュレーション側で
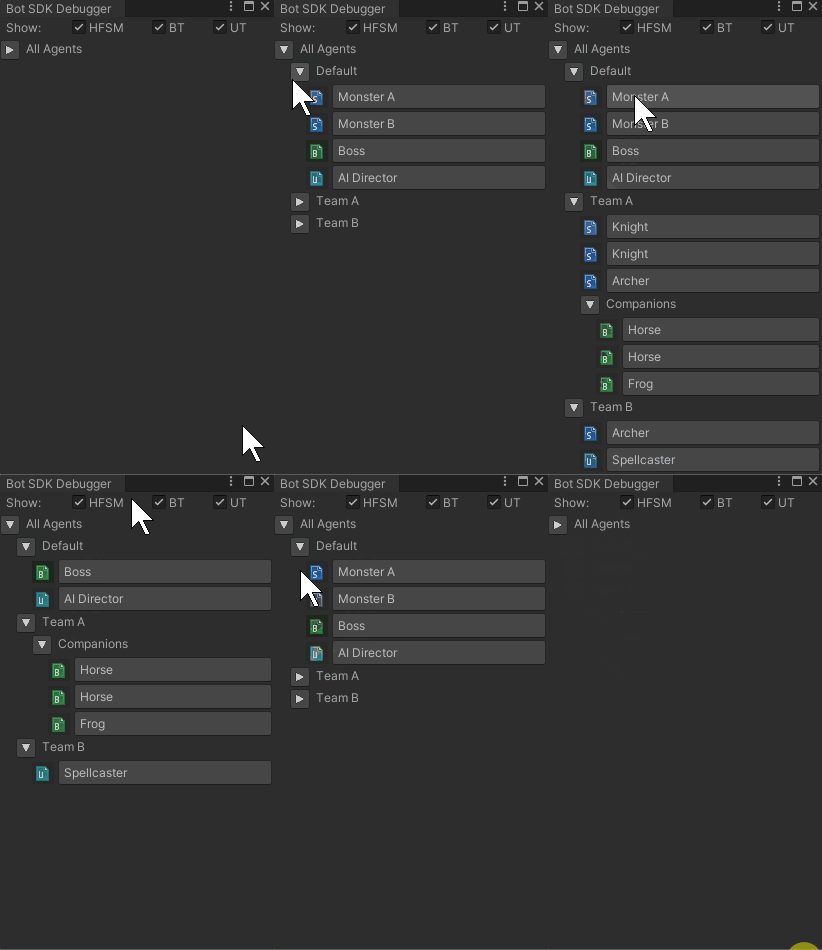
BotSDKDebuggerSystem.AddToDebugger(frame, collectorEntity, hfsmAgent, (optional) customLabel);を呼び出して、エージェントのエンティティをデバッガーウィンドウに登録します。デバッグ対象のエンティティのデフォルト名は「Entity XX | AI Document Name」形式になりますが、customLabelパラメーターを使用して特定のラベルを割り当てることが可能です。階層構造名を作成することも可能で、カスタムラベルに区切り文字「/」を使用すると、デバッガーウィンドウに階層構造が作成されて、折りたたみ/展開できるようになります。 - Unity側でデバッガー起動ボタンの隣のボタンをクリックすると、登録済みエージェントすべてを表示するウィンドウが新しく開きます。そこからデバッグ対象のエージェントを選択してください。

重要:デバッガーを有効にすると、エージェントデータを処理するためにCPUとメモリ使用量が増加します。
これによって、ゲームのパフォーマンスが低下する可能性があるため、エージェントの挙動をデバッグする際のみデバッガーを有効にし、パフォーマンステスト時は必ずデバッガーを無効にしてください。デバッガーをあまり使用していなくても、バッググラウンドではデータ処理が継続しています。
補足:現在、エンティティにリンクしていないエージェント(例:グローバルに存在するエージェント)はデバッグできません。
ビジュアルエディターのコメント
ビジュアルエディターでコメントを作成する方法について、詳細な情報はビジュアルエディターのコメントをご覧ください。
コンパイル出力フォルダーの変更
デフォルトでは、Bot SDKのコンパイルプロセスで生成されたアセットはAssets/Resources/DB/CircuitExportフォルダーに置かれます。出力フォルダーを変更する方法については、出力フォルダーの変更をご覧ください。
- はじめに
- 利点と欠点
- ドキュメントの作成
- Root Node(ルートノード)
- Nodes Status(ノードステータス)
- 新しいノードの作成
- Composite Nodes(コンポジットノード)
- Decorator Nodes(デコレーターノード)
- デコレーターによる中断
- Leaf Nodes(リーフノード)
- Service Nodes(サービスノード)
- ビヘイビアツリーのコンパイル
- BTRootアセットの使用
- ビヘイビアツリーのコード実装
- ノードのコード実装
- ノードデータ
- リアクティブデコレーターのコード実装
- フィールド値の定義
- AIParam
- AIContext
- BotSDKSystem
- デバッガー
- ビジュアルエディターのコメント
- コンパイル出力フォルダーの変更