リプレイ
はじめに
このドキュメントでは、決定論的Quantumシミュレーションのリプレイを保存/再生する方法について説明します。
リプレイは、同じライブラリ・ゲームアセット・設定・ユーザー入力を使用して、記録されたセッションからゲームシミュレーションを再実行するものです。例えば、少し前からシミュレーションを開始して、キルカムのリプレイを実行することにも使用できます。アプリケーションが同じである必要も、同じプラットフォームで実行される必要もありませんが、同じゲームとQuantumのDLLでビルドされている必要があります。オプションでチェックサムを記録して、再生時に検証できます。
Quantumリプレイを実行するには、次の4つが必要です。
- 同じバージョンのゲームとQuantumライブラリでビルドされたアプリケーション
- QuantumDeterministic.dll および Quantum.Engine.dll
- Quantum.Simulation.dll
- ゲームアセット
- Quantumアセットデータベース(DB)
- ルックアップテーブルファイル(LUT)
- ゲームセッション固有のコンフィグファイル
- SimulationConfig
- RuntimeConfig
- ゲームセッション固有の入力履歴
リプレイを保存する方法
Unity
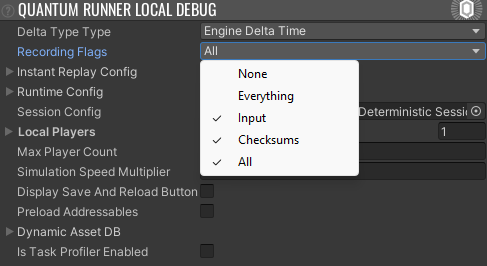
Quantumを開始する前にRecordingFlagsをInput/Allに設定します。
C#
  [Flags]
  public enum RecordingFlags {
    None = 0,                 // 何も記録しない、デフォルト設定
    Input = 1 << 0,           // 入力を記録する
    Checksums = 1 << 1,       // チェックサムを記録する(有効にする必要がある)
    All = Input | Checksums   // 入力とチェックサムを記録する
  }
- インスペクター上で
QuantumRunnerLocalDebugのenumフィールドを使用する
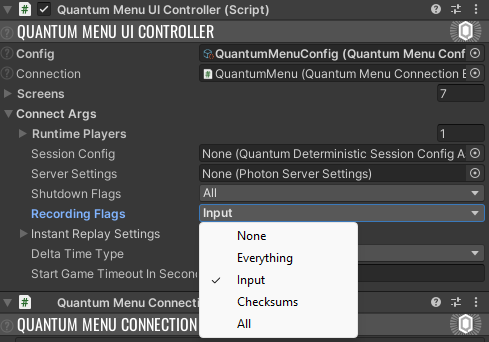
- Quantumメニュー使用時に、インスペクター上で
QuantumMenuUIController.ConnectArgsのenumフィールドを使用する
SessionRunner.Start()呼び出し時に、SessionRunner.Argumentsのフラグを設定する

- あるいは、
QuantumGame.StartRecordingInput()を使用して、手動で入力の記録を開始する
補足:一般的に入力の記録には、マネージドメモリの割り当てが行われます。
ゲームを開始し、以下のUnityエディターメニューの1つを選択して、リプレイを保存します。エクスポートされるファイルは、利便性を考えてアセットDBを含めることも、リプレイファイルサイズを小さくするためにアセットDBを除外することもできます。リプレイファイルのデフォルトの場所はAssets/QuantumUser/Replaysで、デフォルト名はロードされているマップと日時から構成されます。アセットDBを除外する場合、接尾辞-DBの別のファイルがエクスポートされることもあります。
Quantum > Export > Replay (Include Asset DB)
Quantum > Export > Replay (Exclude Asset DB)
また、コードから手動でリプレイファイルを作成/保存することもできます。
C#
var replay = quantumGame.GetRecordedReplay(includeChecksums: true, includeDb: false))
File.WriteAllText("replay.json", JsonUtility.ToJson(replay));
コードからアセットDBをエクスポートすることもできます。
C#
using (var file = File.Create("db.json")) {
  quantumGame.AssetSerializer.SerializeAssets(file, quantumGame.ResourceManager.LoadAllAssets().ToArray());
}
Webhook
Quantum Public Cloudで実行中のセッションでリプレイを保存するには、リプレイWebhookを設定して、カスタムバックエンドに送る必要があります。
ReplayStartのリクエストには、SessionConfigとRuntimeConfigのコンフィグファイルが含まれます。ReplayChunkは、すべてのプレイヤーの入力ストリーミングで、IsLastがtrueになるまで定期的に届きます。
Unityでリプレイを再生するには、QuantumReplayFileクラスにJSONでシリアライズするか、必要なデータを格納する別のデータ構造を作成します。
リプレイを実行する方法
Unity
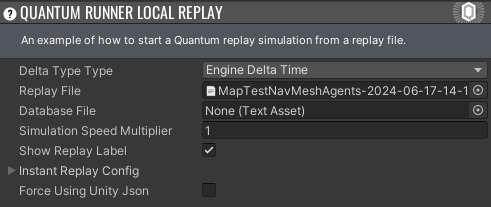
QuantumRunnerLocalDebugスクリプトのかわりにQuantumRunnerLocalReplayスクリプトを使用して、リプレイによるローカルゲームを開始します。インスペクター上のReplay Fileフィールドに、記録ファイルをドラッグ&ドロップしてください。デフォルトのファイル命名規則が使用されている場合、Database Fileアセットが自動的に検知されて設定されます。
このスクリプトからリプレイファイルをロードするには、引数をセットアップ/構成し、Quantumセッションを開始します。このプロセスは、.Netアプリケーションランナーと似ていて、カスタムリプレイ開始ロジックを作成するために使用できます。
ステップ1:リプレイファイルをデシリアライズします。
C#
var replayFile = JsonUtility.FromJson<QuantumReplayFile>(ReplayFile.text);
ステップ2:リプレイファイルから入力プロバイダーを作成します。入力がデルタ圧縮されているか、生の入力を使用しているかに基づいて、自動的に正しいプロバイダーが作成されます。
C#
_replayInputProvider = replayFile.CreateInputProvider();
ステップ3:SessionRunner引数を作成します。例えば、RuntimeConfigバイナリをデコードしたり、シミュレーションをDeterministicGameMode.Replayモードに設定したりします。InitialTickとFrameDataは、リプレイを途中から開始する場合にのみ必要です。
C#
var serializer = new QuantumUnityJsonSerializer();
var runtimeConfig = serializer.ConfigFromByteArray<RuntimeConfig>(replayFile.RuntimeConfigData.Decode(), compressed: true);

var arguments = new SessionRunner.Arguments {
  RunnerFactory = QuantumRunnerUnityFactory.DefaultFactory,
  RuntimeConfig = runtimeConfig,
  SessionConfig = replayFile.DeterministicConfig,
  ReplayProvider = _replayInputProvider,
  GameMode = DeterministicGameMode.Replay,
  RunnerId = "LOCALREPLAY",
  PlayerCount = replayFile.DeterministicConfig.PlayerCount,
  InstantReplaySettings = InstantReplayConfig,
  InitialTick = replayFile.InitialTick,
  FrameData = replayFile.InitialFrameData,
  DeltaTimeType = DeltaTypeType
};
ステップ4:リプレイに保存されたアセットデータベースを使用するか、外部アセットデータベースソースを使用するか、異なるResourceManagerを何も設定しないかを選択します。
C#
var assets = replayFile.AssetDatabaseData?.Decode();
if (DatabaseFile != null) {
  assets = DatabaseFile.bytes;
}

var serializer = new QuantumUnityJsonSerializer();

if (assets?.Length > 0) {
  _resourceAllocator = new QuantumUnityNativeAllocator();
  _resourceManager = new ResourceManagerStatic(serializer.AssetsFromByteArray(assets), new QuantumUnityNativeAllocator());
  arguments.ResourceManager = _resourceManager;
}
ステップ5:最後にゲームを開始します。
C#
_runner = QuantumRunner.StartGame(arguments);
オプションで、チェックサムのリストを検証し、チェックサムの不一致をログに出すことも可能です。
C#
_runner.Game.StartVerifyingChecksums(replayFile.Checksums);
.Netアプリケーション
QuantumDotnetBuildSettingsアセットを選択し、Generate Dotnet Projectを押すことで、.Netシミュレーションプロジェクトを作成/更新します。
Assets/../Quantum.Dotnet/Quantum.Dotnet.slnのソリューションファイルを開いてコンパイルします。
コマンドラインからランナーを開始します。
Quantum.Dotnet\Quantum.Runner.Dotnet\bin\Debug> .\Quantum.Runner.exe --help
Description:
  Main method to start a Quantum runner.

Usage:
  Quantum.Runner [options]

Options:
  --replay-path <replay-path>      Path to the Quantum replay json file.
  --lut-path <lut-path>            Path to the LUT folder.
  --db-path <db-path>              Optionally an extra path to the Quantum database json file.
  --checksum-path <checksum-path>  Optionally an extra path to the checksum file.
  --version                        Show version information
  -?, -h, --help                   Show help and usage information
例:
Quantum.Dotnet\Quantum.Runner.Dotnet\bin\Debug>.\Quantum.Runner.exe
  --replay-path ..\..\..\..\Assets\QuantumUser\Replays\MapTestNavMeshAgents-2024-06-17-14-19-46.json
  --lut-path ..\..\..\..\Assets\Photon\Quantum\Resources\LUT
注意: Unityで記録されたチェックサムは、Dotnetランナーで生成されたものとは互換性がありません。異なるプラットフォームで記録されたチェックサムを検証するには、SessionConfigでChecksumCrossPlatformDeterminismを有効にしてください。
PlayerIsLocal()
Quantum.Game.SessionのPlayerIsLocalは、例えばカメラ・オーディオ・VFXのフォーカスなど、様々なビューの制御に役立ちます。しかし、これはリプレイでは機能しません。
例えば、Webhookを使用してオンラインでキャプチャされたリプレイには、この情報は一切含まれません。
これをリプレイでサポートするには、PlayerIsLocalをセッションのゲームモードのチェックでラップすると良いでしょう。
C#
public class CustomViewContext : MonoBehaviour, IQuantumViewContext
{
  private PlayerRef _focusedPlayer;

  public bool IsFocusedPlayer(QuantumGame game, PlayerRef player)
  {
    if (game.Session.GameMode == DeterministicGameMode.Replay)
    {
      return player == _focusedPlayer;
    }

    return game.PlayerIsLocal(player);
  }
}
QuantumReplayFile API
QuantumReplayFileは、Quantumリプレイを実行するためのすべての関連データを保持し、JSONでシリアライズされます。
リプレイには、InputHistoryDeltaCompressed/InputHistoryLegacyに保存された有効な入力履歴を含める必要があります。前者はファイルサイズが小さく、Photon Public Cloudからストリームされる入力モードになります。
RuntimeConfigDataは、バイナリシリアライズ形式(Quantum.AssetSerializer)で保存されます。これはリプレイストリーミングの受信データと同様です。
リプレイには、利便性のためにシリアライズされた(AssetSerializer)アセットデータベースAssetDatabaseDataを含めることができますが、ファイルサイズが問題となる本番環境では除外すべきです。
開発機能として、実行時に検証可能なチェックサムをリプレイに含めることもできます。
QuantumJsonFriendlyDataBlobはJSONでバイナリデータを格納するためのラッパーで、UnityのJSONツールがバイト列を冗長にシリアライズする問題を回避します。
C#
public class QuantumReplayFile {
  // デルタ圧縮されたバイナリ入力履歴で、リプレイWebhookで送信されるものと同じです。
  public QuantumJsonFriendlyDataBlob InputHistoryDeltaCompressed;
  // Quantum 2.1で使用された完全に冗長な入力で、機能はしますが使用は限定的です。
  public DeterministicTickInputSet[] InputHistoryLegacy;
  // バイナリでシリアライズされたRuntimeConfigです。
  // AssetSerializer.ConfigToByteArray(runtimeConfig, compress: true)を使用します。
  /// </summary>
  public QuantumJsonFriendlyDataBlob RuntimeConfigData;
  /// SessionConfigです。
  public DeterministicSessionConfig DeterministicConfig;
  /// 入力の最新ティックです。
  public int LastTick;
  /// 開始時の初期ティックで、<see cref="InitialFrameData"/>が設定されている必要があります。
  public int InitialTick;
  /// リプレイを開始する際のフレームデータのオプションです。例えば、ゲームのセーブに使用されます。
  public byte[] InitialFrameData;
  /// チェックサムのオプションです。本番環境では除外してください。
  public ChecksumFile Checksums;
  /// シリアライズされたアセットデータベースのオプションです。本番環境では除外してください。
  /// AssetSerializer.SerializeAssets(stream, ResourceManager.LoadAllAssets().ToArray()を使用します。
  public QuantumJsonFriendlyDataBlob AssetDatabaseData;
}
C#
public class QuantumJsonFriendlyDataBlob {
  /// バイト列を、そのまま保存する
  public byte[] Binary;
  /// バイト列を、Base64テキストで保存する
  public string Base64;
  /// BinaryもBase64もGZip圧縮が可能
  public bool IsCompressed;
}
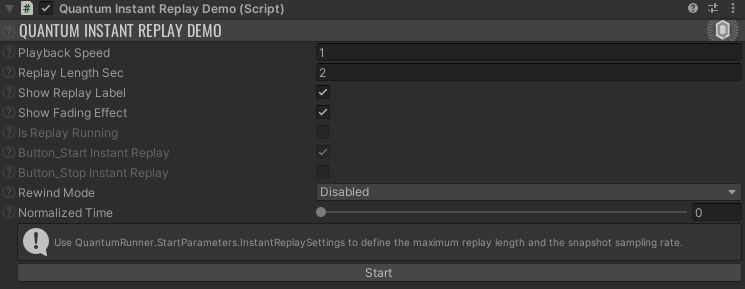
インスタントリプレイ
インスタントリプレイを行う方法を示すスクリプトも提供されています。補助的なQuantumRunnerでゲーム中のキルカムのリプレイなどを行い、インスタントリプレイが終了するとデフォルトのランナーに戻ります。
これを使用するには、UnityコンポーネントQuantumInstantReplayDemoをゲームオブジェクトに追加し、セットアップ(再生速度・リプレイ時間などの設定)して、「Start」/「Stop」ボタンを押します。