Sample Menu Customization
Introduction
The sample menu comes bundled with the SDK and can be used as a starting point for creating customized menus. It gets replaced whenever an upgrade is performed, so some precautions should be taken to ensure that modifications are not overwritten.
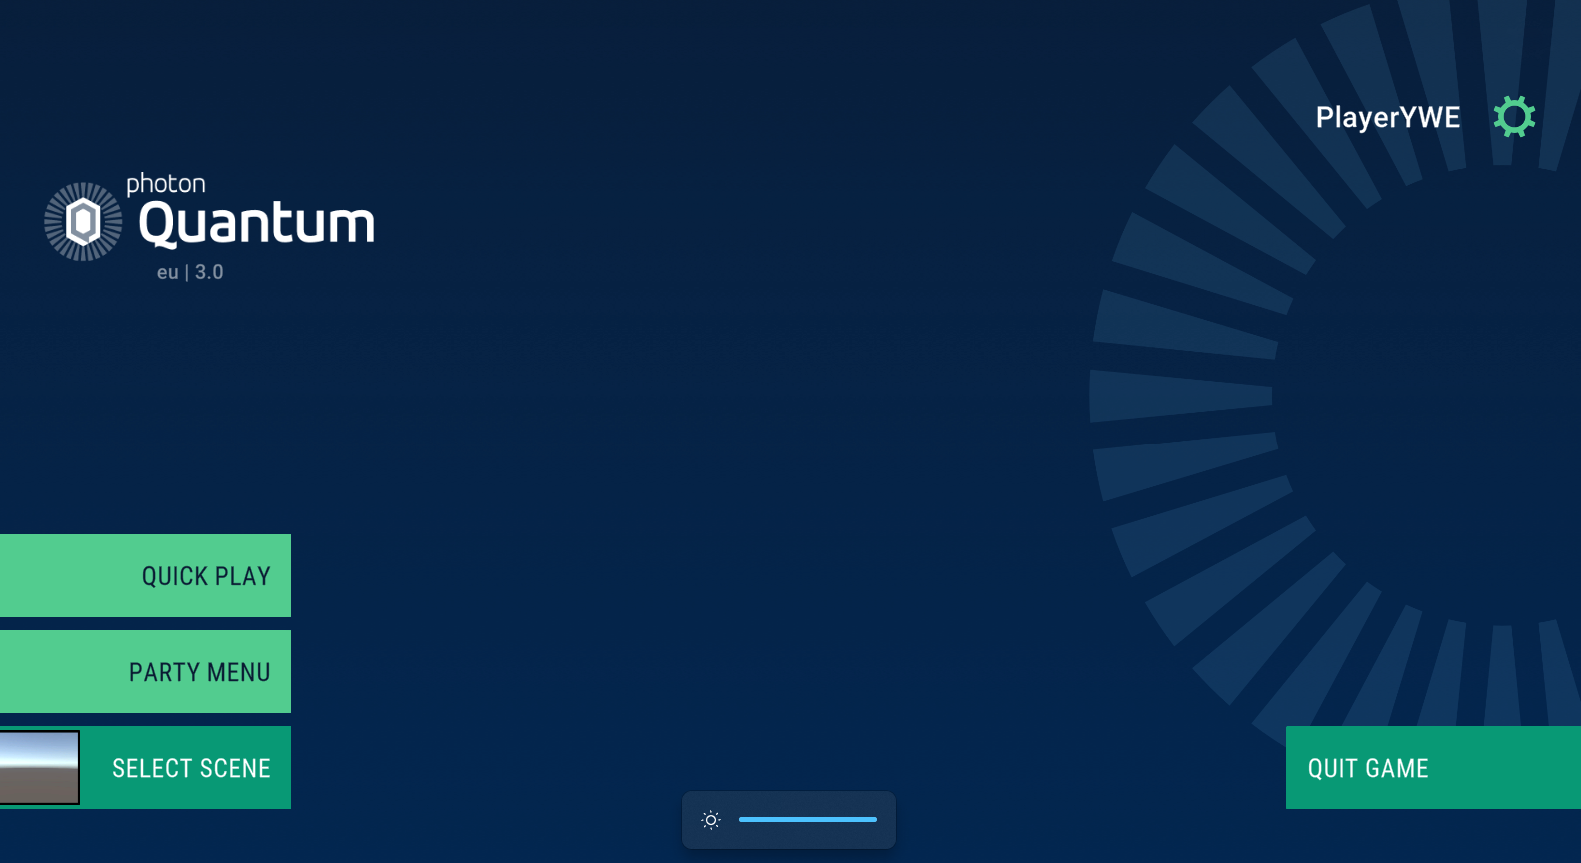
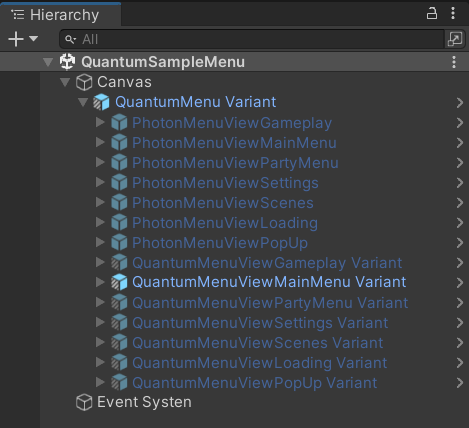
The sample menu is a scene with a menu prefab located within the samples folder. Within the menu prefab, there is a prefab for each screen.
Adding New Scenes
To make the scene selection screen work the menu needs to know information about available scenes.
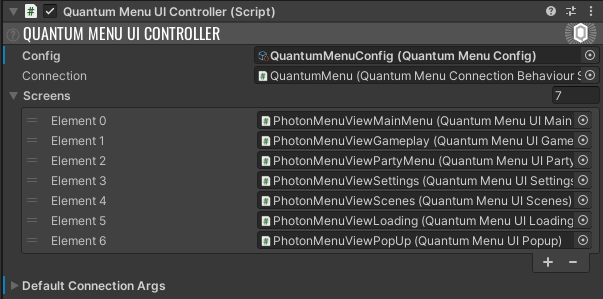
Create or select the QuantumMenuConfig asset and assign it to the QuantumMenuUIController script (which is part of the sample menu scene and QuantumMenu prefab).
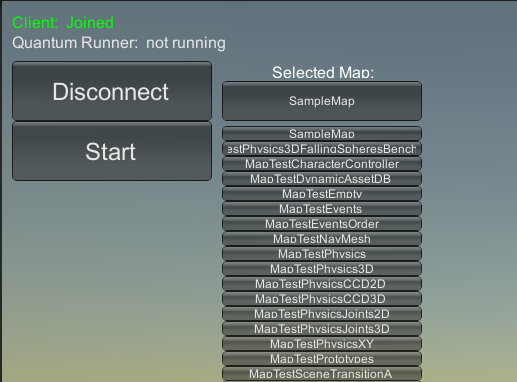
To add a scene that can be selected by the menu the first step is to have a Unity scene that contains a Quantum map like the initial QuantumGameScene.
Use that scene to configure a new entry in the AvailableScenes list of the QuantumMenuConfig asset.
Make sure to also place the scene into the Unity BuildSettings.
| Name | Description |
|---|---|
| Name | The displayed scene name. |
| ScenePath | Drag and drop the scene file here. |
| Preview | Drag and drop a texture to display as the scene preview, for example use QuantumMenuSpriteEmpty. |
| Map | Drag and drop the Quantum map asset that is used in the scene. |
| SystemsConfig | Drag and drop the Quantum SystemsConfig asset to be added to the RuntimeConfig when starting the game. |

There are two buttons that automate some of the process:
AddCurrentSceneToAvailableScenes: Tries to add the currently loaded scene as an available scene.
InitializeAllBuildSettingsScenes : Tries to add all scenes that are located in the Unity BuildSettings as available scenes.
Layout Overview
The sample menu contains a scene and a prefab located in the samples folder. The prefab encompasses all screen prefabs and is structured with a menu base class that references each individual screen. These screens inherit from QuantumMenuUIScreen offering various functionalities, for example, enabling users to incorporate animations when hiding and showing them.
Menu Customization
This section contains some suggestions on how to make modifications to the menu. Each of them has its own benefits and downsides.
Prototyping
The easiest way is to make modifications directly to the QuantumMenu prefab. However, all the changes could get lost during a Quantum SDK upgrade. The recommendation is that this option should only be used for experiments and prototyping.
Prefab Variants
To achieve a good tradeoff between customization and the ability to make upgrades, it is recommended to create a prefab variant from QuantumMenu. It is also a practical choice to create partial classes if it is necessary to add new members to classes, such as QuantumMenuUIMain, for example.
Prefab Creation
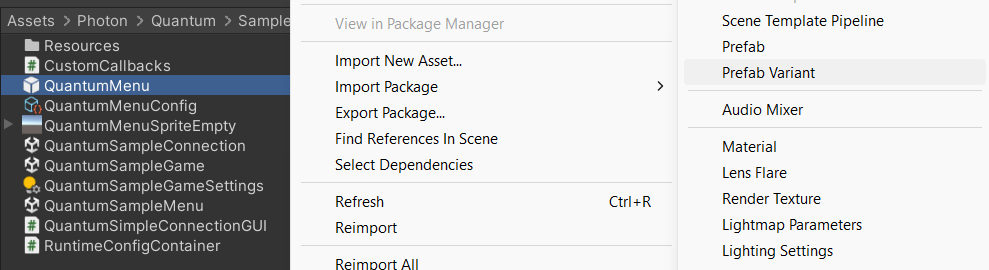
To create a prefab variant, locate the target prefab within the Assets/Photon/Quantum/Samples directory. Then, right-click on it and choose Create > Prefab Variant.
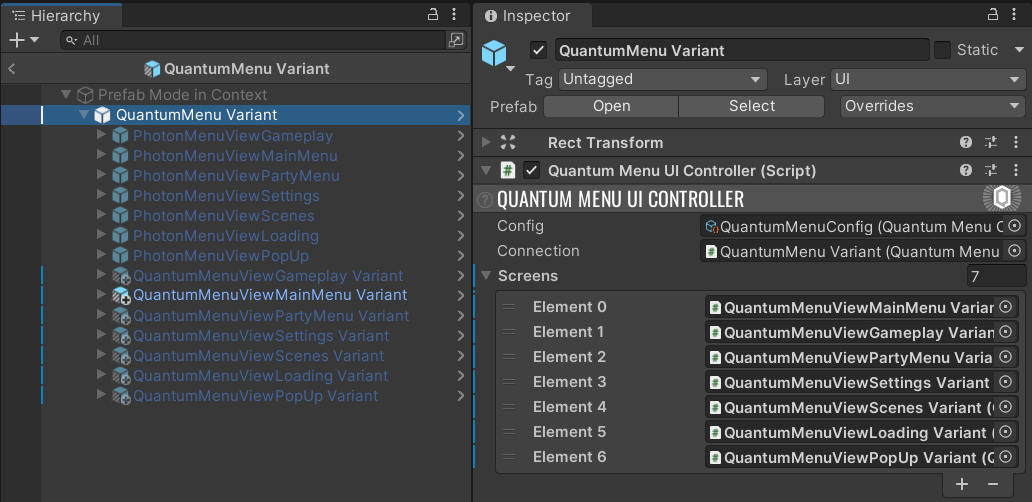
As this is a nested prefab, it will need to also create a variant for each of the screens inside QuantumMenu Variant. After that, change the screen references on QuantumMenuUiController.
Now, in the QuantumMenuScene, or in any other scene used as a menu, replace the original QuantumMenu prefab with its Variant. It's important to place it inside a Canvas for it to work properly.
Prefab Duplication
To customize the menu without losing your changes when upgrading Quantum, duplicating the QuantumMenu prefab is the easiest way. However, there will be no connection between your custom menu and the sample, so future updates will not be incorporated.
Constructing Screens
When you inherit from QuantumMenuUIScreen, your custom screen gains access to several valuable accessors. These include IQuantumMenuConfig, IQuantumMenuConnection, IQuantumMenuConnectArgs, and IQuantumMenuUIController, which may have useful information for your customization needs. Furthermore, it will also inherit the default Show and Hide methods. Use the Sample Menu API documentation for more information about constructing screen using sample menu framework,
Screen Plugin
It's a way to add widgets to screens like a plugin, so the same widget can be used by other screens without adding code to the base screen. By inheriting from QuantumMenuScreenPlugin, the plugin will receive calls to Show() and Hide(), as shown in the code snippet below. QuantumMenuScreenPluginPing is implemented in the PhotonMenuViewGameplay screen and can be used as an example.
C#
public class QuantumMenuScreenPluginFoo : QuantumMenuScreenPlugin {

    public override void Show(QuantumMenuUIScreen screen) {
      base.Show(screen);
    }

    public override void Hide(QuantumMenuUIScreen screen) {
      base.Hide(screen);
    }
}
Simple Connection
In case you wish to build your menu entirely custom, QuantumSampleConnection is a simplified scene that can be used as a reference to understand the key procedures necessary to start a session. In QuantumSimpleConnectionGUI, you can see the basics necessary to establish a connection, select the map, and start a session.
Extending RuntimePlayer data
By default, the RuntimePlayer class comes with a couple useful/common fields meant to speed up the prototyping process: PlayerNickname meant to store the name the player has set on the Menu and PlayerAvatar which is a reference to an Entity Prototype that represents a character that has a specific player and can be used to create an entity when the simulation starts, in some System's code.
Even though the name nickname is set via the Menu UI in runtime, the player avatar is not and it can be set either via code, or directly on the QuantumMenu GameObject in the QuantumMenuUIController component, on the ConnectArgs/RuntimePlayers array.
In order to add more player-specific data and have custom Menu logic that fills such data accordingly, follow the steps below:
- Find the file
RuntimePlayer.User.csand add the relevant fields as demonstrated:
C#
namespace Quantum
{
  using Photon.Deterministic;

  public partial class RuntimePlayer
  {
    public int TeamId;
  }
}
- Create a new class that inherits from
QuantumMenuConnectionBehaviourSDK, overrides theConnectAsyncInternal()method and adds the relevant data as demonstrated:
C#
namespace Quantum
{
  using Quantum.Menu;
  using System.Threading.Tasks;

  public class CustomQuantumConnectionBehaviour : QuantumMenuConnectionBehaviourSDK
  {
    protected override Task<ConnectResult> ConnectAsyncInternal(QuantumMenuConnectArgs connectArgs)
    {
      connectArgs.RuntimePlayers[0].TeamId = 1; // Add any game-specific logic for getting the desired team id here
      return base.ConnectAsyncInternal(connectArgs);
    }
  }
}
- On the Menu scene, find the
QuantumMenuobject and replace theQuantumMenuConnectionBehaviourSDKwithCustomQuantumConnectionBehaviour. Don't forget to add back the exact sameOnProgresscallback the previous script had; - On the same object, in the
QuantumMenuUIController, make a reference to the newly added component on the fieldConnection.