1 - Lobby
Connection to Server, Room Access and Creation
Let's first tackle the core of this tutorial, being able to connect to Photon Cloud server and join a Room or create one if necessary.
Create a new scene, and save it as
Launcher.unity.Create a new C# script
Launcher.Create an empty GameObject in the Hierarchy, named
LauncherAttach the C# script
Launcherto the GameObjectLauncher.Edit the C# script
Launcherto have its content as below
Coding Tip: if you are not copying and pasting (which is recommended, because if you do type everything, you will likely remember it better),
writing comments is very easy, type /// on the line above a method or a property and you'll have the script editor automatically create
a structured comment with for example the <summary> tag.
And then we can hit "Play".
You should see in the Unity Console a good dozen of logs.
Look specifically for "Connected to master server." log which indicated that indeed we are now connected and ready to join a room for example.
A good habits to have when coding is to always test potential failure.
Here we assume the computer is connected to the Internet, but what would happen if the computer isn't connected to the Internet?
Let's find out.
Turn off the Internet of your computer and play the Scene.
You should see in the Unity console an Error "Connect() to 'ns.exitgames.com' failed: System.Net.Sockets.SocketException: No such host is known".
Ideally, our script should be made aware of this issue and react elegantly to this situation and propose a responsive experience no matter what situation or problem could arise.
Let's now handle both of these cases and be informed within our Launcher script that we indeed connected or not to PUN Server.
This will be the perfect introduction to PUN Callbacks.
PUN CallBacks
PUN is very flexible with callbacks and offered three very different implementations.
Let's cover all three approaches for the sake of learning and we'll pick the one that fits best depending on the situation.
"Magic" Methods
When using a regular MonoBehaviour, one can actually simply create private methods.
C#
void OnConnectedToMaster()
{
    Debug.Log("DemoAnimator/Launcher: OnConnectedToMaster() was called by PUN");
}
It's magical because any MonoBehaviour can implement that method or any other message from PUN.
It's following the same principal as the main methods Unity is sending to MonoBehaviours like Awake() or Start().
However we are not going to use this, because if you misspell these 'Magic' methods, nothing will inform you about your error, so this is a very fast and practical implementation, but only when know exactly the name of each method and that you are well acquainted and expert in debugging techniques to quickly find this kind of issues.
Using IPunCallbacks and IPunObservable Interfaces
PUN is providing two C# Interfaces that you can implement in your class:
IPunObservable and IPunCallbacks.
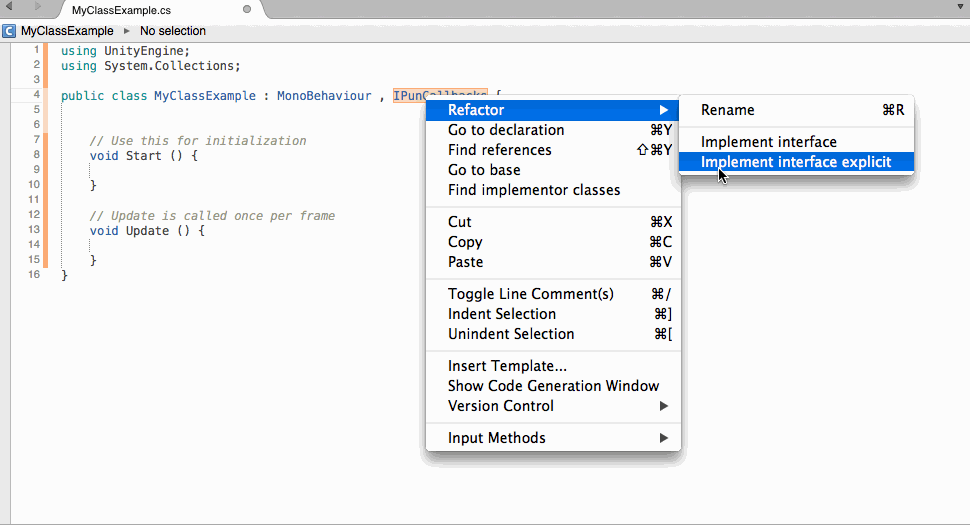
This is a very secure way to make sure a class complies to all the interface, but forces the developer to implement all the interface declarations.
Most good IDEs will make this task very easy, as demonstrated above when using MonoDevelop.
However, the script could end up with a lot of methods that may do nothing, yet all methods must be implemented for Unity compiler to be happy.
So this is really when your script is going to make heavy use of all or most PUN Features.
We are indeed going to use IPunObservable, further down the tutorial for data serialization.
Using Photon.PunBehaviour
The last technique, which is the one we'll be using often, is the most convenient one.
Instead of creating a class that derives from MonoBehaviour, we'll derive the class from Photon.PunBehaviour, as it exposes specific properties and virtual methods for us to use and override at our convenience.
It's very practical because we can be sure that we don't have any typos and we don't need to implement all methods.
Note: when overriding, most script editor will by default implement a base call and fill that up for you automatically, but in our case, we don't need to, so as a general rule for Photon.PunBehaviour, never call the base method.
Note: the other great benefit when overriding, is that you benefit from contextual helps by simply hovering over the method name.
So, let's put this in practice with OnConnectedToMaster() and OnDisconnectedFromPhoton() pun callbacks
Edit the C# script
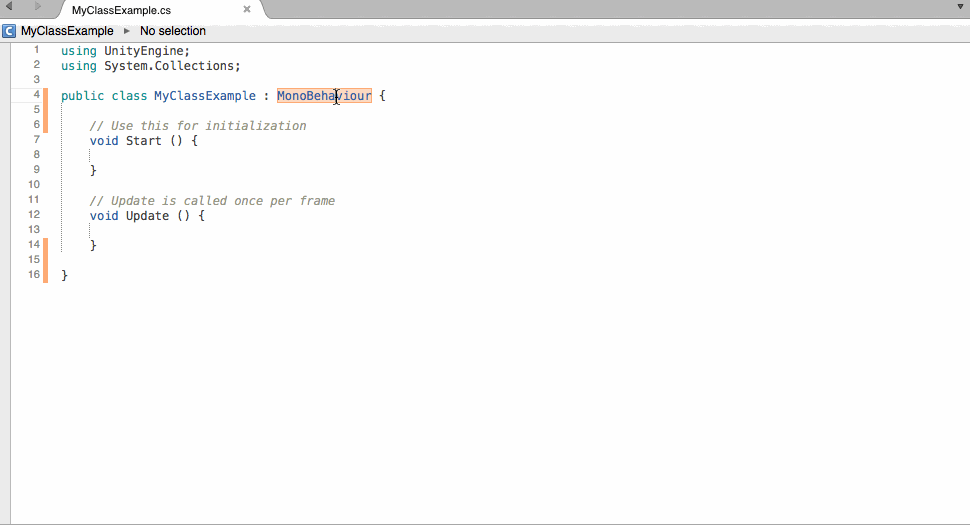
LauncherModify the base class from MonoBehaviour to Photon.PunBehaviour
C#
public class Launcher : Photon.PunBehaviour
{
Add the following two methods at the end of the class, within a region
Photon.PunBehaviour CallBacksfor clarity.C#
#region Photon.PunBehaviour CallBacks

public override void OnConnectedToMaster()
{
    Debug.Log("DemoAnimator/Launcher: OnConnectedToMaster() was called by PUN");
}

public override void OnDisconnectedFromPhoton()
{
    Debug.LogWarning("DemoAnimator/Launcher: OnDisconnectedFromPhoton() was called by PUN");
}

#endregion
Save
Launcherscript.
Now if we play this scene with or without Internet, we can take the appropriate steps to inform the Player and/or proceed further into the logic.
We'll deal with this in the next section when we'll start building the UI.
right now we'll deal with the successful connections:
So, we append to the OnConnectedToMaster() method the following call:
C#
// #Critical: The first we try to do is to join a potential existing room. If there is, good, else, we'll be called back with OnPhotonRandomJoinFailed()
PhotonNetwork.JoinRandomRoom();
As the comment says, we need to be informed if the attempt to join a random room failed, in which case we need to actually create a room, so we implement OnPhotonRandomJoinFailed() PUN callback in our script and create a room using PhotonNetwork.CreateRoom() and, you guessed already, the related PUN callback OnJoinedRoom() which will inform your script when we effectively join a room:
C#
public override void OnPhotonRandomJoinFailed (object[] codeAndMsg)
{
    Debug.Log("DemoAnimator/Launcher:OnPhotonRandomJoinFailed() was called by PUN. No random room available, so we create one.\nCalling: PhotonNetwork.CreateRoom(null, new RoomOptions() {maxPlayers = 4}, null);");
    // #Critical: we failed to join a random room, maybe none exists or they are all full. No worries, we create a new room.
    PhotonNetwork.CreateRoom(null, new RoomOptions() { MaxPlayers = 4 }, null);
}

public override void OnJoinedRoom()
{
    Debug.Log("DemoAnimator/Launcher: OnJoinedRoom() called by PUN. Now this client is in a room.");
}
Now if you run the scene and you should end up following the logical successions of connecting to PUN, attempting to join an existing room, else creating a room and join that newly created room.
At this point of the tutorial, since we have now covered the critical aspects of connecting and joining a room, there are few things not very convenient and they need to be addressed, sooner than later.
These are not really related to learning PUN, however important from an overall perspective.
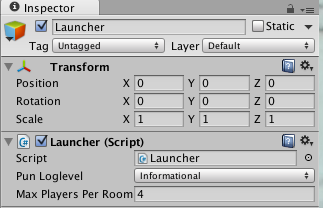
Expose variables in Unity Inspector
You may already know this, but in case you don't, MonoBehaviours automatically expose their public properties to the Unity Inspector.
This is a very important concept within Unity and in our case, we'll modify the way we define the LogLevel and make a public variable so that we can set that up without touching the code itself.
C#
/// <summary>
/// The PUN loglevel.
/// </summary>
public PhotonLogLevel Loglevel = PhotonLogLevel.Informational;
and in the Awake() we'll modify it as follow:
C#
// #NotImportant
// Force LogLevel
PhotonNetwork.logLevel = Loglevel;
So, now we don't force the script to be of a certain type of LogLevel, we simply need to set it in the Unity inspector and hit run, no need to open the script, edit it, save it, wait for Unity to recompile and finally run.
It's a lot more productive and flexible this way.
We'll do the same for the maximum number of players per room.
Hardcoding this within the code isn't the best practice, instead, let's make it as a public variable so that we can later decide and toy around with that number without the need for recompiling.
at the beginning of the class declaration, within the Public Variables region let's add:
C#
/// <summary>
/// The maximum number of players per room. When a room is full, it can't be joined by new players and so new room will be created.
/// </summary>
[Tooltip("The maximum number of players per room. When a room is full, it can't be joined by new players and so new room will be created")]
public byte MaxPlayersPerRoom = 4;
and then we modify the PhotonNetwork.CreateRoom() call and use this new public variable in place of the hardcoded number we were using before.
C#
// #Critical: we failed to join a random room, maybe none exists or they are all full. No worries, we create a new room.
PhotonNetwork.CreateRoom(null, new RoomOptions() { MaxPlayers = MaxPlayersPerRoom }, null);