Quantum Addressables Tutorial
Overview
In this tutorial you will reproduce the Quantum Addressables sample from a fresh Quantum project. The end result is a small multiplayer game with two gameplay scenes, each loaded through Unity Addressables, each spawning a different prototype that is also loaded through Addressables. The simulation code is intentionally minimal, a single component and a single system, so the Addressables integration stays the visible lesson.
This tutorial assumes you are comfortable with the Quantum Hub, the DSL, and basic ECS authoring. If any of those are new, work through the Asteroids Tutorial first. Familiarity with Unity Addressables is helpful but not required, the relevant concepts are introduced in step 4.
1. Project Setup
Create a fresh Unity project with Quantum installed and install the Addressables package.
- Open
"Window > Package Manager", switch to the Unity Registry, search for "Addressables", and install it. - Open
"Window > Asset Management > Addressables > Groups". Click Create Addressables Settings. This generatesAssets/AddressableAssetsData/and the default profile.
2. Author the Simulation
The simulation has three pieces: a DSL component, an extension to RuntimeConfig, and a system that creates prototypes.
Create Assets/QuantumUser/Simulation/Game.qtn and define the Spawner component:
Qtn
component Spawner {
    AssetRef<EntityPrototype> ToSpawn;
    FrameTimer                Timer;
    Int32                     Count;
}
Open Assets/QuantumUser/Simulation/RuntimeConfig.User.cs and add two AssetRef<EntityPrototype> fields. These will be set per-scene from QuantumMenuSceneInfo assets in step 7.
C#
namespace Quantum
{
    using Photon.Deterministic;

    partial class RuntimeConfig
    {
        public AssetRef<EntityPrototype> SpawnerPrototype;
        public AssetRef<EntityPrototype> Prototype;

        partial void SerializeUserData(BitStream stream)
        {
            stream.Serialize(ref SpawnerPrototype);
            stream.Serialize(ref Prototype);
        }
    }
}
Create Assets/QuantumUser/Simulation/Systems/SpawnerSystem.cs. The system creates one spawner entity on init from RuntimeConfig.SpawnerPrototype, configures it to emit RuntimeConfig.Prototype, and then spawns one prototype per second around the origin.
C#
namespace Quantum
{
    using Photon.Deterministic;

    public unsafe class SpawnerSystem : SystemMainThreadFilter<SpawnerSystem.Filter>
    {
        public struct Filter
        {
            public EntityRef Entity;
            public Spawner* Spawner;
        }

        public override void OnInit(Frame f)
        {
            EntityRef entity = f.Create(f.RuntimeConfig.SpawnerPrototype);
            Spawner* spawner = f.Unsafe.GetPointer<Spawner>(entity);
            spawner->ToSpawn = f.RuntimeConfig.Prototype;
            spawner->Timer = FrameTimer.FromSeconds(f, 1);
        }

        public override void Update(Frame f, ref Filter filter)
        {
            if (filter.Spawner->Timer.IsRunning(f) == false)
            {
                EntityRef entity = f.Create(filter.Spawner->ToSpawn);
                Transform3D* transform = f.Unsafe.GetPointer<Transform3D>(entity);
                FPVector2 targetPos = f.RNG->InUnitCircle();
                transform->Position = new FPVector3(targetPos.X, 1, targetPos.Y);

                filter.Spawner->Timer = FrameTimer.FromSeconds(f, 1);
            }
        }
    }
}
Register the system in Assets/QuantumUser/Simulation/SystemSetup.User.cs or add it to DefaultConfigSystem:
C#
namespace Quantum
{
    public static partial class DeterministicSystemSetup
    {
        static partial void AddSystemsUser(ICollection<SystemBase> systems, RuntimeConfig gameConfig, SimulationConfig simulationConfig, SystemsConfig systemsConfig)
        {
            systems.Add(new SpawnerSystem());
        }
    }
}
3. Author Prototypes and Views
Create the entity prototypes that reference them.
- Create
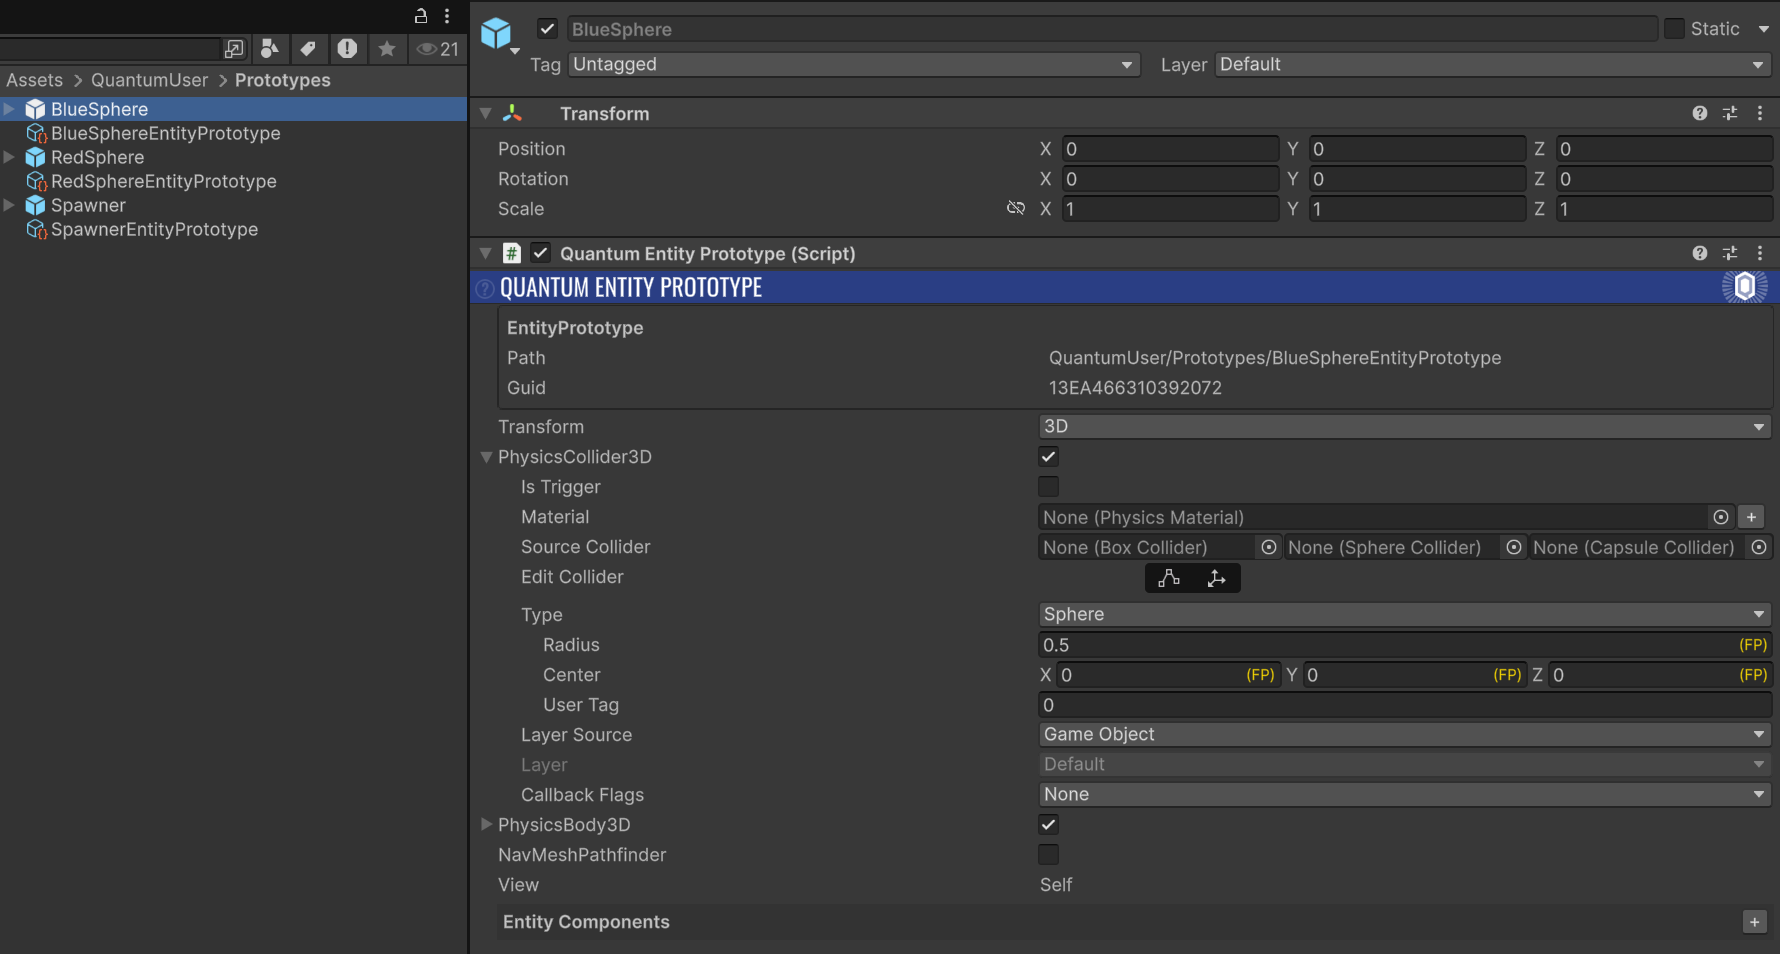
Assets/QuantumUser/Prototypes/RedSphere.prefab. It should contain a primitive Sphere ("GameObject > 3D Object > Sphere"), aQuantumEntityPrototypeand aQuantumEntityViewcomponent, and a red material. Repeat forBlueSphere.prefabwith a blue material. - Create
Assets/QuantumUser/Prototypes/Spawner.prefab. Add theQuantumEntityPrototypeandSpawnercomponent. LeaveToSpawnempty, the system fills it at runtime fromRuntimeConfig.Prototype.
Adding QuantumEntityPrototype to each prefab triggers the Quantum codegen to emit a sibling .qprototype data asset (RedSphereEntityPrototype.qprototype, BlueSphereEntityPrototype.qprototype, SpawnerEntityPrototype.qprototype). These are the assets the simulation actually loads through AssetRef<EntityPrototype>.
4. Mark Assets as Addressable
Open "Window > Asset Management > Addressables > Groups". Create two new groups by right-clicking in the Groups window and choosing "Create New Group > Packed Assets":
QuantumPrototypes, for the.qprototypefiles and view prefabs;QuantumMap, for theMapand mesh assets you'll create in step 5.
Drag All prototype files into the QuantumPrototypes group. Edit the address strings to be readable: prototypes/RedSphere, prototypes/BlueSphere and so on.

NOTE: Group names are organisational only. The Quantum SDK queries by label, not by group. We'll set the literal label in step 6.
After populating the group, force a reimport on Assets/QuantumUser/Resources/QuantumUnityDB.qunitydb ("Right-click > Reimport"). The DB importer rebinds each Addressables-marked asset to a QuantumAssetObjectSourceAddressable source.
5. Author Maps and Gameplay Scenes
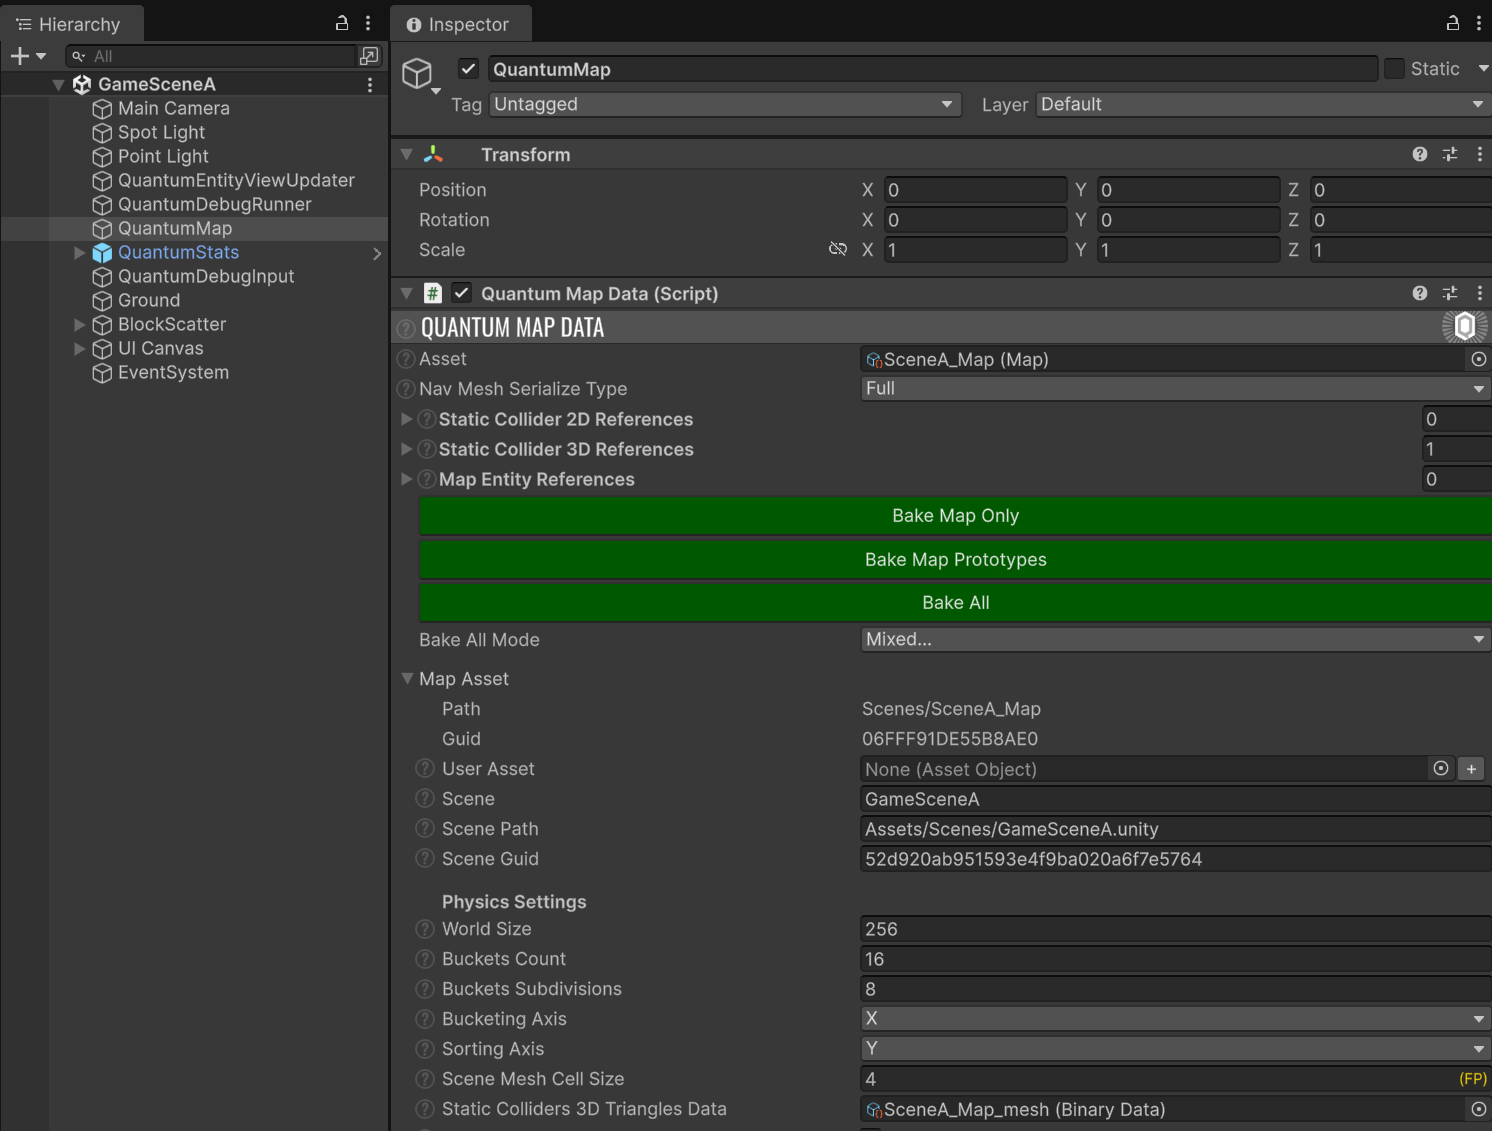
Create one Map asset per gameplay scene. Right-click in Assets/QuantumUser/Scenes/ and choose "Create > Quantum > Map". Name them SceneA_Map.asset and SceneB_Map.asset. In each map's inspector, set the Scene field to the matching scene's filename without the .unity extension: GameSceneA and GameSceneB.
Create GameSceneA.unity (under Assets/Scenes/ right click to "Create > Quantum > Scene"). The scene must contain a QuantumMapData component referencing SceneA_Map.asset (AutoFindMapData = true);
Repeat for GameSceneB.unity with SceneB_Map.asset.
6. Tag Scenes with the QuantumScenes label
Back in "Window > Asset Management > Addressables > Groups", create a third group named QuantumScenes and drag both gameplay scenes into it.
Open the labels manager via "Tools > Manage Labels..." (or the Labels column dropdown on a scene entry). Add a new label literally named QuantumScenes. Tick that label on the row for GameSceneA.unity and GameSceneB.unity.
Open "File > Build Settings". Remove GameSceneA.unity and GameSceneB.unity from the Scenes In Build list. Only MainMenu.unity (which we'll create in step 9) should remain there once we're done.

The label string is exact. Variants like QuantumScene (singular) or quantumscenes (lowercase) will not be picked up Addressables.LoadResourceLocationsAsync queries the literal QuantumScenes. A typo here silently makes scene loading fall back to SceneManager, which fails because the scene isn't in Build Settings.
7. Wire QuantumMenuSceneInfo
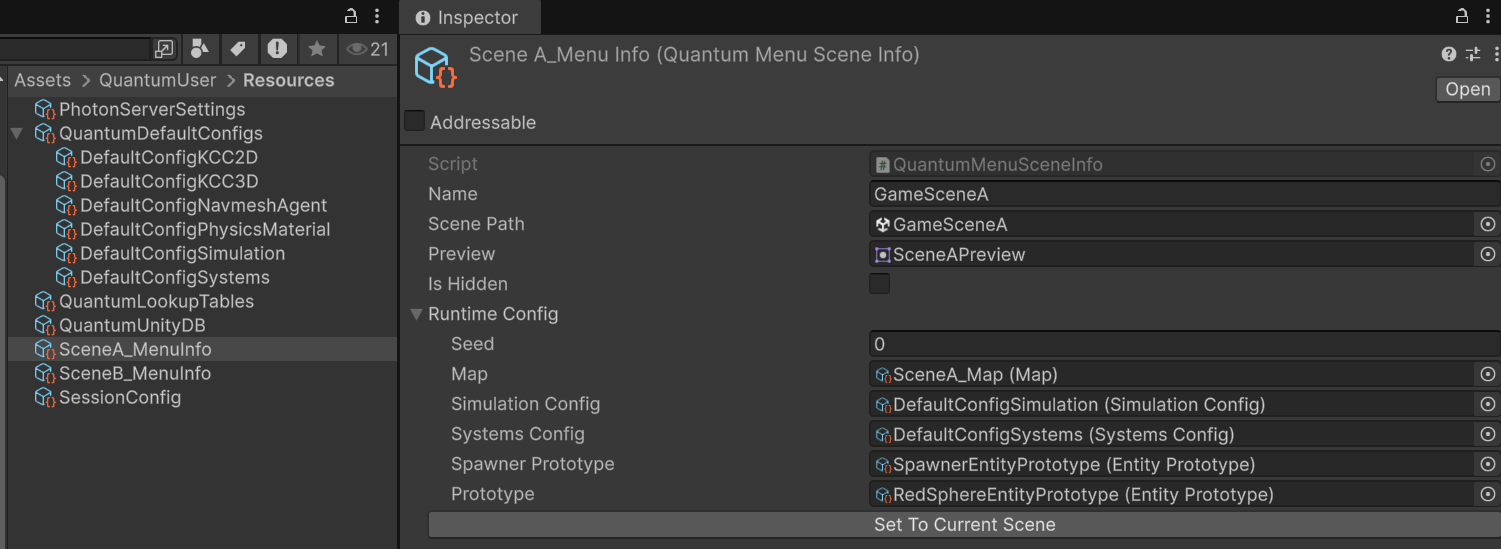
The Quantum Menu's scene picker auto-discovers QuantumMenuSceneInfo assets via Resources.LoadAll<QuantumMenuSceneInfo>(""). Drop one per gameplay scene under Resources/.
- Right-click in
Assets/QuantumUser/Resources/and choose"Create > Quantum > Menu > Scene Info". Name the assetSceneA_MenuInfo.asset. Set:Name→Red SpheresScenePath→Assets/QuantumUser/Scenes/GameSceneA.unityPreview→ leave empty for now- Expand the embedded
RuntimeConfig. SetMaptoSceneA_Map.asset,SpawnerPrototypetoSpawnerEntityPrototype.qprototype,PrototypetoRedSphereEntityPrototype.qprototype.
- Repeat for
SceneB_MenuInfo.assetwithName = Blue Spheres,ScenePath = GameSceneB.unity,Map = SceneB_Map.asset, andPrototype = BluesphereEntityPrototype.qprototype. TheSpawnerPrototypeis the same in both.
NOTE: When the host picks a scene, its RuntimeConfig is JSON-cloned to all clients before SessionRunner.StartAsync.
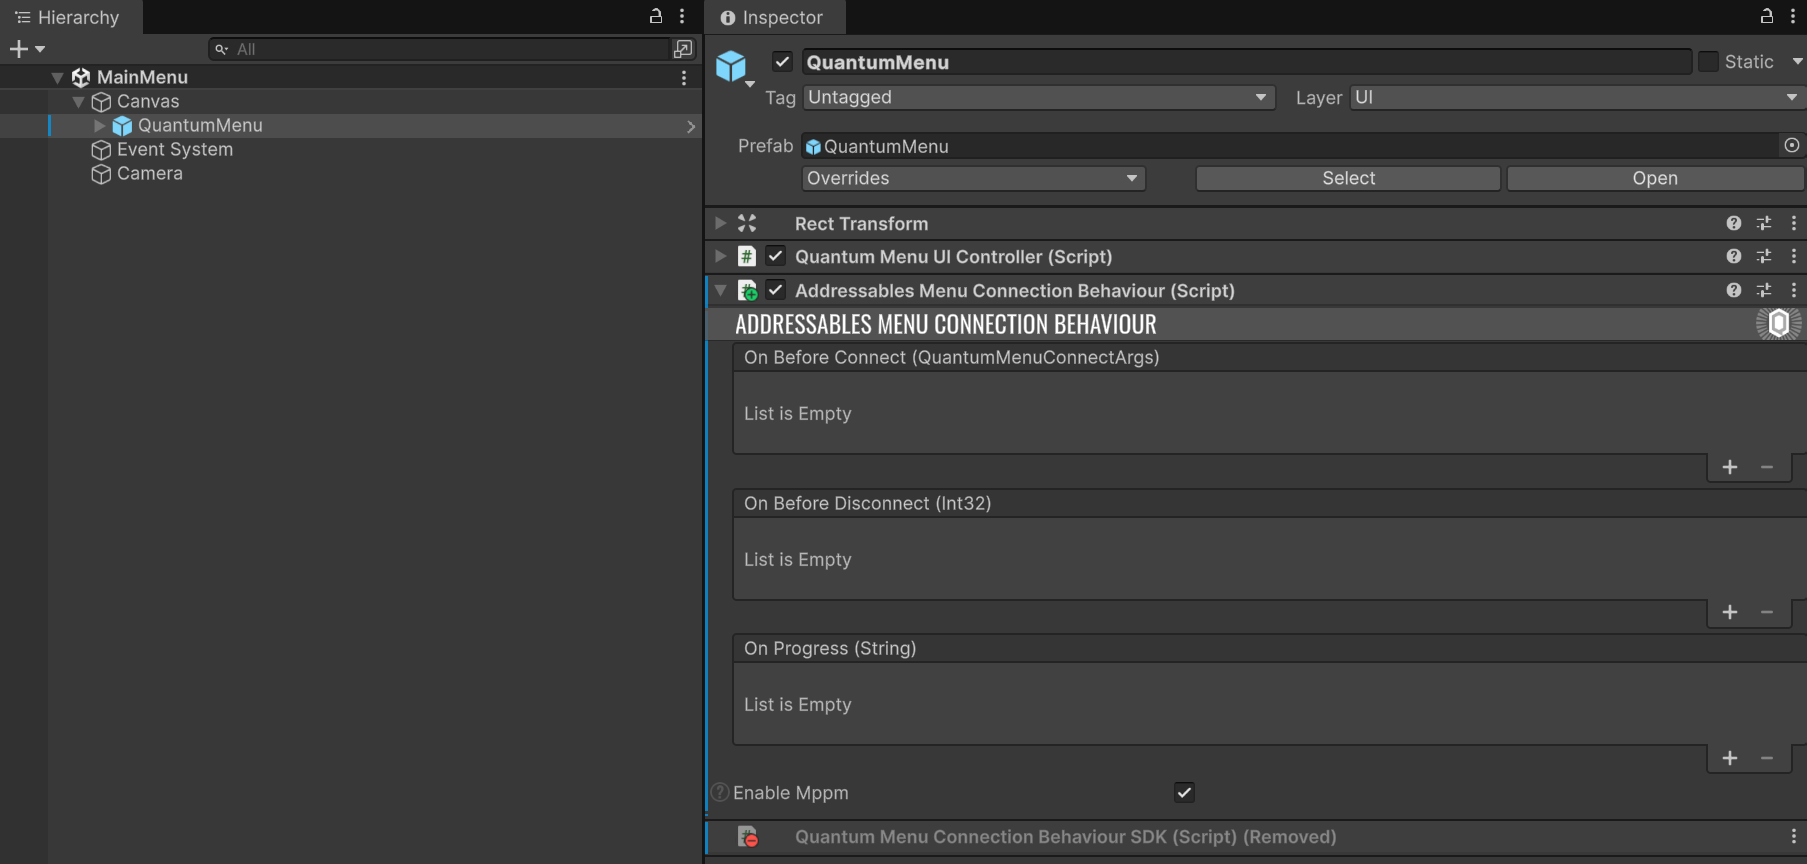
8. Custom Connection Behaviour
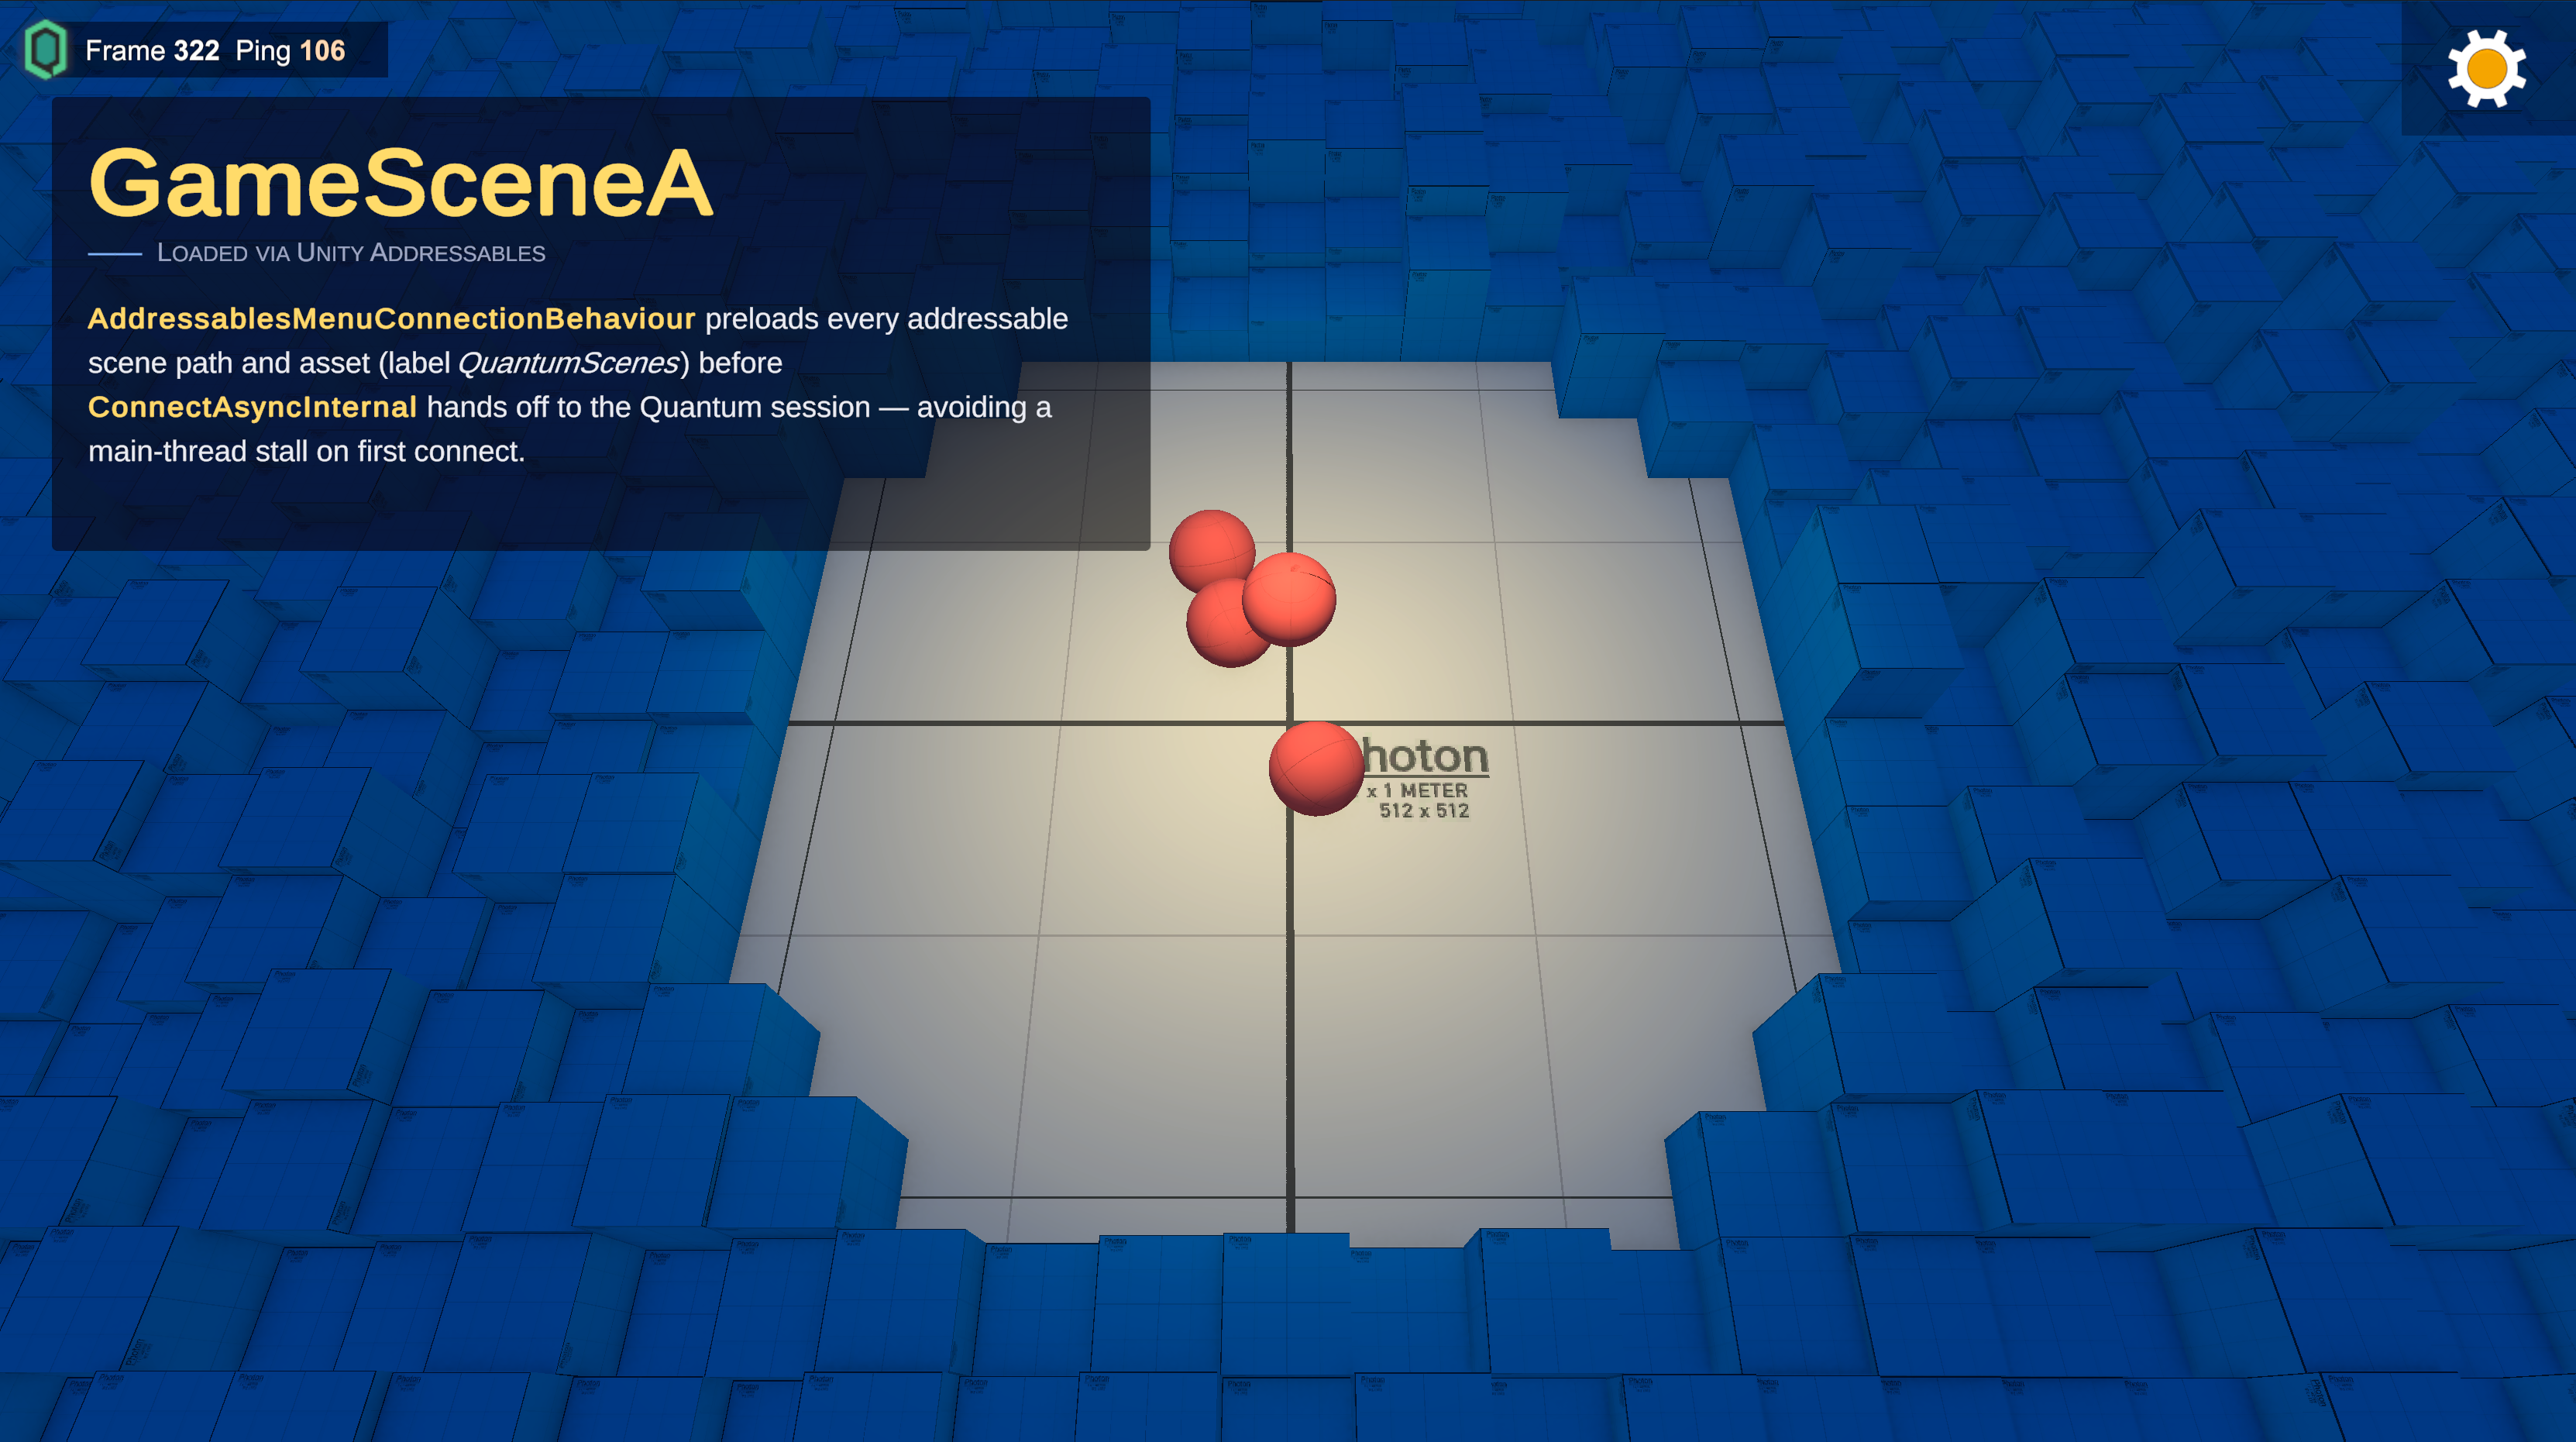
The Quantum Menu does not preload Addressables on its own. We need to inject the preload step so that when the simulation asks for an AssetRef<T>, the asset is already in memory. The hook is QuantumMenuConnectionBehaviourSDK.ConnectAsyncInternal, an async Task method that runs once when the user clicks Start on the menu, before any Photon connection happens.
Create Assets/QuantumUser/Scripts/AddressablesMenuConnectionBehaviour.cs:
C#
namespace Quantum.Sample
{
    using System.Linq;
    using System.Threading.Tasks;
    using Quantum;
    using Quantum.Menu;
    using UnityEngine;
    using UnityEngine.AddressableAssets;

    public class AddressablesMenuConnectionBehaviour
        : QuantumMenuConnectionBehaviourSDK
    {
        protected override async Task<ConnectResult> ConnectAsyncInternal(
            QuantumMenuConnectArgs connectArgs)
        {
            Task scenePathsTask =
                QuantumCallbackHandler_UnityCallbacks.LoadAddressableScenePathsAsync();

            Task[] assetTasks = QuantumUnityDB.Global.Entries
                .Where(e => e.Source is QuantumAssetObjectSourceAddressable)
                .Select(e =>
                {
                    var src = (QuantumAssetObjectSourceAddressable)e.Source;
                    Debug.Log($"Preloading {src.RuntimeKey} Addressable type: {src.AssetType}");
                    return Addressables.LoadAssetAsync<UnityEngine.Object>(src.RuntimeKey).Task;
                })
                .ToArray();

            await Task.WhenAll(assetTasks.Append(scenePathsTask));
            return await base.ConnectAsyncInternal(connectArgs);
        }
    }
}
A few notes on the design:
- Why
ConnectAsyncInternaland notOnStart. We preload concurrently before matchmaking even starts, which means the user perceives one continuous "connecting..." stage instead of a stall after the room joins. Task.WhenAllfor parallel async, everyLoadAssetAsyncreturns aTaskthat we accumulate into an array. Joining them withTask.WhenAllkeeps the main thread responsive while N Addressable handles resolve concurrently.- Pre-resolving scene paths,
LoadAddressableScenePathsAsynctriggers the SDK's lazy scene-path lookup (theQuantumSceneslabel query). Caching those paths here meansAutoLoadSceneFromMaplater in the flow can resolve the scene synchronously. - Chaining to the SDK,
await base.ConnectAsyncInternal(connectArgs)runs the standard menu connection flow after the preload finishes (AppId validation, matchmaking, runner start). Anything you don't override stays default.
9. Clone the Menu Scene
Locate Assets/Photon/QuantumMenu/QuantumSampleMenu.unity in the Project window. Press Ctrl+D to duplicate it, then drag the copy to Assets/Scenes/MainMenu.unity. The clone now lives under user-owned content and is safe from SDK upgrades.
Open MainMenu.unity. In the Hierarchy, find the GameObject carrying the QuantumMenuConnectionBehaviourSDK component (typically named Connection inside the menu prefab). Replace that component with AddressablesMenuConnectionBehaviour:
- With the GameObject selected, click the gear icon on
QuantumMenuConnectionBehaviourSDKand choose Remove Component. - Click Add Component and add
AddressablesMenuConnectionBehaviour. - Re-wire any inspector references the original component had (most of them are auto-resolved by the menu prefab).
Add MainMenu.unity to "File > Build Settings" at index 0. Confirm the Scenes In Build list contains only MainMenu.unity.
N.B.: Don't edit Assets/Photon/QuantumMenu/QuantumSampleMenu.unity directly. Anything under Assets/Photon/ is overwritten on SDK upgrade.
10. Verify the Sample
A short play-mode pass confirms the integration end-to-end.
- Open
MainMenu.unityand press Play. The Quantum Menu loads and the scene picker shows two entries: Red Spheres and Blue Spheres. - Select Red Spheres and press Start. Watch the Console:
ConnectAsyncInternallogs each Addressable being preloaded (Preloading <key> Addressable type: ...). - Stop, re-enter Play, pick Blue Spheres. A different ground appears and blue spheres spawn. This confirms scene swap and prototype swap both work through Addressables.
Where to go next
This tutorial built the integration shape but stopped at the minimum viable sample. The next step depends on what you're optimising for.
Quantum Manual
Two manual pages cover the Quantum-side surface area in detail:
- Extending Assets the
IQuantumAssetObjectSourcecontract and howQuantumUnityDBresolves entries. - Assets in Unity how the editor importer assembles the
.qunitydband how Resources / Addressables sources are detected.
Other Quantum Samples
- Quantum Mini Golf A 2 player turn-based mini-golf game and implements several turn-based features..
- Overview
- 1. Project Setup
- 2. Author the Simulation
- 3. Author Prototypes and Views
- 4. Mark Assets as Addressable
- 5. Author Maps and Gameplay Scenes
- 6. Tag Scenes with the QuantumScenes label
- 7. Wire QuantumMenuSceneInfo
- 8. Custom Connection Behaviour
- 9. Clone the Menu Scene
- 10. Verify the Sample
- Where to go next