3 - Movement & Camera
概述
在第3部分中,透過新增基於玩家輸入的玩家移動,和跟隨正確玩家物件的第一人稱相機,來擴展現有場景。
玩家移動
在Fusion中,更新每個刷新(如移動)的遊戲遊玩程式碼不應在Update / FixedUpdate中運行。取而代之地,應該使用FixedUpdateNetwork。這樣可以確保移動是平滑的,並在所有客戶端上正確內插補點。
建立一個新的指令碼並將其命名為PlayerMovement,然後將以下程式碼新增到指令碼中:
C#
using Fusion;
using UnityEngine;

public class PlayerMovement : NetworkBehaviour
{
    private CharacterController _controller;

    public float PlayerSpeed = 2f;

    private void Awake()
    {
        _controller = GetComponent<CharacterController>();
    }

    public override void FixedUpdateNetwork()
    {
        // Only move own player and not every other player. Each player controls its own player object.
        if (HasStateAuthority == false)
        {
            return;
        }

        Vector3 move = new Vector3(Input.GetAxis("Horizontal"), 0, Input.GetAxis("Vertical")) * Runner.DeltaTime * PlayerSpeed;

        _controller.Move(move);

        if (move != Vector3.zero)
        {
            gameObject.transform.forward = move;
        }
    }
}
請注意,它繼承自NetworkBehaviour而不是MonoBehaviour,後者提供了FixedUpdateNetwork,並允許稍後使用Networked Properties。
HasStateAuthority可用於檢查客戶端是否控制物件。NetworkTransform只將來自StateAuthority的更改同步到其他所有人。如果另一個客戶端更改了物件的位置,則該更改將僅為本機更改,並在未來被來自網路的資料覆寫。
對於固定更新網路中運行的程式碼,始終使用Runner.DeltaTime!
處理按鈕按下
在Update期間,在Unity中引發一次性輸入,如GetButtonDown和上。在Fusion中,諸如移動之類的遊戲遊玩程式碼應該在FixedUpdateNetwork中執行。這意味著需要特殊處理才能準確追蹤按鈕狀態。
請注意,在固定更新中檢查按鈕按下時也會出現相同的問題。
有多種方法可以捕捉輸入,如FixedUpdateNetwork中的輸入:
- 在
Update中査詢向下按鈕。將結果儲存在布林值中,並將其用於遊戲邏輯。在FixedUpdateNetwork的末尾將其清除。 - 使用Fusion的網路輸入與
NetworkButtons。 - 使用新的Unity輸入系統,將
Update Mode設定為Manual Update,並調用FixedUpdateNetwork中的InputSystem.Update。
以上選項僅適用於共享模式。在伺服器/主機端模式下運行Fusion時,請始終使用網路輸入。
跳躍
讓我們透過為玩家執行跳躍動作,來執行一個處理按鈕按下的示例。在這個案例下,將使用上一章節中列出的選項中的選項1。
將玩家移動指令碼中的程式碼替換為以下內容:
C#
using Fusion;
using UnityEngine;

public class PlayerMovement : NetworkBehaviour
{
    private Vector3 _velocity;
    private bool _jumpPressed;

    private CharacterController _controller;

    public float PlayerSpeed = 2f;

    public float JumpForce = 5f;
    public float GravityValue = -9.81f;

    private void Awake()
    {
        _controller = GetComponent<CharacterController>();
    }

    void Update()
    {
        if (Input.GetButtonDown("Jump"))
        {
            _jumpPressed = true;
        }
    }

    public override void FixedUpdateNetwork()
    {
        // Only move own player and not every other player. Each player controls its own player object.
        if (HasStateAuthority == false)
        {
            return;
        }

        if (_controller.isGrounded)
        {
            _velocity = new Vector3(0, -1, 0);
        }

        Vector3 move = new Vector3(Input.GetAxis("Horizontal"), 0, Input.GetAxis("Vertical")) * Runner.DeltaTime * PlayerSpeed;

        _velocity.y += GravityValue * Runner.DeltaTime;
        if (_jumpPressed && _controller.isGrounded)
        {
            _velocity.y += JumpForce;
        }
        _controller.Move(move + _velocity * Runner.DeltaTime);

        if (move != Vector3.zero)
        {
            gameObject.transform.forward = move;
        }

        _jumpPressed = false;
    }
}
此程式碼為KCC新增了跳躍功能和速度/重力處理。
_jumpPressed用於追蹤按鈕狀態。每次更新都會輪詢該按鈕,以確保不會錯過按下按鈕,並在固定更新網路結束時重新設定該按鈕。
C#
if (_controller.isGrounded)
{
    _velocity = new Vector3(0, -1, 0);
}
用於確保KCC即使在小斜坡上行走時也能固定在地面上,並且只有跳躍才能讓玩家離開地面。
遊玩測試
準備好PlayerMovement指令碼後,返回Unity並將PlayerMovement元件新增到PlayerCharacter預製件中。
現在是時候測試玩家的移動了。為了有兩個可用的客戶端,首先要建立一個Unity組建。
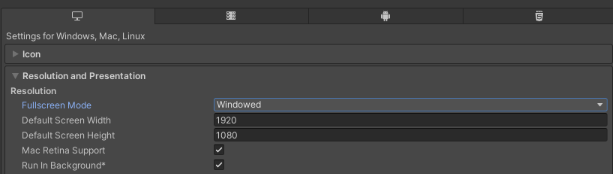
請前往File > Build Settings並將目前場景新增到清單中。然後按下視窗左下角的Player Settings按鈕。
在Player Settings的Resolution and Presentation下,將Fullscreen Mode設定為Windowed,並確保勾選Run In Background。
返回Build Settings視窗,選擇Build and Run以建立一個組建。完成組建後,在Unity中進入遊玩模式,這樣就有兩個客戶端可用。
在兩個客戶端上,按下Start Shared Client按鈕。出現了兩個玩家,每個玩家都由其中一個客戶端控制。測試一下四處走動和跳躍是否有效。
相機
為了完成玩家設定,讓我們新增一個相機。
有許多設定相機的方法(第三人稱、第一人稱等)和不同的執行方法。在多人玩家遊戲中,通常需要一個跟隨本機玩家物件的相機。有兩種常見的方法來實現這一點。
- 當生成本機玩家物件時,讓它具現化一個相機。
- 將相機作為場景的一部分。當生成本機玩家物件時,讓它將相機附加到自己身上。
在本教學中,使用了第二種方法。
建立一個新的指令碼,並將其命名為FirstPersonCamera。向其中新增以下程式碼:
C#
using UnityEngine;

public class FirstPersonCamera : MonoBehaviour
{
    public Transform Target;
    public float MouseSensitivity = 10f;

    private float verticalRotation;
    private float horizontalRotation;

    void LateUpdate()
    {
        if (Target == null)
        {
            return;
        }

        transform.position = Target.position;

        float mouseX = Input.GetAxis("Mouse X");
        float mouseY = Input.GetAxis("Mouse Y");

        verticalRotation -= mouseY * MouseSensitivity;
        verticalRotation = Mathf.Clamp(verticalRotation, -70f, 70f);

        horizontalRotation += mouseX * MouseSensitivity;

        transform.rotation = Quaternion.Euler(verticalRotation, horizontalRotation, 0);
    }
}
這是一個非常簡單的第一人稱相機實作。請注意,該程式碼不包含任何多人玩家遊戲元素。您可以將此相機替換為適用於目標物件(包括Cinemachine)的任何其他相機設定。
將FirstPersonCamera行為放在場景中的MainCamera遊戲物件上。不需要在目標中拖曳。目標將在運行階段由程式碼設定。

為了指派目標,請開啟PlayerMovement指令碼。新增一個變數來儲存相機:
C#
public Camera Camera;
然後,當生成玩家物件時,如果它是本機玩家,請找到並設定相機。
C#
public override void Spawned()
{
    if (HasStateAuthority)
    {
        Camera = Camera.main;
        Camera.GetComponent<FirstPersonCamera>().Target = transform;
    }
}
初始化NetworkObjects時,請確保始終使用Spawned而不是Awake/Start。在Awake/Start中,NetworkObject可能尚未準備好使用。
HasStateAuthority僅在玩家控制的物件為真,因此僅適用於本機玩家物件,而不適用於其他玩家物件。
最後,由於在第一人稱遊戲中,玩家角色在觀看方向上移動,請稍微調整一下移動。將計算Vector3 move的行替換為:
C#
Quaternion cameraRotationY = Quaternion.Euler(0, Camera.transform.rotation.eulerAngles.y, 0);
Vector3 move = cameraRotationY * new Vector3(Input.GetAxis("Horizontal"), 0, Input.GetAxis("Vertical")) * Runner.DeltaTime * PlayerSpeed;
下一章是 共享模式基礎4 - 網路屬性
Back to top