Creating Navmesh Agents
Navmesh agent functionality is split into multiple components.
NavMeshPathfinder: performs multi-threaded path-finding, stores waypoints and waypoint progressionNavMeshSteeringAgent: performs agent steering computing acceleration, speed, rotation velocity and breakingNavMeshAvoidanceAgent: allows agents to avoid each otherNavMeshAvoidanceObstacle: makes the entity avoidable byNavMeshAvoidanceAgent
Agent components work with either a Transform2D or a Transform3D component.
All components share one config NavMeshAgentConfig asset.
They can be combined for different use cases.
| Complete | Pathfinder, SteeringAgent and AvoidanceAgent | Entities with all three components can find paths, move along them and dynamically avoid other agents. |
| No avoidance | Pathfinder and SteeringAgent | No avoidance code will be executed and the components do not store any avoidance relevant data.
SimulationConfig.Navigation.EnableAvoidance can be toggled off to save more CPU time. |
| Custom movement | Pathfinder and SteeringAgent | The agent can find and store paths but the steering agents are disabled by implementing the movement signal ISignalOnNavMeshMoveAgent in a custom system (caveat: the callback is only executed when the agents actually have a target).
The NavMeshAgentConfig.MovementType is set to Callback.
SimulationConfig.Navigation.EnableNavigationCallbacks must be enabled. |
| Custom movement but with avoidance | Pathfinder, SteeringAgent and AvoidanceAgent | Addition to the requirements from Custom movement as the desiredDirection parameter from the ISignalOnNavMeshMoveAgent includes the avoidance altered movement direction. |
| Path-find only | Pathfinder | The agent performs path-finding and waypoints storing and progression. Steering, avoidance and movement are handled in a custom system.
Requires the setting from Custom movement
For the waypoint progression to work without the steering component information about how fast the agent is approaching a waypoint is required. NavMeshPathfinder.WaypointDetectionDistanceSqr must be set each frame. |
Creating an Agent with Entity Prototypes
The tutorial expects a Unity scene with a Quantum setup including a baked Quantum navmesh (see Importing A Unity Navmesh).
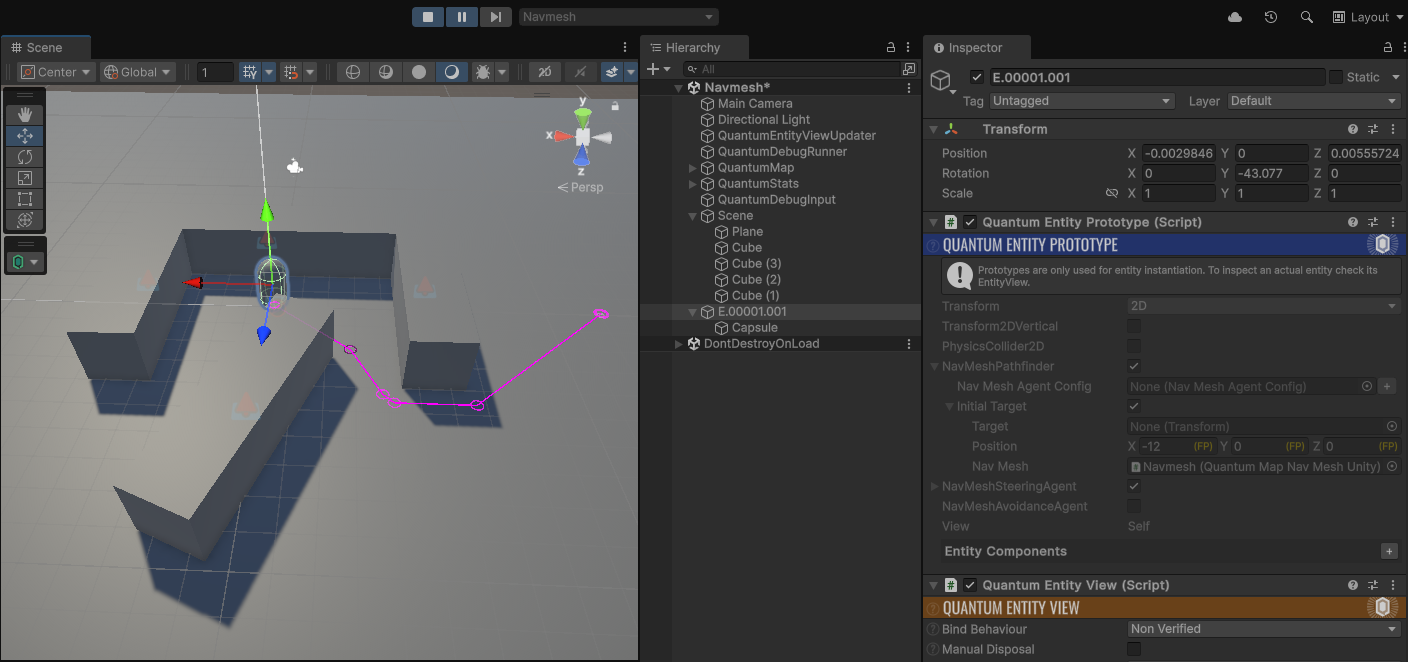
- Create a Quantum prototype in the scene:
GameObject > Quantum > Empty Entity - Select the
QuantumEntityPrototypeand setTransformto2D - Select the
QuantumEntityPrototypeand enableNavMeshPathfinder- Unfold
NavMeshPathfinder.Initial Targetand set a worldPosition - In
NavMeshfor theInitial Target, select the baked Quantum navmesh asset - Optionally assign a
NavMeshAgentConfigasset, otherwise the default config will be used
- Unfold
- Select the
QuantumEntityPrototypeand enableNavMeshSteeringAgent - Add a Unity view to the GameObject
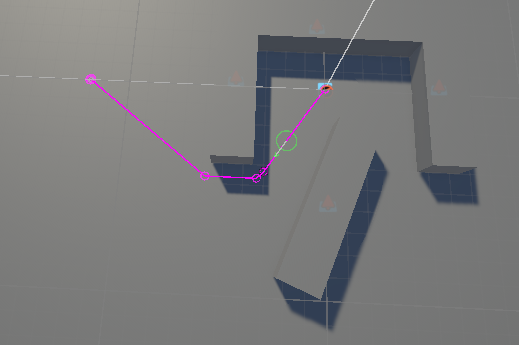
right-click on the GameObject > 3D Object > Capsuleand move the capsule up 1 unit - Open the Quantum Gizmos Menu Overlay and toggle on
NavMesh Pathfinder - Press play
Creating an Agent in Code
The tutorial expects a Unity scene with a Quantum setup including a baked Quantum navmesh (see Importing A Unity Navmesh).
Create a new Quantum system using right-click on the folder QuantumUser > Simulation and select Create > Quantum > System. Rename the script and class to NavMeshAgentTestSystem, open the NavMeshAgentTestSystem asset and add the new system to the DefaultSystemsConfig.Entries.
Open the Quantum Gizmos Menu Overlay and toggle on NavMesh Pathfinder to display the agent gizmos when entering the play mode. For Unity to create a prefab, a View component is required to be added (which is outside of the scope of this example).
Copy the system below that creates an agent during OnInit() and sets a target position.
C#
namespace Quantum
{
  using Photon.Deterministic;
  using UnityEngine.Scripting;

  [Preserve]
  public unsafe class NavMeshAgentTestSystem : SystemMainThread
  {
    public override void OnInit(Frame frame)
    {
      base.OnInit(frame);

      var entity = frame.Create();

      // Add a transform 3d component or 2d component
      frame.Set(entity, new Transform3D()
      {
        Position = FPVector3.Zero,
        Rotation = FPQuaternion.Identity
      });

      // Create the pathfinder component using the factory method, optionally pass a NavMeshAgentConfig
      var pathfinder = NavMeshPathfinder.Create(frame, entity, null);

      // Find the navmesh by name and set a target before adding the component
      var navmesh = frame.Map.NavMeshes["Navmesh"];
      pathfinder.SetTarget(frame, new FPVector3(12, 0, 0), navmesh);

      // Add the pathfinder and steering components to the entity
      frame.Set(entity, pathfinder);
      frame.Set(entity, new NavMeshSteeringAgent());
    }

    public override void Update(Frame frame)
    {
    }
  }
}
The NavMeshPathfinder component
The NavMeshPathfinder is the main component that generates paths, saves waypoints and performs the waypoint progression.
To make the component generate a path and move, SetTarget() must be called. The input Target position is saved and also an InternalTarget is created that can be slightly corrected.
Setting a target will make the agent IsActive. It will deactivate itself after reaching the target.
It's waypoints can be inspected by using GetWaypoint(), the amount of waypoints are currently stored using WaypointCount and the current waypoint is returned by WaypointIndex.
Stop() can be used to immediately stop the agent.
NavMeshPathfinder.SetConfig() can be executed during the component creation and during run-time. If the agent is currently following a path and the waypoint count from the new config is different the path is reset. The config is automatically updated on the NavMeshSteeringAgent and NavMeshAvoidanceAgent components of the entity and values for Speed, Acceleration, AvoidancePriority, Layer and Mask are reset to the config values.
NavMeshAgentConfig - Pathfinding
| UpdateInterval | For performance optimization reasons agents can be configured to run path-finding and avoidance not at every simulation tick.
Setting the UpdateInterval to a value higher than 1 reduces the amount of updates it gets. It will make the agent less responsive but can also save CPU time. The agent entity index is used to define the exact tick to update, this way not all entities are updated at the same tick.
The formula is: updateAgent = entity.Index % agentConfig.UpdateInterval == f.Number % agentConfig.UpdateInterval
1 = update every tick2 = update every other tick8 = update every 8th tick, etc. |
| PathQuality | Reflect the path quality and changes the A* heuristic function. Good gives the best quality-performance trade-of.
Fast - Uses parent G and Manhattan Distance.Good - Creates a pivot point on the entry edge towards goal, recalculates G and Manhattan Distance.Best - Creates a pivot point on the entry edge towards goal, recalculates G with another pivot point towards start and Euclidean Distance. |
| CachedWaypointCount | Configures the number of waypoints that are cached on the NavMeshPathfinder.
Only a limited number of waypoints are stored on the component because increasing the amount of non-transient data will slow down the simulation. When the agent starts to steer towards the last waypoint it will automatically run path-finding again and compute a new path to update the waypoints. The first waypoint stored in the cache is the current position the agent has when SetTarget() was called and is used to enhance the waypoint reached detection.
|
| MaxRepathTimeout | The timeout in seconds that will trigger a new path-find if a waypoint is not reached in this time. A fail-safe to mitigate stuck agents. Set the value to 0 to disable. |
| LineOfSightFunneling | If enabled, waypoints are removed using a line of sight check.
This option should be activated when navmesh regions are located in the middle of the main navmesh. For example destructibles. The extra triangles introduced by the regions can sometimes result is slightly odd paths near active regions. |
| DynamicLineOfSight | If enabled, agents check if waypoints can be skipped each tick. This option is costly but will remove any unnecessary waypoints on its path. |
| DynamicLineOfSightWaypointRange | This is similar to the DynamicLineOfSight option but only triggers when the agent is in a certain range of the waypoint.
Disabled when set to 0. |
| AutomaticTargetCorrection | If disabled the SetTarget() can fail when the position is off the navmesh.
Never disable for 3D navmeshes. |
| AutomaticTargetCorrectionRadius | The range around the target to search for valid navmesh.
This value is also used to correct the start position which otherwise uses a radius of 0.25 for tolerance.
The target marked with a yellow X in the following image. The correction radius finds the closest valid position on the navmesh and corrects the internal target while leaving the Input Target unchanged.
Never set 0 for 3D navmeshes. Default is 1.
This feature can get very costly if the radius is increased unreasonably. ::: figure src="{img}/quantum/v3/manual/navigation/agents-target-correction.png" caption="Auto correction screenshot" ::: |
| EnableWaypointDetection | This feature will mitigate situations when the agents have trouble reaching waypoints (for example due to slow rotation speed or avoidance).
The parameter Axis Extend and Axis Offset define the waypoint reached detection axis (black line). If an agents enters the yellow zone, the waypoint is considered to be reached.
::: figure src="{img}/quantum/v2/manual/navigation/agent-waypoint-detection.png" caption="Waypoint Reached Detection Axis"
:::
|
| DefaultWaypointDetectionDistance | If the agent does not have a NavMeshSteeringAgent component, this value is used to perform waypoint reached detection and should be set to the agent `max speed * delta time`.
This value is not used when setting WaypointDetectionDistanceSqr directly each tick. |
The NavMeshSteeringAgent component
The NavMeshSteeringAgent component is optional and requires a NavMeshPathfinder.
The component can change Acceleration and MaxSpeed during run-time. The initial values are retrieved from the config.
Rotation speed and acceleration can be disabled by setting them to 0.
CurrentSpeed and Velocity can be queried from the component.
NavMeshAgentConfig - Steering
| MovementType | Agent movement can be applied directly to the transform or drive a custom movement logic by executing a movement callback.
None - Movement is not appliedTransform - Movement is applied to the Transform2D or Transform3D component on the same entityCallback - Movement is not applied, but the ISignalOnNavMeshMoveAgent signal is executed |
| VerticalPositioning | This option is only valid when used with 3D transforms. It defines how the y-position of the agent is calculated.
None - No vertical positioning is applied.Navmesh - Raycasts the navmesh. Navmesh is the default but it has drawbacks because the navmesh geometry might be too simplified for a character to walk on.Physics - Raycasts the 3D physics geometry. To use Physics there has to be a walkable ground consisting of Quantum colliders. |
| Speed | The maximum speed of the agent.
To change the Speed during run-time use NavMeshSteeringAgent.MaxSpeed. |
| AngularSpeed | The angular speed of the agent (in Radian/sec).
Set to 0 to disable agent rotation.Set to 200 or more to make rotation instant-like. |
| Acceleration | The acceleration of the agent.
Set to 0 to disable acceleration.
|
| StoppingDistance | The distance that the agent stops in front of the destination to avoid overshooting the target and help stabilizing the agent. The agent always stops when the remaining distance is less then the agents current movement distance per tick. |
| AutoBraking | If enabled the agent will start breaking when approaching the target. |
| AutoBrakingDistance | The distance to the target when the agents starts to brake. |
| ClampAgentToNavmesh | Only selectable when the MovementType is Transform.
If enabled the option pushes agents out of non-navmesh areas, similar to physics colliders. Agents may get diverted to non-navmesh areas by avoidance for example. |
| ClampAgentToNavmeshCorrection | The percentage of how much the agent is corrected each tick. |
The NavMeshAvoidanceAgent component
The NavMeshAvoidanceAgent component requires a NavMeshPathfinder and a NavMeshSteeringAgent component to operate correctly. Both need to be Set() on an entity prior to this component.
This agent performs avoidance computations to avoid other moving agents (HRVO) by using priorities and filtering with masks and layers. Initially set by the NavMeshAgentConfig priority, mask and layer can be changed during run-time on the component.
Read the avoidance section for more information.
Navmesh Agent Callbacks
All agent callbacks are called from the main thread and do not cause multi-threading issues when accessing and writing other components and entities.
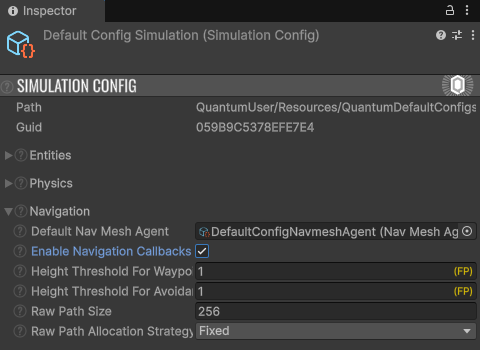
Navigation agent callbacks have to enabled by toggling on two settings:
SimulationConfig.Navigation.EnableNavigationCallbackshas to be toggled on;- The NavMesh Agent config's
Movement Typehas to be set toCallbackfor the agents that should use callbacks.
The following signals will provide imminent feedback that can be used to further control the agent.
C#
namespace Quantum {
  public unsafe partial class NavMeshAgentTestSystem : SystemMainThread,
                                                       ISignalOnNavMeshSearchFailed,
                                                       ISignalOnNavMeshWaypointReached,
                                                       ISignalOnNavMeshMoveAgent {
    }
}
| ISignalOnNavMeshSearchFailed | The signal is called when the agent could not create a path between its position and the target set in SetTarget(). For example when the destination is too far off the navmesh.
The resetAgent parameter has to be set to false after calling SetTarget() during this callback. |
| ISignalOnNavMeshWaypointReached | The signal is called when the agent reached a waypoint on its path to the target.
The WaypointFlags carry additional information about the waypoint.
Target - The waypoint is the targetLinkStart - The waypoint is the start of a off-mesh linkLinkEnd - The waypoint is the end of a off-mesh linkRepathWhenReached - The agent will perform a repath when reaching the waypoint |
| ISignalOnNavMeshMoveAgent | The signal is called when the agent has a target and the NavMeshAgentConfig.MovementType is set to Callback and the agent has a NavMeshSteeringAgent component.
The desiredDirection parameter is the normalized direction that the internal agent steering and avoidance thinks the agent movement vector should be. |
A sample implementation of the move agent callback. It can also be input for a KCC for example.
C#
public void OnNavMeshMoveAgent(Frame frame, EntityRef entity, FPVector2 desiredDirection) {
    var agent = frame.Unsafe.GetPointer<NavMeshSteeringAgent>(entity);

    // simple demonstration how to move the agent.
    if (frame.Has<Transform2D>(entity)) {
        var transform = frame.Unsafe.GetPointer<Transform2D>(entity);
        transform->Position.X.RawValue = transform->Position.X.RawValue + ((desiredDirection.X.RawValue * frame.DeltaTime.RawValue) >> FPLut.PRECISION);
        transform->Position.Y.RawValue = transform->Position.Y.RawValue + ((desiredDirection.Y.RawValue * frame.DeltaTime.RawValue) >> FPLut.PRECISION);
        transform->Rotation = FPVector2.RadiansSignedSkipNormalize(FPVector2.Up, desiredDirection);
    } else if (frame.Has<Transform3D>(entity)) {
        var transform = frame.Unsafe.GetPointer<Transform3D>(entity);
        transform->Position.X.RawValue = transform->Position.X.RawValue + ((desiredDirection.X.RawValue * frame.DeltaTime.RawValue) >> FPLut.PRECISION);
        transform->Position.Z.RawValue = transform->Position.Z.RawValue + ((desiredDirection.Y.RawValue * frame.DeltaTime.RawValue) >> FPLut.PRECISION);
        var desiredRotation = FPVector2.RadiansSignedSkipNormalize(FPVector2.Up, desiredDirection);
        transform->Rotation = FPQuaternion.AngleAxis(desiredRotation * FP.Rad2Deg, -FPVector3.Up);
    }
}