Click to Move
In this Sample, we show how you can make a Top-Down game where your players can control their characters using only a Point-And-Click method, assigning target locations to move. If you don't have Bolt installed and configured into your project, please follow the Getting Started Tutorial first.
We will use as a base the ThirdPersonCharacter from the Standard Assets from Unity on this sample, as it's already well made with animations and can be controlled via the Navigation System. This tutorial will be splitted into the (i) creation of the level, (ii) setup the character and (iii) configure Bolt to manage the character.
You can find the final result of this sample at our Bolt Samples repository.
Level Creation
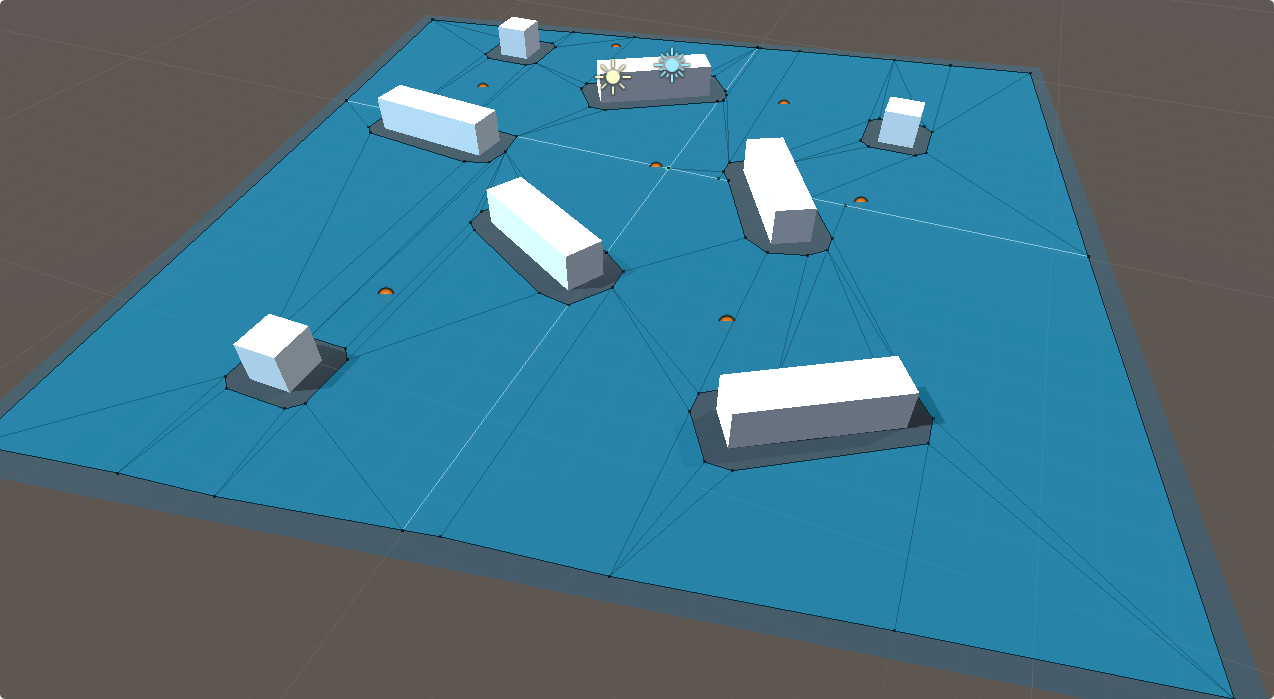
Our objective here is to build a level similar to the one shown below, it should have some obstacles and starting points where the characters will spawn. You can place the objects wherever you want, just be creative.
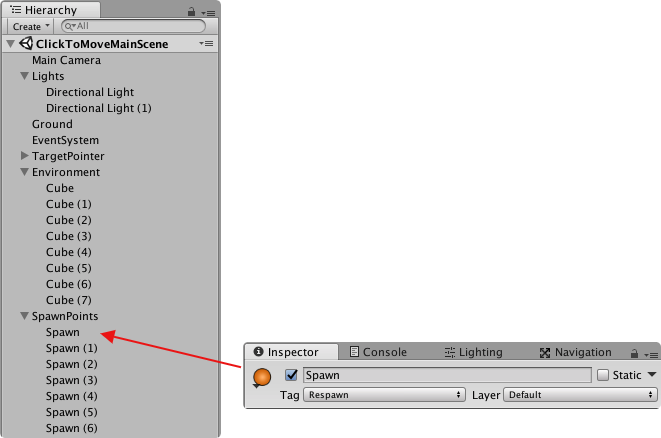
Here is the main hierarchy used to create the level:
- You should have plane to be used as the Ground;
- Place some boxes on the Ground;
- Add an
EventSystemobject in order to receive events from the player; - Add some Spawn Points around the scene:
- Simple create an empty object to hold the points;
- Create another empty object inside the holder, name it as
Spawnand set it'sTagtoRespawn; - Now you can duplicate this object and place them on a well-distributed manner.
- You can assign an Icon to your spawn points, to better see them on the scene.
- You can increment the scene by adding some Materials to the Ground and to Obstacles, just to better differentiate them when the game is running.
Now we will setup a GameObject to update the target location where the character should go:
- Create an empty
GameObjectand name it asTargetPointer; - In order to make it visible to our
Player, you can add a smallSphereas a child of this object and create a transparentMaterialto it. This will serve as a visual reference. - Create a new Script named
PlaceTarget, and add it to theTargetPointerobject. We will use this script to control our target position.

Here is the PlaceTarget script. The code is simple, for each Update loop, it will check for Click inputs from the Player, traces a ray from this position until it hits something on the scene, with the hit information, changes the TargetPointer position and raises the UpdateTarget event (that later will be subscribed by our player).
C#
public class PlaceTarget : MonoBehaviour
{
    public float surfaceOffset = 0.2f;
    public event Action<Transform> UpdateTarget;

    Vector3 lastPosition = Vector3.zero;

    private void Update()
    {
        if (!Input.GetMouseButtonDown(0))
        {
            return;
        }

        Ray ray = Camera.main.ScreenPointToRay(Input.mousePosition);
        RaycastHit hit;

        if (!Physics.Raycast(ray, out hit))
        {
            return;
        }

        transform.position = hit.point + hit.normal * surfaceOffset;

        if (lastPosition != transform.position)
        {
            lastPosition = transform.position;

            if (UpdateTarget != null)
            {
                UpdateTarget(transform);
            }
        }
    }
}
With the script in place, you should be able to run the game and click on the objects, the TargetPointer should move to the right position respecting the normal vector of the click.
Now we need to setup our navigation system, in order to create a navigation mesh to our character. This is super simple to do:
- Open the
Navigationtab onWindow/Navigation. If you are not familiar with the Navigation on Unity, follow this link. - Configure the navigation area:
- Go to the latest tab
Object, here we will configure where the character can or can't walk; - Select the
Groundobject, check it asNavigation Staticand set it asWalkable; - Select all obstacles in the scene, check them as
Navigation Staticand set asNot Walkable;
- Go to the latest tab
- With all objects configured, we need to create the
NavMesh. Go to theBaketab and click at theBakebutton. This will create a folder and aNavMeshfile next to your scene location.
After these steps, you should have a NavMesh similar to the one shown below. All blue area is Walkable, notice how the mesh is restricted by the obstacles in the scene, this will make our character avoid these areas while calculating its path.
Now our level is ready to play. You can tweak the walkable area or the obstacles a little more if you want, but remember to rebake (Bake button on the Navigation window) after you are done with the changes.
Character Setup
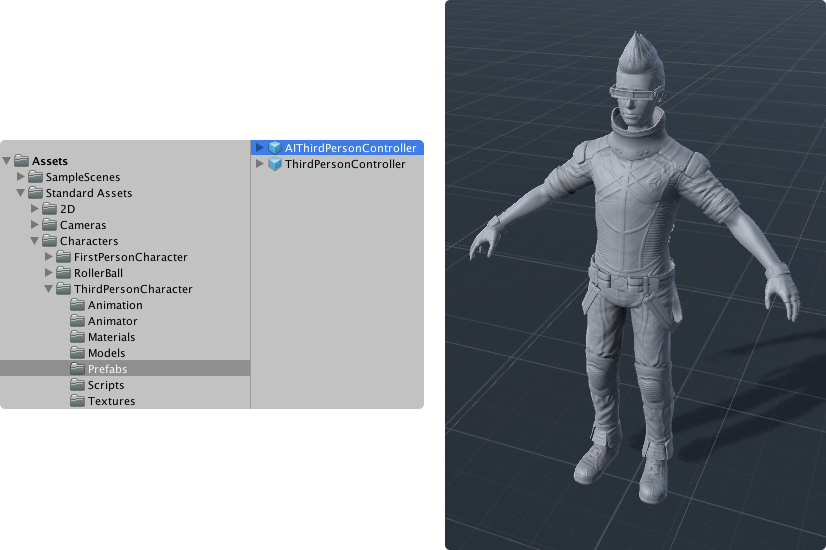
In this sample, we are using the ThirdPersonCharacter, specifically the AIThirdPersonController version (you can get it from the Standard Assets) as our main character. The representation of the character is made by the model known as Ethan, the nice guy with sunglasses 😎. So, go ahead, download and import the package into your Unity project.
You should get a similar structure as shown below, where you can find the AIThirdPersonController prefab. Please, make a copy of this Prefab and move it to another folder, you can name it anything you want, here we will be using EthanClickToMove. This is necessary because we are going to change some components of the original object and it's always a good practice to have a backup.
First, we will create a simple script to listen to changes on the TargetPointer and send the player to that position, it must be attached to the character. At the Start() method, it finds the TargetPointer object, gets a reference to PlaceTarget component and subscribe to the UpdateTarget event, once the event is fired, sends a message to any other script on the GameObject that listen to a SetTarget call, in this case, the AICharacterControl script will receive this data and act accordingly.
C#
public class ClickToMoveController : MonoBehaviour
{
    void Start()
    {
        var placeTarget = GameObject.Find("TargetPointer").GetComponent<PlaceTarget>();

        placeTarget.UpdateTarget += (newTarget) =>
        {
            gameObject.SendMessage("SetTarget", newTarget);
        };
    }
}
If you put a copy of our character prefab into the scene and run the game, you should be able to click around and get the player running to that location, like its shown below. Now you are ready to the next step, integrate Bolt into our game and make it multiplayer.
Bolt Integration
Now that we have a working game, our character is walking and follows the target, we are ready to start integrating Bolt on the project. As we said before, if you don't have Bolt already set into your project, please follow the Getting Started Tutorial first.
Assets Setup
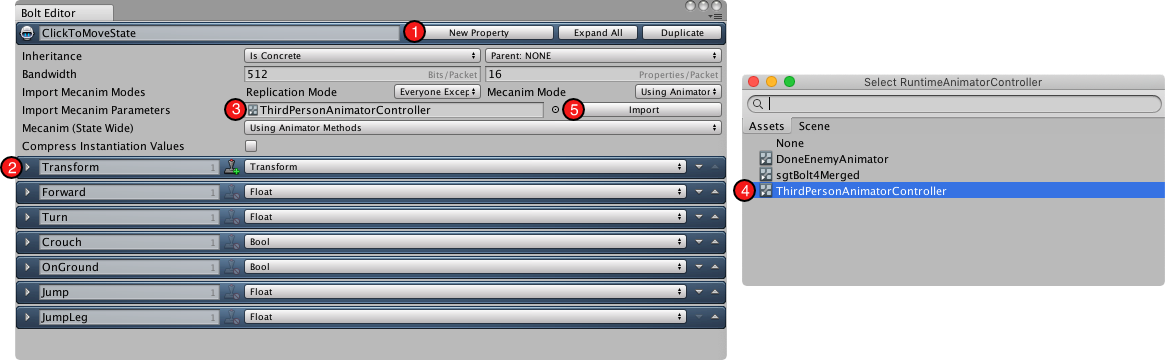
In Bolt all entities sync their data using States, in this sample is not different. Go to Window/Bolt/Assets and create a new State named ClickToMoveState, then follow the next steps:
- Create a new Property
Transformand set it's type toTransform; - Now we need to import some properties from the animation used by the Player in order to sync then through the network:
- In the
Import Mecanim Parametersselect theThirdPersonAnimatorControllerassets; - Click the
Importbutton; - All parameters should be imported properly.
- In the
Now you should have a State configured similar to the one shown below.
We also need a way to send data from the Clients to the Server, this is done using Commands on Bolt. A command represent inputs from the Player to control the character, but also is used by the Server to mantain the integrity of the game by sending corrections to the Clients.
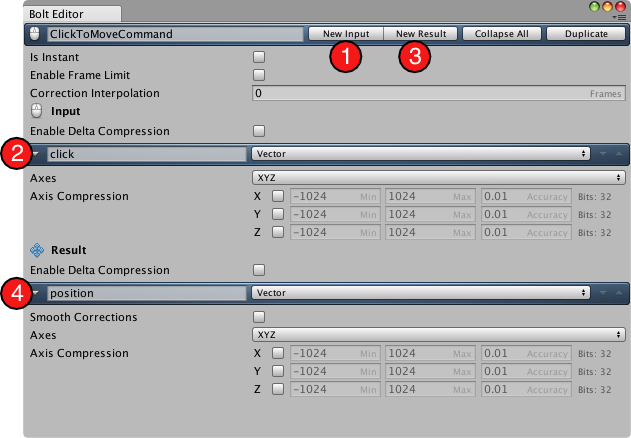
On the same Window that you just created the ClickToMoveState, right-click and create a new Command named ClickToMoveCommand:
- Create a new
Inputwith nameclick, set it's type toVector. This will be used to send the target position set by the Player; - Create a new
Resultwith nameposition, set it's type toVector. The result will set the position of the character to wherever it's on theServer.
You can now close the Bolt Assets window and compile Bolt by running the command at Assets/Bolt/Compile Assembly, after you get the BoltCompiler: Success! message on the Console you are ready to continue.
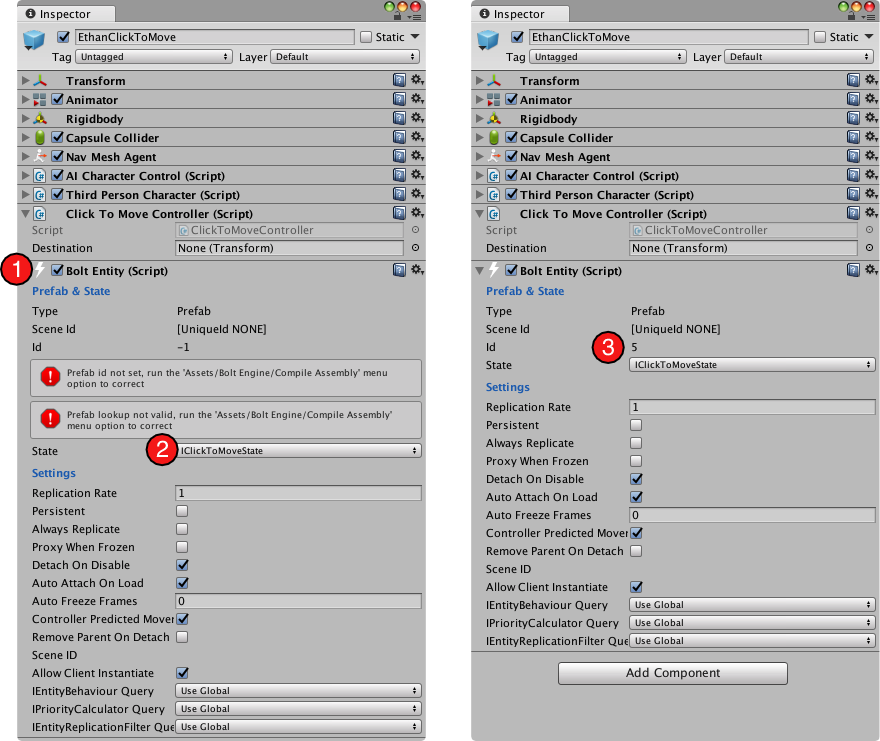
In order to get our Player replicated using Bolt, we need to add an Bolt Entity component and configure it to use our recent created State. As shown in the figure:
- Select the
EthanClickToMoveprefab; - Add a new component
Bolt Entitycomponent; - Select
IClickToMoveStateon theStatedropdown; - Compile
Bolt(atAssets/Bolt/Compile Assembly) to make sure the library is aware of this Entity (signaled by theId).
Network Scripts
In this session, we will add modify some scripts to make Bolt aware of our assets, spawn the player for us and sync all the necessary data.
First of all, we will create a network game manager script, it will be responsible for instantiating the prefab on the game, both on the server and on clients. Create a new script ClickToMoveNetworkCallbacks as shown below:
C#
[BoltGlobalBehaviour(BoltNetworkModes.Server, "ClickToMoveGameScene")]
public class ClickToMoveNetworkCallbacks : Bolt.GlobalEventListener
{
    public override void SceneLoadLocalDone(string scene)
    {
        var player = InstantiateEntity();
        player.TakeControl();
    }

    public override void SceneLoadRemoteDone(BoltConnection connection)
    {
        var player = InstantiateEntity();
        player.AssignControl(connection);
    }

    private BoltEntity InstantiateEntity()
    {
        GameObject[] respawnPoints = GameObject.FindGameObjectsWithTag("Respawn");

        var respawn = respawnPoints[Random.Range(0, respawnPoints.Length)];
        return BoltNetwork.Instantiate(BoltPrefabs.EthanClickToMove, respawn.transform.position, Quaternion.identity);
    }
}
Some notes about this code:
- It will run only on the server and when our game scene is loaded, in this case,
ClickToMoveGameScene(change this to match the name of your scene); - It uses the callbacks
SceneLoadLocalDoneandSceneLoadRemoteDone, both are invoked when the game scene finishes loading. We use this moment to instantiate a copy of theEthanClickToMoveprefab on a random position (using the previously created Respawn points); - As this will execute only on the game host (server), when the scene loads locally, the player takes control (
player.TakeControl()) of the entity, and when the scene loads on the clients, the host gives control to that remote player (player.AssignControl(connection)).
Now we need to update our controller script to send commands using Bolt. Open the ClickToMoveController script and let's make some changes to it:
- In order to receive event callbacks from
Bolt, we need to extendEntityEventListener. This will give us access to several utilities from the library. Notice that we includeIClickToMoveStateas a generic argument, it will guarantee that we only handle data from this particularState.
C#
public class ClickToMoveController : Bolt.EntityEventListener<IClickToMoveState>
{
    // ...
}
- The
Attached()callback will give us the opportunity to link some of the character data toBolt, in this case, we will sync all theTransformandAnimatorinformation.
C#
// ...
public override void Attached()
{
    state.SetTransforms(state.Transform, transform);
    state.SetAnimator(GetComponentInChildren<Animator>());
}
// ...
- Later, we will give to the local Player the control over the
Bolt Entity, making it possible to send commands. To take advantage of this, we will use override 3 other callbacks:
- The
ControlGainedmethod will be executed when the player takes control over the Entity. We will use it to find the localTargetPointerand hook to theUpdateTargetcallback, as we did before, but here we will save the target transform to be used later.
C#
// ...
public Transform destination;

public override void ControlGained()
{
    var placeTarget = GameObject.Find("TargetPointer").GetComponent<PlaceTarget>();

    placeTarget.UpdateTarget += (newTarget) =>
    {
        destination = newTarget;
    };
}
// ...
- Only in the
SimulateControllercallback we can send new commands to theServer. Here we create a newClickToMoveCommand, set it's destination (in this case, theclickparameter) and queue it to execution by callingentity.QueueInput. Observe that we are sending only the position vector on our command.
C#
// ...
public override void SimulateController()
{
    if (destination != null)
    {
        IClickToMoveCommandInput input = ClickToMoveCommand.Create();
        input.click = destination.position;
        entity.QueueInput(input);
    }
}
// ...
- On the
ExecuteCommandis where all the magic happens. In this callback we process all commands sent by the Player, both client and server will execute the command, reading theclickparameter and sending it to theAICharacterControlthrough a message. Besides that, theServerwill send corrections back to the clients, making sure that the character will be on the same position on all peers.
C#
// ...
public override void ExecuteCommand(Command command, bool resetState)
{
    ClickToMoveCommand cmd = (ClickToMoveCommand)command;

    if (resetState)
    {
        // owner has sent a correction to the controller
        transform.position = cmd.Result.position;
    }
    else
    {
        if (cmd.Input.click != Vector3.zero)
        {
            gameObject.SendMessage("SetTarget", cmd.Input.click);
        }

        cmd.Result.position = transform.position;
    }
}
// ...
With all these changes in place, we are almost ready to run our game and get our Player running around the scene. Here is the complete ClickToMoveController script for reference:
C#
public class ClickToMoveController : Bolt.EntityEventListener<IClickToMoveState>
{
    public Transform destination;

    public override void Attached()
    {
        state.SetTransforms(state.Transform, transform);
        state.SetAnimator(GetComponentInChildren<Animator>());
    }

    public override void ControlGained()
    {
        var placeTarget = GameObject.Find("TargetPointer").GetComponent<PlaceTarget>();

        placeTarget.UpdateTarget += (newTarget) =>
        {
            destination = newTarget;
        };
    }

    public override void SimulateController()
    {
        if (destination != null)
        {
            IClickToMoveCommandInput input = ClickToMoveCommand.Create();
            input.click = destination.position;
            entity.QueueInput(input);
        }
    }

    public override void ExecuteCommand(Command command, bool resetState)
    {
        ClickToMoveCommand cmd = (ClickToMoveCommand)command;

        if (resetState)
        {
            //owner has sent a correction to the controller
            transform.position = cmd.Result.position;
        }
        else
        {
            if (cmd.Input.click != Vector3.zero)
            {
                gameObject.SendMessage("SetTarget", cmd.Input.click);
            }

            cmd.Result.position = transform.position;
        }
    }
}
There is one more thing we need to modify. If you noticed, AICharacterControl.SetTarget method receives a Transform as an argument, not a Vector3. Currently Bolt has no support to send a full Transform in one parameter (but you can do it by sending the position and rotation into two Vector3 variables), but as we are interested only on the target position, this is not a problem. Open the AICharacterControl script and modify it to look like below:
C#
public class AICharacterControl : MonoBehaviour
{
    // Add this new field
    public Vector3 targetPosition;

    // ...

    // Modify the Update method
    private void Update()
    {
        if (target != null)
            agent.SetDestination(target.position);

        // Here we pass our new Vector3 target
        if (targetPosition != Vector3.zero)
            agent.SetDestination(targetPosition);

        if (agent.remainingDistance > agent.stoppingDistance)
            character.Move(agent.desiredVelocity, false, false);
        else
            character.Move(Vector3.zero, false, false);
    }

    // ...

    // Add this new overload
    public void SetTarget(Vector3 target)
    {
        this.targetPosition = target;
    }
}
Running the Game
Great! These are all the steps to get this sample working, now it's time to see it running. The simplest way to run it is by using the Bolt Debug utility. First, you need to add your game scene to the Build Settings/Scenes In Build and compile Bolt (Assets/Bolt/Compile Assembly) to make sure it's aware of the scene.
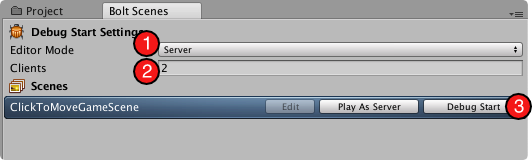
Once you have this done, open the Bolt Debug window on Window/Bolt/Scenes, set the editor to act as Server, configure the number of clients, and click at Debug Start. In some moments, the clients should start automatically and the Unity Editor will run as the game host. Yay!
Have fun !
Congratulations, you have finished the tutorial!
Back to top